


在Unity开发中我们难免要使用代码控制角色的移动,现将已知的几种方法总结如下:
一、transform.Translate()
function Translate (translation : Vector3, relativeTo : Space = Space.Self) : void
物体以relativeTo为参照系,沿着translation运动|translation|的距离。如果relativeTo缺省将
以Space.Self为默认值。举个例子:
function Update() {

//导弹相对于战斗机Fighter以ShootSpeed 的速度向前运动,Vector3.forward在此时表示导弹的正前方

transform.Translate(Vector3.forward * ShootSpeed * Time.deltaTime, Fighter.transform);

}
再举个例子:
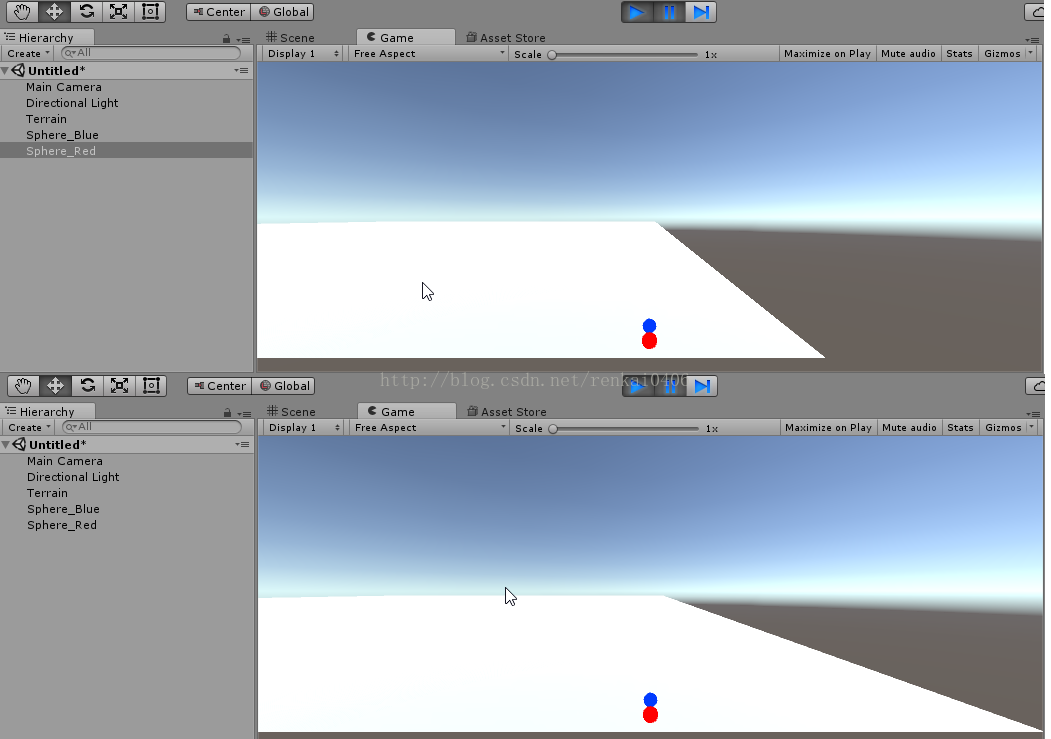
在场景中有一个红球和一个蓝球,红球沿着世界坐标系的z轴正方向匀速运动,蓝球沿着红球坐标系的z轴正向以和红球同样的速度匀速运动。
红球运动脚本RedMove.cs:
using UnityEngine;
using System.Collections;

public class RedMove : MonoBehaviour {

    public int MoveSpeed = 10;

    // Update is called once per frame
    void FixedUpdate () {
        transform.Translate(Vector3.forward * MoveSpeed * Time.deltaTime, Space.World);
    }
}
蓝球运动脚本BlueMove.cs:
using UnityEngine;
using System.Collections;

public class BlueMove : MonoBehaviour {

    public GameObject RedBall;
    public int MoveSpeed = 10;

    // Update is called once per frame
    void FixedUpdate () {
        transform.Translate(Vector3.forward * MoveSpeed * Time.deltaTime, RedBall.transform);
    }
}
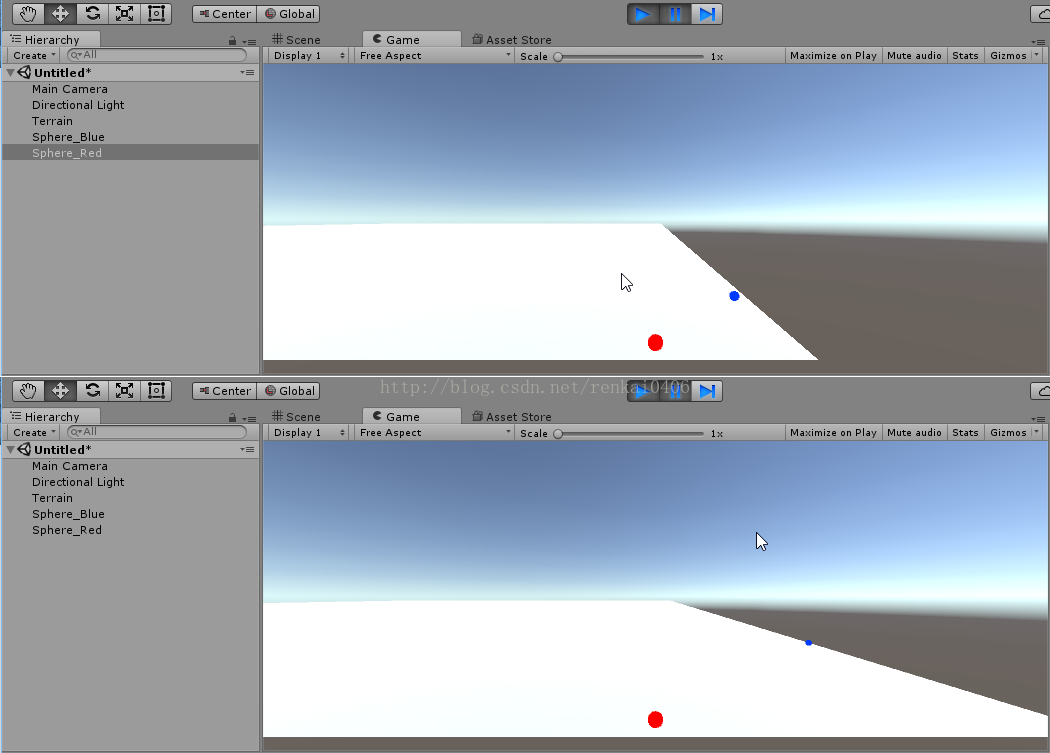
2、接着我们将红球绕y轴顺时针旋转90度(即使红球的Transform.Rotation.y = 90),此时红球坐标系的z轴正向和世界坐标系的x轴正向重合,此时运动效果如下:
二、指定速度velocity
这种方法只能适用于刚体,因为velocity是刚体特有的属性。代码如下:
void Start () {
        gameObject.GetComponent<Rigidbody>().velocity = Vector3.forward * MoveSpeed;
}三、使用rigbody.MovePosition()
public void MovePosition(Vector3position);
让物体移动到新的位置position。
示例:
void FixedUpdate() {

        //让物体向前运动Time.deltaTime距离
        rb.MovePosition(transform.position + transform.forward * Time.deltaTime);
}
四、Vector3.MoveTowards()
static function MoveTowards(current: Vector3, target: Vector3, maxDistanceDelta: float): Vector3;
该方法一般以以下形式使用:
using UnityEngine;
using System.Collections;
public class YellowMove : MonoBehaviour {
    public int MoveSpeed = 10;
    Vector3 target;

     void Start () {
        target = new Vector3(20, transform.position.y, 20);
     }

     void Update () {
        transform.position = Vector3.MoveTowards(transform.position, target, MoveSpeed * Time.deltaTime);
     }
}
五、使用lerp()
1、使用Mathf.Lerp()函数
static functionLerp (from : float,to : float,t : float) : float
调用该函数会返回from与to之间的插值(from + to) * t,t在0~1之间。
使用方法如下:
using UnityEngine;
using System.Collections;
public class YellowMove : MonoBehaviour {
    public float MoveSpeed = 0.1f;
    Vector3 Target = new Vector3(20, 20, 20);

 //控制物体向Target移动
    void Update () {
        gameObject.transform.localPosition = new Vector3(
        Mathf.Lerp(transform.position.x, Target.x, MoveSpeed * Time.deltaTime),
        Mathf.Lerp(transform.position.y, Target.y, MoveSpeed * Time.deltaTime),
        Mathf.Lerp(transform.position.z, Target.z, MoveSpeed * Time.deltaTime));
    }
}
2、使用Vector3.Lerp()
public staticVector3 Lerp(Vector3a,Vector3b, floatt);
其使用方法与Mathf.Lerp()用法相似,不同点是Vector3.Lerp()是对三维向量进行插值,而Mathf.Lerp()是对数字进行插值。
using UnityEngine;
using System.Collections;
public class YellowMove : MonoBehaviour {
    public float MoveSpeed = 0.1f;
    Vector3 Target = new Vector3(20, 20, 20);

 //控制物体向Target移动
    void Update () {
        gameObject.transform.localPosition = Vector3.Lerp(transform.position, Target, MoveSpeed * Time.deltaTime),
    }
}
六、使用SmoothDamp()
1、使用Vector3.SmoothDamp()
static function SmoothDamp (current : Vector3,target : Vector3,ref currentVelocity : Vector3,smoothTime : float,maxSpeed : float = Mathf.Infinity,deltaTime : float = Time.deltaTime) : Vector3
在smoothTime的时间间隔内从current移动到target,其移动的当前速度为currentVelocity,此方法一般用于摄像机的平滑移动。需要注意的是currentVelocity值一般在开始时指定为零向量,每次调用该方法时该方法会自动给currentVelocity赋值。方便起见以Mathf.SmoothDamp()进行如下测试:
using UnityEngine;
using System.Collections;
public class YellowMove : MonoBehaviour {
public float MoveSpeed = 0f;
float CurrentNum = 0f;
float TargetNum = 20f;
float MoveTime = 10f;
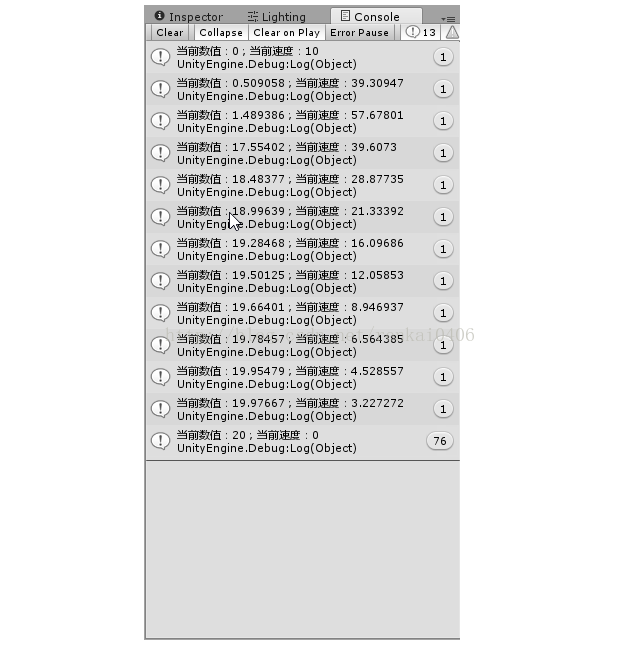
void Update () {
Debug.Log("当前数值:" + CurrentNum + ";当前速度:" + MoveSpeed);
CurrentNum = Mathf.SmoothDamp(CurrentNum, TargetNum, ref MoveSpeed, MoveTime * Time.deltaTime);
}
}控制台输出:
Vector3.SmoothDamp()用法如下:
using UnityEngine;
using System.Collections;

public class example : MonoBehaviour{
    public Transform target;
    public float smoothTime = 0.3F;
    private Vector3 velocity = Vector3.zero;


    void Update() {

      //定义一个目标位置在目标变换的上方并且在后面
       Vector3 targetPosition = target.TransformPoint(new Vector3(0, 5, -10));

      //平滑地移动摄像机朝向目标位置
       transform.position = Vector3.SmoothDamp(transform.position, targetPosition, ref velocity, smoothTime);
    }
}
2、使用Mathf.SmoothDamp()
使用方法与Vector3.SmoothDamp()差不多,只是Mathf.SmoothDamp()是对float类型数字操作,而Vector3.SmoothDamp是对三维向量操作。
七、使用CharacterController组件控制角色移动
Unity使用CharacterController(角色控制器)来控制角色骨骼运动,包括移动、跳跃以及各种动作。CharacterController比较复杂,具体详情请参照博客Unity CharacterController(角色控制器)
八、使用iTween
iTween是Unity3d的一个动画插件,可以让你更加轻松的实现各种动作,iTween实现移动的方式也比较多样,具体的可以参考博客Unity iTween动画库插件
九、使用协程
关于Unity的协程介绍请看博客:Unity协程介绍及使用。
协程和Update方法很类似,不过协程可以在执行切换到下一帧时局部变量任然会保存,但update方法在执行下一帧后局部变量又重新定义了。既然相似,那么我们就可以像在update中每执行一帧改变一次position那样,在协程中改变position然后再执行下一帧来改变物体的位置让物体运动起来。方法如下:
usingUnityEngine;
Using System.Collections;

Public class RedMove: MonoBehaviour
{
    public Vector3 TargetPosition;
    public float MoveSpeed;

    Void Start()
    {
        StartCoroutine(Move(TargetPosition));
    }

    IEnumerator Move(Vector3 target)
    {
        while(transform.position != target)
        {
            transform.position = Vector3.MoveTowards(transform.position, target, MoveSpeed * Time.deltaTime);
            Yield return 0;
        }
    }
}


 1万+
1万+

 被折叠的 条评论
为什么被折叠?
被折叠的 条评论
为什么被折叠?
 到【灌水乐园】发言


