


Pix2pix GAN 理论讲解:
论文地址:https://arxiv.org/pdf/1611.07004.pdf
图像处理的很多问题都是将一张输入的图片转变为一张对应的输出图片,比如灰度图、彩色图之间的转换、图像自动上色等。但如果要根据每个问题设定一个特定的loss function 来让CNN去优化,通常都是训练CNN去缩小输入跟输出的欧式距离,但这样通常会得到比较模糊的输出。
普通的GAN接受的G(生成器)部分的输入是随机向量,输出是图像。D(判别器)部分接收的输入是图像(生成的或真实的),输出是对或者错的。G和D联手就能输出真实的图像。
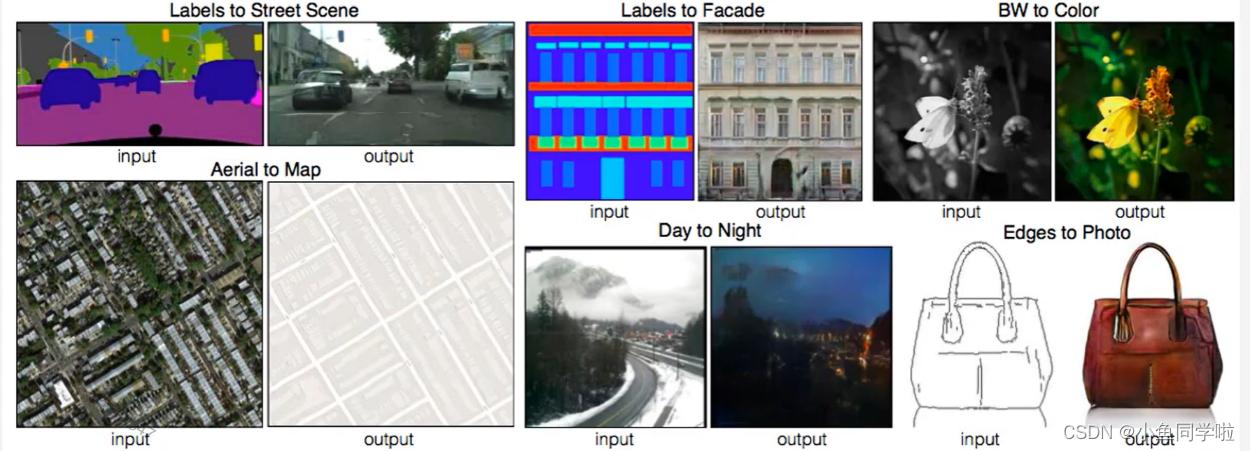
Pix2pix GAN主要用于图像之间的转换,又称图像翻译(Image Translation)。如下图所示,Pix2pix GAN能够将语义分割处理的图片转换成真实场景(马路和建筑)、将灰色图转换成彩色图、将素描图转换成真实的图片等等,是不是很神奇啊 ~ ~
Pix2pix GAN 其实本质上是一个CGAN(【对抗网络】CGAN模型讲解和代码实现-CSDN博客),将图片 x 作为CGAN的条件y,输入到G和D中。G的输入是x(x是需要转换的图片),输出是生成的图片G(x)。D则需要分辨出 {x,G(x)} 和 {x,y}。
Pix2pix整体架构:
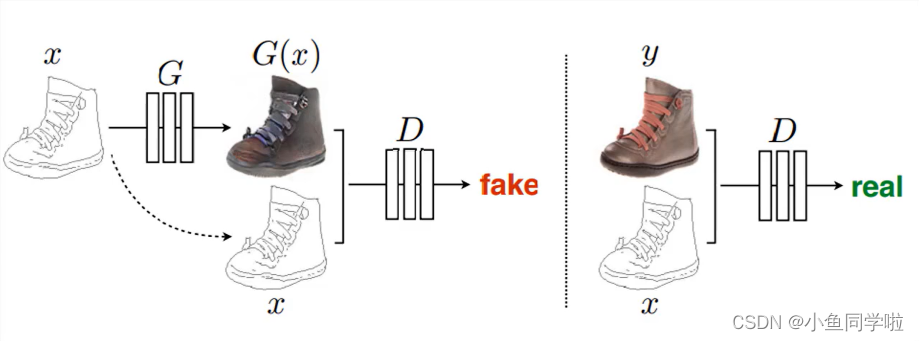
由上图可见,x图片作为条件输入到G和D中,由G生成再由D分辨。值得一提的是,这里没有随机输入噪声z给生成器,这是因为添加z可以带来多样性,所以可以不用添加z。
生成器整体架构:
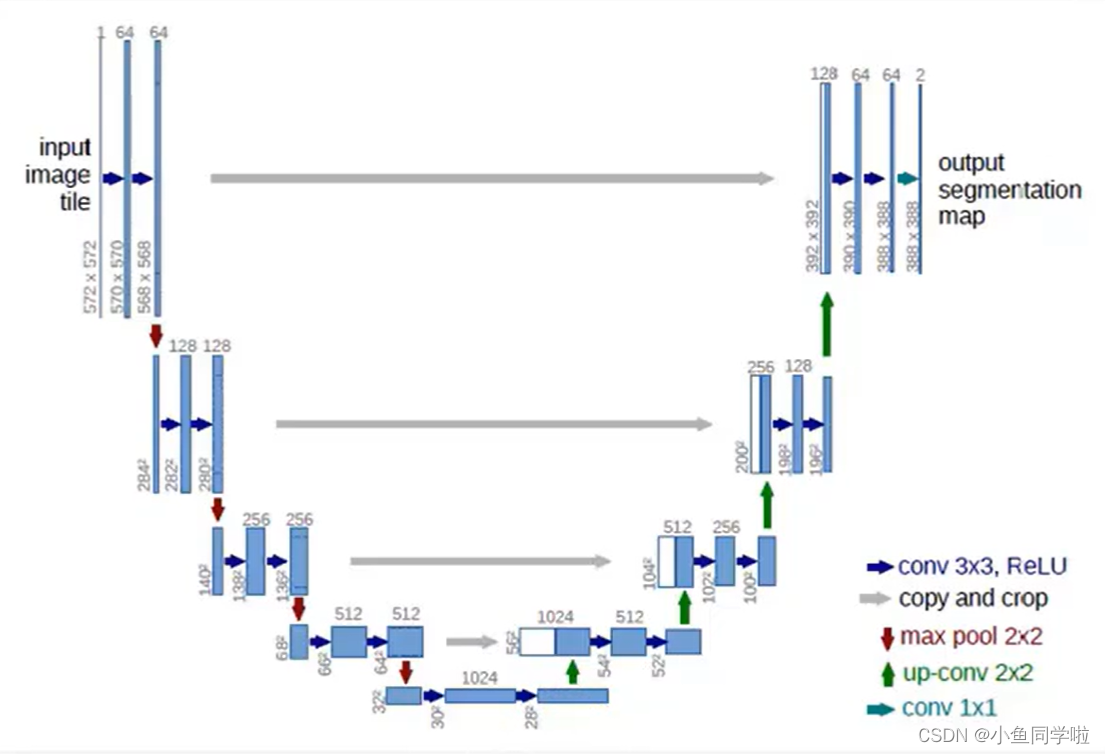
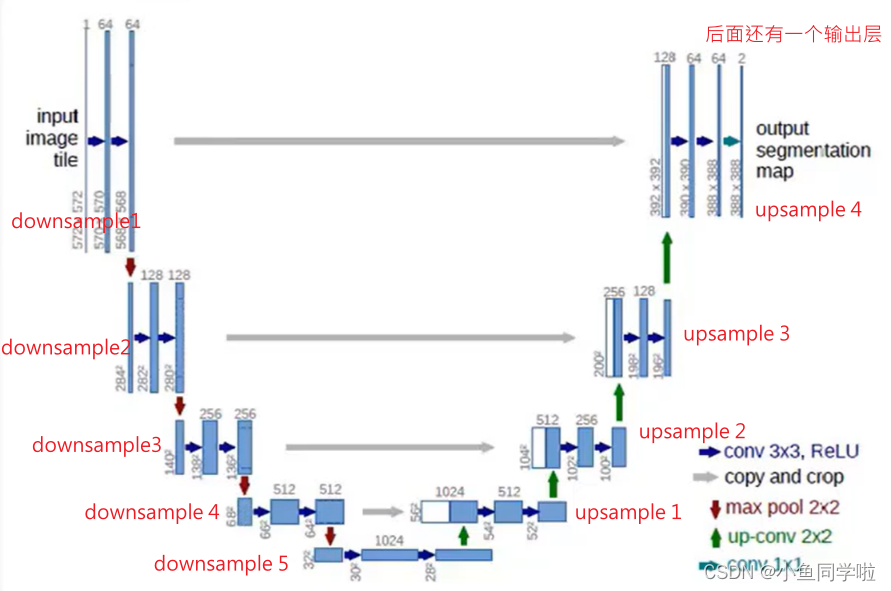
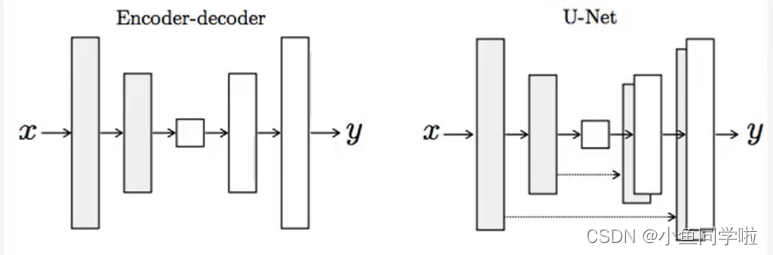
这里的生成器主要采用了U-net架构,其中由最主要的两个模块组成,也就是下采样模块和上采样模块。图中左边部分就是由5个下采样模块构成,右边由4个上采样模块构成,最后还有一个输出层,如下图所示:
为什么生成器要使用U-net架构呢? 以为如果使用普通的卷积神经网络,那么会导致每一层都承载保存所有的消息,这样神经网络很容易出错。
训练结果:
epoch=1
epoch=15
epoch=30
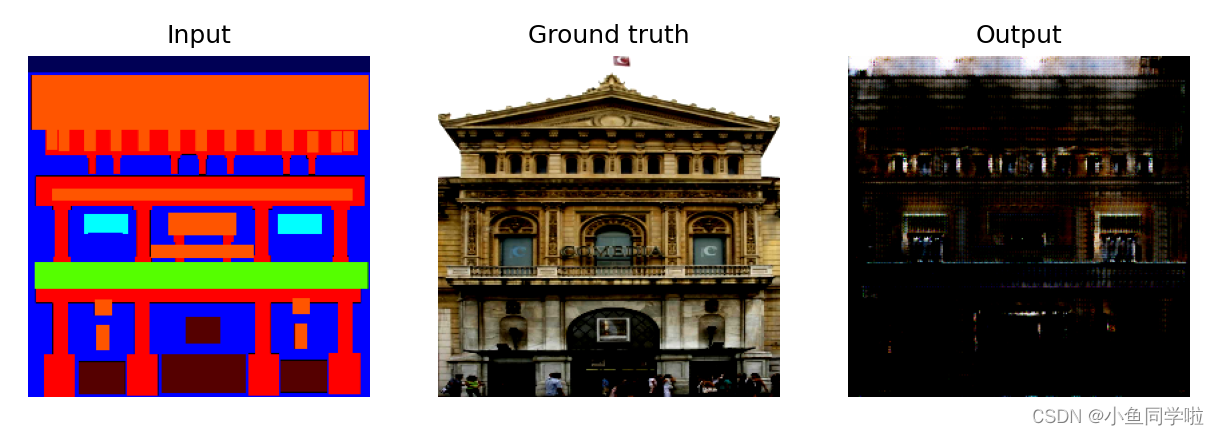
epoch=45
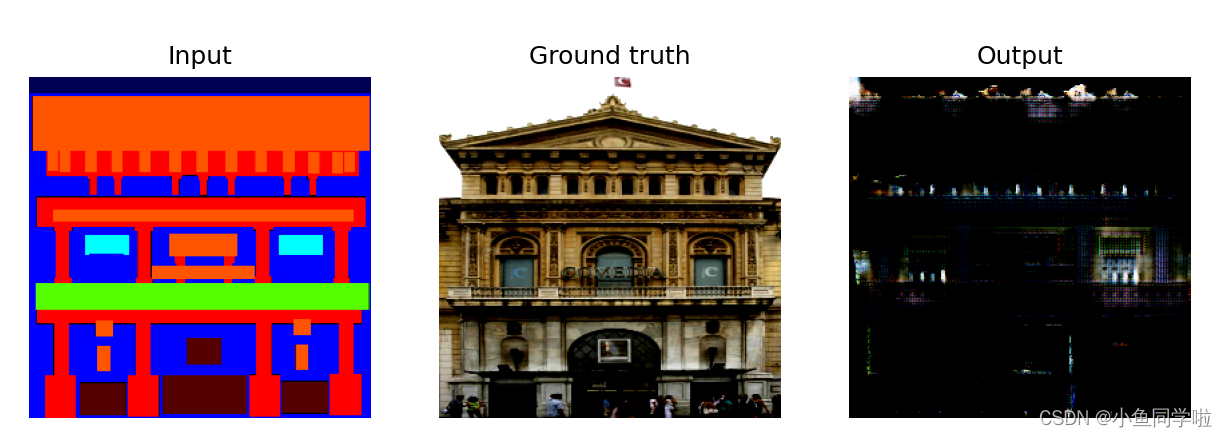
epoch=60
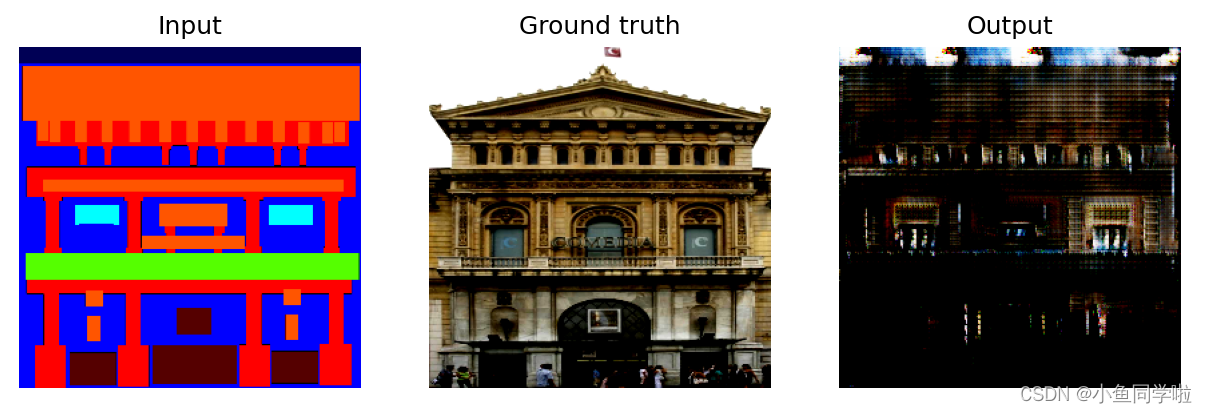
因为时间原因我只训练了60轮,你们如果有更多的时间可以训练更多轮次,效果会更好。
导入的库:
import torch
import torch.nn as nn
import torch.nn.functional as F
from torch.utils import data
from torchvision import transforms

import matplotlib.pyplot as plt
import glob
from PIL import Image
数据准备:
# 数据准备
imgs_path = glob.glob("data/pix2pixdata/base/train/*.jpg")
annos_path = glob.glob("data/pix2pixdata/base/train/*.png")
print(len(imgs_path))
print(len(annos_path))
transform = transforms.Compose([
    transforms.ToTensor(),
    transforms.Resize((256, 256)),
    transforms.Normalize(mean=0.5, std=0.5)
])


class CMP_dataset(data.Dataset):
    def __init__(self, imgs_path, annos_path):
        self.imgs_path = imgs_path
        self.annos_path = annos_path

    def __getitem__(self, index):
        img_path = self.imgs_path[index]
        anno_path = self.annos_path[index]
        pil_img = Image.open(img_path)
        pil_img = transform(pil_img)
        pil_anno = Image.open(anno_path)  # 这里的OPEN会将图片通道变为1
        pil_anno = pil_anno.convert("RGB")  # 需要用convert变为三通道
        pil_anno = transform(pil_anno)
        return pil_anno, pil_img

    def __len__(self):
        return len(self.imgs_path)


dataset = CMP_dataset(imgs_path, annos_path)
BATCHSIZE = 4
dataloader = data.DataLoader(dataset, batch_size=BATCHSIZE, shuffle=True)
annos_batch, imgs_batch = next(iter(dataloader))  # 此时的格式为(4, 3, 256, 256)
fig = plt.figure(figsize=(8, 12))
for i, (anno, img) in enumerate(zip(annos_batch[:3], imgs_batch[:3])):  # ZIP用来同时迭代annos_batch和imgs_batch
    anno = (anno.permute(1, 2, 0).numpy() + 1) / 2
    img = (img.permute(1, 2, 0).numpy() + 1) / 2
    plt.subplot(3, 2, 2 * i + 1)
    plt.title("input_img")
    plt.imshow(anno)
    plt.subplot(3, 2, 2 * i + 2)
    plt.title("output_img")
    plt.imshow(img)
plt.show()
定义下采样和上采样模块:
# 定义下采样模块
class Downsample(nn.Module):
    def __init__(self, in_channels, out_channels):
        super(Downsample, self).__init__()
        self.conv_relu = nn.Sequential(
            nn.Conv2d(in_channels=in_channels,
                      out_channels=out_channels,
                      kernel_size=3,
                      stride=2,
                      padding=1),
            nn.LeakyReLU(inplace=True)  # inplce=True:就地修改输入张量
        )
        self.bn = nn.BatchNorm2d(out_channels)

    def forward(self, x, is_bn=True):
        x = self.conv_relu(x)
        if is_bn:
            x = self.bn(x)
        return x


# 定义上采样模块
class Upsample(nn.Module):
    def __init__(self, in_channels, out_channels):
        super(Upsample, self).__init__()
        self.upconv1 = nn.Sequential(
            nn.ConvTranspose2d(in_channels=in_channels,
                               out_channels=out_channels,
                               kernel_size=3,
                               stride=2,
                               padding=1,
                               output_padding=1),
            nn.LeakyReLU(inplace=True)  # inplce=True:就地修改输入张量
        )
        self.bn = nn.BatchNorm2d(out_channels)

    def forward(self, x, is_drop=False):
        x = self.upconv1(x)
        x = self.bn(x)
        if is_drop:
            x = F.dropout2d(x)
        return x
定义生成器:
# 初始化生成器:6个下采样,5个上采样+1个输出层
# PS:实战中建议画出模型图,方便了解输入层和输出层的关系(U-net)
class Generator(nn.Module):
    def __init__(self):
        super(Generator, self).__init__()
        self.down1 = Downsample(3, 64)  # (64, 128, 128)
        self.down2 = Downsample(64, 128)  # (128, 64, 64)
        self.down3 = Downsample(128, 256)  # (256, 32, 32)
        self.down4 = Downsample(256, 512)  # (512, 16, 16)
        self.down5 = Downsample(512, 512)  # (512, 8, 8)
        self.down6 = Downsample(512, 512)  # (512, 4, 4)

        self.up1 = Upsample(512, 512)  # (512, 8, 8)
        self.up2 = Upsample(1024, 512)  # (512, 16, 16)
        self.up3 = Upsample(1024, 256)  # (256, 32, 32)
        self.up4 = Upsample(512, 128)  # (128, 64, 64)
        self.up5 = Upsample(256, 64)  # (64, 128, 128)

        self.last = nn.ConvTranspose2d(128, 3,
                                       kernel_size=3,
                                       stride=2,
                                       padding=1,
                                       output_padding=1)

    def forward(self, x):
        x1 = self.down1(x)
        x2 = self.down2(x1)
        x3 = self.down3(x2)
        x4 = self.down4(x3)
        x5 = self.down5(x4)
        x6 = self.down6(x5)

        x6 = self.up1(x6, is_drop=True)
        x6 = torch.cat([x6, x5], dim=1)
        x6 = self.up2(x6, is_drop=True)
        x6 = torch.cat([x6, x4], dim=1)
        x6 = self.up3(x6, is_drop=True)
        x6 = torch.cat([x6, x3], dim=1)
        x6 = self.up4(x6)
        x6 = torch.cat([x6, x2], dim=1)
        x6 = self.up5(x6)
        x6 = torch.cat([x6, x1], dim=1)

        x6 = torch.tanh(self.last(x6))
        return x6
定义判别器:
# 初始化判别器  输入anno+img(生成的或者真实的)  concat
class Discriminator(nn.Module):
    def __init__(self):
        super(Discriminator, self).__init__()
        self.down1 = Downsample(6, 64)  # (64, 128, 128)  PS:这里输入的6:anno+img
        self.down2 = Downsample(64, 128)  # (128, 64, 64)
        self.conv1 = nn.Conv2d(128, 256, 3)
        self.bn = nn.BatchNorm2d(256)
        self.last = nn.Conv2d(256, 1, 3)

    def forward(self, anno, img):
        x = torch.cat([anno, img], dim=1)  # (batch, 6, H, W)  PS:这里需要将anno和img进行合并
        x = self.down1(x)
        x = self.down2(x)
        x = F.dropout2d(self.bn(F.leaky_relu_(self.conv1(x))))
        x = torch.sigmoid(self.last(x))  # (batch, 1, 60, 60)
        return x
生成优化器,初始化模型:
# 生成优化器,初始化模型
device = "cuda" if torch.cuda.is_available() else "cpu"
dis = Discriminator().to(device)
gen = Generator().to(device)

d_optimizer = torch.optim.Adam(dis.parameters(), lr=0.001, betas=(0.5, 0.999))
g_optimizer = torch.optim.Adam(gen.parameters(), lr=0.001, betas=(0.5, 0.999))
定义绘图函数:
# 定义绘图函数
def generate_images(model, test_anno, test_real):
    prediction = model(test_anno).permute(0, 2, 3, 1).detach().cpu().numpy()  # 这里涉及到计算但我们不希望它计算梯度所以用detach截断
    test_anno = test_anno.permute(0, 2, 3, 1).cpu().numpy()
    test_real = test_real.permute(0, 2, 3, 1).cpu().numpy() + 1 / 2
    plt.figure(figsize=(10, 10))
    display_list = [test_anno[3], test_real[3], prediction[3]]
    title = ["Input", "Ground truth", "Output"]
    for i in range(3):
        plt.subplot(1, 3, i + 1)
        plt.title(title[i])
        plt.imshow(display_list[i])
        plt.axis("off")
    plt.show()
定义测试数据集:
# 定义测试数据集
test_imgs_path = glob.glob("data/pix2pixdata/extended/test/*.jpg")
test_annos_path = glob.glob("data/pix2pixdata/extended/test/*.png")
test_dataset = CMP_dataset(test_imgs_path, test_annos_path)
test_dataloader = data.DataLoader(test_dataset, batch_size=BATCHSIZE)

# 定义损失函数
# cgan损失函数
loss_fn = torch.nn.BCELoss()
# L1损失


annos_batch, imgs_batch = next(iter(test_dataloader))  # 此时的格式为(4, 3, 256, 256)
fig = plt.figure(figsize=(6, 10))
for i, (anno, img) in enumerate(zip(annos_batch[:3], imgs_batch[:3])):  # ZIP用来同时迭代annos_batch和imgs_batch
    anno = (anno.permute(1, 2, 0).numpy() + 1) / 2
    img = (img.permute(1, 2, 0).numpy() + 1) / 2
    plt.subplot(3, 2, 2 * i + 1)
    plt.title("input_img")
    plt.imshow(anno)
    plt.subplot(3, 2, 2 * i + 2)
    plt.title("output_img")
    plt.imshow(img)
plt.show()
训练GAN:
annos_batch, imgs_batch = annos_batch.to(device), imgs_batch.to(device)
LAMBDA = 7
D_loss = []
G_loss = []
# 开始训练
for epoch in range(61):
D_epoch_loss = 0
G_epoch_loss = 0
count = len(dataloader)
for step, (annos, imgs) in enumerate(dataloader):
imgs = imgs.to(device)
annos = annos.to(device)
# 对判别器的损失定义和优化
d_optimizer.zero_grad()
disc_real_output = dis(annos, imgs) # 输入真实图片
d_real_loss = loss_fn(disc_real_output, torch.ones_like(disc_real_output, device=device))
d_real_loss.backward()
gen_output = gen(annos)
disc_gen_loss = dis(annos, gen_output.detach()) # 这里需要把梯度计算截断
d_fake_loss = loss_fn(disc_gen_loss, torch.zeros_like(disc_gen_loss, device=device))
d_fake_loss.backward()
disc_loss = d_real_loss + d_fake_loss
d_optimizer.step()
# 对生成器的损失定义和优化
g_optimizer.zero_grad()
disc_gen_out = dis(annos, gen_output)
gen_loss_crossentropyloss = loss_fn(disc_gen_out, torch.ones_like(disc_gen_out, device=device))
gen_l1_loss = torch.mean(torch.abs(gen_output - imgs)) # 生成器有两种损失函数
gen_loss = gen_loss_crossentropyloss + LAMBDA * gen_l1_loss
gen_loss.backward()
g_optimizer.step()
with torch.no_grad():
D_epoch_loss += disc_loss.item()
G_epoch_loss += gen_loss.item()
with torch.no_grad():
D_epoch_loss /= count
G_epoch_loss /= count
D_loss.append(D_epoch_loss)
G_loss.append(G_epoch_loss)
print("Epoch:", epoch)
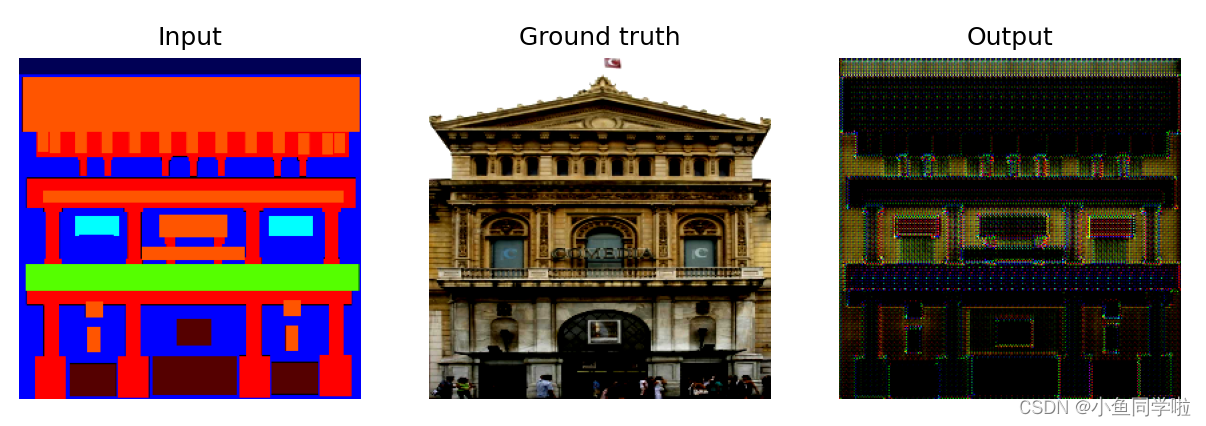
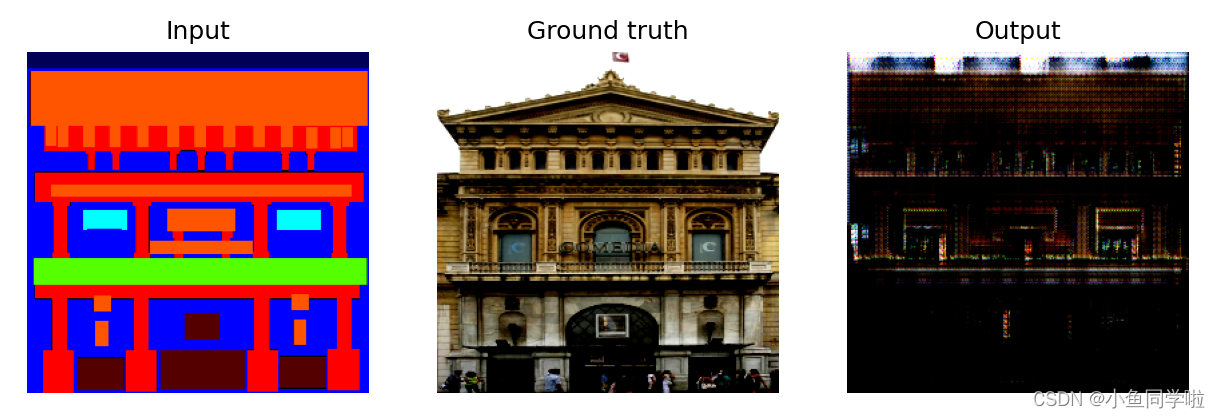
if epoch % 15 == 0:
generate_images(gen, annos_batch, imgs_batch)
plt.plot("G_loss", label="G_loss")
plt.plot("D_loss", label="D_loss")
# PS:训练技巧
# 当发现效果向判别器一边倒的时候,主要有3中策略:
# 1.调小判别器初始学习率(178-line)
# 2.减少判别器的训练层(167-line)
# 3.增加生成器的优化轮数(251-line)完整代码:
import torch
import torch.nn as nn
import torch.nn.functional as F
from torch.utils import data
from torchvision import transforms

import matplotlib.pyplot as plt
import glob
from PIL import Image

# 数据准备
imgs_path = glob.glob("data/pix2pixdata/base/train/*.jpg")
annos_path = glob.glob("data/pix2pixdata/base/train/*.png")
print(len(imgs_path))
print(len(annos_path))
transform = transforms.Compose([
    transforms.ToTensor(),
    transforms.Resize((256, 256)),
    transforms.Normalize(mean=0.5, std=0.5)
])


class CMP_dataset(data.Dataset):
    def __init__(self, imgs_path, annos_path):
        self.imgs_path = imgs_path
        self.annos_path = annos_path

    def __getitem__(self, index):
        img_path = self.imgs_path[index]
        anno_path = self.annos_path[index]
        pil_img = Image.open(img_path)
        pil_img = transform(pil_img)
        pil_anno = Image.open(anno_path)  # 这里的OPEN会将图片通道变为1
        pil_anno = pil_anno.convert("RGB")  # 需要用convert变为三通道
        pil_anno = transform(pil_anno)
        return pil_anno, pil_img

    def __len__(self):
        return len(self.imgs_path)


dataset = CMP_dataset(imgs_path, annos_path)
BATCHSIZE = 4
dataloader = data.DataLoader(dataset, batch_size=BATCHSIZE, shuffle=True)
annos_batch, imgs_batch = next(iter(dataloader))  # 此时的格式为(4, 3, 256, 256)
fig = plt.figure(figsize=(8, 12))
for i, (anno, img) in enumerate(zip(annos_batch[:3], imgs_batch[:3])):  # ZIP用来同时迭代annos_batch和imgs_batch
    anno = (anno.permute(1, 2, 0).numpy() + 1) / 2
    img = (img.permute(1, 2, 0).numpy() + 1) / 2
    plt.subplot(3, 2, 2 * i + 1)
    plt.title("input_img")
    plt.imshow(anno)
    plt.subplot(3, 2, 2 * i + 2)
    plt.title("output_img")
    plt.imshow(img)
plt.show()


# 定义下采样模块
class Downsample(nn.Module):
    def __init__(self, in_channels, out_channels):
        super(Downsample, self).__init__()
        self.conv_relu = nn.Sequential(
            nn.Conv2d(in_channels=in_channels,
                      out_channels=out_channels,
                      kernel_size=3,
                      stride=2,
                      padding=1),
            nn.LeakyReLU(inplace=True)  # inplce=True:就地修改输入张量
        )
        self.bn = nn.BatchNorm2d(out_channels)

    def forward(self, x, is_bn=True):
        x = self.conv_relu(x)
        if is_bn:
            x = self.bn(x)
        return x


# 定义上采样模块
class Upsample(nn.Module):
    def __init__(self, in_channels, out_channels):
        super(Upsample, self).__init__()
        self.upconv1 = nn.Sequential(
            nn.ConvTranspose2d(in_channels=in_channels,
                               out_channels=out_channels,
                               kernel_size=3,
                               stride=2,
                               padding=1,
                               output_padding=1),
            nn.LeakyReLU(inplace=True)  # inplce=True:就地修改输入张量
        )
        self.bn = nn.BatchNorm2d(out_channels)

    def forward(self, x, is_drop=False):
        x = self.upconv1(x)
        x = self.bn(x)
        if is_drop:
            x = F.dropout2d(x)
        return x


# 初始化生成器:6个下采样,5个上采样+1个输出层
# PS:实战中建议画出模型图,方便了解输入层和输出层的关系(U-net)
class Generator(nn.Module):
    def __init__(self):
        super(Generator, self).__init__()
        self.down1 = Downsample(3, 64)  # (64, 128, 128)
        self.down2 = Downsample(64, 128)  # (128, 64, 64)
        self.down3 = Downsample(128, 256)  # (256, 32, 32)
        self.down4 = Downsample(256, 512)  # (512, 16, 16)
        self.down5 = Downsample(512, 512)  # (512, 8, 8)
        self.down6 = Downsample(512, 512)  # (512, 4, 4)

        self.up1 = Upsample(512, 512)  # (512, 8, 8)
        self.up2 = Upsample(1024, 512)  # (512, 16, 16)
        self.up3 = Upsample(1024, 256)  # (256, 32, 32)
        self.up4 = Upsample(512, 128)  # (128, 64, 64)
        self.up5 = Upsample(256, 64)  # (64, 128, 128)

        self.last = nn.ConvTranspose2d(128, 3,
                                       kernel_size=3,
                                       stride=2,
                                       padding=1,
                                       output_padding=1)

    def forward(self, x):
        x1 = self.down1(x)
        x2 = self.down2(x1)
        x3 = self.down3(x2)
        x4 = self.down4(x3)
        x5 = self.down5(x4)
        x6 = self.down6(x5)

        x6 = self.up1(x6, is_drop=True)
        x6 = torch.cat([x6, x5], dim=1)
        x6 = self.up2(x6, is_drop=True)
        x6 = torch.cat([x6, x4], dim=1)
        x6 = self.up3(x6, is_drop=True)
        x6 = torch.cat([x6, x3], dim=1)
        x6 = self.up4(x6)
        x6 = torch.cat([x6, x2], dim=1)
        x6 = self.up5(x6)
        x6 = torch.cat([x6, x1], dim=1)

        x6 = torch.tanh(self.last(x6))
        return x6


# 初始化判别器  输入anno+img(生成的或者真实的)  concat
class Discriminator(nn.Module):
    def __init__(self):
        super(Discriminator, self).__init__()
        self.down1 = Downsample(6, 64)  # (64, 128, 128)  PS:这里输入的6:anno+img
        self.down2 = Downsample(64, 128)  # (128, 64, 64)
        self.conv1 = nn.Conv2d(128, 256, 3)
        self.bn = nn.BatchNorm2d(256)
        self.last = nn.Conv2d(256, 1, 3)

    def forward(self, anno, img):
        x = torch.cat([anno, img], dim=1)  # (batch, 6, H, W)  PS:这里需要将anno和img进行合并
        x = self.down1(x)
        x = self.down2(x)
        x = F.dropout2d(self.bn(F.leaky_relu_(self.conv1(x))))
        x = torch.sigmoid(self.last(x))  # (batch, 1, 60, 60)
        return x


# 生成优化器,初始化模型
device = "cuda" if torch.cuda.is_available() else "cpu"
dis = Discriminator().to(device)
gen = Generator().to(device)

d_optimizer = torch.optim.Adam(dis.parameters(), lr=0.001, betas=(0.5, 0.999))
g_optimizer = torch.optim.Adam(gen.parameters(), lr=0.001, betas=(0.5, 0.999))


# 定义绘图函数
def generate_images(model, test_anno, test_real):
    prediction = model(test_anno).permute(0, 2, 3, 1).detach().cpu().numpy()  # 这里涉及到计算但我们不希望它计算梯度所以用detach截断
    test_anno = test_anno.permute(0, 2, 3, 1).cpu().numpy()
    test_real = test_real.permute(0, 2, 3, 1).cpu().numpy() + 1 / 2
    plt.figure(figsize=(10, 10))
    display_list = [test_anno[3], test_real[3], prediction[3]]
    title = ["Input", "Ground truth", "Output"]
    for i in range(3):
        plt.subplot(1, 3, i + 1)
        plt.title(title[i])
        plt.imshow(display_list[i])
        plt.axis("off")
    plt.show()


# 定义测试数据集
test_imgs_path = glob.glob("data/pix2pixdata/extended/test/*.jpg")
test_annos_path = glob.glob("data/pix2pixdata/extended/test/*.png")
test_dataset = CMP_dataset(test_imgs_path, test_annos_path)
test_dataloader = data.DataLoader(test_dataset, batch_size=BATCHSIZE)

# 定义损失函数
# cgan损失函数
loss_fn = torch.nn.BCELoss()
# L1损失


annos_batch, imgs_batch = next(iter(test_dataloader))  # 此时的格式为(4, 3, 256, 256)
fig = plt.figure(figsize=(6, 10))
for i, (anno, img) in enumerate(zip(annos_batch[:3], imgs_batch[:3])):  # ZIP用来同时迭代annos_batch和imgs_batch
    anno = (anno.permute(1, 2, 0).numpy() + 1) / 2
    img = (img.permute(1, 2, 0).numpy() + 1) / 2
    plt.subplot(3, 2, 2 * i + 1)
    plt.title("input_img")
    plt.imshow(anno)
    plt.subplot(3, 2, 2 * i + 2)
    plt.title("output_img")
    plt.imshow(img)
plt.show()

annos_batch, imgs_batch = annos_batch.to(device), imgs_batch.to(device)
LAMBDA = 7
D_loss = []
G_loss = []

# 开始训练
for epoch in range(61):
    D_epoch_loss = 0
    G_epoch_loss = 0
    count = len(dataloader)
    for step, (annos, imgs) in enumerate(dataloader):
        imgs = imgs.to(device)
        annos = annos.to(device)

        # 对判别器的损失定义和优化
        d_optimizer.zero_grad()
        disc_real_output = dis(annos, imgs)  # 输入真实图片
        d_real_loss = loss_fn(disc_real_output, torch.ones_like(disc_real_output, device=device))
        d_real_loss.backward()

        gen_output = gen(annos)
        disc_gen_loss = dis(annos, gen_output.detach())  # 这里需要把梯度计算截断
        d_fake_loss = loss_fn(disc_gen_loss, torch.zeros_like(disc_gen_loss, device=device))
        d_fake_loss.backward()

        disc_loss = d_real_loss + d_fake_loss
        d_optimizer.step()

        # 对生成器的损失定义和优化
        g_optimizer.zero_grad()
        disc_gen_out = dis(annos, gen_output)
        gen_loss_crossentropyloss = loss_fn(disc_gen_out, torch.ones_like(disc_gen_out, device=device))
        gen_l1_loss = torch.mean(torch.abs(gen_output - imgs))  # 生成器有两种损失函数
        gen_loss = gen_loss_crossentropyloss + LAMBDA * gen_l1_loss
        gen_loss.backward()
        g_optimizer.step()

        with torch.no_grad():
            D_epoch_loss += disc_loss.item()
            G_epoch_loss += gen_loss.item()
    with torch.no_grad():
        D_epoch_loss /= count
        G_epoch_loss /= count
        D_loss.append(D_epoch_loss)
        G_loss.append(G_epoch_loss)
        print("Epoch:", epoch)
        if epoch % 15 == 0:
            generate_images(gen, annos_batch, imgs_batch)
plt.plot("G_loss", label="G_loss")
plt.plot("D_loss", label="D_loss")

# PS:训练技巧
# 当发现效果向判别器一边倒的时候,主要有3中策略:
# 1.调小判别器初始学习率(178-line)
# 2.减少判别器的训练层(167-line)
# 3.增加生成器的优化轮数(251-line)


 565
565

 被折叠的 条评论
为什么被折叠?
被折叠的 条评论
为什么被折叠?
 到【灌水乐园】发言


