


非最大抑制(Non-Maximum Suppression)是一种常见的对象检测后处理步骤,从许多重叠实体中选择一个实体。标准通常是丢弃低于给定概率界限的实体。对于剩余的实体,我们反复选择概率最高的实体。
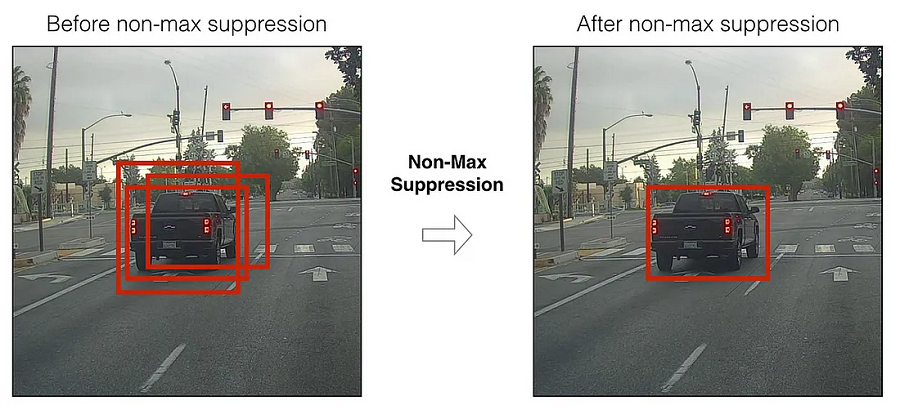
NMS 示例
主要目标是减少串行操作的数量并利用批处理。为此,我们将使用 ONNX NMS 实现。
提示:使用 Netron 帮助可视化ONNX模型,点击这里查看Netron中文使用文档。
NSDT工具推荐: Three.js AI纹理开发包 - YOLO合成数据生成器 - GLTF/GLB在线编辑 - 3D模型格式在线转换 - 可编程3D场景编辑器 - REVIT导出3D模型插件 - 3D模型语义搜索引擎 - AI模型在线查看 - Three.js虚拟轴心开发包 - 3D模型在线减面 - STL模型在线切割
1、ONNX的NMS 节点
在本教程中,我将考虑一个以分数和框作为输出的检测器模型。
- 分数的形状为:
(batch_size、spacial_dimension、num_classes) - 包围框的形状为:
(batch_size、spacial_dimension、4)
通过 SpacialDimension,你可以了解框/锚点是如何生成的。
根据 ONNX 文档,NMS 节点的输入是:
boxes:包围框,张量(浮点)。形状为[num_batches、spatial_dimension、4]的输入张量。单框数据格式由center_point_box表示。scores:分数,张量(浮点)。形状为[num_batches、num_classes、spatial_dimension]的输入张量max_output_boxes_per_class(可选):张量(int64)。表示每个类别每个批次要选择的最大框数的整数。它是一个标量。默认为 0,表示无输出。iou_threshold(可选):张量(浮点数)。浮点数表示用于决定框相对于 IOU 是否重叠过多的阈值。它是标量。值范围 [0, 1]。默认为 0score_threshold(可选):张量(浮点数)。浮点数表示用于根据分数决定何时删除框的阈值。它是一个标量。
属性:
center_point_box:int(默认为 0)。整数表示框数据的格式。默认值为 0。0 — 框数据以[y1, x1, y2, x2]的形式提供,其中(y1, x1)和(y2, x2)是任何对角线框角对的坐标,坐标可以作为归一化(即位于区间 [0, 1] 内)或绝对值提供。主要用于 TF 模型。1 — 框数据以[x_center, y_center, width, height]的形式提供。主要用于 Pytorch 模型。
输出:
selected_indices:张量(int64)。从框张量中选择的索引[num_selected_indices,3],选定的索引格式为[batch_index,class_index,box_index]。
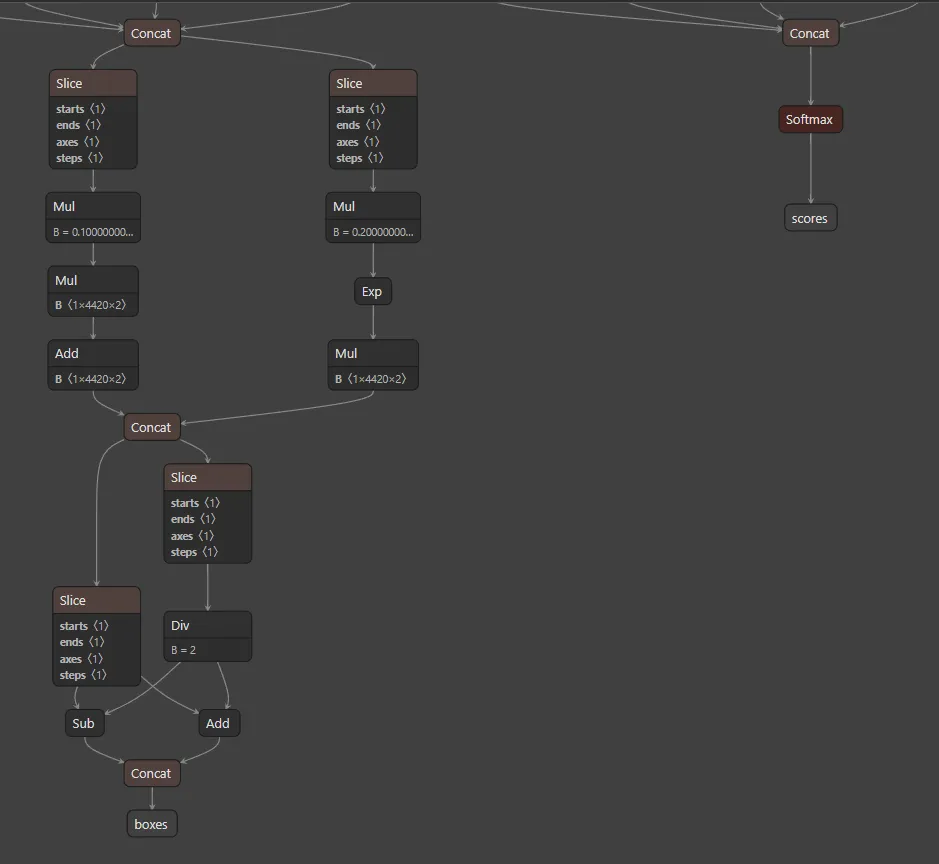
我的检测器。2 个输出。框和分数
如你所见,这些确实是输出名称。你的模型可能有不同的名称,因此使用 Netron 是一种很好的做法。
2、创建NMS节点图
!pip install onnx numpy
import onnx
from onnx import TensorProto
import numpy as np

model_path = '/path/to/your/model.onnx'

model = onnx.load(model_path)

graph = model.graph
我的包围盒格式正确。我的分数需要在连接到 NMS 节点之前应用转置操作。
# create transpose node
# (batch_size, spacial_dimension, num_classes) -> (batch_size, num_classes, spacial_dimension)
transpose_scores_node = onnx.helper.make_node(
    'Transpose',
    inputs=['scores'],
    outputs=['scores_transposed'],
    perm=(0, 2, 1))

# add to graph
graph.node.append(transpose_scores_node)
定义输入:
max_detections = 200
score_thresh = 0.95
iou_thresh = 0.5

# make constant tensors
score_threshold = onnx.helper.make_tensor(
    'score_threshold',
    TensorProto.FLOAT,
    [1],
    [score_thresh])

iou_threshold = onnx.helper.make_tensor(
    'iou_threshold',
    TensorProto.FLOAT,
    [1],
    [iou_thresh])

max_output_boxes_per_class = onnx.helper.make_tensor(
    'max_output_boxes_per_class',
    TensorProto.INT64,
    [1],
    [max_detections])
创建 NMS 节点并定义新的输出:
inputs_nms=['boxes', 'scores_transposed', 'max_output_boxes_per_class',
            'iou_threshold', 'score_threshold']
outputs_nms = ['num_selected_indices']

nms_node = onnx.helper.make_node(
    'NonMaxSuppression',
    inputs_nms,
    outputs_nms,
    center_point_box=1,
)

# add to the list of graph nodes
graph.node.append(nms_node)

# initializer
graph.initializer.append(score_threshold)
graph.initializer.append(iou_threshold)
graph.initializer.append(max_output_boxes_per_class)

# define output
output_nms_value_info = onnx.helper.make_tensor_value_info(
    'num_selected_indices',
    TensorProto.INT64,
    shape=['num_selected_indices', 3])

# add to graph
graph.output.append(output_nms_value_info)
保存模型:
onnx.save(model, 'model-nms-node.onnx')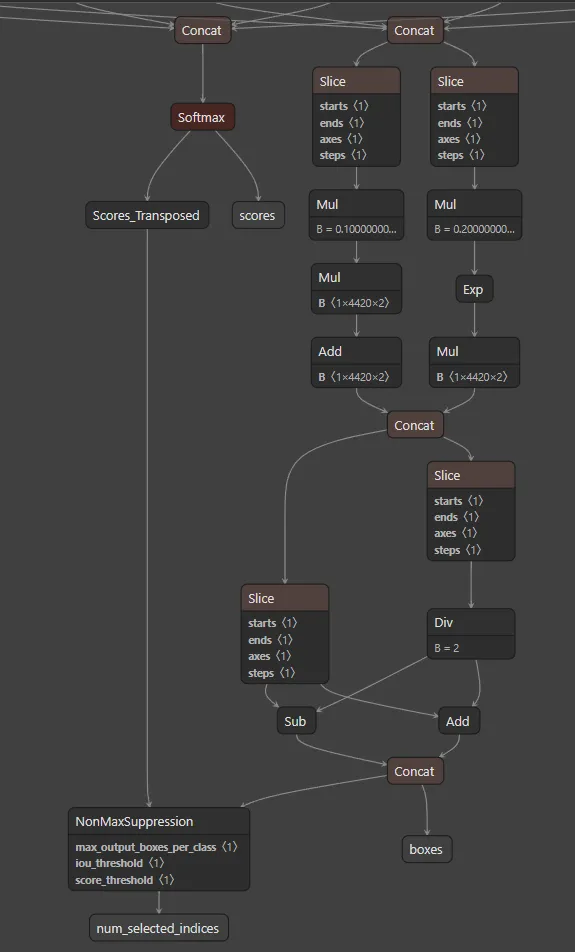
具有新输出um_selected_indices的模型
3、后处理 NMS实现
好的,现在我们有了一个新的输出,它表明我选择的索引是什么。但这并不是完美的输出。一种常见的解决方法是 NVIDIA DeepStream 标准。
根据 TensorRT 文档:
num_detections:这是一个[batch_size, 1]数据类型为 int32 的张量。最后一个维度是一个标量,表示每个批次图像的有效检测数量。它可以小于max_output_boxes。detection_boxes:这是一个[batch_size, max_output_boxes, 4]数据类型为 float32 或 float16 的张量,包含非最大抑制框的坐标。无论输入代码类型如何,输出坐标始终为 BoxCorner 格式。detection_scores:这是一个数据类型为 float32 或 float16 的[batch_size, max_output_boxes]张量,包含框的分数。detection_classes:这是一个数据类型为 int32 的[batch_size, max_output_boxes]张量,包含框的类别。
使用 ONNX 执行此操作可能很困难。
!pip install torch相反,我们将使用 Pytorch 来创建后处理,然后使用 ONNX 连接。
import torch

torch_boxes = torch.tensor([
  [91.0,2,3,4,5,6],
  [11,12,13,14,15,16],
  [21,22,23,24,25,26],
  [31,32,33,34,35,36],
]).unsqueeze(0)

torch_scores = torch.tensor([
  [0.1,0.82,0.3,0.6,0.55,0.6],
  [0.9,0.18,0.7,0.4,0.45,0.4],
]).unsqueeze(0)

torch_indices = torch.tensor([[0,0,0], [0,0,2], [0,0,1]])

torch_boxes = torch_boxes.permute(0, 2, 1)
torch_scores = torch_scores.permute(0, 2, 1)
构建 pytorch 模型:
# 01
from torch import nn

class PostProcessingNMS(nn.Module):

    def forward(self, idx, boxes, scores):
        """
        idx: selected indices from the boxes tensor. [num_selected_indices, 3],
             the selected index format is [batch_index, class_index, box_index]

        boxes: in (X, Y, H, W) format. Shape is:
               [batch_size, spacial_dimensions, 4]

        scores: Shape is: [batch_size, spacial_dimensions, num_classes]
        """
        bbox_result = self.gather(boxes, idx)
        score_intermediate_result = self.gather(scores, idx).max(axis=-1)
        score_result = score_intermediate_result.values
        classes_result = score_intermediate_result.indices
        num_dets = torch.tensor(score_result.shape[-1]).clone().detach()
        return (bbox_result, score_result,  classes_result, num_dets)

    def gather(self, target, idx):
        pick_indices = idx[:, -1:].repeat(1, target.shape[2]).unsqueeze(0)
        return torch.gather(target, 1, pick_indices)
但是,如果我想应用一个过滤器来删除 0 类(通常是背景),该怎么办?使用:
# 02
from torch import nn

class PostProcessingNMS(nn.Module):

    def forward(self, idx, boxes, scores):
        """
        Args:
            idx: selected indices from the boxes tensor. [num_selected_indices, 3],
                the selected index format is [batch_index, class_index, box_index]

            boxes: in (X, Y, H, W) format. Shape is:
                [batch_size, spacial_dimensions, 4]

            scores: Shape is: [batch_size, spacial_dimensions, num_classes]
        """
        bbox_result = self.gather(boxes, idx)
        score_intermediate_result = self.gather(scores, idx).max(axis=-1)

        mask = score_intermediate_result.indices != 0

        bbox_result = bbox_result[mask]
        score_result = score_intermediate_result.values[mask]
        classes_result = score_intermediate_result.indices[mask]

        num_dets = torch.tensor(score_result.shape[-1]).clone().detach()
        return (bbox_result, score_result,  classes_result, num_dets)

    def gather(self, target, idx):
        pick_indices = idx[:, -1:].repeat(1, target.shape[2]).unsqueeze(0)
        return torch.gather(target, 1, pick_indices)
除了像 DeepStream 这样的应用程序之外,你唯一感兴趣的就是包围框。使用:
# 03
from torch import nn

class PostProcessingNMS(nn.Module):

    def forward(self, idx, boxes, scores):
        """
        Args:
            idx: selected indices from the boxes tensor. [num_selected_indices, 3],
                the selected index format is [batch_index, class_index, box_index]

            boxes: in (X, Y, H, W) format. Shape is:
                [batch_size, spacial_dimensions, 4]

            scores: Shape is: [batch_size, spacial_dimensions, num_classes]

        Output:
            boxes selecteds
        """
        bbox_result = self.gather(boxes, idx)

        score_intermediate_result = self.gather(scores, idx).max(axis=-1)

        mask = score_intermediate_result.indices != 0

        bbox_result = bbox_result[mask]

        return bbox_result

    def gather(self, target, idx):
        pick_indices = idx[:, -1:].repeat(1, target.shape[2]).unsqueeze(0)
        return torch.gather(target, 1, pick_indices)
我选择Case #03:
postp = PostProcessingNMS()

dynamic =  {
    'boxes':{0:'batch', 1:'num_anchors', 2:'boxes'},
    'scores':{0:'batch', 1:'num_anchors', 2:'classes',},
    'num_selected_indices':{0:'num_results'},
    'det_bboxes':{0:'batch', 1:'num_results'},
    #'det_scores':{0:'batch', 1:'num_results'},
    #'det_classes':{0:'batch', 1:'num_results'},
}

output_names=['det_bboxes',
              #'det_scores', 'det_classes', 'num_dets'
              ]

torch.onnx.export(postp,
                  (torch_indices, torch_boxes, torch_scores),
                  'postp.onnx',
                  input_names=['num_selected_indices', 'boxes', 'scores'],
                  output_names=output_names,
                  dynamic_axes=dynamic,
                  opset_version=17)
使用 ONNX-sim,简化模型:
!pip install onnxsim
!onnxsim postp.onnx postp-sim.onnx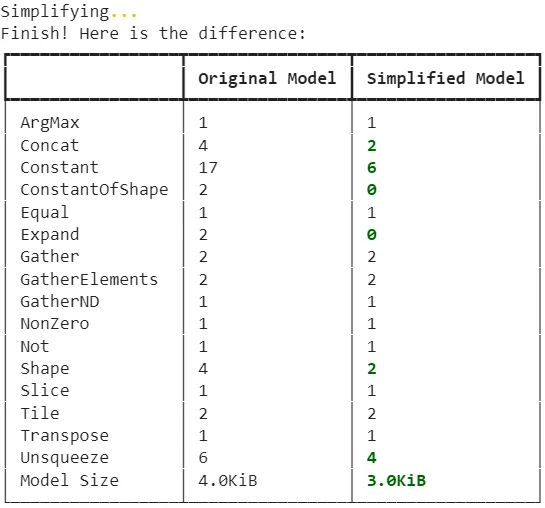
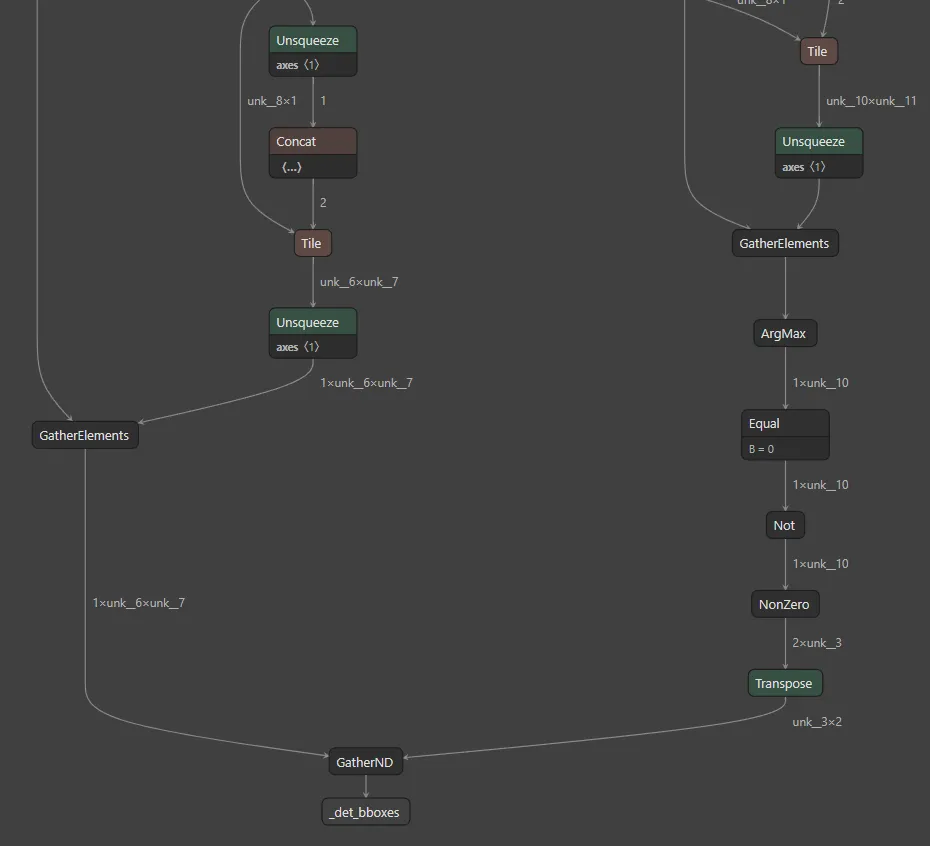
简化的后处理 NMS 模型
4、完整的组合模型
import onnx
from onnx import compose
from onnx.compose import merge_models
model_nms = onnx.load('model-nms-node.onnx')
model_postp = onnx.load('postp-sim.onnx')
# add prefix, resolve names conflits
postp_with_prefix = compose.add_prefix(model_postp, prefix='_')

# as in the other tutorial, check if the IR and Opset versions are the same
model_full = compose.merge_models(
    model_nms,
    postp_with_prefix,
    io_map=[('scores', '_scores'),
            ('boxes', '_boxes'),
            ('num_selected_indices', '_num_selected_indices')])
onnx.save_model(model_prep, 'model_nms.onnx')
包围框通常采用相对格式。要转换为绝对格式,请乘以每个图像形状;
# example img dim
width=4200
height=2800

boxes[:, 0] *= width
boxes[:, 1] *= height
boxes[:, 2] *= width
boxes[:, 3] *= height

# convert to int
boxes_int = boxes.astype(np.int32)

def rescale_bbox(box: np.ndarray) -> List[int]:
    width = box[2] - box[0]
    height = box[3] - box[1]
    maximum = max(width, height)
    dx = int((maximum - width)/2)
    dy = int((maximum - height)/2)
    bboxes = [box[0] - dx, box[1] - dy, box[2] + dx, box[3] + dy]
    return bboxes

# then, reescale bbox to adapt to original img
for i in range(boxes_int.shape[0]):
    box = rescale_bbox(boxes_int[i, :])
    print(box)
这最后一步可能会有所不同,请检查你的模型文档。
原文链接:非最大抑制ONNX实现 - BimAnt


 5043
5043

 被折叠的 条评论
为什么被折叠?
被折叠的 条评论
为什么被折叠?
 到【灌水乐园】发言


