


CLIP (Contrastive Language-Image Pretraining)
这个太简单了,下面是一个带着InfoNCE的training loop
train_dataloader = Dataloader(dataset, ...)
for batch in train_dataloader:
    self.optimizer.zero_grad()

    text_features = text_encoder(batch['text']) #[bs,dim]
    image_features = image_encoder(batch['image']) #[bs,dim]
    bs,dim = text_features.shape

    # normalized features
    image_features = image_features / image_features.norm(dim=1, keepdim=True)
    text_features = text_features / text_features.norm(dim=1, keepdim=True)

    # cosine similarity as logits
    logits_per_image = image_features @ text_features.t() / self.tau
    logits_per_text = logits_per_image.t()

    target = torch.arange(bs)
    loss = (F.cross_entropy(logits_per_image, target) + F.cross_entropy(logits_per_text, target)) / 2

    loss.backward()
    self.optimizer.step()
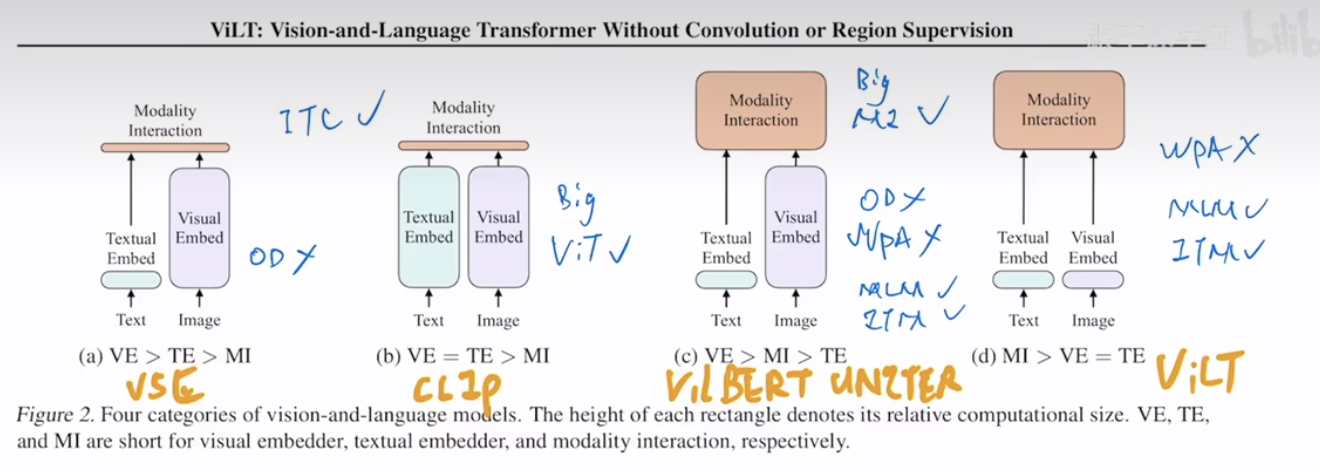
Vilt (ViLT: Vision-and-Language Transformer Without Convolution or Region Supervision)
ALBEF(ALign BEfore Fuse)
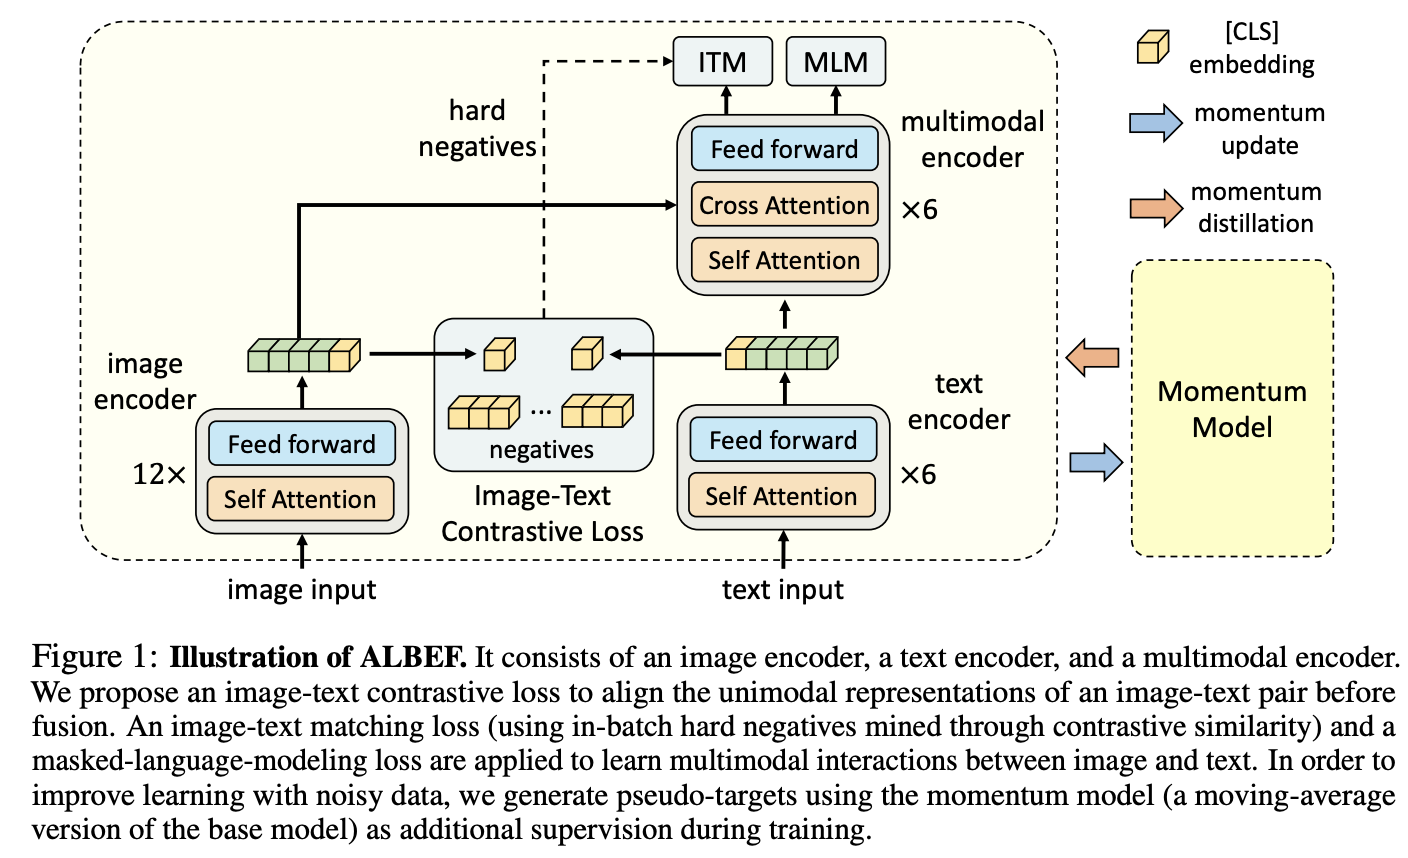
为什么有5个loss?
两个ITC+两个MIM+1个ITM。ITM是基于ground truth的,必须知道一个pair是不是ground truth,同时ITM loss是用了hard negative,这个是和Momentum Distillation(动量蒸馏)是有冲突的,所以ITM只有一个loss没有给基于Momentum Distillation的loss。而另外两个都有基于Momentum Distillation版本的loss
ALBEF模型forward了几次
算ITC和ITM的时候用的是原始图像和文本,算MIM的时候用的是mask过文本和原始的图像,所以要过2次forward过程
为什么要做Momentum Distillation?
The image-text pairs used for pre-training are mostly collected from the web and they tend to be noisy. Positive pairs are usually weakly-correlated: the text may contain words that are unrelated to the image, or the image may contain entities that are not described in the text. For ITC learning, negative texts for an image may also match the image’s content. For MLM, there may exist other words different from the annotation that describes the image equally well (or better). However, the one-hot labels for ITC and MLM penalize all negative predictions regardless of their correctness.
Momentum Distillation是怎么做的?
To address this, we propose to learn from pseudo-targets generated by the momentum model. The momentum model is a continuously-evolving teacher which consists of exponential-moving-average versions of the unimodal and multimodal encoders. 简单说就通过exponential-moving-average(多数代码库都是自带EMA的,比如swin tranformer和Deit等)来产生一些伪标签。即预测的时候不光和原始的one-hot labeling接近,也和pseudo-targets接近,当one-hot labeling不够准时,pseudo targets就派上用场了
Momentum Distillation里为什么用KL散度代替了交叉熵?
简单来说,就是因为Distillation的结果是一个softmax结果而不是onehot,直接在Pytorch的CE里用不了,所以换了KL散度,下面有更详细的解释
KL散度和交叉熵在什么条件下是一样的?
不带label smoothing,label是完全的onehot形式(例如3个类,只能是[0,0,1]、[0,1,0]和[1,0,0]),这种情况下KL散度结果就和交叉熵是完全一样的,可以回顾下信息熵 条件熵 交叉熵 联合熵 相对熵 KL散度 SCE MAE 互信息(信息增益)。但是在Pytorch实现中,交叉熵的只能输入其中某一类类别的下标,而Pytorch的KVDivLoss就可以是两个分布算loss,增加了灵活性。KVDivLoss针对
q
i
q_i
qi也就是logits对应的输入要预先过一下log(都是为了NLLLoss(Softmax)的CrossEntropyLoss进行对齐),而且KVDivLoss和数学上KL(P||Q)的参数顺序是反的,下面截图自
https://pytorch.org/docs/stable/generated/torch.nn.KLDivLoss.html

稍微总结一下:
- CrossEntropyLoss:输入是原始的logits(公式里的Q,对应n个cases×m个类别的矩阵)和labels(公式里的P,对应n个cases所属类别的下标)
- KVDivLoss:输入是01之间但未过log的logits(公式里的Q,对应n个cases×m个类别的矩阵,当然在01之间,但没进行log)和labels(公式里的P,对应n个cases×m个类别的矩阵,当然在01之间)
- NLLLoss(LogSoftMax(logits, dim=-1), labels)和CrossEntropyLoss(logits, labels)完全一致,LogSoftMax的输入是原始logits(-无穷到+无穷)
CoCa (Contrastive loss and caption loss,CoCa: Contrastive Captioners are Image-Text Foundation Models)
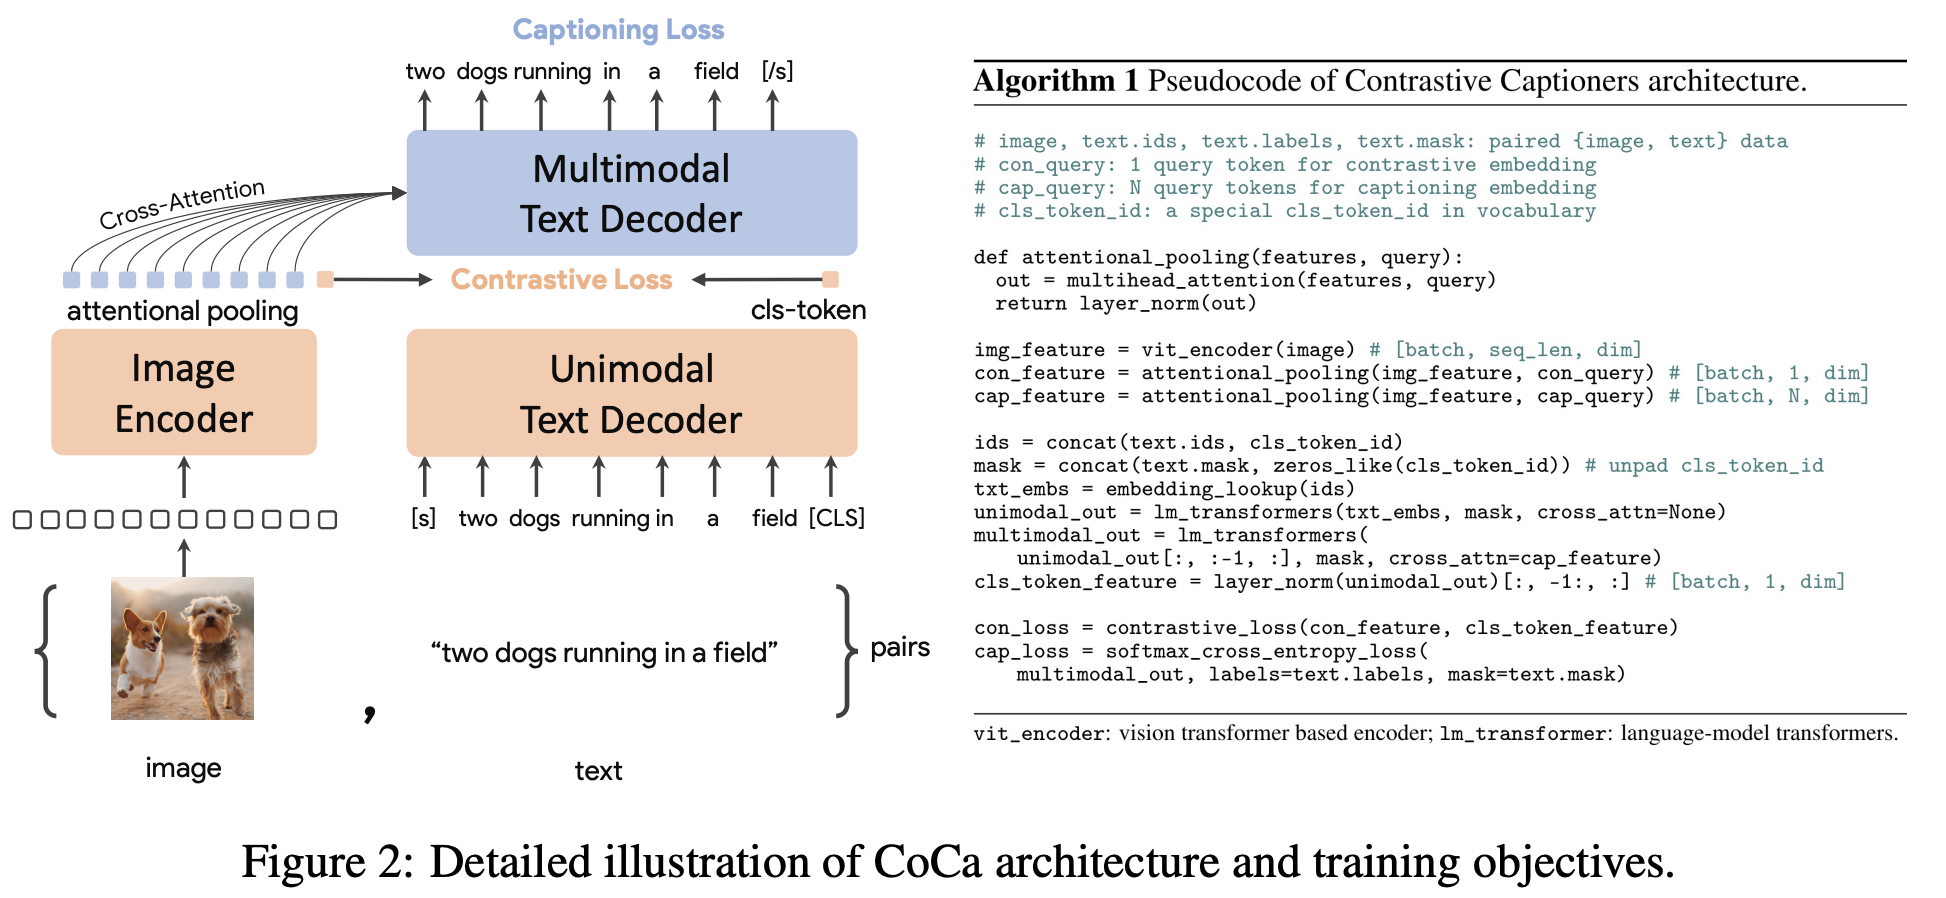
基本是ALBEF的延伸工作了,loss换成了Contrastive loss 和 caption loss,和ALBef区别在于:
- Coca图像分支是可以学习的,用了AttentionPooling方式。这里的AttentionPooling方式源自于Set Transformer: A Framework for Attention-based Permutation-Invariant Neural Networks这篇论文,基本的想法就是Image Encoder可以来自于多个不同任务提取,任务和任务之间是set的关系,而不是像transformer一样存在顺序,所以使用set transformer来学习这种集合关系来提取特征
- 文本端只用casual的loss,一个纯的casual LM,这也就是caption loss
为什么不用ITM呢?因为用ITM一个epoch要forward 3遍,这有一遍就够了,但是CoCa scale的非常大,一般人玩不动
FLAVA(FLAVA: A Foundational Language And Vision Alignment Model)
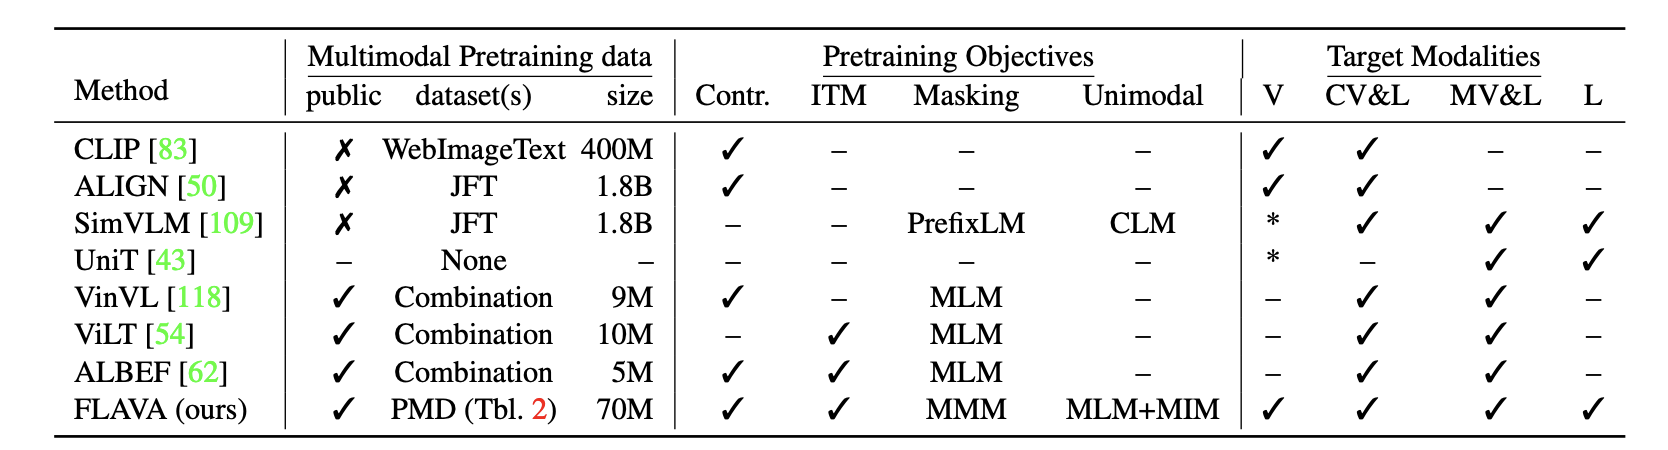
这图基本写清楚了FLAVA和之前工作的对比,一些关键点:
- MMM(Masked multimodal modeling):Specifically, given an image and text input, we first tokenize the input image patches using a pretrained dVAE tokenizer [89], which maps each image patch into an index in a visual codebook similar to a word dictionary (we use the same dVAE tokenizer as in [5]). Then, we replace a subset of image patches based on rectangular block image regions following BEiT [5] and 15% of text tokens following BERT [28] with a special [MASK] token. Then, from the multimodal encoder’s output {hM}, we apply a multilayer perceptron to predict the visual codebook index of the masked image patches, or the word vocabulary index of the masked text tokens.
- 也是分阶段训练: After unimodal pretraining of the image and text encoders, we continue
training the entire FLAVA model jointly on the three types of datasets with round-robin sampling. In each training iteration, we choose one of the datasets according to a sampling
ratio that we determine empirically (see supplemental) and obtain a batch of samples.
VLMO

stagewise 训练(先图片,再文本,再多模态;但先文本,再图片就不太行)
Beit v3
可以看成VLMO的多模态版本,只用了Mask loss,图像叫Imglish。Transformer叫multi-way transformer
BLIP (BLIP: Bootstrapping Language-Image Pre-training for Unified Vision-Language Understanding and Generation)
标题两个关键词,Bootstrapping和Unified框架,主要两个贡献:
- 整体的Bootstrapping框架,作者叫MED( Multimodal mixture of Encoder-Decoder):BLIP借鉴了VLMO里的思想,把「之前ALBEF文本侧和融合侧12层Transformer劈开的做法」改成了「Self-Att共享参数->根据情况接Cross Attention->Feedforward」这样一种比较通用的框架。另外BLIP的ITC也用了Momentum Encoder,ITM也用了ITC的分数做hard negative sampling。
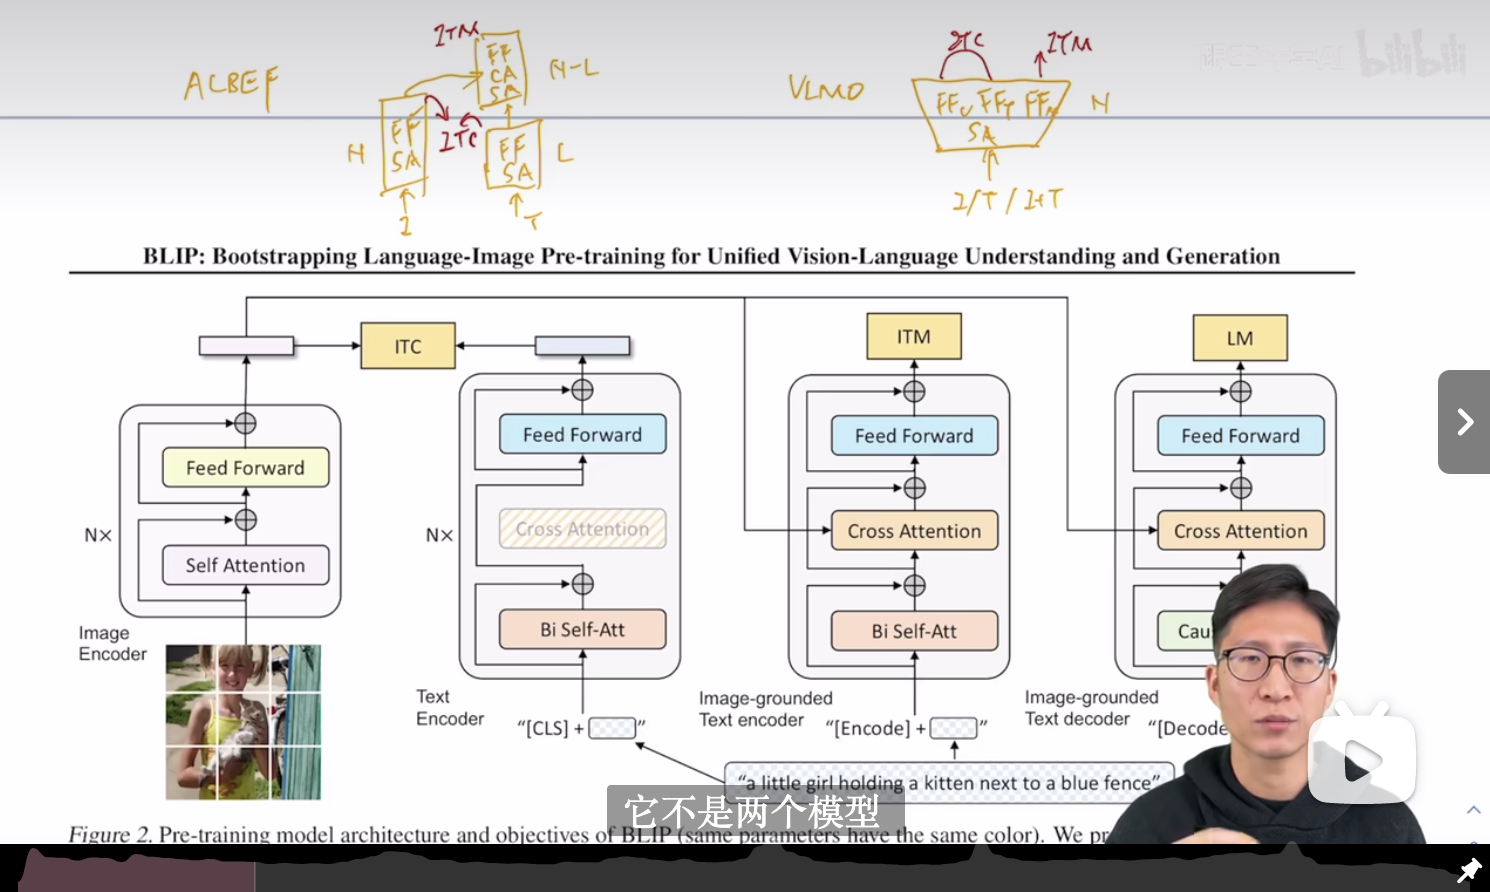
(部分截图自李沐老师团队视频:https://www.bilibili.com/video/BV1fA411Z772?vd_source=e260233b721e72ff23328d5f4188b304) - CapFilter:还是冲着图文不匹配问题去的
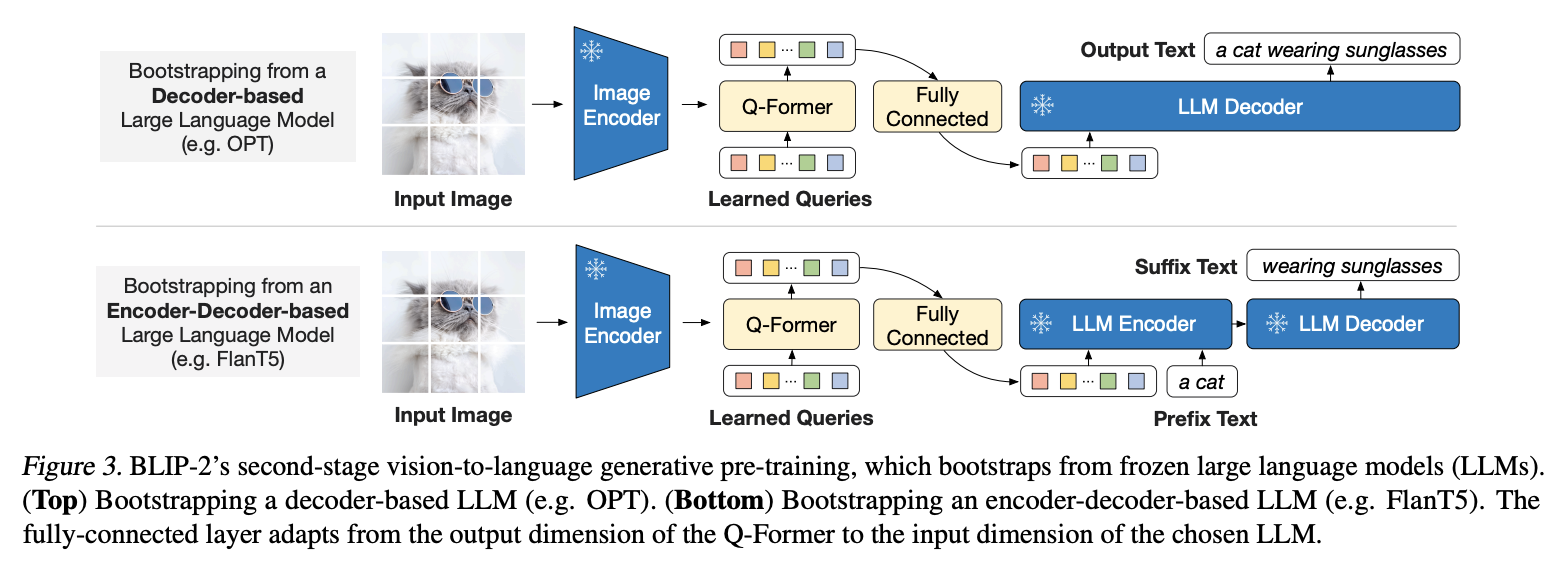
BLIP2
相当于把BLIP里的MED给抽成了QFormer来和大语言模型交互,注意下面这个图实际上BLIP2的QFormer并没有用Text作为输入,但训练的时候有ITC和ITC参与,这一点参考Figure3理解一下

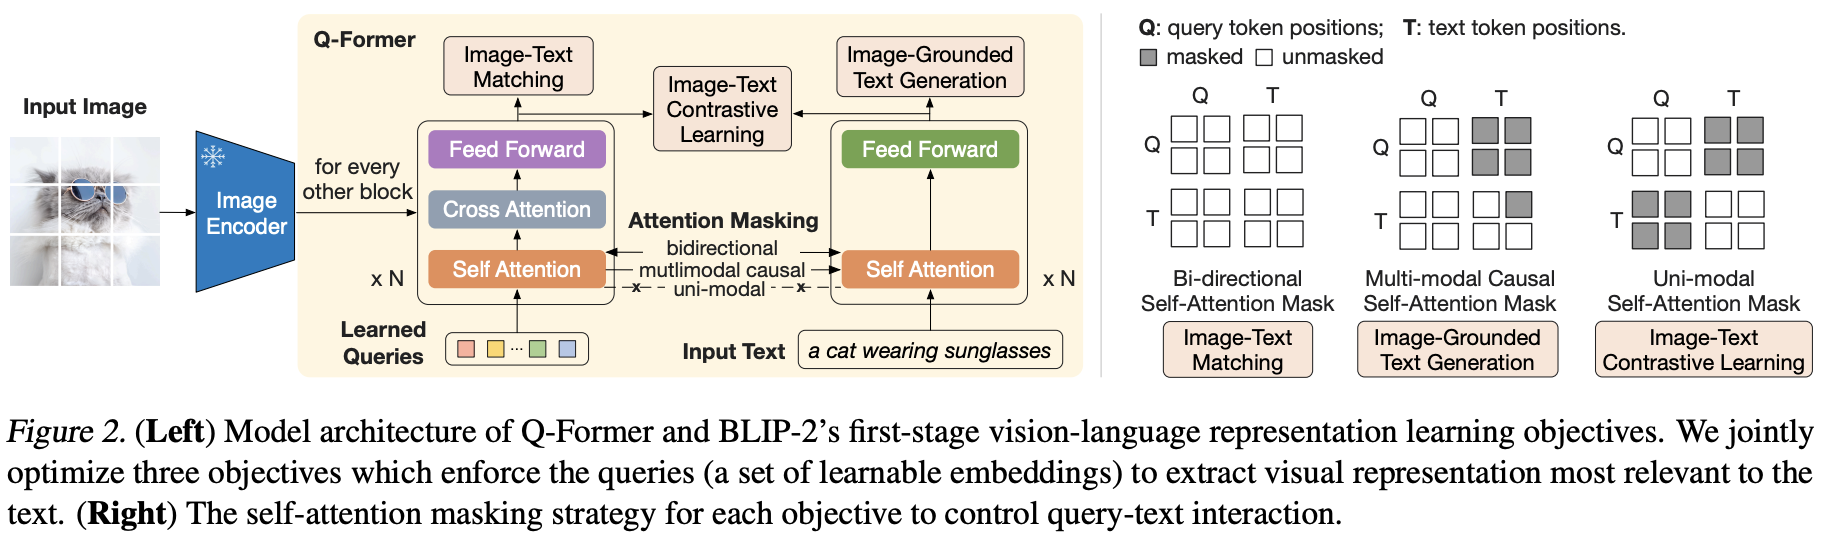
QFormer和BLIP1突出的对比有几点:
- BLIP2中QFormer不像BLIP1是把图片过完image encoder后直接过self attention,而是过了cross attention,也就是说图片的特征是被压缩的learned queries作为q和image encoder结果cross attention得到的。用作者自己的话说就是This bottleneck architecture works together with our pre-training objectives into forcing the queries to extract visual information that is most relevant to the text. 个人理解是这样bottleneck的尺寸会比较小,方便后续作为比较小的特征送给LLM;同时这个query也是文本和图片模态交互得到的
- 第二点是BLIP2训练是两阶段的:第一阶段没有引入LLM,ITC+ITM+ITG三个loss训练Qformer和Learned queries;第二阶段除了训练Qformer和Learned queries外还训练了一把QFormer输出和LLM之间的Fully Connected
BLIP2第一阶段训练中使用了ITM loss,由于训练中是bs个图和bs个文本,所以给每个图分别从bs-1个文本中随机一个作为负样本,给每个文本分别从bs-1个图中也随机一个作为负样本,所以就是bs个正样本和2*bs个负样本,然后过CrossEntropy,细节可以参考摘自Lavis的代码:
class Blip2Qformer(Blip2Base):
    """
    BLIP2 first-stage model with Q-former and ViT.
    Supported model types:
        - pretrained: pretrained model with vit-g
        - pretrain_vitL: pretrained model with vit-large
        - coco: fintuned model on coco
    Usage:
        >>> from lavis.models import load_model
        >>> model = load_model("blip2", "pretrain")
    """

    PRETRAINED_MODEL_CONFIG_DICT = {
        "pretrain": "configs/models/blip2/blip2_pretrain.yaml",
        "pretrain_vitL": "configs/models/blip2/blip2_pretrain_vitL.yaml",
        "coco": "configs/models/blip2/blip2_coco.yaml",
    }

    def __init__(
        self,
        vit_model="eva_clip_g",
        img_size=224,
        drop_path_rate=0,
        use_grad_checkpoint=False,
        vit_precision="fp16",
        freeze_vit=True,
        num_query_token=32,
        cross_attention_freq=2,
        embed_dim=256,
        max_txt_len=32,
    ):
        super().__init__()

        self.tokenizer = self.init_tokenizer()

        self.visual_encoder, self.ln_vision = self.init_vision_encoder(
            vit_model, img_size, drop_path_rate, use_grad_checkpoint, vit_precision
        )
        if freeze_vit:
            for name, param in self.visual_encoder.named_parameters():
                param.requires_grad = False
            self.visual_encoder = self.visual_encoder.eval()
            self.visual_encoder.train = disabled_train
            logging.info("freeze vision encoder")
        self.Qformer, self.query_tokens = self.init_Qformer(
            num_query_token, self.visual_encoder.num_features, cross_attention_freq
        )
        self.Qformer.resize_token_embeddings(len(self.tokenizer))
        state_dict = self.Qformer.state_dict()
        for name, param in self.Qformer.named_parameters():
            if "_query" in name:
                key_orig = name.replace("_query", "")
                param.data.copy_(state_dict[key_orig])

        self.vision_proj = nn.Linear(self.Qformer.config.hidden_size, embed_dim)
        self.text_proj = nn.Linear(self.Qformer.config.hidden_size, embed_dim)

        self.itm_head = nn.Linear(self.Qformer.config.hidden_size, 2)

        self.temp = nn.Parameter(0.07 * torch.ones([]))

        self.max_txt_len = max_txt_len

    def forward(self, samples):
        image = samples["image"]
        text = samples["text_input"]

        image_embeds = self.ln_vision(self.visual_encoder(image))
        image_atts = torch.ones(image_embeds.size()[:-1], dtype=torch.long).to(
            image.device
        )

        query_tokens = self.query_tokens.expand(image_embeds.shape[0], -1, -1)

        query_output = self.Qformer.bert(
            query_embeds=query_tokens,
            encoder_hidden_states=image_embeds,
            encoder_attention_mask=image_atts,
            use_cache=True,
            return_dict=True,
        )

        image_feats = F.normalize(
            self.vision_proj(query_output.last_hidden_state), dim=-1
        )

        text_tokens = self.tokenizer(
            text,
            padding="max_length",
            truncation=True,
            max_length=self.max_txt_len,
            return_tensors="pt",
        ).to(image.device)
        text_output = self.Qformer.bert(
            text_tokens.input_ids,
            attention_mask=text_tokens.attention_mask,
            return_dict=True,
        )
        text_feat = F.normalize(
            self.text_proj(text_output.last_hidden_state[:, 0, :]), dim=-1
        )

        ###============== Image-text Contrastive ===================###
        image_feats_all = concat_all_gather(
            image_feats
        )  # [batch_size*num_gpu, num_query_tokens, embed_dim]
        text_feat_all = concat_all_gather(text_feat)  # [batch_size*num_gpu, embed_dim]

        sim_q2t = torch.matmul(
            image_feats.unsqueeze(1), text_feat_all.unsqueeze(-1)
        ).squeeze()
        # [batch_size, batch_size*num_gpu, num_query_tokens]

        # image-text similarity: aggregate across all query tokens
        sim_i2t, _ = sim_q2t.max(-1)
        sim_i2t = sim_i2t / self.temp

        # text-query similarity: [batch_size, batch_size*num_gpu, num_query_tokens]
        sim_t2q = torch.matmul(
            text_feat.unsqueeze(1).unsqueeze(1), image_feats_all.permute(0, 2, 1)
        ).squeeze()

        # text-image similarity: aggregate across all query tokens
        sim_t2i, _ = sim_t2q.max(-1)
        sim_t2i = sim_t2i / self.temp  # [batch_size, batch_size*num_gpu]

        rank = dist.get_rank()
        bs = image.size(0)
        targets = torch.linspace(rank * bs, rank * bs + bs - 1, bs, dtype=int).to(
            image.device
        )

        if "image_id" in samples.keys(): #coco retrieval finetuning
            image_ids = samples["image_id"].view(-1,1)
            image_ids_all = concat_all_gather(image_ids)
            pos_idx = torch.eq(image_ids, image_ids_all.t()).float()
            sim_targets = pos_idx / pos_idx.sum(1,keepdim=True)
            sim_targets = 0.9 * sim_targets + 0.1 * torch.ones_like(sim_targets) / sim_targets.size(1)

            loss_t2i = -torch.sum(F.log_softmax(sim_t2i, dim=1)*sim_targets,dim=1).mean()
            loss_i2t = -torch.sum(F.log_softmax(sim_i2t, dim=1)*sim_targets,dim=1).mean()
            loss_itc = (loss_t2i+loss_i2t)/2
        else:
            loss_itc = (
                F.cross_entropy(sim_i2t, targets, label_smoothing=0.1)
                + F.cross_entropy(sim_t2i, targets, label_smoothing=0.1)
            ) / 2

        ###============== Image-text Matching ===================###
        text_input_ids_world = concat_all_gather(text_tokens.input_ids)
        text_attention_mask_world = concat_all_gather(text_tokens.attention_mask)
        image_embeds_world = all_gather_with_grad(image_embeds)
        with torch.no_grad():
            if "image_id" in samples.keys():
                mask = torch.eq(image_ids, image_ids_all.t())
                sim_t2i.masked_fill_(mask, -10000)
                sim_i2t.masked_fill_(mask, -10000)
            else:
                sim_t2i[:, rank * bs : rank * bs + bs].fill_diagonal_(-10000)
                sim_i2t[:, rank * bs : rank * bs + bs].fill_diagonal_(-10000)

            weights_t2i = F.softmax(sim_t2i, dim=1)
            weights_i2t = F.softmax(sim_i2t, dim=1)

        # select a negative image for each text
        image_embeds_neg = []
        for b in range(bs):
            neg_idx = torch.multinomial(weights_t2i[b], 1).item()
            image_embeds_neg.append(image_embeds_world[neg_idx])
        image_embeds_neg = torch.stack(image_embeds_neg, dim=0)

        # select a negative text for each image
        text_ids_neg = []
        text_atts_neg = []
        for b in range(bs):
            neg_idx = torch.multinomial(weights_i2t[b], 1).item()
            text_ids_neg.append(text_input_ids_world[neg_idx])
            text_atts_neg.append(text_attention_mask_world[neg_idx])

        text_ids_neg = torch.stack(text_ids_neg, dim=0)
        text_atts_neg = torch.stack(text_atts_neg, dim=0)

        text_ids_all = torch.cat(
            [text_tokens.input_ids, text_tokens.input_ids, text_ids_neg], dim=0
        )  # pos, pos, neg
        text_atts_all = torch.cat(
            [text_tokens.attention_mask, text_tokens.attention_mask, text_atts_neg],
            dim=0,
        )

        query_tokens_itm = self.query_tokens.expand(text_ids_all.shape[0], -1, -1)
        query_atts_itm = torch.ones(query_tokens_itm.size()[:-1], dtype=torch.long).to(
            image.device
        )
        attention_mask_all = torch.cat([query_atts_itm, text_atts_all], dim=1)

        image_embeds_all = torch.cat(
            [image_embeds, image_embeds_neg, image_embeds], dim=0
        )  # pos, neg, pos
        image_atts_all = torch.ones(image_embeds_all.size()[:-1], dtype=torch.long).to(
            image.device
        )

        output_itm = self.Qformer.bert(
            text_ids_all,
            query_embeds=query_tokens_itm,
            attention_mask=attention_mask_all,
            encoder_hidden_states=image_embeds_all,
            encoder_attention_mask=image_atts_all,
            return_dict=True,
        )

        vl_embeddings = output_itm.last_hidden_state[:, : query_tokens_itm.size(1), :]
        vl_output = self.itm_head(vl_embeddings)
        logits = vl_output.mean(dim=1)

        itm_labels = torch.cat(
            [torch.ones(bs, dtype=torch.long), torch.zeros(2 * bs, dtype=torch.long)],
            dim=0,
        ).to(image.device)
        loss_itm = F.cross_entropy(logits, itm_labels)

        ##================= Image Captioning ========================##
        decoder_input_ids = text_tokens.input_ids.clone()
        decoder_input_ids[:, 0] = self.tokenizer.bos_token_id
        labels = decoder_input_ids.masked_fill(
            decoder_input_ids == self.tokenizer.pad_token_id, -100
        )

        query_atts = torch.ones(query_tokens.size()[:-1], dtype=torch.long).to(
            image.device
        )
        attention_mask = torch.cat([query_atts, text_tokens.attention_mask], dim=1)
        lm_output = self.Qformer(
            decoder_input_ids,
            attention_mask=attention_mask,
            past_key_values=query_output.past_key_values,
            return_dict=True,
            labels=labels,
        )

        loss_lm = lm_output.loss

        return BlipOutput(
            loss=loss_itc + loss_itm + loss_lm,
            loss_itc=loss_itc,
            loss_itm=loss_itm,
            loss_lm=loss_lm,
        )
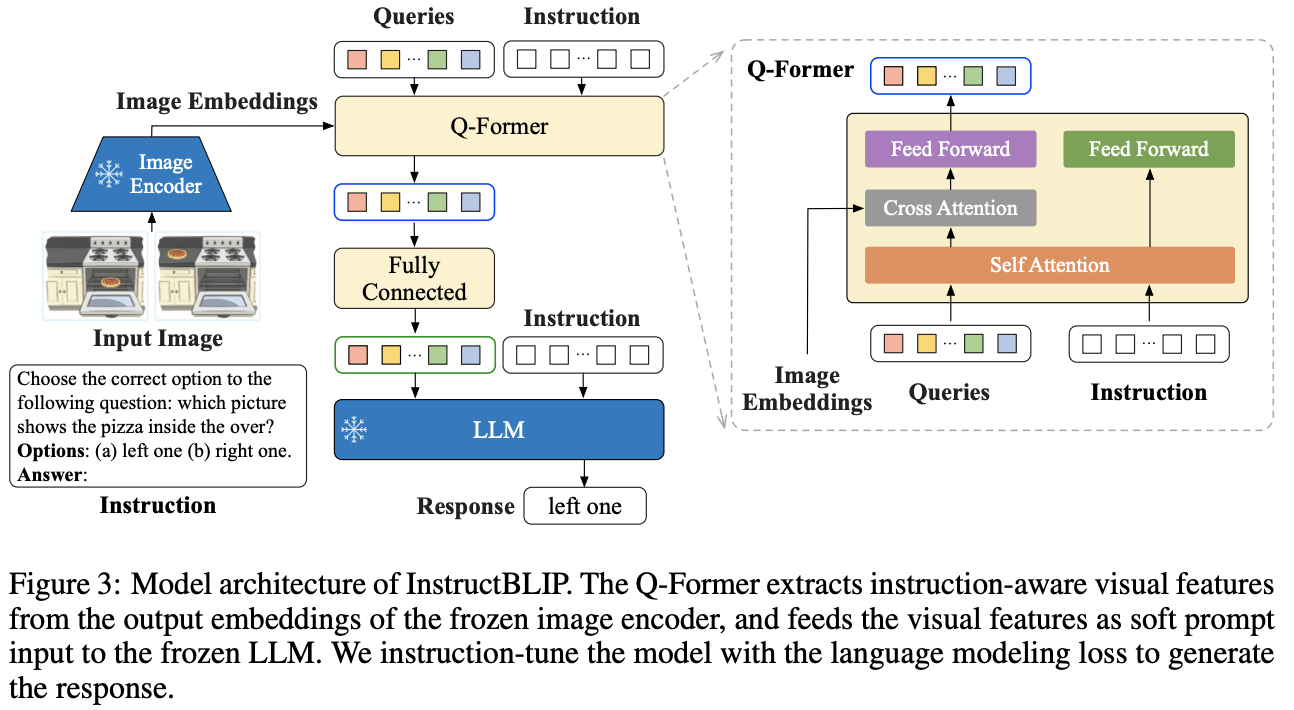
InstructBLIP
和BLIP2的区别在于,Qformer把Instruction的内容也加到了QFormer中,用作者自己的话来说就是:Extending BLIP-2, InstructBLIP proposes an instruction-aware Q-former module, which takes in the instruction text tokens as additional input. The instruction interacts with the query embeddings through self-attention layers of the Q-Former, and encourages the extraction of task-relevant image features. As a result, the LLM receives visual information conducive to instruction following。
来参考下huggingface transfomer的代码,其中InstructBlipForConditionalGeneration在forward时候的qformer_input_ids和qformer_attention_mask是InstructBlip相比BLIP2多出来的forward参数,而且qformer_input_ids还是用了和后面过LLM不一样的tokenizer。
transformers/models/instructblip/modeling_instructblip.py
    def forward(
        self,
        pixel_values: torch.FloatTensor,
        qformer_input_ids: torch.FloatTensor,
        qformer_attention_mask: Optional[torch.LongTensor] = None,
        input_ids: Optional[torch.FloatTensor] = None,
        attention_mask: Optional[torch.LongTensor] = None,
        decoder_input_ids: Optional[torch.LongTensor] = None,
        decoder_attention_mask: Optional[torch.LongTensor] = None,
        output_attentions: Optional[bool] = None,
        output_hidden_states: Optional[bool] = None,
        labels: Optional[torch.LongTensor] = None,
        return_dict: Optional[bool] = None,
    ) -> Union[Tuple, InstructBlipForConditionalGenerationModelOutput]:
直接完整对比一下Blip2QFormerModel和InstructBlipQFormerModel,InstructBlipQFormerModel这个多出来的其实只有InstructBlipQFormerEmbeddings这个东西,而这个的实现也比较简单,简单来说就是把多出来的Instruction产生的embedding在seq这个维度拼在Query后面,具体可以看InstructBlipQFormerEmbeddings这个类里面的代码
mPlug

来自于阿里mPLUG-2: A Modularized Multi-modal Foundation Model Across Text, Image and Video,主要2个改进点:
- Local Temporal Modeling : 对视频帧多一个Local Temporal Modeling处理时序信息,在多帧间局部使用3D卷积进行交互,全局使用注意力机制来交互
- Universal Layers Module: 文本和视觉共用self-attn和ffn部分,视觉序列用了Learnable Queries压缩,多一个CrossAttn。这里文本和视觉没有直接交互只是共用了参数,paper将这部分的作用描述为“将文本和视觉在统一语意空间中编码”,消融上看这一操作是有效的
Lynx
来自于字节的https://mp.weixin.qq.com/s?__biz=MzA3MzI4MjgzMw==&mid=2650884047&idx=3&sn=28fa9f6c91cff61f1a720f362c5fa79f&chksm=8504e7ad3f43bb4b764047fcf4e0f0f325cd41cfe75ef2676d3d4286606e7cbebf25cbb96b7f#rd
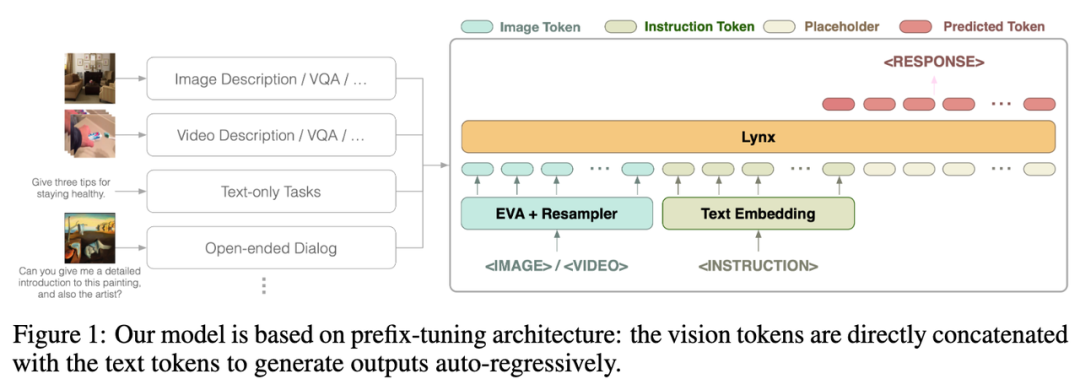
视觉输入经过视觉编码器处理后得到视觉令牌 (tokens) ,经过映射后与指令 tokens 拼接作为 LLMs 的输入,在本文中将这种结构称为「prefix-finetuning」以区别于如 Flamingo所使用的 cross-attention 结构。
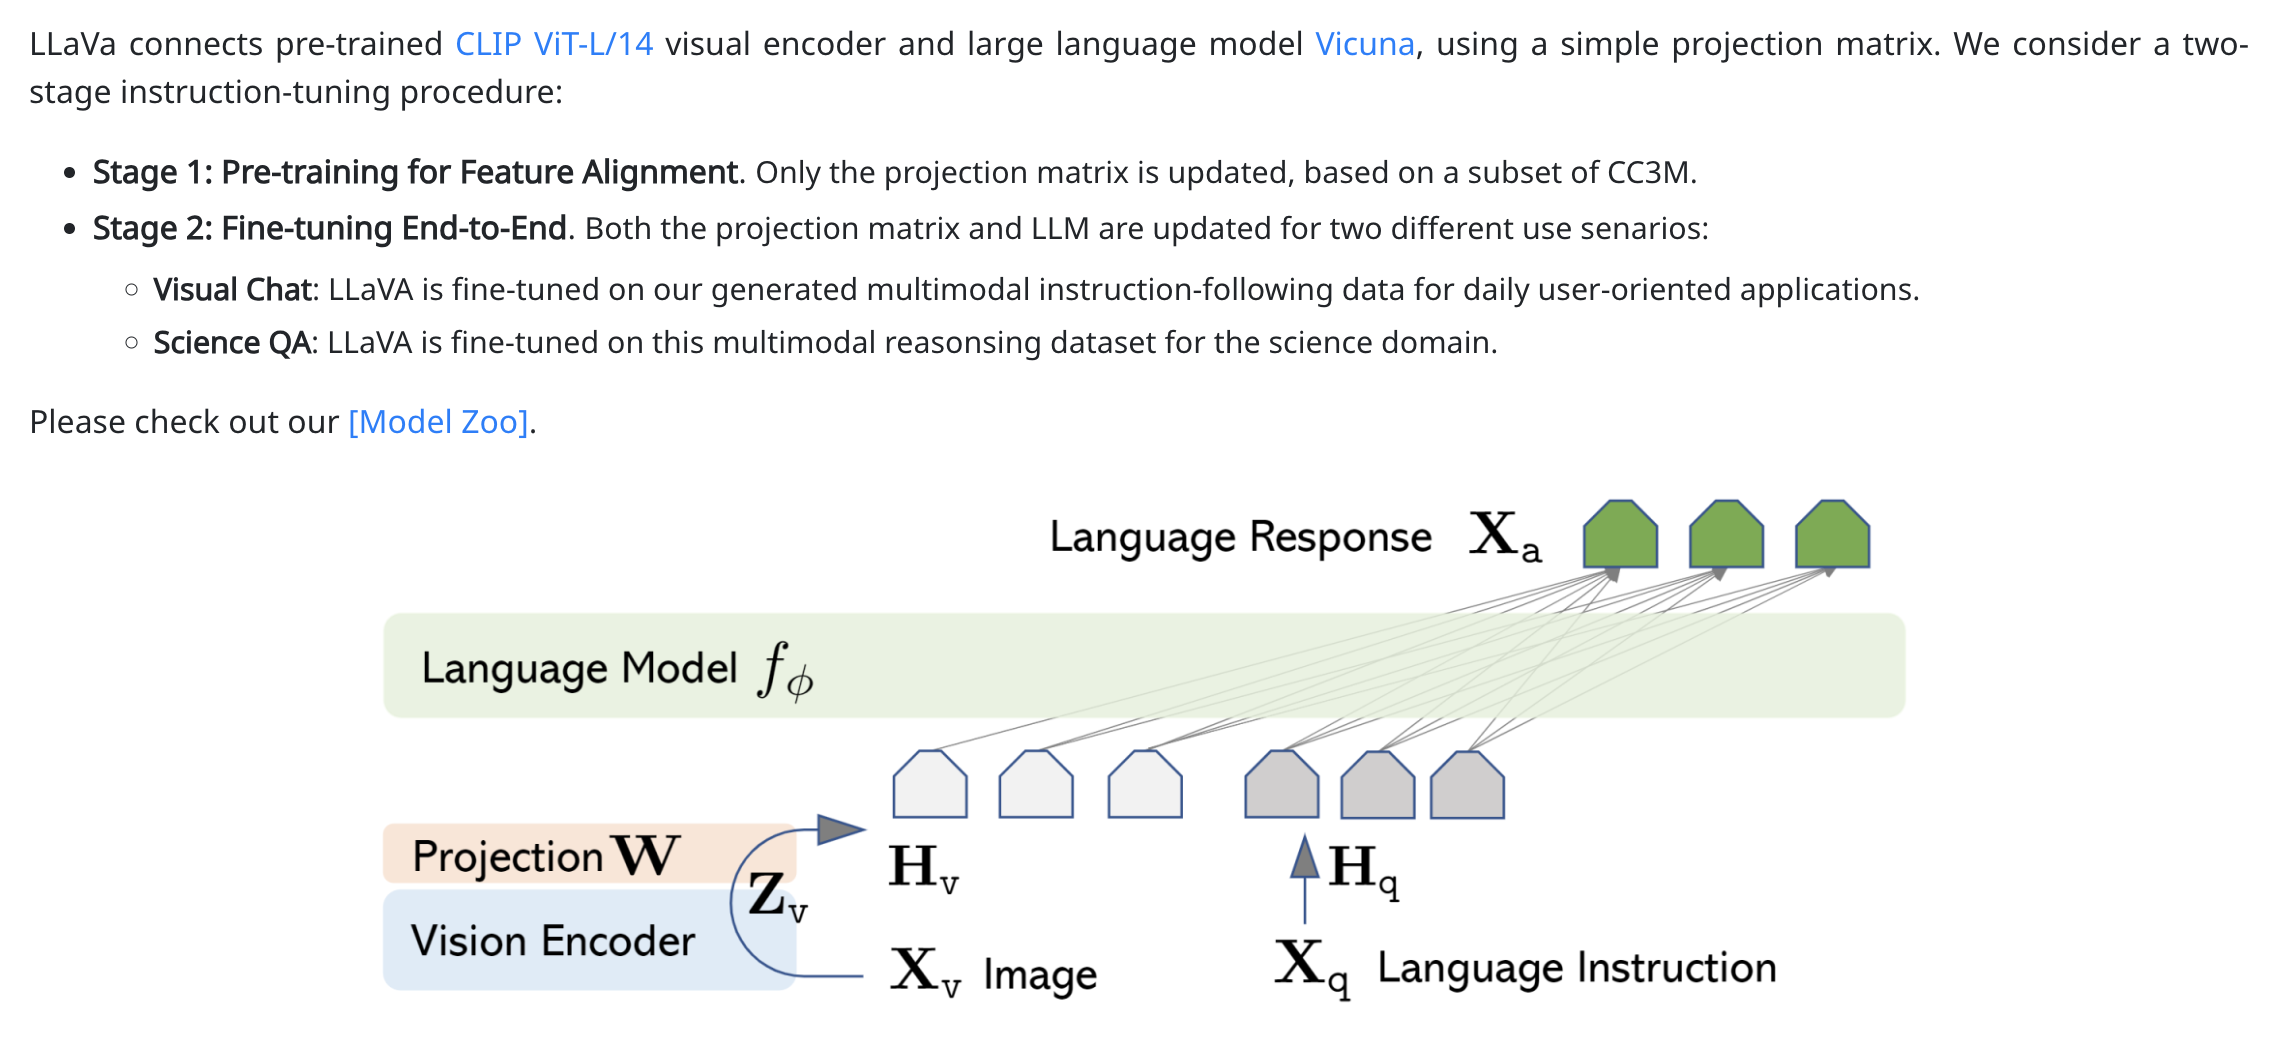
LLava->Valley
LLava(https://llava-vl.github.io/,来自Wisconsin团队)->Valley(视频版本的LLava,https://arxiv.org/pdf/2306.07207.pdf,来自Bytedance团队),LLaVA的思想比较简单,仅用Linear Layer来连接文本embedding和CV embedding:
LLava 1.5
来自 https://arxiv.org/pdf/2310.03744,结构与LLaVA相同,每个模块做了升级
- Visual Encoder: CLIP ViT-L/336px
- Language Model: Vicuna v1.5 13B
- Connector: 受到自监督学习中线性映射到MLP的升级,将视觉转换文本token模块也替换为2层MLP
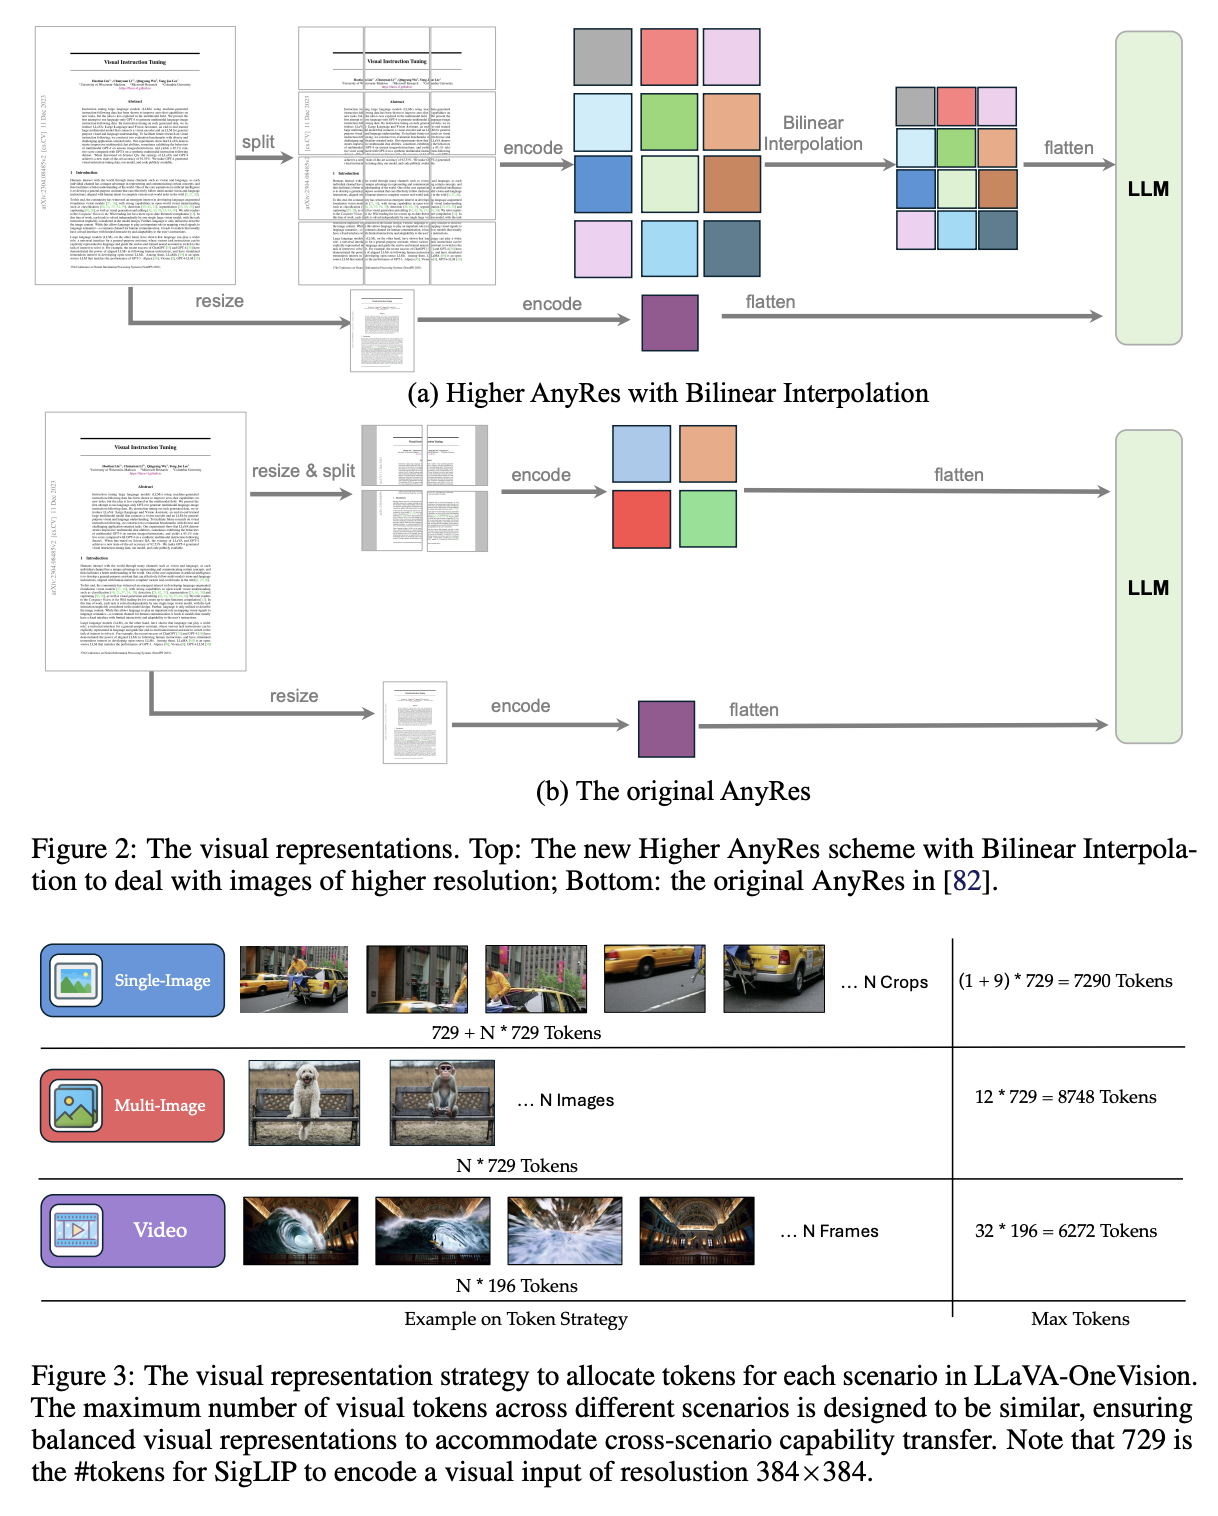
LLava-1.6(LLava One Vision,也是LLava Next系列博客的集合)
LLaVA-NeXT是LLaVA系列多模态大模型的重大升级版本,其核心改进可概括为以下几个方面,博客来自https://arxiv.org/pdf/2408.03326:
动态高分辨率支持
通过"AnyRes"技术将输入图像分辨率提升至4倍(最高支持672x672、336x1344等比例),采用网格化分割策略处理任意分辨率图像。这种设计在保持数据效率的同时,显著提升对图像细节的捕捉能力,减少低分辨率导致的幻觉现象。
混合数据增强
重构视觉指令调优数据集,用DocVQA和SynDog-EN替代TextCaps以强化OCR能力,新增ChartQA、DVQA等数据集提升图表理解。同时整合15K真实用户场景的对话数据,通过GPT-4V生成高质量响应,覆盖更广泛的应用场景。
多模态主干扩展
支持Mistral-7B、Nous-Hermes-2-Yi-34B等更强LLM,并首次兼容Qwen-1.5-110B和LLaMA3等大模型,继承其世界知识与逻辑推理能力。通过线性扩展技术突破LLM的token长度限制,实现从图像到长视频(56帧)的模态迁移。
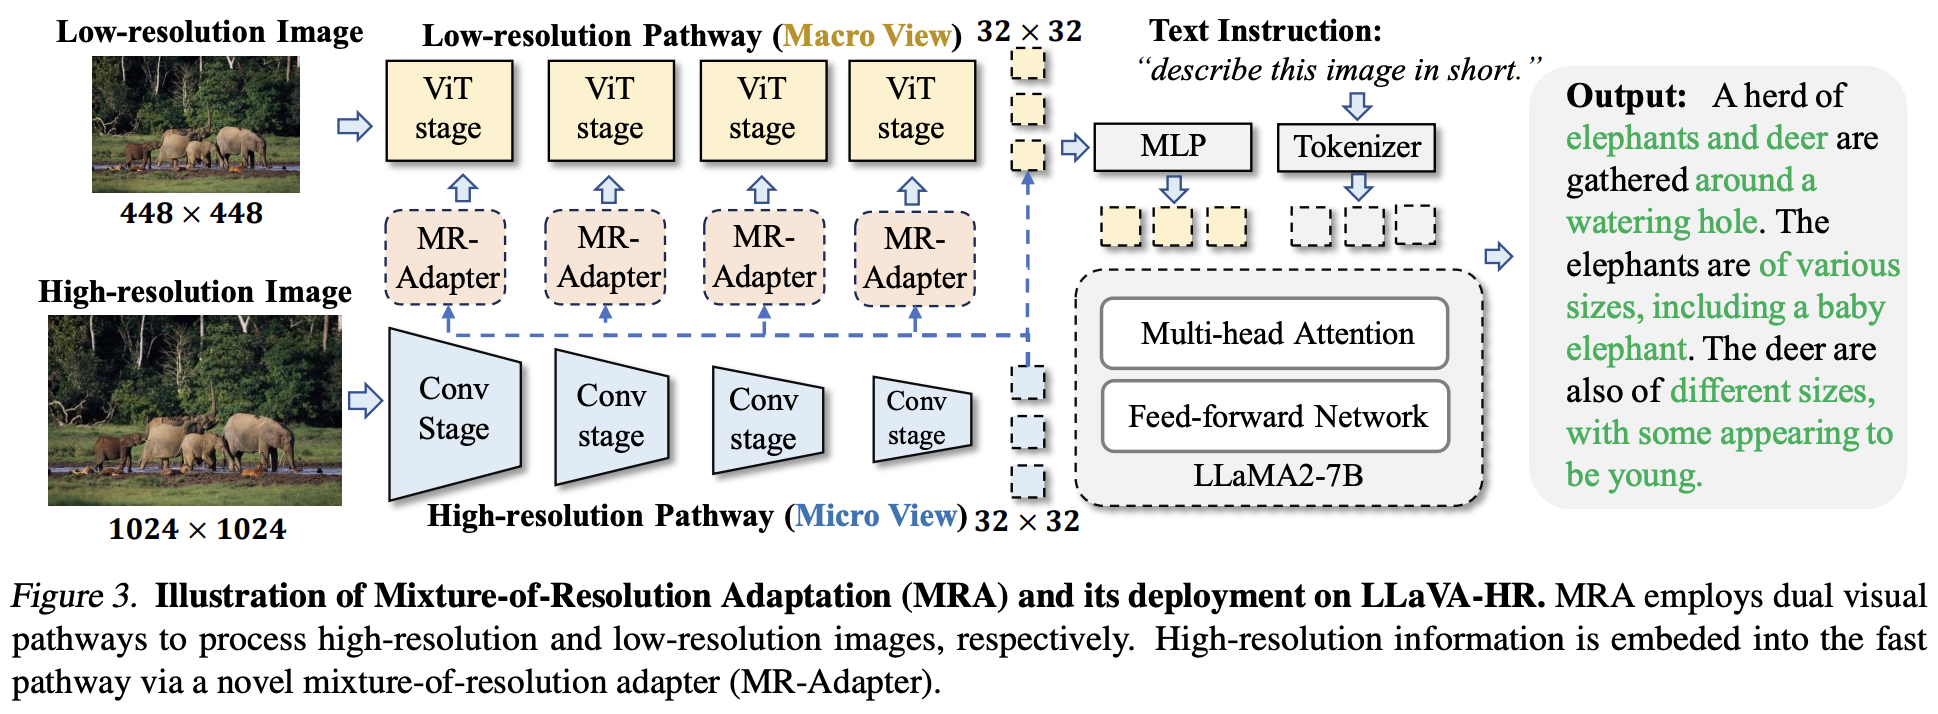
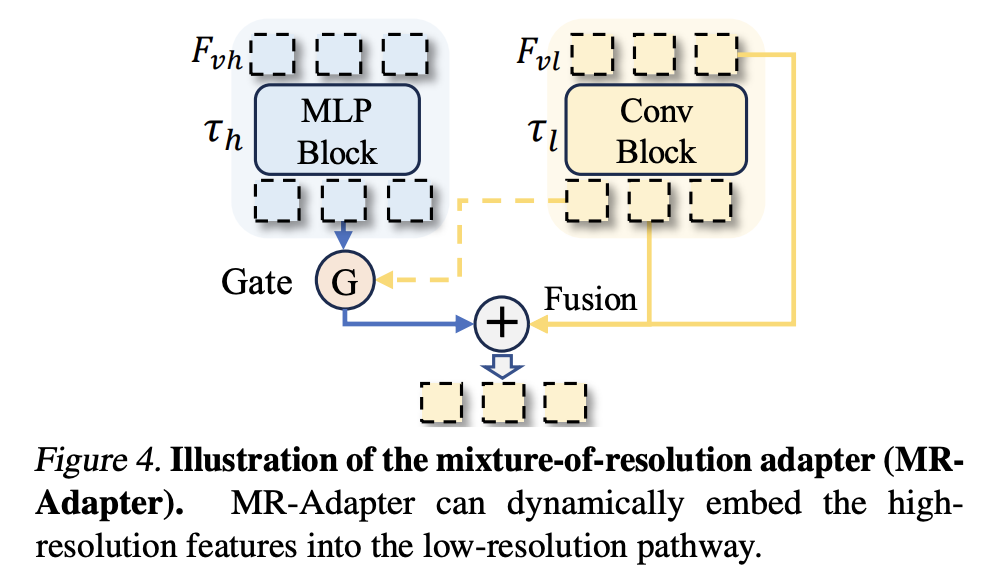
LLaVA-HR
- MRA核心就是通过双通路设计把高分辨率信息嵌入低分辨率信息进行融合,从而可以通过更少量的视觉tokens获取更丰富更细粒度的视觉信息
- 提出Mixture-of-Resolution Adaptation模块,可以无需scaling up数据规模/视觉编码器的条件下,低成本提升细粒度识别能力
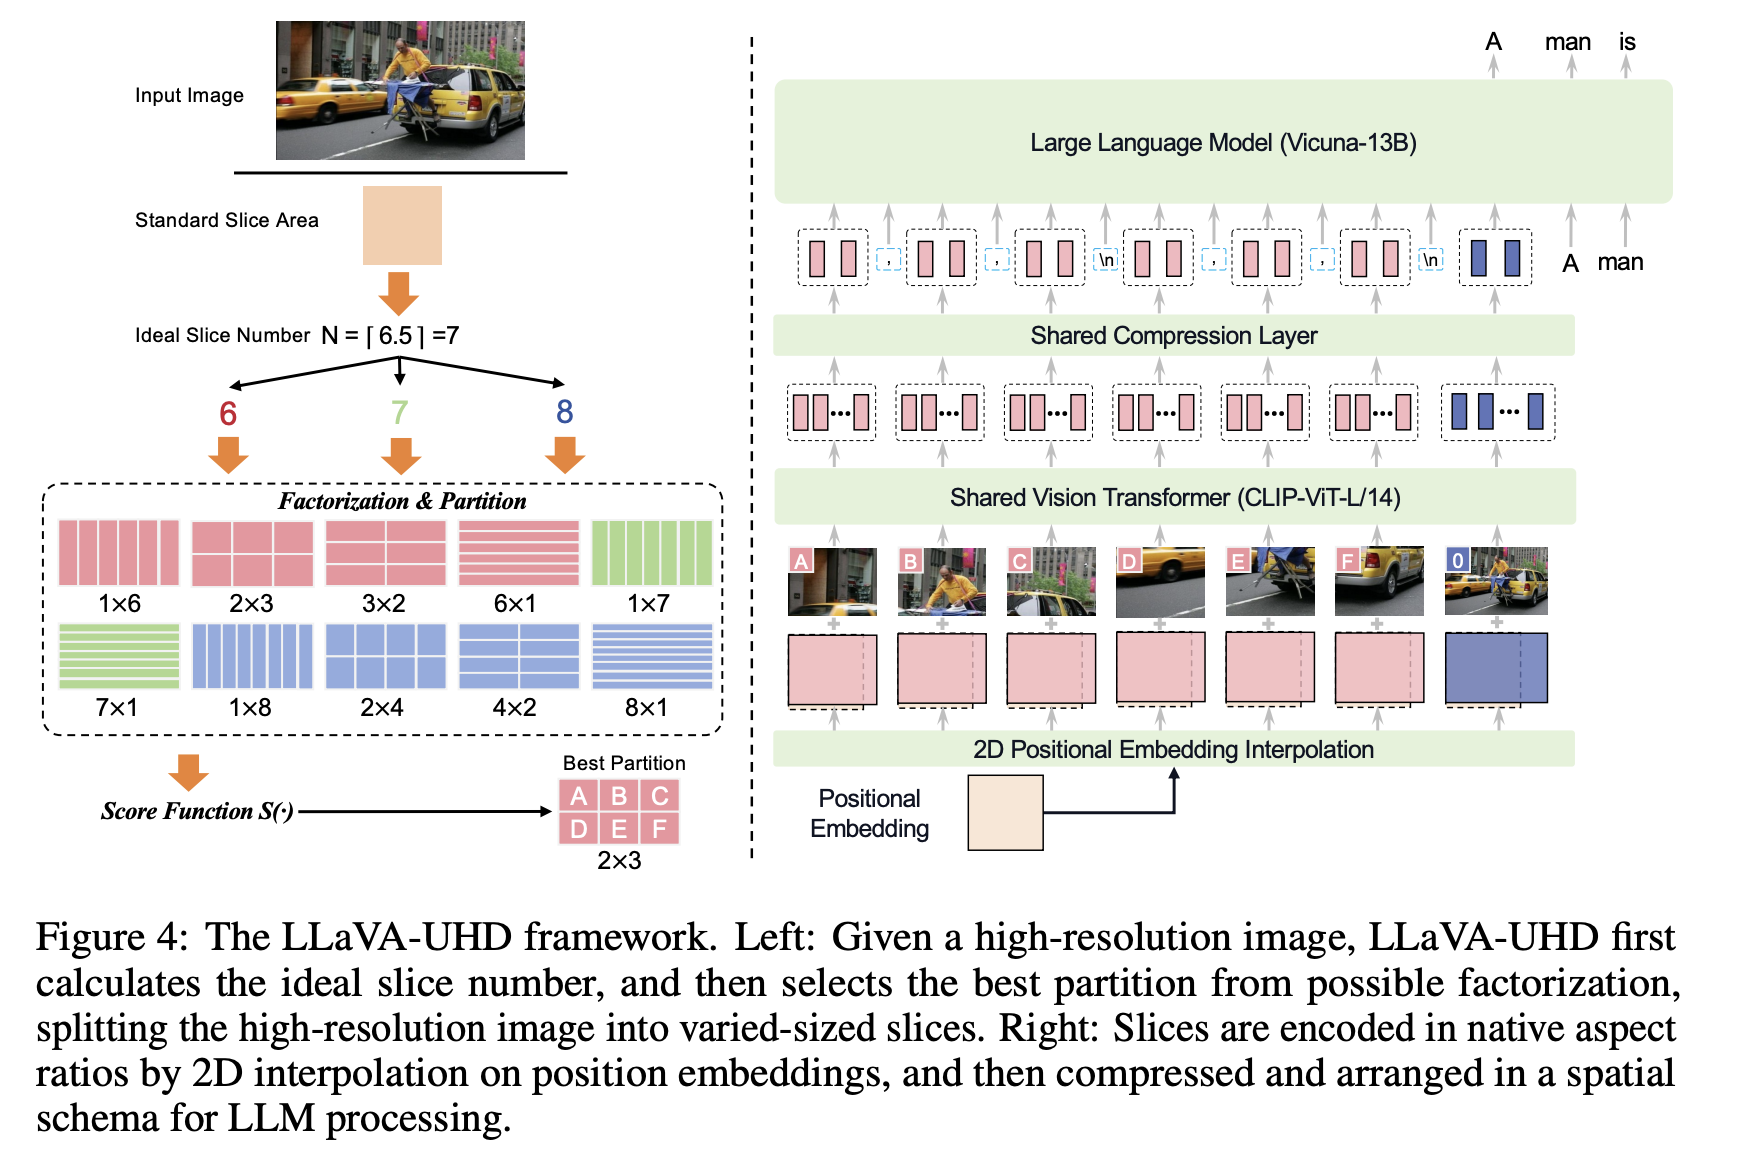
LLaVA-UHD(Ultra High Definition)
来自https://arxiv.org/pdf/2403.11703.pdf,使用一个算法自动将大分辨率图片分割为几个小图片,小图片的纵横比需要比较符合vit原本的纵横比,切换发现和Vit的Shape没法完全对上再去插个值,再使用cross attn 来减少tokens
LLaVA-UHD一个关键的点是用不同的slide number来取代padding,用padding的缺点用原来说就是Another issue of padding is that, the model essentially cannot know whether the padding-like pixels come from image pre-processing or an actual part of the original input image. To demonstrate this issue, we synthesize a series of input images as in Fig. 3(right), where blue/green/red rectangles in various aspect ratios are surrounded by grey (i.e., the color of LLaVA-1.5’s padding RGB value). Given the input image, we prompt: “What is the color of the left/right/top/bottom most area?” From the results in Fig. 3(left), we observe that LLaVA-1.5 neglects the grey input areas (considering them
as padding), and faithfully responds with the color of the central rectangle.
另外LLava-UHD的Related Work部分对Any Resolution方案的总结还是非常清楚的, High-resolution LMMs. To perceive images with higher resolutions, recent work can be divided into four categories:
- Up-Resize. Qwen-VL [5] interpolates the positional embedding of ViT from 224×224 to 448×448 and additionally executes a training stage to fine-tune the ViT. CogAgent [17] and LLaVA-HR [31] marries a large low-resolution encoder with a small high-resolution image. MiniGPT-v2 [7] only resizes the positional embeddings without fine-tuning the visual encoder during 10 instruction tuning. These methods dramatically change the original visual position encoding of CLIP-ViT [34], which can cause sub-optimal visual representation.
- Fix+Crop. To address the above issue, SPHINX [24] utilizes a fixed window size (224×224) to crop a padded image (448×448) into four slices, and concatenates them with a down-sampled 224×224 image as visual inputs. Monkey [23] follows this idea yet increases the accessible image size to 896×1344, and converts each slice using a shared resampler.
- Fix+Enumerated-Crop. UReader [42], LLaVA-1.6 [26] and infiMM-HD [25] enumerate a similar aspect ratio to resize, rather than using a fixed square ratio (e.g., 2×2 as in SPHINX [24]). The unavoidable image resizing and padding operation might cause image deformation and waste of computation, respectively.
- Any. Fuyu-8B [6] and Otter-HD [20] directly utilize LLMs to encode visual features instead of vision transformers. They just split images into patches and project them using linear layers before feeding into the LLM. Regarding image patches as a sequence enables itself to process images with continuous resolution. However, the removal of an image encoder means insufficient visual representation, which makes these methods limited in unsatisfactory performance.
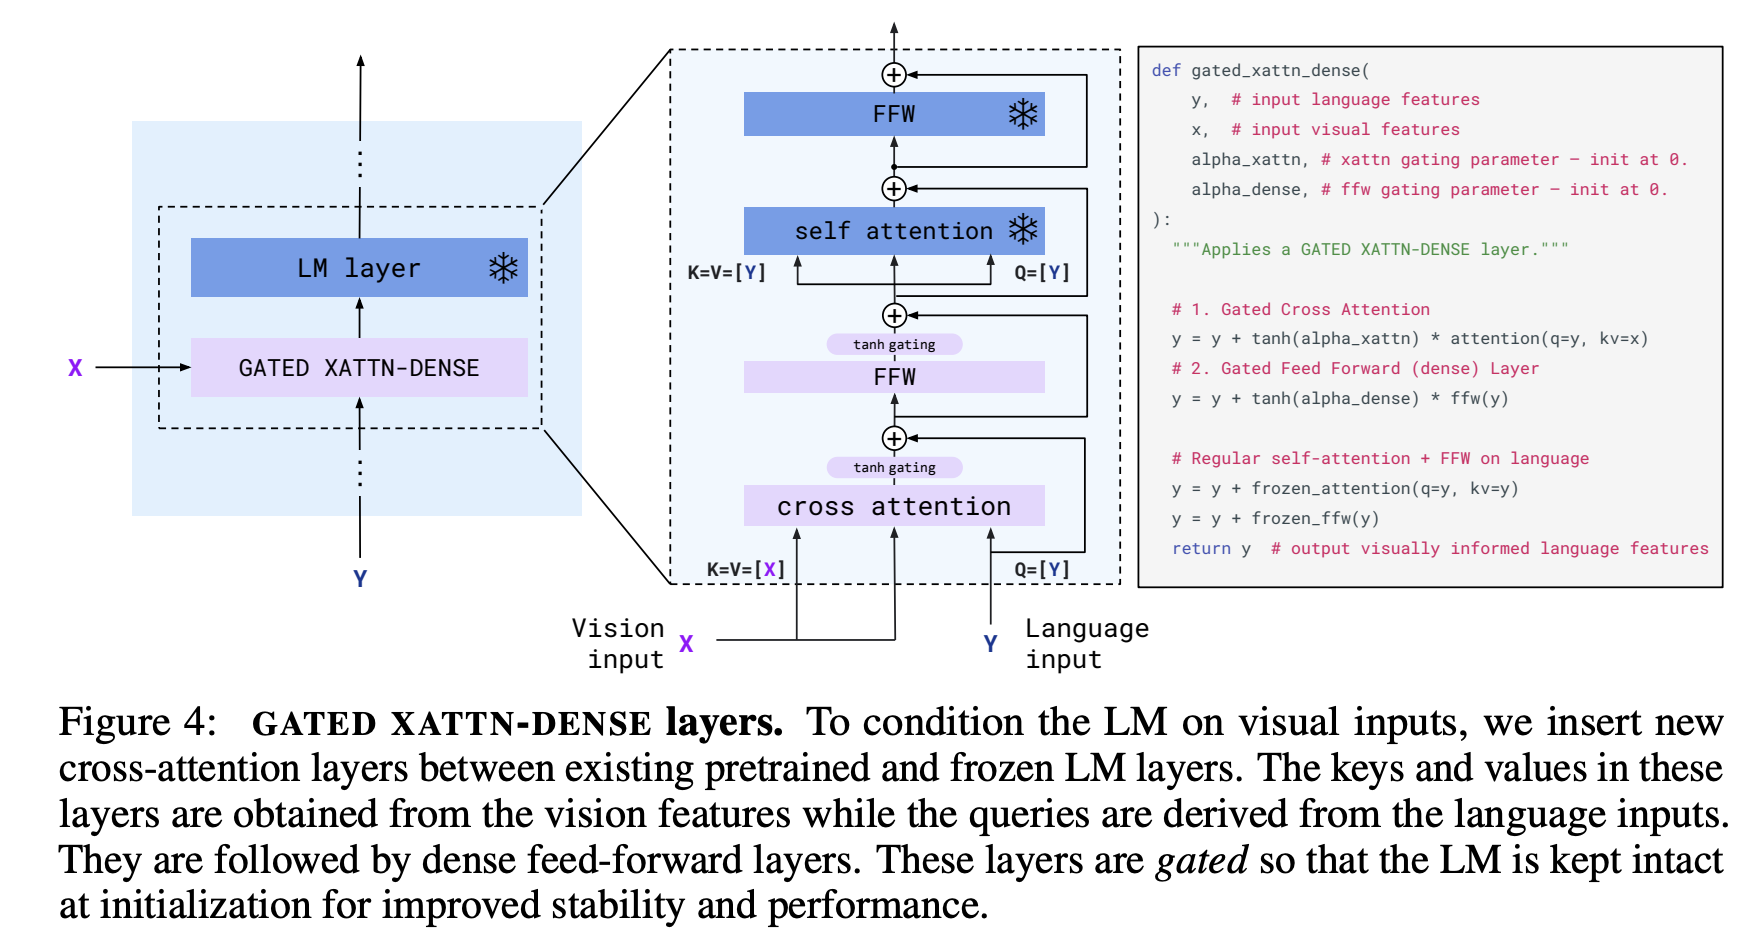
Flamingo->Otter->CogVLM
Flamingo(https://arxiv.org/abs/2204.14198,来自Deepmind团队)->Otter(视频版本的Flamingo,https://arxiv.org/pdf/2306.05425.pdf,来自微软团队)
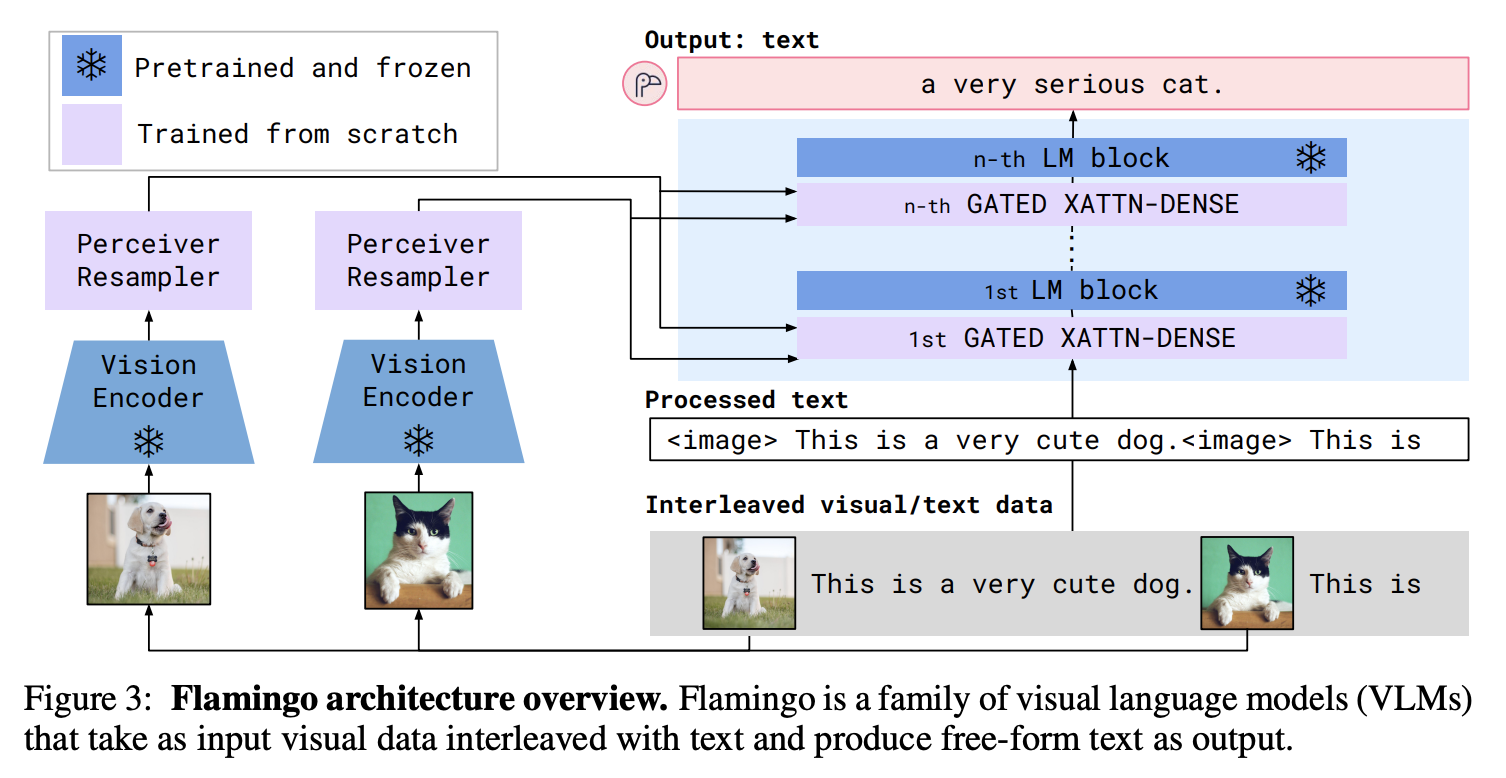
和LLaVa的文本、图片交互方式相比,Flamingo选择在现有预训练并冻住的大语言模型层之间插入Cross Attention Layer来连接文本embedding和CV embedding,Votta在实践中经常出现幻觉,而且Votta的论文中也没有在VQAv2等权威数据集上对比结果,VQA能力成疑
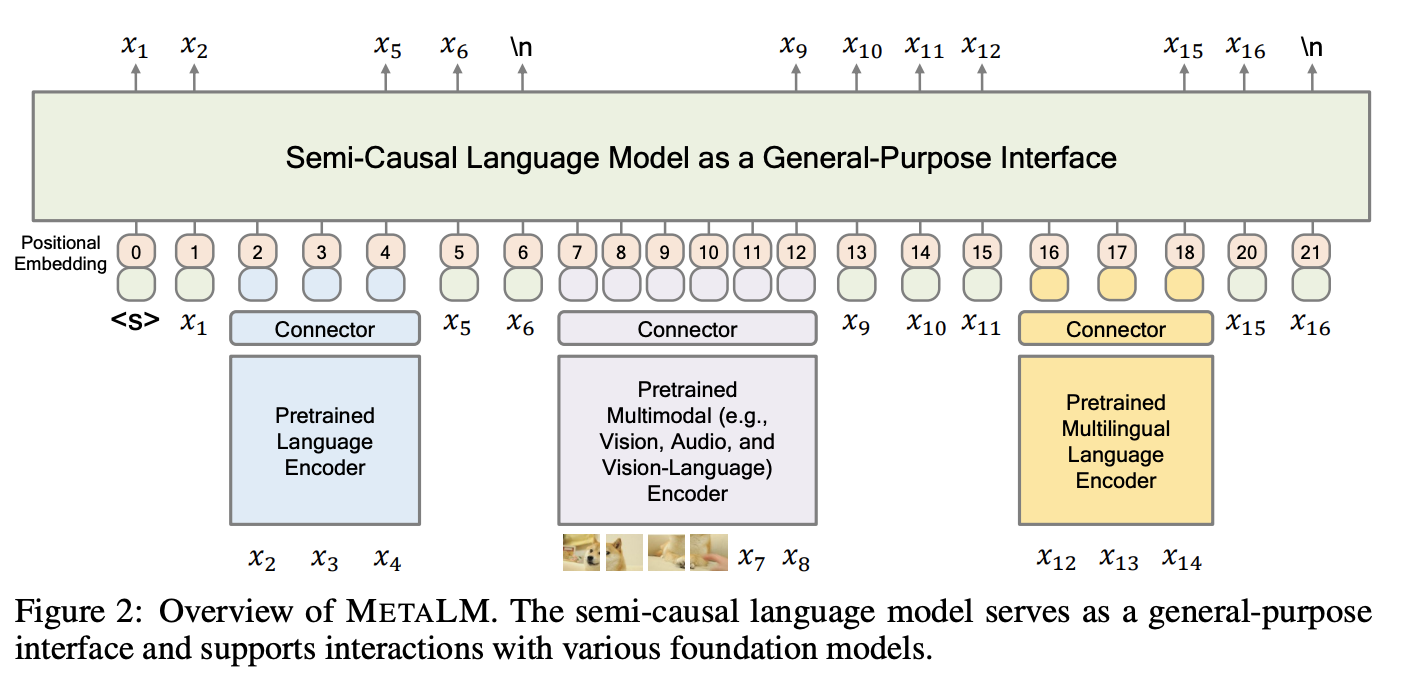
MetaLM->Kosmos系列
MetaLM(https://arxiv.org/pdf/2206.06336.pdf)->Kosmos系列(https://arxiv.org/pdf/2306.14824.pdf),这个系列来自Microsoft的Furu Wei团队,MetaLM更期待把文本、CV、语音、目标检测等一系列任务统一融合到semi-causal LM的框架内。从VQA任务的目前表现来看不如之前的Beit-3,而且Kosmos2更注重grounding任务和多模态任务的融合,期待Kosmos3可以有所突破
MAGVIT-v2(LANGUAGE MODEL BEATS DIFFUSION — TOKENIZER IS KEY TO VISUAL GENERATION)
几个关键改进点(部分转载自https://zhuanlan.zhihu.com/p/676289469):
LFQ(Lookup-Free Quantization)
对比LLM的生成能力,有一个朴素的想法就是要加大词表同时减少一个token的表达能力,所以最直接做法就是减少token的维度加大词表数目,在文中作者一步到位直接把token的维度减少为0(可以认为token就是离散的整数),回想VQVAE中,code(token)是一个向量,decode生成图像时用的向量是code表中距离最近的向量(不是encode生成的向量,所以有损),而整数的token直接查找避免损失,文中称这种做法为LFQ(无量化查找)

具体看一个例子,例如z = [-0.3, 0.1], index(z) = 2,VQVAE是需要一个码表的,但是MAGVIT-V2不需要和codebook算相似度,所以叫做look-up free codebook:

对图片encoder的改进(Monkey和Vary)
Monkey来自Image Resolution and Text Label Are Important Things for Large Multi-modal Models
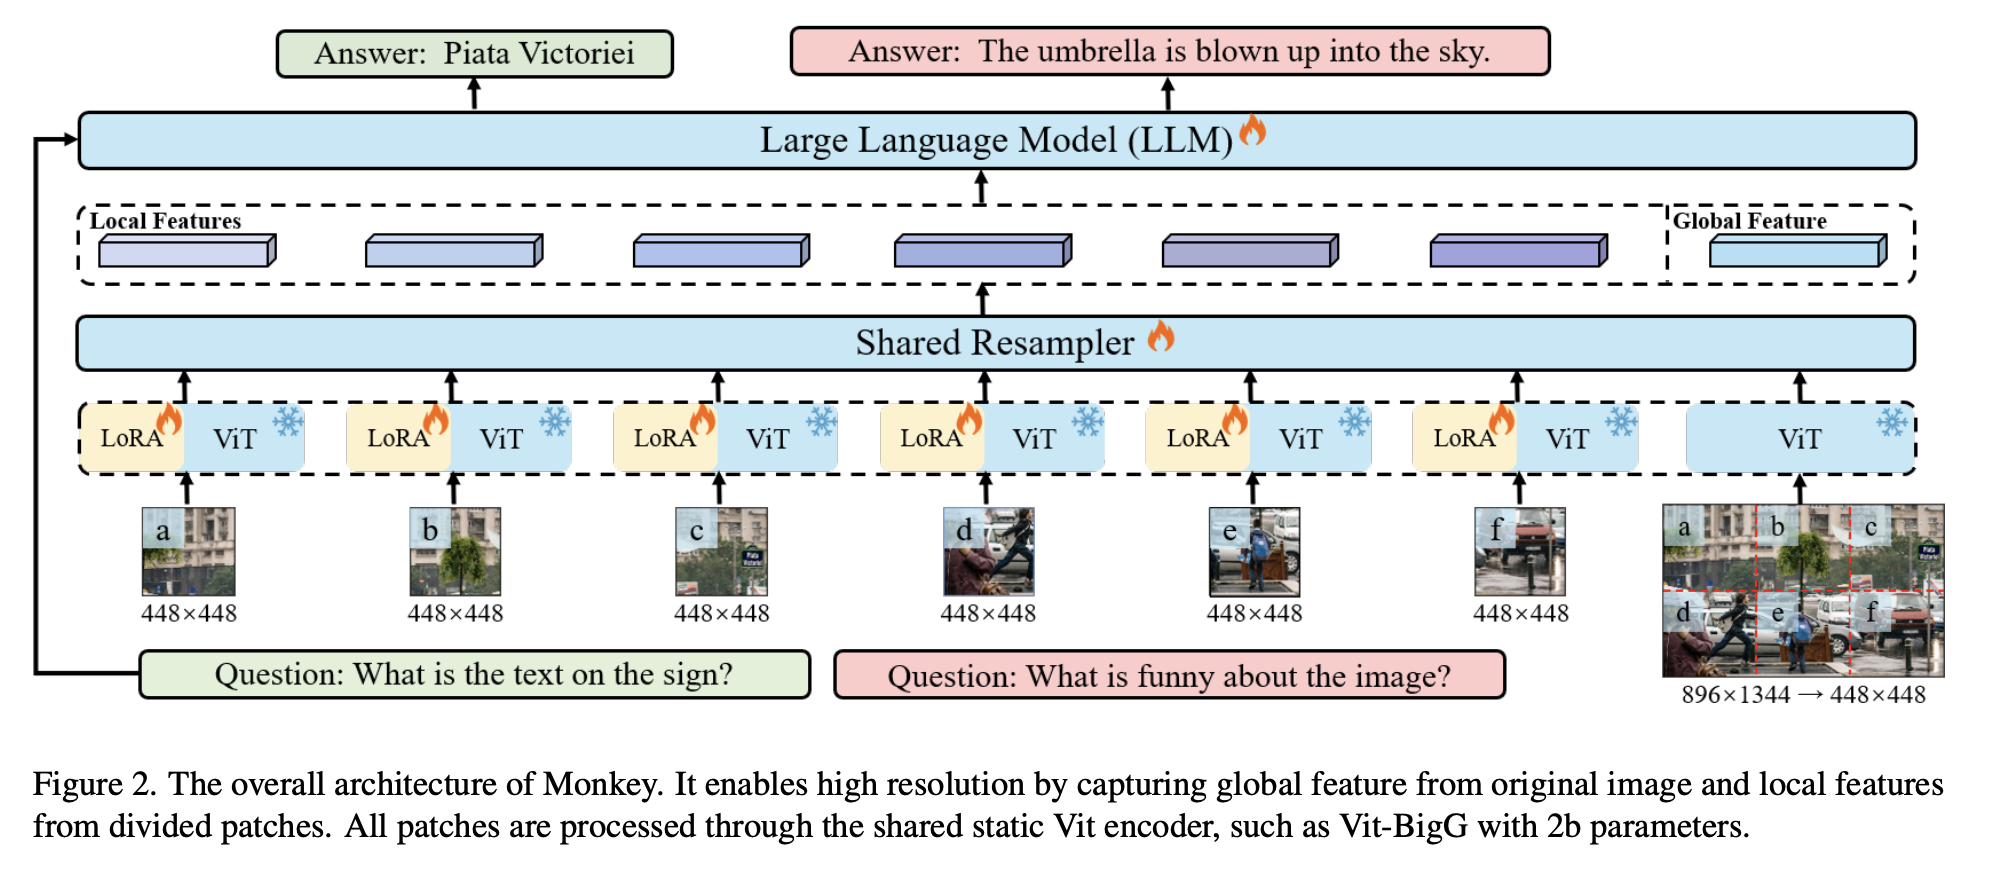
- 全局描述生成: Monkey使用BLIP2对整张图生成全局描述,并且使用CC3M原始标注作为全局描述的补充。
- 区域框和对应描述生成:Monkey使用 GRIT生成区域框,并提供区域中对象的名称和详细描述,包括它们的属性、动作和数量等信息。同时为了提取图像中的文本信息,还会使用PPOCR提取图像中的文本框坐标和文本内容。
- 分割图和对应描述生成:首先使用SAM模型提取图像中各个物体及其组成部分的分割图,然后利用分割图将物体抠出,送入BLIP2生成对各个物体及其组成部分的详细描述。
- 过滤低质量局部描述:由于在zero-shot场景中模型难免会生成低质量的标注,为了确保局部描述的正确性,Monkey还使用BLIP-2 评估图像区域、对象及其描述性文本之间的一致性,过滤掉低分匹配。
- ChatGPT总结:在最后阶段,将全局描述、过滤后的区域框和对应描述、过滤后的分割图和对应描述及其坐标输入 ChatGPT API 中总结。并让ChatGPT考虑各个物体之间的位置关系及其相互关联。
Vary来自Vary: Scaling up the Vision Vocabulary for Large Vision-Language Models
该论文主要的贡献就是在原来视觉编码器的基础上新加入了一个ViTDet,并且这个ViTDet是通过自回归预训练过的。这样既避免了遗忘的问题,又解决了文档图片分辨率高的问题(ViTDet支持1024输入)。
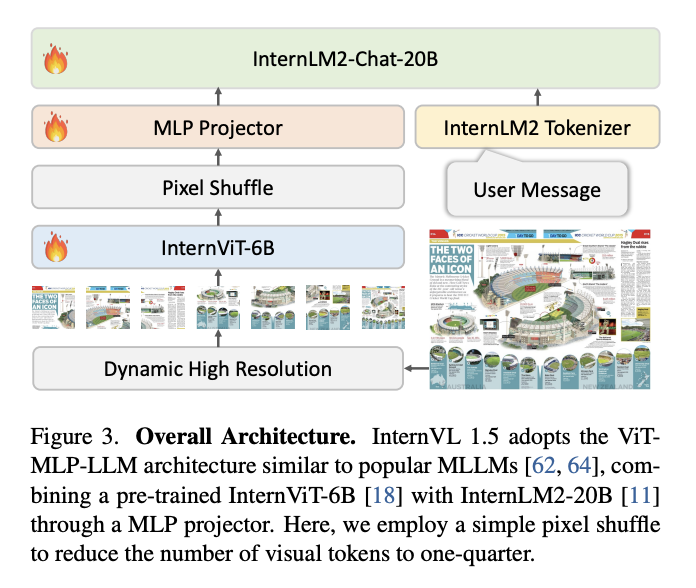
InternVL 1.5
来自How Far Are We to GPT-4V?
Closing the Gap to Commercial Multimodal Models with Open-Source Suites 这篇,主要的一点特点:
- Strong Vision Encoder:6B的InternViT配20B的InternLM2-Chat
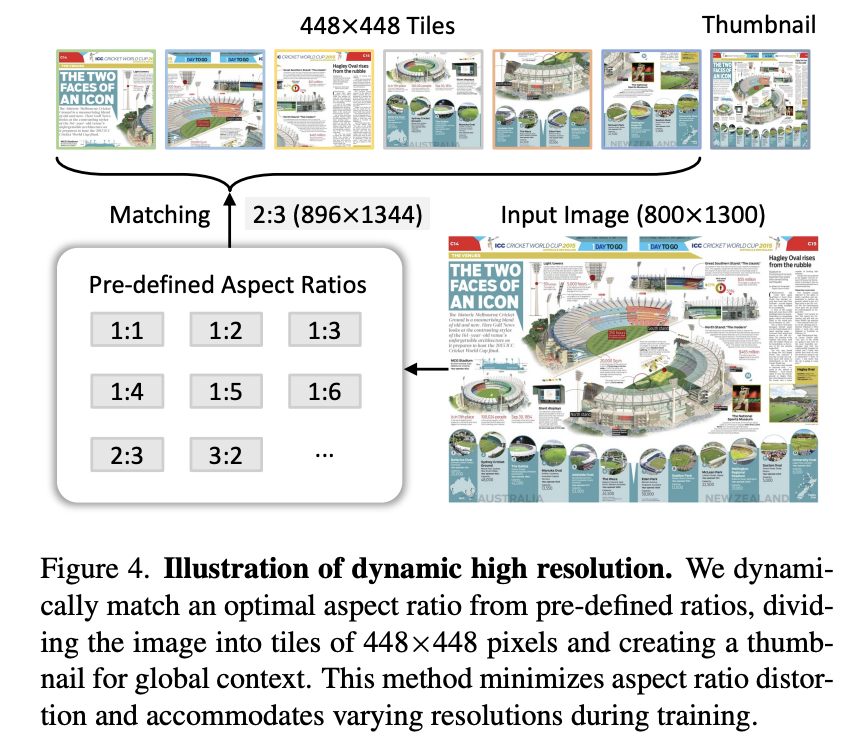
- Dynamic HighResolution: we divide images into tiles ranging from 1 to 40 of 448×448 pixels according to the aspect ratio and resolution of the input images, which supports up to 4K resolution input
- pixel shuffle: To enhance scalability for high resolution, we simply employed
a pixel shuffle operation to reduce the number of visual tokens to one-quarter of the original. Therefore, in our model, a 448×448 image is represented by 256 visual tokens. 这里说的pixel shuffle实际上就是减少空间增加通道,数据维度变化:[N, W, H, C] -> [N, Ws, Hs, C//(s^2)](当s>1时,则实现上采样;当s<1时,则实现下采样)。448×448 image在patch size是14×14的情况下应该得到(448/14)×(448/14)=32×32=1024个tokens,通过pixel shuffle后1024个tokens再过一个linear就成了256个tokens。pixel shuffle和pooling相比的主要好处是可以增加通道内的交互。贴一点关于pixel shuffle的代码,写的非常墨迹,还是einops的rearrange会好看点:
    def pixel_shuffle(self, x, scale_factor=0.5):
        n, w, h, c = x.size()
        # N, W, H, C --> N, W, H * scale, C // scale
        x = x.view(n, w, int(h * scale_factor), int(c / scale_factor))
        # N, W, H * scale, C // scale --> N, H * scale, W, C // scale
        x = x.permute(0, 2, 1, 3).contiguous()
        # N, H * scale, W, C // scale --> N, H * scale, W * scale, C // (scale ** 2)
        x = x.view(n, int(h * scale_factor), int(w * scale_factor),
                   int(c / (scale_factor * scale_factor)))
        if self.ps_version == 'v1':
            warnings.warn("In ps_version 'v1', the height and width have not been swapped back, "
                          'which results in a transposed image.')
        else:
            x = x.permute(0, 2, 1, 3).contiguous()
        return x
InternLM-XComposer2-4KHD
主要亮点是\n特殊token,部分转载自 https://mp.weixin.qq.com/s/uT0hqiSjgdp6z1EB6Dp2uA
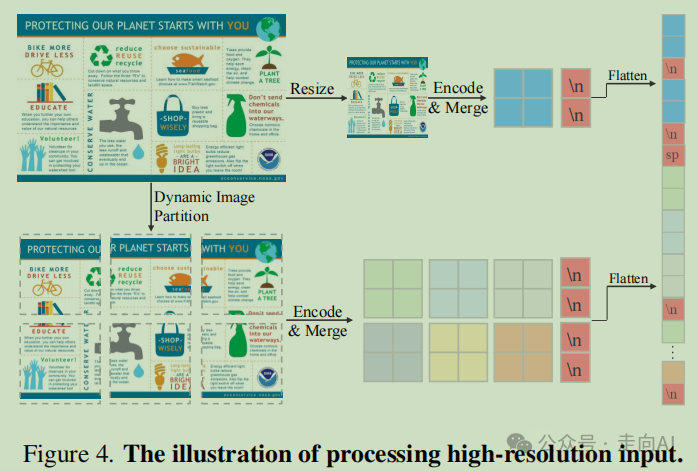
从表8的实验对比可以看出,\n 这个可学习分隔符,在 patch 非常多时候有用,HD-9 没啥用,因为模型可能能自动区分。表9展示了Token merge 策略效果,可以看到都差不多,这也是一个很有意思的发现,之前的方案,比如TextMonkey,DocOwl1.5, LLava-UHD等都专门弄了一个resampler的模块进来用于降低token数量,本文实验却表明简单的token merge和专门设计的resampler效果差不多。
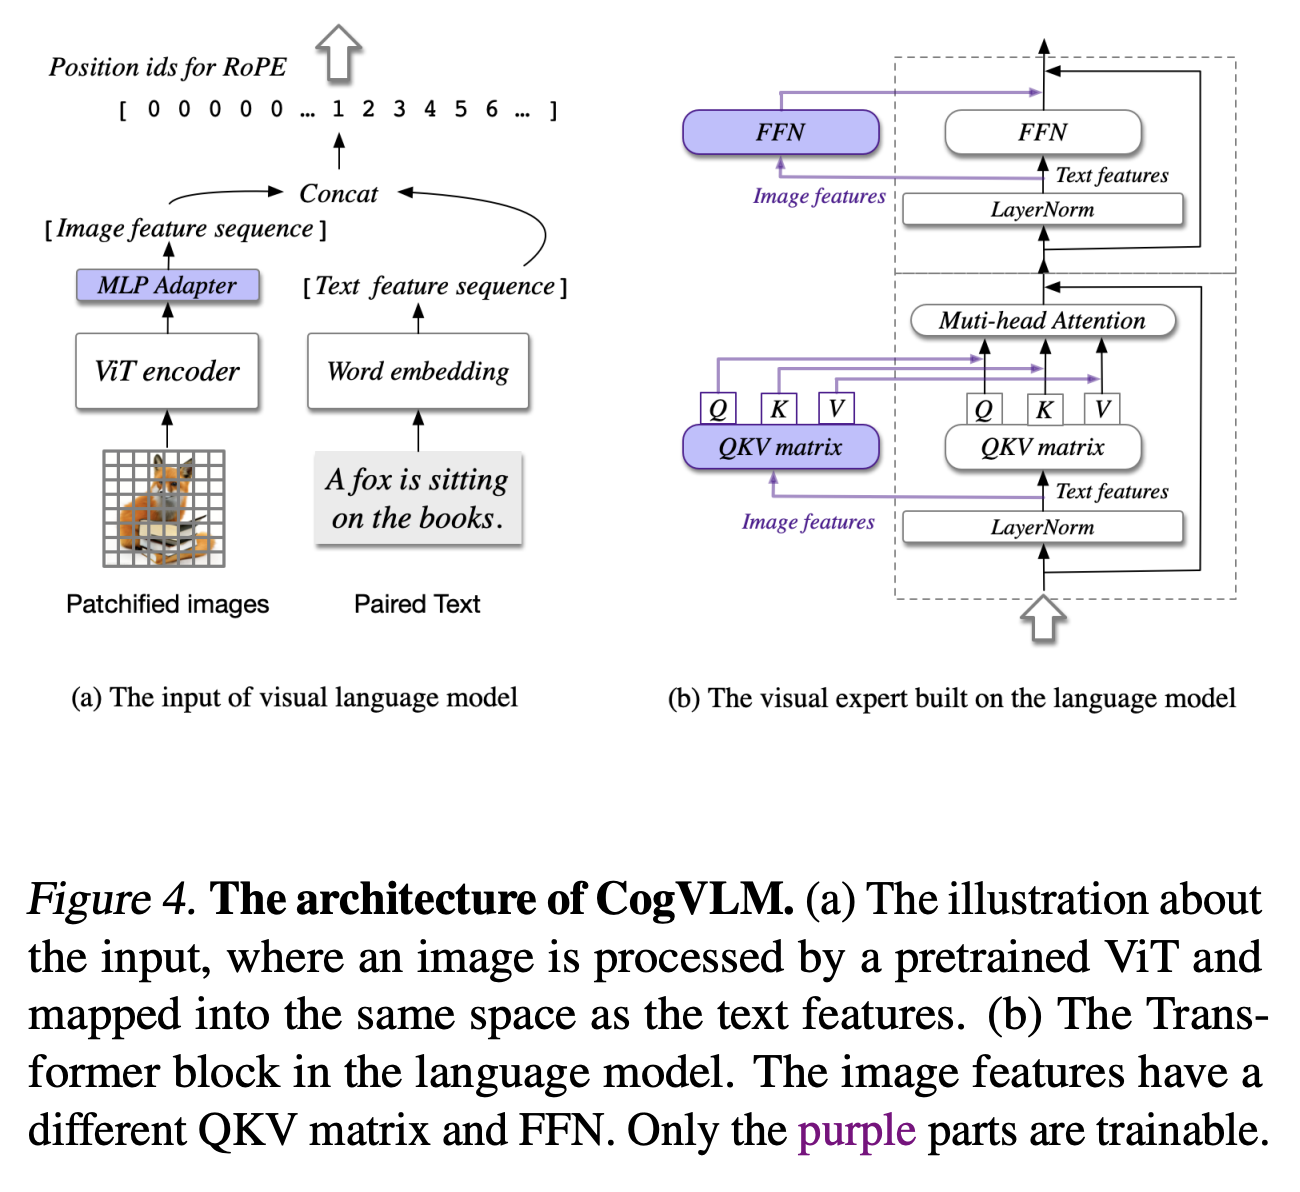
CogVLM
来自CogVLM: Visual Expert for Pretrained Language Models,主要特点是在每一层之间增加了 visual expert,增加视觉特征的参与。如图所示只有紫色部分是trainable的,CogVLMf模型和Perceiver这种在文本Attn中每一层中额外加一些文本和图片Attn的思路是一脉相承的,CogVLM模型和Perceiver这种在文本Attn中每一层中额外加一些文本和图片Attn的思路是一脉相承的,但是CogVLM模型更加强调在原始文本Attn外额外加一些文本和图片Attn从而不破坏原始文本Attn的效果
Qwen2.5-VL
来自 Qwen2.5-VL Technical Report 和 Qwen2-VL: Enhancing Vision-Language Model’s Perception
of the World at Any Resolution 和 Qwen-VL: A Versatile Vision-Language Model for
Understanding, Localization, Text Reading, and Beyond ,截止202504还是在OpenCompass上高居榜首,一些主要的特点:
三阶段训练
- 1阶段 数据全部为 图文对,有 1.5b
- 2阶段 主要是VQA、Caption等这些多任务
- 3阶段 SFT
在Qwen2中开始采用Navit修改Any Resolution
在Qwen2中开始实现MRope
主要注意下MRope的方式,可以参考旋转式位置编码Rotary Position Embedding(RoPE)

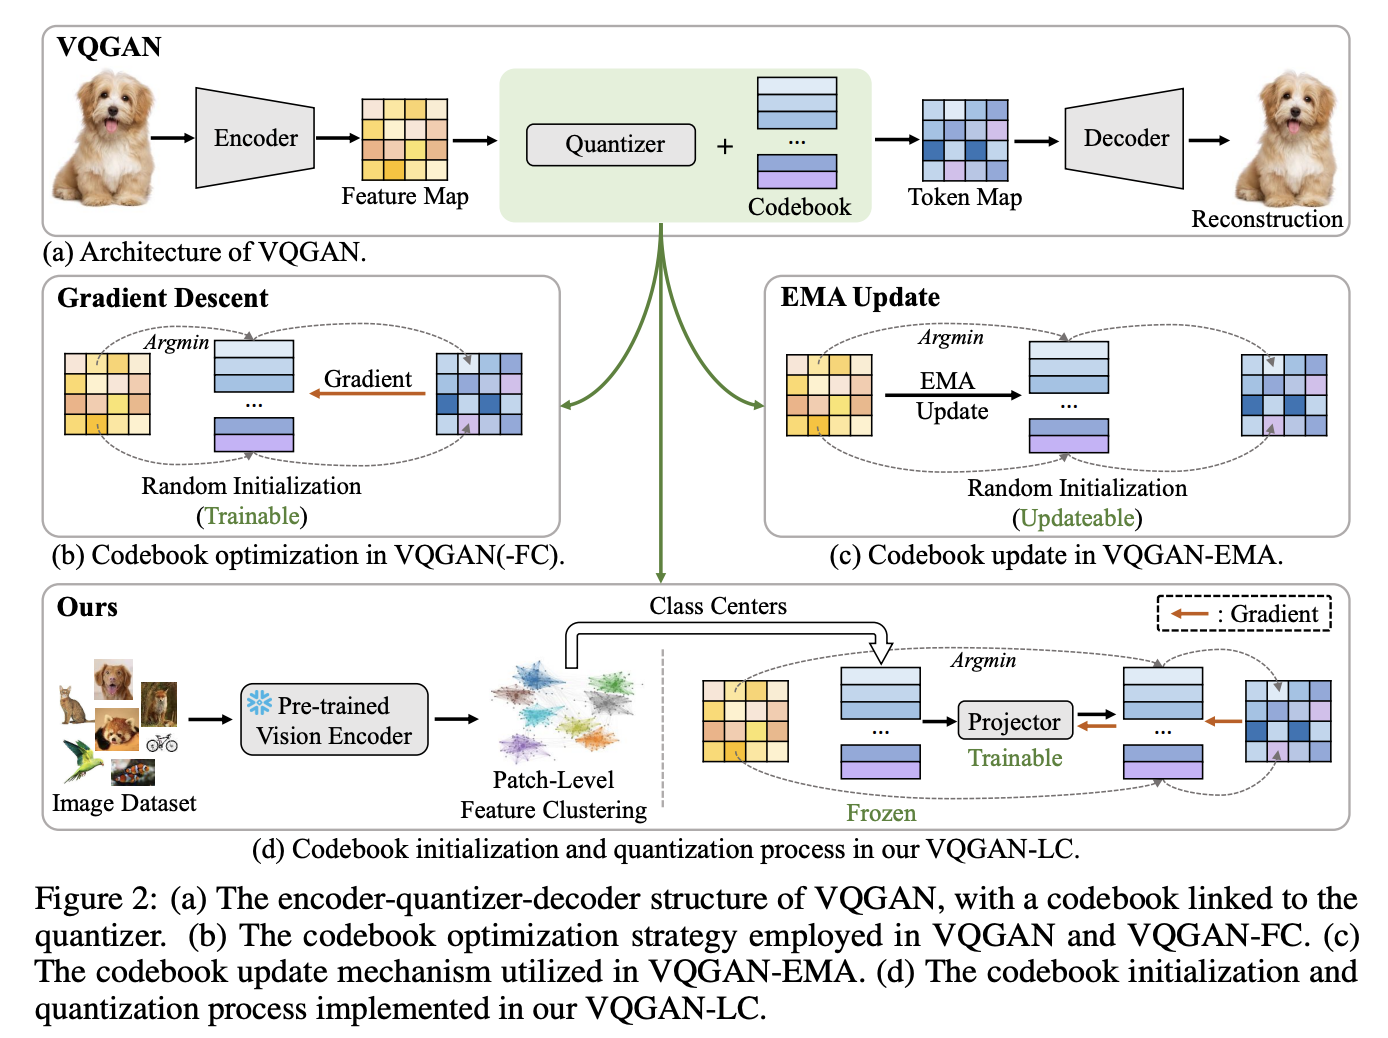
VQGAN-LC
来自于Scaling the Codebook Size of VQGAN to 100,000 with a Utilization Rate of 99%,VQGAN-LC(Large-Codebook)的关键点在于codebook不再是随机初始化,而是预先使用clip-vit feature经过kmeans聚类得到一个100k的cluster centroids。这100k个centroids在tokenizer的训练过程中是完全frozen的,只更新一个projector,将clip-vit feature的维度映射到任意想要的,最终codebook的维度。VQGAN-LC这样设计codebook的目的是为了保证codebook利用率接近100%,同时projector的更新影响所有的embedding entries,而不是像传统训练方式那样,每张图片只影响部分embedding entries。
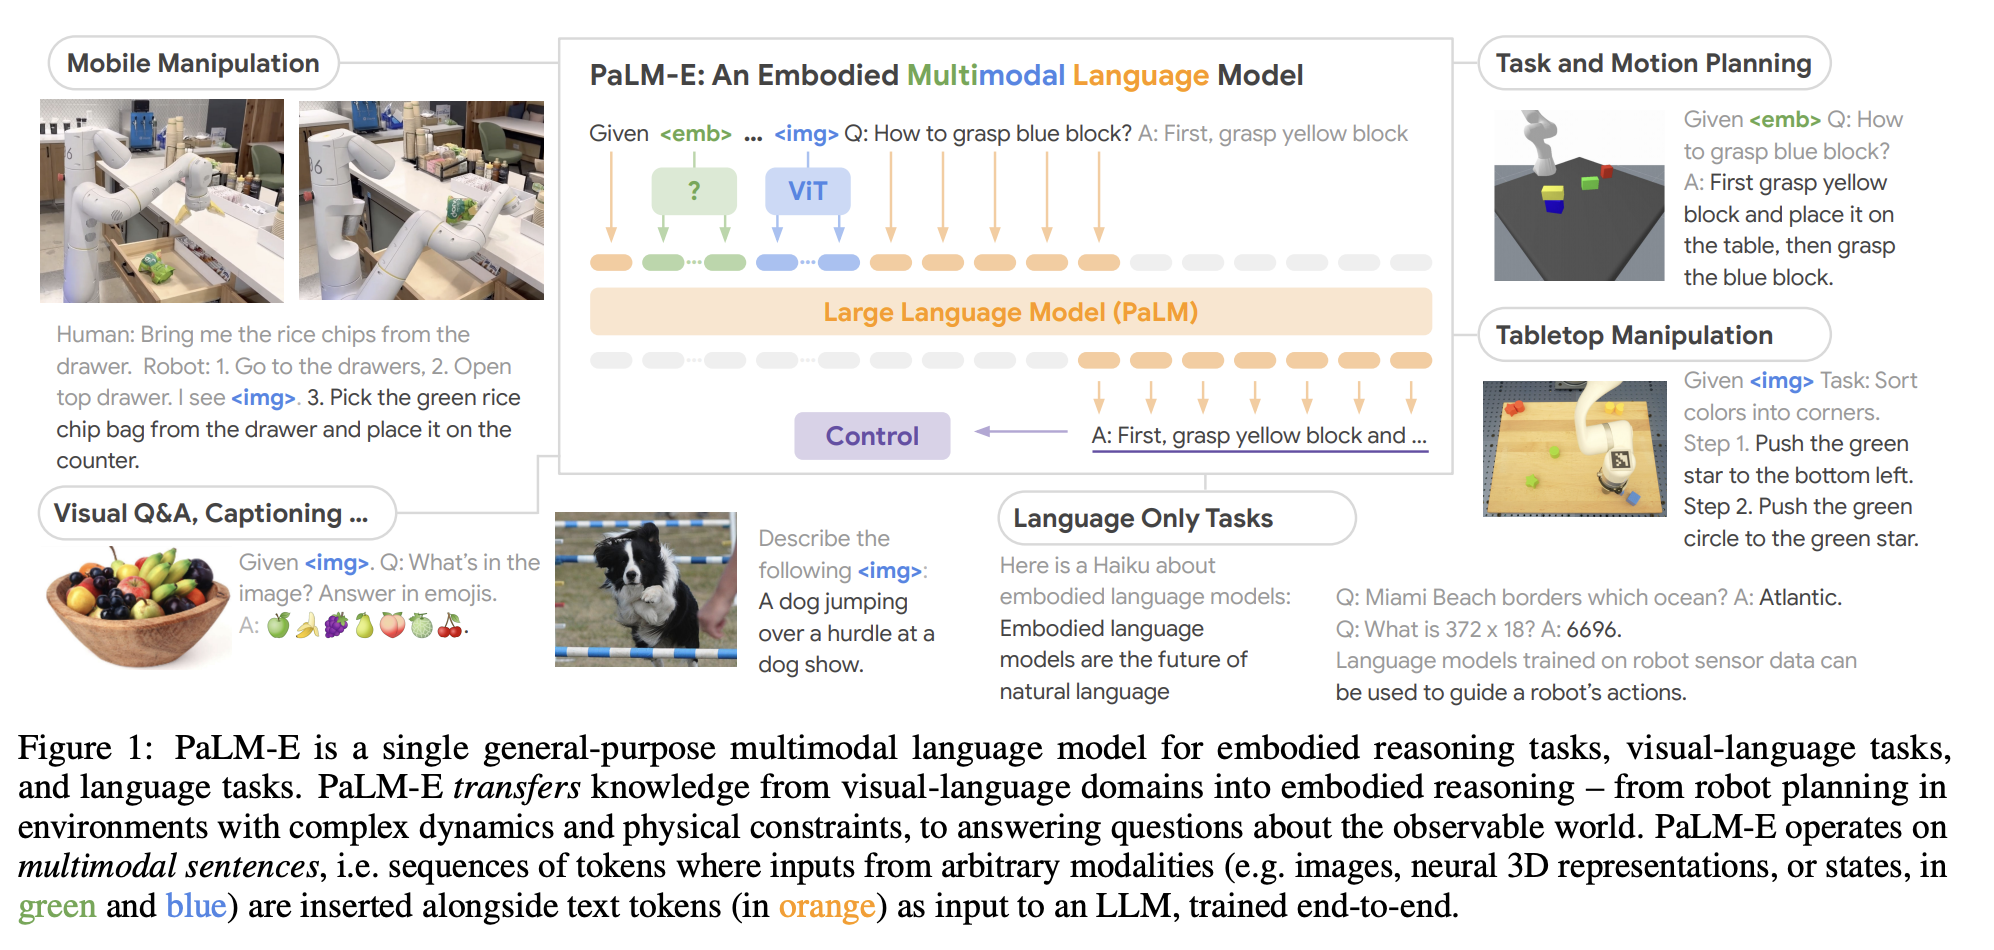
PALM-E
冻住LLM,训练视觉编码器等额外结构以适配LLM,来自于PaLM-E: An Embodied Multimodal Language Model
Ovis
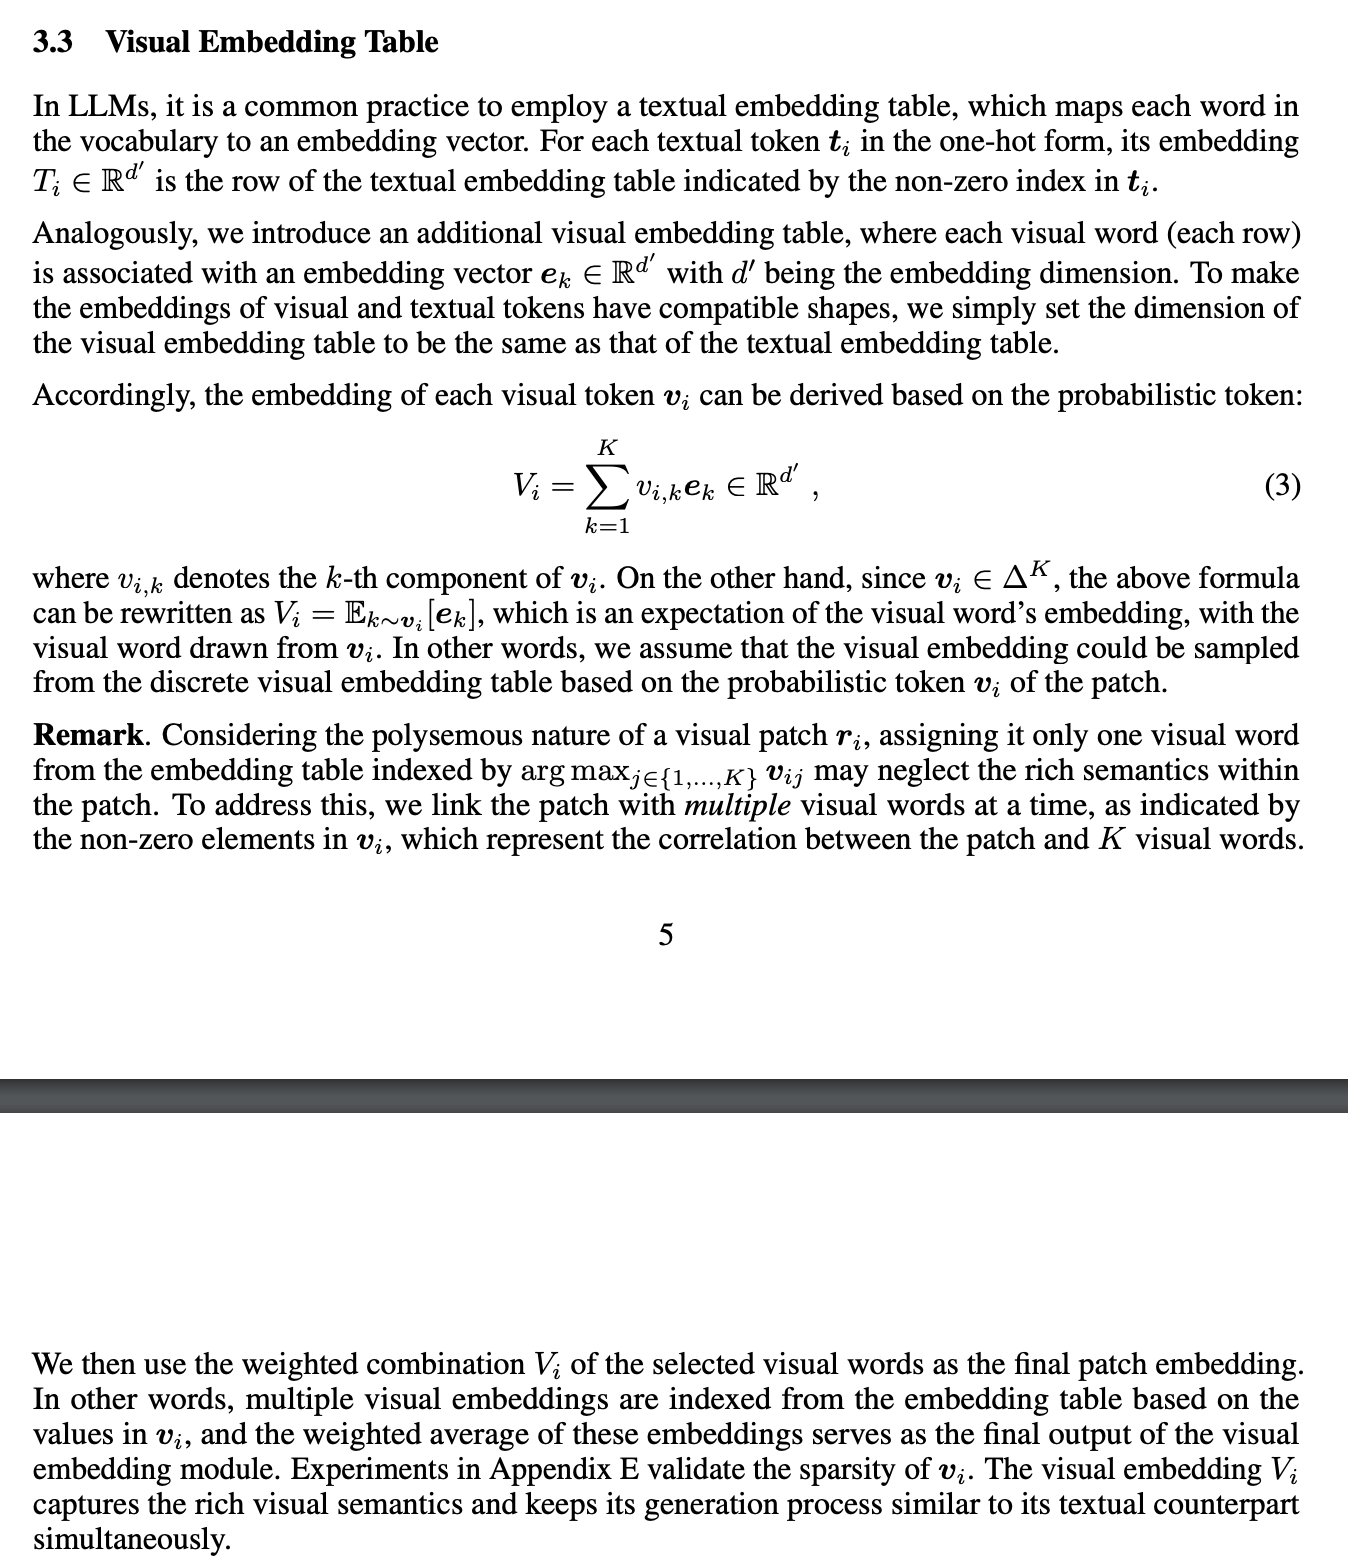
来自于阿里的Ovis: Structural Embedding Alignment for Multimodal Large Language Model,https://mp.weixin.qq.com/s/VLvF4J-8CsBN6Wam5UlVXQ 刚出时是个SOTA。核心改进点是Visual Embedding Table。
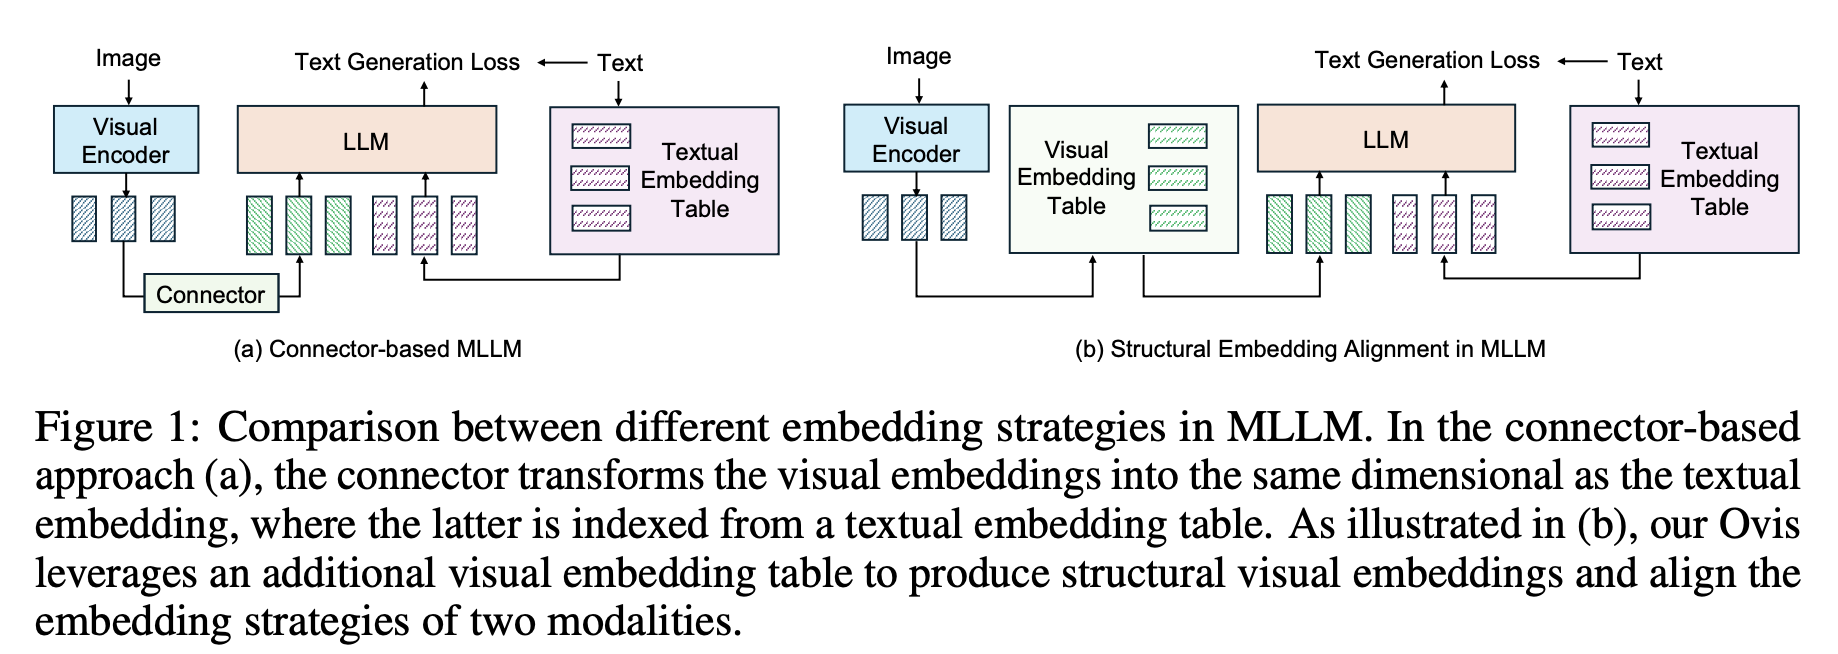
这个Visual Embedding Table可以看成是一个projector的变种,通过超大的hidden states带来参数量的提升,通过softmax带来norm


 1427
1427

 被折叠的 条评论
为什么被折叠?
被折叠的 条评论
为什么被折叠?
 到【灌水乐园】发言


