


一、什么是叠加?
-
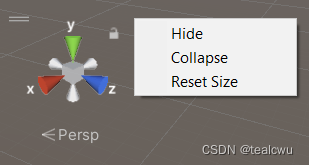
Overlay,叠加,是指Unity视图中的悬浮工具栏,如下图所示。
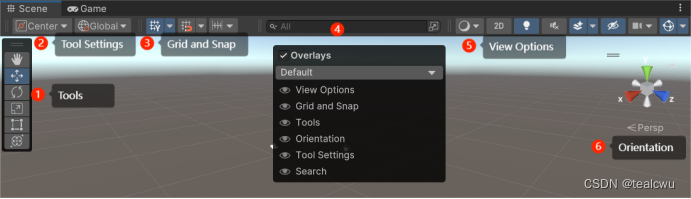
其中,按键盘上“`”键(Esc下面)可以显示叠加层的设置选项。 -
叠加分为两种:面板叠加和工具栏叠加。二者的区别主要有两方面:
(1)包含元素:工具栏元素可以包括文本、图标或两者的结合。而面板元素可以是任意控件。
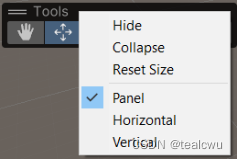
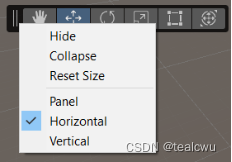
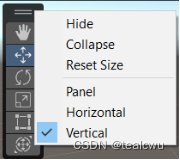
(2)展示布局:在于工具栏叠加可以按不同布局展示:Panel, Horizontal, Vertical。而面板只能按Panel一种布局展示。二者都可以展开或收起。
-
Unity视图中默认的叠加除了”Orientation”是面板叠加外,其他都是工具栏叠加。
二、如何创建叠加?
(一)编辑器工具栏元素
工具栏元素可以是文本、图标或二者的组合。
使用[]注册工具栏元素。EditorToolbarElement(Identifier, EditorWindowType)ToolbarOverlay
可以继承任何VisualElement类型并自行提供样式,但工具栏元素需要特定的样式,因此最好继承预定义类型之一:EditorToolbar。
- 按钮:EditorToolbarButton,继承自UnityEditor.UIElements.ToolbarButton
- 下拉列表:EditorToolbarDropdown,继承自EditorToolbarButton
- 下拉切换:EditorToolbarDropdownToggle,继承自UnityEngine.UIElements.BaseField
- 切换:EditorToolbarToggle:继承自UnityEditor.UIElements.ToolbarToggle
提示:如果工具栏水平或垂直停靠,则文本将被剪裁或不可见,因此最好为每个工具樯指定一个图标。
(二)创建面板叠加
所有的叠加都必须继承于Overlay类,并且实现CreatePanelContent方法。下面我们创建一个基本的面板。
- 在Editor文件夹中新建C#脚本并命名为OverlayExample.cs。
- 打开刚创建的脚本。
- 添加三个命名空间
using UnityEditor;
using UnityEditor.Overlays;
using UnityEngine.UIElements;
- 删除OverlayExample类中默认的内容,并将OverlayExample的继承改为Overlay。
- 重写CreatePanelContent方法并添加内容。
- 为OverlayExample类添加OverlayAttribute属性。
- 在OverlayAttribute属性中,指定此叠加将在哪种类型的窗口中使用:
- 如果你想让叠加在所有编辑器窗口中使用,可以指定为EditorWindow类型。
- 如果你想让叠加只在Scene视图中使用,可以指定为SceneView类型。
- 在OverlayAttribute属性中,添加name, ID,以及要在叠加中展示的名字。
[Overlay(typeof(SceneView), “My Custom Overlay”, true)] - 为叠加添加图标,这样当叠加折叠时会以图标形式展示。可以通过为Overlay类添加Icon属性来设置图标。如果不设置的话,叠加折叠时将默认展示叠加名称的前两个字母或者前两个单词的首字母。
[Icon(“Assets/Icons/SpriteLight.png”)]
using UnityEditor;
using UnityEditor.Overlays;
using UnityEngine.UIElements;
[Overlay(typeof(SceneView), "Panel Overlay Example", true)]
public class MyToolButtonOverlay : Overlay
{
    public override VisualElement CreatePanelContent()
    {
        var root = new VisualElement() { name = "My Toolbar Root" };
        root.Add(new Label() { text = "Hello" });
        return root;
    }
}
(三)创建工具栏叠加
工具栏叠加是承载工具栏元素的窗口,并且是一个EditorToolbarElement的组合。
工具栏叠加有横向、垂直、面板三种布局。ToolbarOverlay实现了一个无参数的构造函数,可以传递EditorToolbarElementAttribute ID。与面板叠加不同的是,这些内容被定义为独立的片段,并被整合到一起。
当创建工具栏叠加时要注意:
- 使用EditorToolbarElement(Identifier, EditorWindowType)来注册工具栏元素,以便用于ToolbarOverlay的实现中。
- 将所有叠加用OverlayAttribute标记。
- 确保工具栏叠加继承自ToolbarOverlay,并实现一个无参数构造函数。
- 确保工具栏的内容都有字符串类型的ID,这些ID将被传递到基类构造函数中。
- 确保这些ID被定义为EditorToolbarElementAttribute。
- 使用Icon属性为叠加添加图标。当叠加被折叠时将显示为图标样式。如果没有设置图标属性,当叠加被折叠时将显示叠加名字的前两个字母(或者叠加前两个单词的首字母)。
当实现指定为ToolbarOverlay的元素时:
- IAccessContainerWindow接口仅用于工具栏。因此,元素不会知道上下文。在DropdownToggleExample中,切换元素不会执行任何操作。
- 使用UIElement来设置叠加样式。工具栏元素在叠加中没有自己的样式。
创建工具栏叠加的过程:
- 与面板叠加一样,首先在Editor文件夹中创建一个C#脚本,并打开编辑。
- 添加工具栏元素。
- 将工具栏元素添加到叠加构造函数中。
- 添加面板叠加并使用工具栏元素实现。
 using System.Collections;
    using System.Collections.Generic;
    using System.Text;
    using UnityEngine;
    using UnityEditor.EditorTools;
    using UnityEditor.Toolbars;
    using UnityEditor.Overlays;
    using UnityEngine.UIElements;
    using UnityEditor;

    // Use [EditorToolbarElement(Identifier, EditorWindowType)] to register toolbar elements for use in ToolbarOverlay implementation.

    [EditorToolbarElement(id, typeof(SceneView))]
    class DropdownExample : EditorToolbarDropdown
    {
        public const string id = "ExampleToolbar/Dropdown";

        static string dropChoice = null;

        public DropdownExample()
        {
            text = "Axis";
            clicked += ShowDropdown;
        }

        void ShowDropdown()
        {
            var menu = new GenericMenu();
            menu.AddItem(new GUIContent("X"), dropChoice == "X", () => { text = "X"; dropChoice = "X"; });
            menu.AddItem(new GUIContent("Y"), dropChoice == "Y", () => { text = "Y"; dropChoice = "Y"; });
            menu.AddItem(new GUIContent("Z"), dropChoice == "Z", () => { text = "Z"; dropChoice = "Z"; });
            menu.ShowAsContext();
        }
    }
    [EditorToolbarElement(id, typeof(SceneView))]
    class ToggleExample : EditorToolbarToggle
    {
        public const string id = "ExampleToolbar/Toggle";
        public ToggleExample()
        {
            text = "Toggle OFF";
            this.RegisterValueChangedCallback(Test);
        }

        void Test(ChangeEvent<bool> evt)
        {
            if (evt.newValue)
            {
                Debug.Log("ON");
                text = "Toggle ON";
            }
            else
            {
                Debug.Log("OFF");
                text = "Toggle OFF";
            }
        }
    }

    [EditorToolbarElement(id, typeof(SceneView))]
    class DropdownToggleExample : EditorToolbarDropdownToggle, IAccessContainerWindow
    {
        public const string id = "ExampleToolbar/DropdownToggle";

        // This property is specified by IAccessContainerWindow and is used to access the Overlay's EditorWindow.

        public EditorWindow containerWindow { get; set; }
        static int colorIndex = 0;
        static readonly Color[] colors = new Color[] { Color.red, Color.green, Color.cyan };
        public DropdownToggleExample()
        {
            text = "Color Bar";
            tooltip = "Display a color rectangle in the top left of the Scene view. Toggle on or off, and open the dropdown" +
                      "to change the color.";

        // When the dropdown is opened, ShowColorMenu is invoked and we can create a popup menu.

            dropdownClicked += ShowColorMenu;

        // Subscribe to the Scene view OnGUI callback so that we can draw our color swatch.

            SceneView.duringSceneGui += DrawColorSwatch;
        }

        void DrawColorSwatch(SceneView view)
        {

         // Test that this callback is for the Scene View that we're interested in, and also check if the toggle is on
        // or off (value).

            if (view != containerWindow || !value)
            {
                return;
            }

            Handles.BeginGUI();
            GUI.color = colors[colorIndex];
            GUI.DrawTexture(new Rect(8, 8, 120, 24), Texture2D.whiteTexture);
            GUI.color = Color.white;
            Handles.EndGUI();
        }

        // When the dropdown button is clicked, this method will create a popup menu at the mouse cursor position.

        void ShowColorMenu()
        {
            var menu = new GenericMenu();
            menu.AddItem(new GUIContent("Red"), colorIndex == 0, () => colorIndex = 0);
            menu.AddItem(new GUIContent("Green"), colorIndex == 1, () => colorIndex = 1);
            menu.AddItem(new GUIContent("Blue"), colorIndex == 2, () => colorIndex = 2);
            menu.ShowAsContext();
        }
    }

    [EditorToolbarElement(id, typeof(SceneView))]
    class CreateCube : EditorToolbarButton//, IAccessContainerWindow
    {
        // This ID is used to populate toolbar elements.

        public const string id = "ExampleToolbar/Button";

        // IAccessContainerWindow provides a way for toolbar elements to access the `EditorWindow` in which they exist.
        // Here we use `containerWindow` to focus the camera on our newly instantiated objects after creation.
        //public EditorWindow containerWindow { get; set; }

        // Because this is a VisualElement, it is appropriate to place initialization logic in the constructor.
        // In this method you can also register to any additional events as required. In this example there is a tooltip, an icon, and an action.

        public CreateCube()
        {

    // A toolbar element can be either text, icon, or a combination of the two. Keep in mind that if a toolbar is
        // docked horizontally the text will be clipped, so usually it's a good idea to specify an icon.

            text = "Create Cube";
            icon = AssetDatabase.LoadAssetAtPath<Texture2D>("Assets/CreateCubeIcon.png");
            tooltip = "Instantiate a cube in the scene.";
            clicked += OnClick;
        }

        // This method will be invoked when the `Create Cube` button is clicked.

        void OnClick()
        {
            var newObj = GameObject.CreatePrimitive(PrimitiveType.Cube).transform;

        // When writing editor tools don't forget to be a good citizen and implement Undo!

            Undo.RegisterCreatedObjectUndo(newObj.gameObject, "Create Cube");

        //if (containerWindow is SceneView view)
        //    view.FrameSelected();

        }

    }

    // All Overlays must be tagged with the OverlayAttribute

    [Overlay(typeof(SceneView), "ElementToolbars Example")]

        // IconAttribute provides a way to define an icon for when an Overlay is in collapsed form. If not provided, the name initials are used.

    [Icon("Assets/unity.png")]

    // Toolbar Overlays must inherit `ToolbarOverlay` and implement a parameter-less constructor. The contents of a toolbar are populated with string IDs, which are passed to the base constructor. IDs are defined by EditorToolbarElementAttribute.

    public class EditorToolbarExample : ToolbarOverlay
    {

     // ToolbarOverlay implements a parameterless constructor, passing the EditorToolbarElementAttribute ID.
    // This is the only code required to implement a toolbar Overlay. Unlike panel Overlays, the contents are defined
    // as standalone pieces that will be collected to form a strip of elements.

        EditorToolbarExample() : base(
            CreateCube.id,
            ToggleExample.id,
            DropdownExample.id,
            DropdownToggleExample.id
            )
        { }
    }
三、哪些场合会用到叠加?
- 叠加是对Unity Editor的扩展,通过创建一些叠加有助于我们更方便地进行设计。
四、待解决
- 在EditorToolbarDropdown中,如何设置下拉项与容器的对齐方式?
- 如何改变EditorToolbarDropdown的列表样式?
- 在EditorToolbarDropdownToggle中,如何使用组合控件?
- 如何创建透明背景的叠加,就像Orientation那样?
- 如何设置叠加之间的联动?
- 如何将叠加打包成Package?并发布到AssetStore中?
- 如何复现系统内置的Tools,Search叠加?查看源代码
- 如何创建方向球叠加?
- 如何让叠加里的图标适应不同的主题(Dark/Light)?
- 代码示例中CreateCube,创建Cube后不会自动选中,如何实现?
五、常见问题
1. 问题描述:
Failed to load EditorToolbar ID ‘ExampleToolbar/Toggle’ for window ’ (UnityEditor.SceneView)'. No element with that ID and target toolbar was registered using the EditorToolbarElement attribute.
UnityEngine.GUIUtility:ProcessEvent (int,intptr,bool&)
解决方案:
需要为ToggleExample添加属性:[EditorToolbarElement(id, typeof(SceneView))]
六、参考资料:
- Overlay in Unity Manual: https://docs.unity3d.com/Manual/overlays-custom.html
- Overlay Design Pattern: https://www.foundations.unity.com/patterns/overlays
- Editor Foundation Figma: https://www.figma.com/community/file/1159561885404235152
- Overlay Scripting References: https://docs.unity3d.com/ScriptReference/Overlays.Overlay.html


 1759
1759

 被折叠的 条评论
为什么被折叠?
被折叠的 条评论
为什么被折叠?
 到【灌水乐园】发言


