


文章目录
MEFLUT: Unsupervised 1D Lookup Tables for Multi-exposure Image Fusion
https://github.com/Hedlen/MEFLUT/tree/main
特点是速度快
1. 首先转换为yuv
然后只对Y处理,得到 weight,
weight 和 Y 进行加权后得到 新的Y
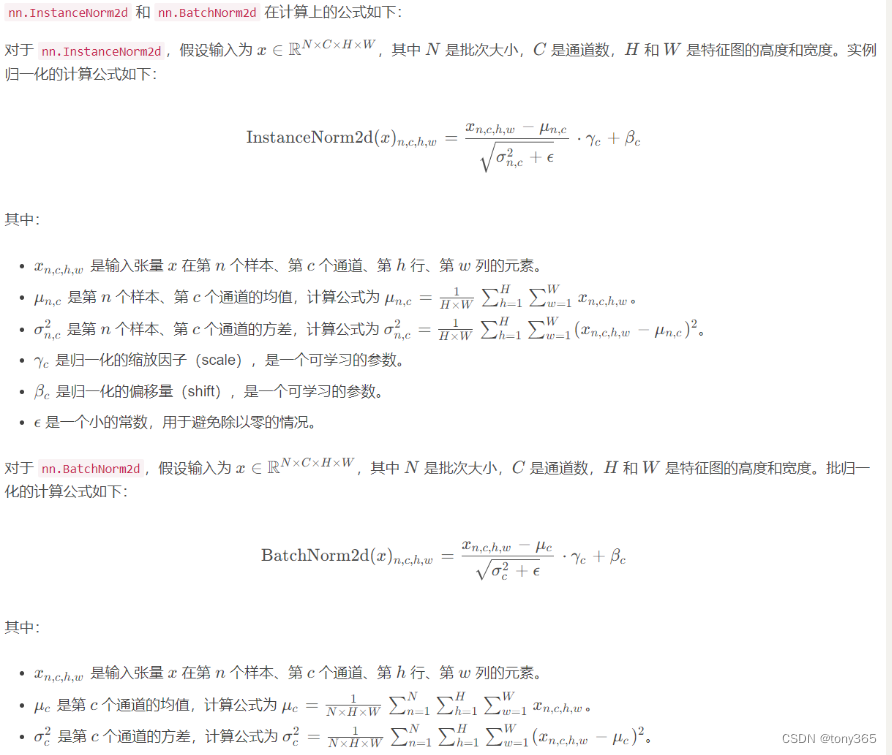
2. InstanceNorm2d
https://pytorch.org/docs/stable/generated/torch.nn.InstanceNorm2d.html
一个很好的介绍:https://blog.csdn.net/qq_36892712/article/details/132131106
代码中有一个层:
AdaptiveNorm 就是 输入 和 输入的InstanceNorm2d 进行加权
加权系数 w0和w1
class AdaptiveNorm(nn.Module):
    def __init__(self, n):
        super(AdaptiveNorm, self).__init__()

        self.w_0 = nn.Parameter(torch.Tensor([1.0]))
        self.w_1 = nn.Parameter(torch.Tensor([0.0]))

        self.in_norm = nn.InstanceNorm2d(n, affine=True, track_running_stats=False)

    def forward(self, x):
        return self.w_0 * x + self.w_1 * self.in_norm(x)
3. channel attention
先平均池化,再求每个通道的attention,再与输入相乘。
## ------ Channel Attention --------------
class CA(nn.Module):
    def __init__(self, channel, reduction=2, bias=False):
        super(CA, self).__init__()
        # global average pooling: feature --> point
        self.avg_pool = nn.AdaptiveAvgPool2d(1)
        # feature channel downscale and upscale --> channel weight
        self.conv = nn.Sequential(
            nn.Conv2d(channel, channel // reduction, 1, padding=0, bias=bias),
            nn.ReLU(inplace=True),
            nn.Conv2d(channel // reduction, channel, 1, padding=0, bias=bias),
            nn.Sigmoid()
        )

    def forward(self, x):
        y = self.avg_pool(x)
        y = self.conv(y)
        return x * y
4. 论文中的CFCA模块
输入 K,1,H,W 的 Y通道图像
head特征提取
flca channel attention
frw frame attention
output是 K,C,H,W 的feature
class CFCA(nn.Module):
    def __init__(self, layers = 4, width = 64, reduction=8, n_frames = 3):
        super(CFCA, self).__init__()
        self.layer = layers
        self.width = width
        self.n_frames = n_frames
        self.reduction = reduction
        self.norm = AdaptiveNorm(self.width)
        self.head = nn.Sequential(
            nn.Conv2d(1, self.width, kernel_size=3, stride=1, padding=1, dilation=1, bias=False),
            self.norm,
            nn.LeakyReLU(0.2, inplace=True),
            nn.Conv2d(self.width, self.width, kernel_size=3, stride=1, padding=1, dilation=1, bias=False),
            self.norm,
        )
        self.flca = CA(self.width, reduction=self.reduction)
        self.frw = CA(self.n_frames, reduction=1)
        self.relu = nn.LeakyReLU(0.2, inplace=True)


    def forward(self, x):
        x = self.head(x)
        x1 = self.flca(x)
        x = self.relu(x + x1)
        x = self.frw(x.transpose(0, 1)).transpose(0, 1)
        return x
5. DISA模块
CFCA提取的特征K,C,H,W
分离后得到K个1,C,H,W
进入到 K个DISA 模块
每个DISA的结构如下:
          body1 dilation2
head ---- body2 dilation4   concat channel,  conv, relu , tail
          body3 dilation8
输入 1,C,H,W 输出 1,1,H,W
class DISA(nn.Module):
    def __init__(self, layers = 4, width = 64):
        super(DISA, self).__init__()
        self.layer = layers
        self.width = width
        self.norm = AdaptiveNorm(width)
        self.head = nn.Sequential(
            nn.Conv2d(self.width, self.width, kernel_size=3, stride=1, padding=1, dilation=1, bias=False),
            self.norm,
            nn.LeakyReLU(0.2, inplace=True))

        self.body1 = nn.Sequential(
            nn.Conv2d(self.width, self.width, kernel_size=3, stride=1, padding=2, dilation=2, bias=False),
            self.norm,
            SA())
        self.body2 = nn.Sequential(
            nn.Conv2d(self.width, self.width, kernel_size=3, stride=1, padding=4,
                      dilation=4, bias=False),
            self.norm,
            SA())

        self.body3 = nn.Sequential(
            nn.Conv2d(self.width, self.width, kernel_size=3, stride=1, padding=8,
                      dilation=8, bias=False),
            self.norm,
            SA())

        self.tail = nn.Sequential(
            nn.Conv2d(self.width, self.width, kernel_size=3, stride=1, padding=1, dilation=1,
                      bias=False),
            self.norm,
            nn.LeakyReLU(0.2, inplace=True),
            nn.Conv2d(self.width, 1, kernel_size=1, stride=1, padding=0, dilation=1)
        )
        self.relu = nn.LeakyReLU(0.2, inplace=True)
        self.conv11 = nn.Conv2d(self.width * self.layer, self.width, kernel_size=1, stride=1, padding=0, dilation=1)


    def forward(self, x):
        x = self.head(x)
        x1 = self.body1(x)
        x2 = self.body2(x)
        x3 = self.body3(x)
        x5 = torch.cat([x1, x2, x3], 1)
        x6 = self.conv11(x5)
        x = self.relu(x6 + x)
        x = self.tail(x)
        return x
在 每个body中有一个 spatial attention
在channel通道上求 max,average得到2 channel
再conv得到 1 channel
再sigmoid得到 1 channel weight
##---------- Spatial Attention ----------
class BasicConv(nn.Module):
    def __init__(self, in_planes, out_planes, kernel_size, stride=1, padding=0, dilation=1, groups=1, relu=True,
                 bn=False, bias=False):
        super(BasicConv, self).__init__()
        self.out_channels = out_planes
        self.conv = nn.Conv2d(in_planes, out_planes, kernel_size=kernel_size, stride=stride, padding=padding,
                              dilation=dilation, groups=groups, bias=bias)
        self.bn = nn.BatchNorm2d(out_planes, eps=1e-5, momentum=0.01, affine=True) if bn else None
        self.relu = nn.ReLU() if relu else None

    def forward(self, x):
        x = self.conv(x)
        if self.bn is not None:
            x = self.bn(x)
        if self.relu is not None:
            x = self.relu(x)
        return x


class ChannelPool(nn.Module):
    def forward(self, x):
        return torch.cat((torch.max(x, 1)[0].unsqueeze(1), torch.mean(x, 1).unsqueeze(1)), dim=1)


class SA(nn.Module):
    def __init__(self, kernel_size=5):
        super(SA, self).__init__()
        self.compress = ChannelPool()
        self.spatial = BasicConv(2, 1, kernel_size, stride=1, padding=(kernel_size - 1) // 2, relu=False)

    def forward(self, x):
        # import pdb;pdb.set_trace()
        x_compress = self.compress(x)
        x_out = self.spatial(x_compress)
        scale = torch.sigmoid(x_out)  # broadcasting
        return x * scale
6. 完整结构
接下来查看完整的网络结构
class MEFNetwork(nn.Module):
    def __init__(self, n_frames=3, radius=2, eps=1, is_guided=True, reduction=8, layers=2, width=48):
        super(MEFNetwork, self).__init__()
        self.n_frames = n_frames
        self.skeleton = CFCA(reduction=reduction, n_frames=self.n_frames, layers = layers, width=width)
        branch = [DISA(layers=layers, width=width) for _ in range(self.n_frames)]
        self.branch = nn.Sequential(*branch)
        self.is_guided = is_guided
        if is_guided:
            self.gf = FastGuidedFilter(radius, eps)

    def forward(self, x_lr, x_hr):
        # x_lr, x_hr 低分辨率和高分辨率,为了网络大小比较小。
        # k,c,h,w
        x_lr_t = self.skeleton(x_lr)
        w = []
        for i in range(self.n_frames):
            w.append(self.branch[i](x_lr_t[i:i+1, :, :, :]))

        # k,1,h,w
        w_lr = torch.cat(w, 0)


        if self.is_guided:
            w_hr = self.gf(x_lr, w_lr, x_hr)
        else:
            w_hr = F.upsample(w_lr, x_hr.size()[2:], mode='bilinear')

        # weight 归一化
        w_hr = torch.abs(w_hr)
        w_hr = (w_hr + EPS) / torch.sum((w_hr + EPS), dim=0)
        o_hr = torch.sum(w_hr * x_hr, dim=0, keepdim=True).clamp(0, 1)
        # 最终得到融合后的o_hr :  1,h,w
        # w_hr : k,1,h,w, x_hr:. k,1,h,w
        return o_hr, w_hr

    def init_lr(self, path):
        self.lr.load_state_dict(torch.load(path))
其中向上插值可以直接插值,也可以利用引导滤波方法
lr, weightlr, hr
lr是引导图,weightlr求得 系数a,b, 然后a,b 扩大到hr的size
与hr做 乘法和加法 得到 最终的weighthr。
class FastGuidedFilter(nn.Module):
    def __init__(self, r, eps=1e-8):
        super(FastGuidedFilter, self).__init__()

        self.r = r
        self.eps = eps
        self.boxfilter = BoxFilter(r)


    def forward(self, lr_x, lr_y, hr_x):
        n_lrx, c_lrx, h_lrx, w_lrx = lr_x.size()
        n_lry, c_lry, h_lry, w_lry = lr_y.size()
        n_hrx, c_hrx, h_hrx, w_hrx = hr_x.size()

        assert n_lrx == n_lry and n_lry == n_hrx
        assert c_lrx == c_hrx and (c_lrx == 1 or c_lrx == c_lry)
        assert h_lrx == h_lry and w_lrx == w_lry
        assert h_lrx > 2*self.r+1 and w_lrx > 2*self.r+1

        ## N
        N = self.boxfilter(Variable(lr_x.data.new().resize_((1, 1, h_lrx, w_lrx)).fill_(1.0)))

        ## mean_x
        mean_x = self.boxfilter(lr_x) / N
        ## mean_y
        mean_y = self.boxfilter(lr_y) / N
        ## cov_xy
        cov_xy = self.boxfilter(lr_x * lr_y) / N - mean_x * mean_y
        ## var_x
        var_x = self.boxfilter(lr_x * lr_x) / N - mean_x * mean_x

        ## A
        A = cov_xy / (var_x + self.eps)
        ## b
        b = mean_y - A * mean_x

        ## mean_A; mean_b
        mean_A = F.upsample(A, (h_hrx, w_hrx), mode='bilinear')
        mean_b = F.upsample(b, (h_hrx, w_hrx), mode='bilinear')

        return mean_A*hr_x+mean_b
以上就是完整的结构。
7.损失函数 MEF-SSIM loss
原理介绍:
https://blog.csdn.net/Pineapple_Daisy/article/details/135717825
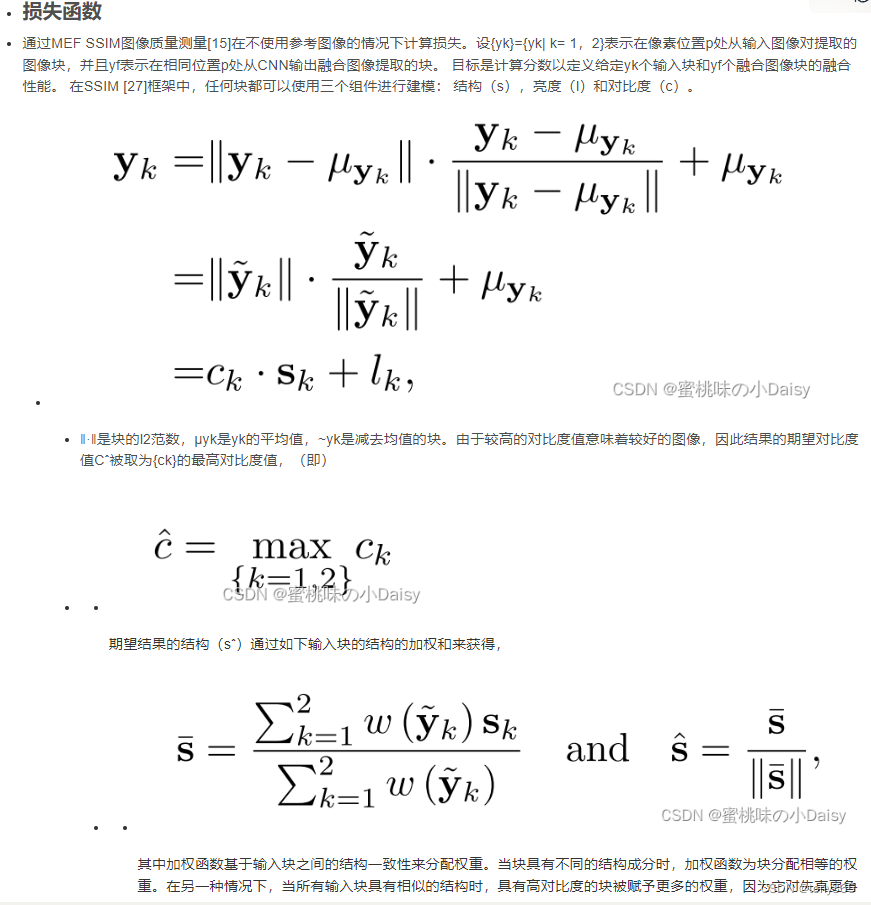
损失函数:
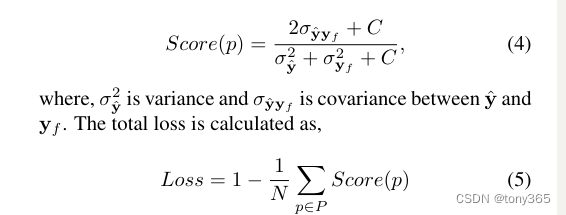
代码如下:
X是合成的图像 1hw
Ys是输入的图像 k,h,w
提取各自的均值,方差
以及协方差。
然后带入公式
def _mef_ssim(X, Ys, window, ws, denom_g, denom_l, C1, C2, is_lum=False, full=False):
    K, C, H, W = list(Ys.size())

    # compute statistics of the reference latent image Y
    muY_seq = F.conv2d(Ys, window, padding=ws // 2).view(K, H, W)
    muY_sq_seq = muY_seq * muY_seq
    sigmaY_sq_seq = F.conv2d(Ys * Ys, window, padding=ws // 2).view(K, H, W) \
                        - muY_sq_seq
    sigmaY_sq, patch_index = torch.max(sigmaY_sq_seq, dim=0)

    # compute statistics of the test image X
    muX = F.conv2d(X, window, padding=ws // 2).view(H, W)
    muX_sq = muX * muX
    sigmaX_sq = F.conv2d(X * X, window, padding=ws // 2).view(H, W) - muX_sq

    # compute correlation term
    sigmaXY = F.conv2d(X.expand_as(Ys) * Ys, window, padding=ws // 2).view(K, H, W) \
                - muX.expand_as(muY_seq) * muY_seq

    # compute quality map
    cs_seq = (2 * sigmaXY + C2) / (sigmaX_sq + sigmaY_sq_seq + C2)
    cs_map = torch.gather(cs_seq.view(K, -1), 0, patch_index.view(1, -1)).view(H, W)
    if is_lum:
        lY = torch.mean(muY_seq.view(K, -1), dim=1)
        lL = torch.exp(-((muY_seq - 0.5) ** 2) / denom_l)
        lG = torch.exp(- ((lY - 0.5) ** 2) / denom_g)[:, None, None].expand_as(lL)
        LY = lG * lL
        muY = torch.sum((LY * muY_seq), dim=0) / torch.sum(LY, dim=0)
        muY_sq = muY * muY
        l_map = (2 * muX * muY + C1) / (muX_sq + muY_sq + C1)
    else:
        l_map = torch.Tensor([1.0])
        if Ys.is_cuda:
            l_map = l_map.cuda(Ys.get_device())

    if full:
        l = torch.mean(l_map)
        cs = torch.mean(cs_map)
        return l, cs

    qmap = l_map * cs_map
    q = qmap.mean()

    return q
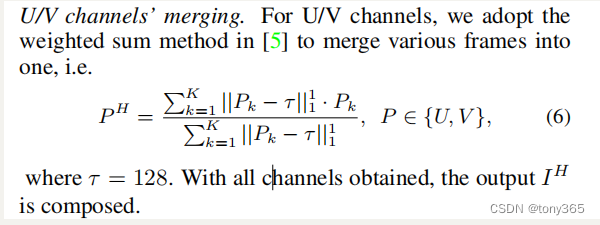
8. uv channel merge
这里U,V的范围应该都是0-255. 等于128的时候表示灰色。
因此这里颜色越饱和,距离128越大,占的weight越大。
根据与128的距离计算weight, 加权融合得到新的 U,V
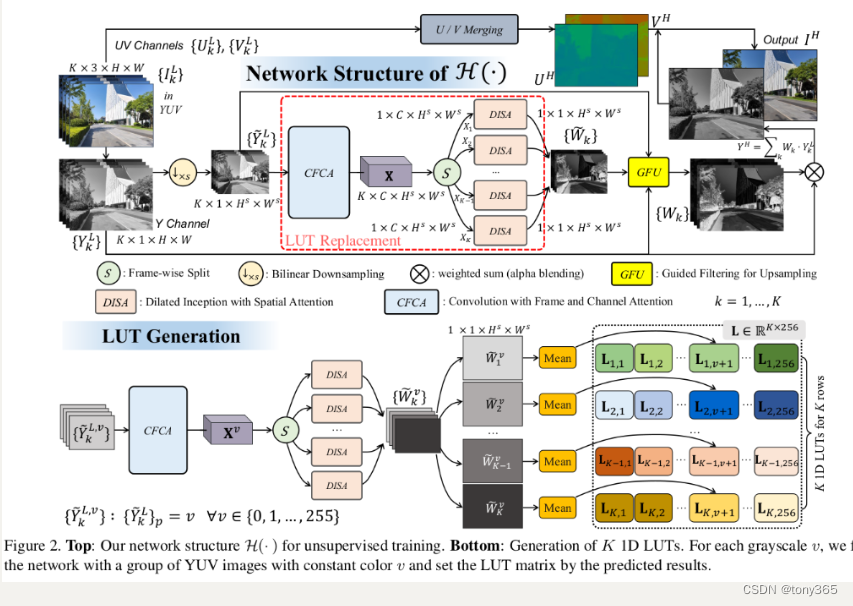
9. lut generation
是这样的。目的是获得 K个 1d LUTs
输入一个图像 全为0, 得到K个weight map,求这k个weight map的mean, 作为
作为 查找表 0位置的值。
同理1-255.
这样的假设相当于认为, 网络学到的映射关系是 只与 单个像素值有关系。
每个像素 被映射到 什么值 完全由这个像素决定, 与其他周边像素没有关系。那么直接训练多个1D LUT是不是也可以呢。另外任何其他网络只要是有求 weight map进行融合的 也可以利用这个方法生成 1D lut
是不是满足这个条件可以看下通过设置 图像输入,相同灰度的像素 输出的 weightmap是不是也是相同的。如果换个数据集,要重新训练,LUT也要重新生成。
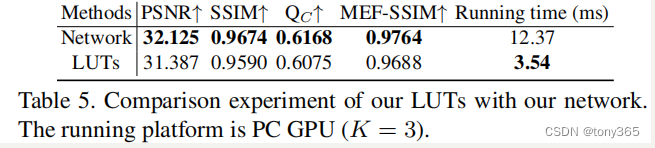
9.1使用和不使用1dlut 对比
下图说明,转换为LUTs后效果并没有损失太多。
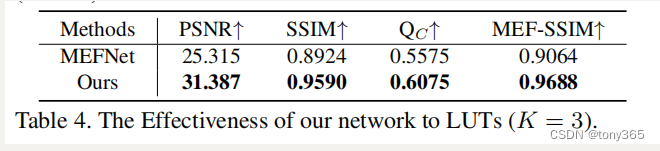
9.2其他网络也转化为1d lut
效果不如本文提出的网络,说明本文提出的网络转换为1Dlut 更加有效。
这是什么原因呢?
如下图,mefnet也用1d lut替换,效果不太好,
原mef net:29.793,0.9569,0.6054,0.9593 转换为luts后退化不少
### 9.3整体网络框架和 生成LUTs流程图
10. dataset
In addition, we collect a new MEF dataset consisting of 960 samples, 155 of which are manually tuned by professionals as ground-truth for evaluation. Our network is trained by this dataset in an unsupervised manner.
The exposure levels are manually set, and Exposure Values (EVs) of our sample sequences setting range
from −4.0 to +2.0 with 0.5 as a step. We select the exposure number 6 (K = 6) for each scene based on the characteristics of different brands of mobile phones.
11.限制
只操作Y channel, u,v上颜色没有操作
查找表没有利用语义信息,可能不够平滑,即使假如guide filter,guide filter的参数也不能自适应调整。
还有一个最重要的问题就是。任意多组K个图像,每组相同位置具有相同的LUT? 适应性有那么好吗?
一个数据集,每组K=3个图像,分别是ev-2,ev0,ev+2. 所有ev-2的图像 使用相同的LUT, 所有ev0的图像使用相同的LUT, 所有ev+2的图像使用相同的LUT. 这样和图像内容似乎没关系?看代码是这样的,难道我看错了?
如果是这样,如果你的K=3的3个图像如果 不是 ev-2,ev0,ev+2 应该也不能使用


 517
517

 被折叠的 条评论
为什么被折叠?
被折叠的 条评论
为什么被折叠?
 到【灌水乐园】发言


