


一、计时器的使用
效果图:点击屏幕,移动头像至指定位置后,停止计时器

类型为SEL_SCHEDULE实质是一个函数指针,指向的是Ref的一个成员方法,参数float,返回值void

场景的.h头文件

场景类的实现.cpp文件
关键代码:


//
//  UpdateScene.cpp
//  01_cocos2d-x
//
//  Created by beyond on 14-10-5.
//
//

#include "UpdateScene.h"
USING_NS_CC;
Scene* UpdateScene::createScene()
{
    // 'scene' 自动释放
    // 创建一个scene
    auto scene = Scene::create();
    // 'layer' 自动释放
    auto layer = UpdateScene::create();
    // 将图层 添加到场景中
    scene->addChild(layer);
    // 返回 填充好图层的 场景
    return scene;
}

// 在 "init" 方法中,实例化自己要用的精灵对象
bool UpdateScene::init()
{
    // 1. 调用父类的init , cpp 没有super,直接写父类名
    if ( !Layer::init() ) return false;
    // 屏幕尺寸
    winSize = Director::getInstance()->getVisibleSize();

    // 添加 一个精灵,点击屏幕后,精灵在update方法中 更改位置
    addSprite();

    // 添加一个LabelTTF,点击文字后,在updatePosition方法中 更改位置
    addLabelTTF();
    return true;
}
#pragma mark - 初始化
// 添加一个精灵,点击屏幕后,精灵在update方法中 更改位置
void UpdateScene::addSprite()
{
    // 精灵精灵Nana
    nana = Sprite::create("nanaLogo.png");
    nana->setAnchorPoint(Point(0,0));
    nana->setPosition(Point(0,0));
    this->addChild(nana);

    // 2.触摸屏幕,开启 时钟update

    // 实例化一个触摸监听器 对象
    auto listener = EventListenerTouchOneByOne::create();
    // 当触摸开始时,绑定一个闭包函数;
    // 【】表示 要传入的外界对象,此处是this
    // ()表示参数
    listener->onTouchBegan = [this](Touch *t,Event *e){
        // 开启默认的 时钟方法
        scheduleUpdate();
        return false;
    };
    // 5、获取事件分发器,添加一个事件监听器,到this身上;即监听的是this对象【整个图层Layer】
    Director::getInstance()->getEventDispatcher()->addEventListenerWithSceneGraphPriority(listener, this);

}
// 添加一个LabelTTF,点击文字后,在updatePosition方法中 更改位置
void UpdateScene::addLabelTTF()
{
    // Label
    label = LabelTTF::create("Nana","Courier",90);
    label->setAnchorPoint(Point(0,0));
    label->setPosition(Point(0,0));
    label->setName("label");
    addChild(label);

    // 2.触摸Label,开启 时钟updatePosition
    // 实例化一个触摸监听器 对象
    auto listener = EventListenerTouchOneByOne::create();
    // 当触摸开始时,绑定一个闭包函数;
    // 【】表示 要传入的外界对象,此处是this
    // ()表示参数
    listener->onTouchBegan = [this](Touch *t,Event *e){
        // 如果 点击 了label,才每隔一秒执行一次 更新位置方法
        LabelTTF *label =(LabelTTF *) e->getCurrentTarget()->getChildByName("label");
        if (label->getBoundingBox().containsPoint(t->getLocation())) {
            // 开启指定时间的 时钟方法;参数是:函数指针,返回值是void,参数是float,指向的是Ref内的一个方法
            schedule(schedule_selector(UpdateScene::updatePosition), 1);
        }
        return false;
    };
    // 5、获取事件分发器,添加一个事件监听器,到this身上;即监听的是this对象【整个图层Layer】
    Director::getInstance()->getEventDispatcher()->addEventListenerWithSceneGraphPriority(listener, this);

}
#pragma mark - 时钟方法
// 时钟方法,使用的是默认的帧率 1/60
void UpdateScene::update(float dt)
{
    // 向右上角,移动nana,当位置大于 400时,stop
    nana->setPosition(nana->getPosition()+Point(3,3));
    if (nana->getPosition().x>400) {
        // 停止时钟方法
        unscheduleUpdate();
    }

}

// 时钟方法,使用的是 1秒1次
void UpdateScene::updatePosition(float dt)
{
    // 向右上角,移动nana,当位置大于 400时,stop
    label->setPosition(label->getPosition()+Point(50,50));
    if (label->getPosition().x>300) {
        // 停止所有时钟方法
        unscheduleAllSelectors();
    }

}
二、用户偏好UserDefault


三、FileUtils文件操作工具类
它屏蔽了不同的平台mac ios android等


FileUtils文件写出和读入演示
如果是Mac平台,则可用目录就是:【/Users/beyond/Documents/】
如果是iOS平台,则可用目录就是:【.../app/Documents/】

四、Plist文件读取

使用的依然是FileUtils工具类

返回的类型是:
字典【ValueMap】或数组【ValueVector】

五、XML文件读取


cocos2d中解析XML用到的库
#include <tinyxml2/tinyxml2.h>


六、JSON文件读取
cocos2d内置的解析Json的库
#include <json/rapidjson.h>
#include <json/document.h>

标记parseFlags默认为0即可


输出结果:

七、场景的代码实现
//
//  FileScene.h
//  01_cocos2d-x
//
//  Created by beyond on 14-10-5.
//
//

#ifndef ___1_cocos2d_x__FileScene__
#define ___1_cocos2d_x__FileScene__

#include "cocos2d.h"
USING_NS_CC;
// 注意 这儿,继承的是 Layer
class FileScene : public cocos2d::Layer
{
private:
    // 屏幕尺寸
    Size winSize;
    Sprite *nana;
    LabelTTF *label;
public:
    // c++里面没有id类型, 所以 返回类的实例对象的 指针
    static cocos2d::Scene* createScene();
    // 以下是 不同点:cocos2d-x的 'init' 方法 返回 bool
    // 而cocos2d-iphone 返回 'id' 类型
    virtual bool init();
    // 宏 自动实现 "静态的 create()方法"
    CREATE_FUNC(FileScene);

    // File操作
    // 用户偏好
    void userDefault();
    // 文件读写 FileUtils工具类,屏蔽了不同的操作系统 mac ios android等
    void fileUtils();
    // Plist 返回只可能是 字典【ValueMap】 或 数组【ValueVector】
    void readPlist();

    // 解析XML
    void readXML();
    // 解析JSON
    void readJSON();


};

#endif /* defined(___1_cocos2d_x__FileScene__) */
//
//  FileScene.cpp
//  01_cocos2d-x
//
//  Created by beyond on 14-10-5.
//
//

#include "FileScene.h"
// 导入 xml 解析器
#include <tinyxml2/tinyxml2.h>
// 导入 Json 解析器
#include <json/rapidjson.h>
#include <json/document.h>

USING_NS_CC;
Scene* FileScene::createScene()
{
    // 'scene' 自动释放
    // 创建一个scene
    auto scene = Scene::create();
    // 'layer' 自动释放
    auto layer = FileScene::create();
    // 将图层 添加到场景中
    scene->addChild(layer);
    // 返回 填充好图层的 场景
    return scene;
}

// 在 "init" 方法中,实例化自己要用的精灵对象
bool FileScene::init()
{
    // 1. 调用父类的init , cpp 没有super,直接写父类名
    if ( !Layer::init() ) return false;
    // 屏幕尺寸
    winSize = Director::getInstance()->getVisibleSize();

    // 2.文件操作演示
    this->userDefault();
    this->fileUtils();
    this->readPlist();
    this->readXML();
    this->readJSON();
    return true;
}

#pragma mark - 文件操作
// 用户偏好
void FileScene::userDefault()
{
    // 存
    UserDefault::getInstance()->setStringForKey("BookName", "红楼梦");

    // 读  参数2 表示:如果key不对,或者取不到 值时,默认值
    log("%s",UserDefault::getInstance()->getStringForKey("BookName", "名著").c_str());
    // cocos2d: 红楼梦
}
// 文件读写 FileUtils工具类,屏蔽了不同的操作系统 mac ios android等
void FileScene::fileUtils()
{
    //********************写入文件***********************
    // 1.屏蔽不同平台的 文件工具类【单例】
    auto util = FileUtils::getInstance();
    // 获得可以写的路径,返回值是std::string类型
    std::string wPath = util->getWritablePath();
    log("wPath %s",wPath.c_str());
    // cocos2d: wPath /Users/beyond/Library/Application Support/iPhone Simulator/7.1/Applications/FC92FA39-E149-4C04-AC55-2FB0930E208B/Documents/
    // 文件名+相对路径 = 文件的绝对路径
    std::string fullPath = util->fullPathFromRelativeFile("1.txt", wPath);
    log("fullPath %s",fullPath.c_str());
    // cocos2d: fullPath /Users/beyond/Library/Application Support/iPhone Simulator/7.1/Applications/FC92FA39-E149-4C04-AC55-2FB0930E208B/Documents/1.txt
    // C 文件操作函数 参数1:文件绝对路径(C字串),参数2:操作mode
    FILE *file = fopen(fullPath.c_str(), "w");

    // 2.写入 内容
    fprintf(file, "演示Demo:如何 通过 工具类FileUtils向不同平台 写入 Hello Beyond~\n");
    // 3.关闭FILE
    fclose(file);
    //*********************读取内容**********************
    Data d = util->getDataFromFile(fullPath);
    // 输出到控制台
    log("%s",d.getBytes());
    // cocos2d: 演示Demo:如何 通过 工具类FileUtils向不同平台 写入 Hello Beyond~
}

// Plist 返回只可能是 字典【ValueMap】 或 数组【ValueVector】
void FileScene::readPlist()
{
    // 1.屏蔽不同平台的 文件工具类【单例】
    FileUtils *util = FileUtils::getInstance();
    // 2.根 是字典
    ValueMap dict = util->getValueMapFromFile("data.plist");
    // 因为ValueMap重载了运算符【】
    log("%s",dict["name"].asString().c_str());
    // cocos2d: 红楼梦
    std::string s = dict.at("author").asString();
    log("%s",s.c_str());
    // cocos2d: 曹雪芹

}

// 解析XML
// 导入 xml 解析器
// #include <tinyxml2/tinyxml2.h>
void FileScene::readXML()
{
    // Document对象
    tinyxml2::XMLDocument *doc = new tinyxml2::XMLDocument();
    // 1.屏蔽不同平台的 文件工具类【单例】
    FileUtils *util = FileUtils::getInstance();
    std::string content = util->getStringFromFile("data.xml");
    log("%s",content.c_str());
    // 2.开始解析
    doc->Parse(content.c_str());
    // 解析完成后,从doc中取得根节点
    tinyxml2::XMLElement *root = doc->RootElement();
    // 从根节点的【FirstChildElement】开始,遍历所有的XMLElement,直至节点为空
    for (tinyxml2::XMLElement *e = root->FirstChildElement(); e != NULL; e=e->NextSiblingElement()) {
        // 用于拼接
        std::string str;
        // 第2层遍历,遍历节点的 所有 Attribute
        for (auto attr = e->FirstAttribute(); attr != NULL; attr=attr->Next()) {
            // 属性名称
            str+=attr->Name();
            str+=":";
            // 属性值
            str+=attr->Value();
            str+=",";
        }
        // 输出到控制台
        log("%s",str.c_str());
    }
}

// 解析Json
// #include <json/rapidjson.h>
// #include <json/document.h>
void FileScene::readJSON()
{
    // Document对象
    rapidjson::Document doc;
    // 1.屏蔽不同平台的 文件工具类【单例】
    FileUtils *util = FileUtils::getInstance();
    std::string content = util->getStringFromFile("data.json");
    log("%s",content.c_str());
    // 从一段只读的string 开始解析
    doc.Parse<0>(content.c_str());

    // 解析完成,打印输出
    int i = 0;
    log("%s",doc[i]["name"].GetString());
    log("%s",doc[i]["author"].GetString());

    log("%s",doc[(int)1]["name"].GetString());
    log("%s",doc[(int)1]["author"].GetString());
}
八、通过Flash CC导出的Plist文件和大图片,
创建帧动画

首先,下载Flash_Professional_13_LS20.dmg,约1G左右
按下面方法,运行补丁
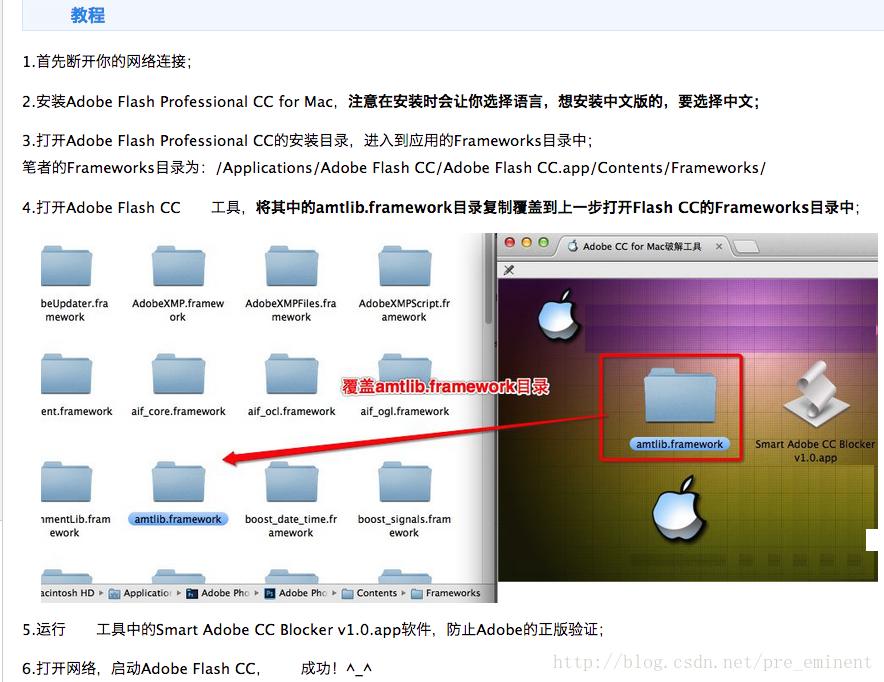
打开Flash,打开【库Library】,点击左下角的新建按钮,
新建一个Symbol,类型选择【影片剪辑Movie Clip】;
在第1帧先画一个正方形,按F6在第20帧创建一个关键帧;
并在第20帧 删除原来的正方形,画一个圆形;
在上面两个关键帧之间的任意一帧,右击,创建一个【形变补间动画shape tween】
最后,重点,导出为cocos2d用的大纹理+Plist文件
点击库,右击刚才创建的影片剪辑【movie clip】,选择【Generate Sprite Sheet】,data format选择【cocos2D v3】,选择【Export导出】
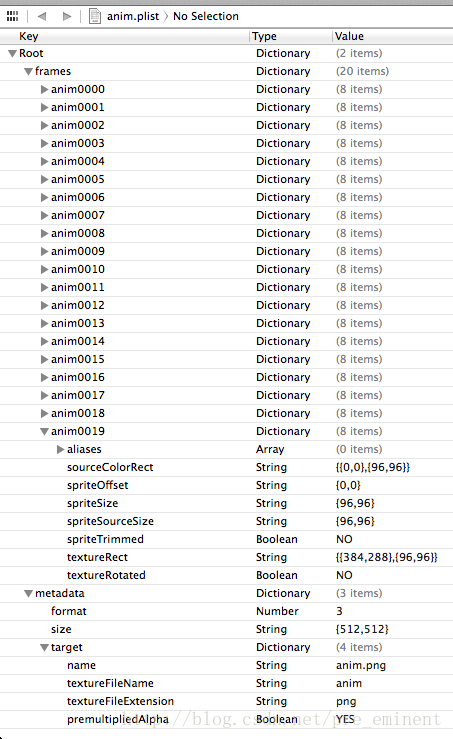
这时,生成了plist文件+一个大纹理图片,如下所示
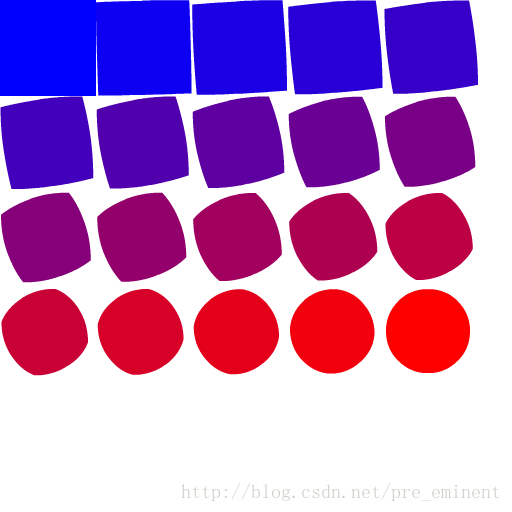
plist文件
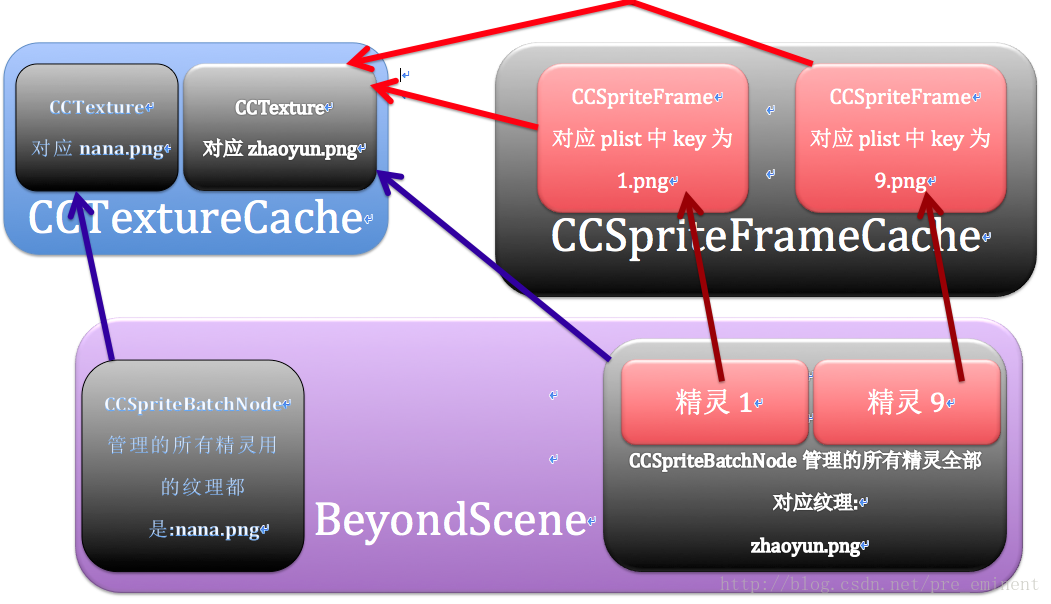
精灵帧缓存、纹理缓存、SpriteBatchNode三者的关系

九、通过Flash CC导出的
Json
文件和大图片,
创建帧动画
大图片纹理 如下图所示:

导出的Json数据如下所示:
{"frames": {

"hero0000":
{
	"frame": {"x":0,"y":0,"w":44,"h":52},
	"rotated": false,
	"trimmed": false,
	"spriteSourceSize": {"x":0,"y":0,"w":44,"h":52},
	"sourceSize": {"w":44,"h":52}
},
"hero0004":
{
	"frame": {"x":42,"y":52,"w":42,"h":52},
	"rotated": false,
	"trimmed": true,
	"spriteSourceSize": {"x":2,"y":0,"w":44,"h":52},
	"sourceSize": {"w":44,"h":52}
}},
"meta": {
	"app": "Adobe Flash Professional",
	"version": "13.1.0.226",
	"image": "Hero.png",
	"format": "RGBA8888",
	"size": {"w":128,"h":128},
	"scale": "1"
}
}
下面通过cocos2d内置的rapidJson解析,并封装成一个Animate对象(可直接runAction)
//
//  FlashTool.cpp
//  01_cocos2d-x
//
//  Created by beyond on 14-10-6.
//
//

#include "FlashTool.h"
// Json解析 使用cocos2d 内置的rapidJson库
#include <json/document.h>

// 通过解析flash cc 导出的Json文件+大图片,生成一个Animate对象,用于执行序列帧动画
Animate * FlashTool::animateFromJsonFile(std::string jsonFile,float delayPerUnit)
{
    // 文档 对象
    rapidjson::Document doc;
    // FileUtils工具类 读入json文件
    std::string fileContent = FileUtils::getInstance()->getStringFromFile(jsonFile);
    //
    fileContent.erase(0,fileContent.find_first_of('{'));
    // 标记默认为 0 ,开始解析
    doc.Parse<0>(fileContent.c_str());
    // 得到大图片的 图片名
    std::string imgFileName = doc["meta"]["image"].GetString();

    auto &frames = doc["frames"];
    // 精灵帧缓存
    auto sfc = SpriteFrameCache::getInstance();
    // 容器用于 存放所有的 动画帧
    Vector<AnimationFrame*> animFrames;
    // 遍历,裁剪,创建,添加到容器
    for (auto m=frames.MemberonBegin(); m!=frames.MemberonEnd(); m++) {
        auto frameName = m->name.GetString();
        auto & frameProperties = m->value["frame"];
        auto & spriteSourceSize = m->value["spriteSourceSize"];

        auto sf = sfc->getSpriteFrameByName(frameName);
        if (!sf) {
            sf = SpriteFrame::create(imgFileName, Rect(frameProperties["x"].GetInt(), frameProperties["y"].GetInt(), frameProperties["w"].GetInt(), frameProperties["h"].GetInt()), m->value["rotated"].GetBool(), Vec2(spriteSourceSize["x"].GetInt(), spriteSourceSize["y"].GetInt()), Size(spriteSourceSize["w"].GetInt(), spriteSourceSize["h"].GetInt()));
            sfc->addSpriteFrame(sf, frameName);
        }
        animFrames.pushBack(AnimationFrame::create(sf, delayPerUnit, ValueMapNull));
    }
    // 生成用于Action的Animate
    Animation * animation = Animation::create(animFrames,delayPerUnit);
    return Animate::create(animation);
}


 2981
2981

 被折叠的 条评论
为什么被折叠?
被折叠的 条评论
为什么被折叠?
 到【灌水乐园】发言


