


文章目录
首先介绍一下什么是GraphRAG?
GraphRAG全称为“基于图的检索增强生成”(Graph-based Retrieval Augmented Generation),是由微软开发的一种新型的检索增强生成框架。GraphRAG使用大模型LLM解析数据以创建知识图谱(实体的结构化表示、属性以及它们之间的关系),并回答用户关于用户提供的私有数据集的问题。
GraphRAG能做什么?
GraphRAG能够连接大量信息中的信息,并使用这些连接来回答使用关键字和基于向量的搜索机制难以或不可能回答的问题。在前一个问题的基础上,提供关于系统如何为各种用途提供功能的半技术性高级信息。这使得使用GraphRAG的系统可以回答跨越许多文档的问题以及主题问题,例如“此数据集中的顶级主题是什么?”
GraphRAG 通过以这种结构化的格式表达,可以克服传统 RAG 方法的局限性。GraphRAG 的知识图谱可以更精确和全面地检索相关信息,使模型能够产生不仅事实准确而且与上下文相关并涵盖查询所需方面的答复。
一、环境安装
1.1 Ollama安装
这里,主要考虑Linux服务器的Ollama安装,参考博客:【大模型】Ollama的安装部署及运行大模型教程
关于Ollama的安装,需要满足以下几点:
- 服务器上安装好 Ollama,
ollama --version可以运行成功 - 运行模型(如llama 3),
ollama run llama3可以运行成功 - 虚拟环境中安装好Ollama依赖包,
pip ollama==0.4.5
1.2 GraphRAG
- 准备环境(在终端运行)
创建虚拟环境(已安装好anaconda),此处建议使用python3.11(官方要求 3.10<= python<3.13):
conda create -n GraphRAG python=3.11
conda activate GraphRAG
- 下载源码并进入目录
GraphRAG源码地址:https://github.com/microsoft/graphrag
git clone https://github.com/microsoft/graphrag.git
cd graphrag
注意:因为现有教程多是基于老版本来修改代码,这里,我安装的是 v0.4.1 的版本:https://github.com/microsoft/graphrag/tree/v0.4.1
大家可以根据自己的需要来安装具体版本。
- 下载依赖并初始化项目
直接基于pip安装依赖(推荐)。
pip install -e .
出现报错:
Preparing editable metadata (pyproject.toml) ... error
  error: subprocess-exited-with-error

  × Preparing editable metadata (pyproject.toml) did not run successfully.
  │ exit code: 1
  ╰─> [26 lines of output]
      Traceback (most recent call last):
        File "/home/pml/anaconda3/envs/codegen_3_10/lib/python3.10/site-packages/pip/_vendor/pyproject_hooks/_in_process/_in_process.py", line 353, in <module>
          main()
        File "/home/pml/anaconda3/envs/codegen_3_10/lib/python3.10/site-packages/pip/_vendor/pyproject_hooks/_in_process/_in_process.py", line 335, in main
          json_out['return_val'] = hook(**hook_input['kwargs'])
        File "/home/pml/anaconda3/envs/codegen_3_10/lib/python3.10/site-packages/pip/_vendor/pyproject_hooks/_in_process/_in_process.py", line 181, in prepare_metadata_for_build_editable
          return hook(metadata_directory, config_settings)
        File "/tmp/pip-build-env-xs0ehnju/overlay/lib/python3.10/site-packages/poetry/core/masonry/api.py", line 42, in prepare_metadata_for_build_wheel
          poetry = Factory().create_poetry(Path().resolve(), with_groups=False)
        File "/tmp/pip-build-env-xs0ehnju/overlay/lib/python3.10/site-packages/poetry_dynamic_versioning/patch.py", line 26, in alt_poetry_create
          name = _get_and_apply_version(
        File "/tmp/pip-build-env-xs0ehnju/overlay/lib/python3.10/site-packages/poetry_dynamic_versioning/__init__.py", line 686, in _get_and_apply_version
          version, instance = _get_version(config, name)
        File "/tmp/pip-build-env-xs0ehnju/overlay/lib/python3.10/site-packages/poetry_dynamic_versioning/__init__.py", line 502, in _get_version
          version = _get_version_from_dunamai(vcs, pattern, config)
        File "/tmp/pip-build-env-xs0ehnju/overlay/lib/python3.10/site-packages/poetry_dynamic_versioning/__init__.py", line 463, in _get_version_from_dunamai
          return Version.from_vcs(
        File "/tmp/pip-build-env-xs0ehnju/overlay/lib/python3.10/site-packages/dunamai/__init__.py", line 2090, in from_vcs
          return cls._do_vcs_callback(
        File "/tmp/pip-build-env-xs0ehnju/overlay/lib/python3.10/site-packages/dunamai/__init__.py", line 2145, in _do_vcs_callback
          return callback(**kwargs)
        File "/tmp/pip-build-env-xs0ehnju/overlay/lib/python3.10/site-packages/dunamai/__init__.py", line 1104, in from_git
          _detect_vcs(vcs, path)
        File "/tmp/pip-build-env-xs0ehnju/overlay/lib/python3.10/site-packages/dunamai/__init__.py", line 371, in _detect_vcs
          raise RuntimeError("This does not appear to be a {} project".format(expected_vcs.value.title()))
      RuntimeError: This does not appear to be a Git project
      [end of output]

  note: This error originates from a subprocess, and is likely not a problem with pip.
error: metadata-generation-failed

× Encountered error while generating package metadata.
╰─> See above for output.

note: This is an issue with the package mentioned above, not pip.
【报错原因】:本地项目未使用Git版本控制。
【解决方案】:找到 pyproject.toml 文件,注释掉版本控制相关的内容:
#[tool.poetry-dynamic-versioning]
#enable = true
#style = "pep440"
#vcs = "git"
#bump = true
#format-jinja = """
#    {%- if distance == 0 -%}
#        {{ serialize_pep440(base, stage, revision) }}
#    {%- else -%}
#        {{ serialize_pep440(base, stage, revision, dev=distance) }}
#    {%- endif -%}
#"""
- 创建 ragtest 文件夹,下载并将待检索的文档document放入./ragtest/input/目录下
mkdir -p ./ragtest/input
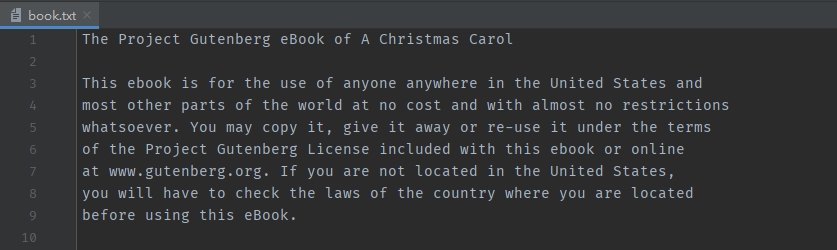
将待检索的文档document放入./input/目录下,这里我们使用 book.txt 作为样例。
book.txt的样例内容如下:
8、初始化 ./ragtest 文件夹以创建所需的文件:
graphrag init --root ./ragtest
此时会在 ragtest 目录下两个文件:.env 和 settings.yaml。
- settings.yaml 是设置文件,因为我们是本地对接 ollama,所以要做一些修改。.
- env为隐藏文件,通过
ll命令可以查看:

9、修改.env文件内容:
GraphRAG默认支持的是OpenAI的GPT模型,这里需要修改为开源模型 llama,.env文件修改后的内容为:
GRAPHRAG_API_KEY=ollama
GRAPHRAG_CLAIM_EXTRACTION_ENABLED=True
10、修改setting.yaml文件,修改的代码为:
- 修改点1
api_key: ollama
  model: llama3.1:8b
  api_base: http://localhost:11434/v1
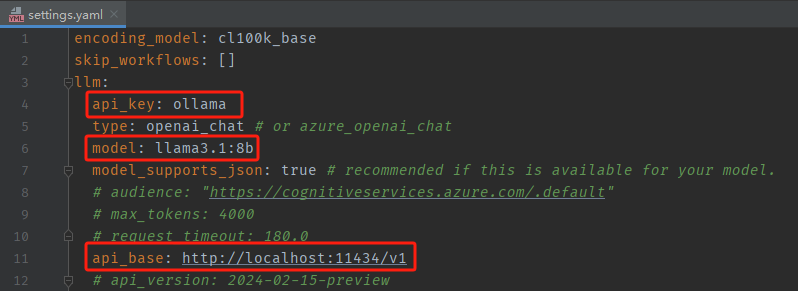
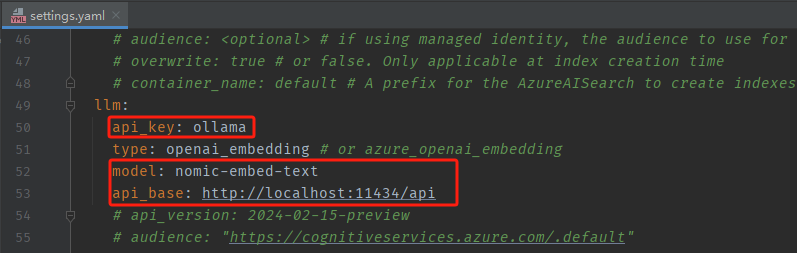
- 修改点2
api_key: ollama
model: nomic-embed-text
api_base: http://localhost:11434/api
- 修改点3(可根据需要选择是否修改)
chunks:
  size: 300

- 修改点4(可根据需要选择是否修改)
snapshots:
  graphml: true

【注意】:
- embeddings模型推荐使用nomic-embed-text。
- 如果出现
ValueError: Columns must be same length as key,这时就可以将chunk size调小一点,使用更大的chunk size可以加快处理速度(另一方面,经由验证,改为1200的chunk size,可以得到更positive的结果),但是也会导致较低保真度的输出和较少的有意义的参考文本。 - 如果需要知识图谱的可视化可以将第七处
graohml修改为true,具体可视化方法见下文。
二、源代码修改
2.1 直接修改本地代码
直接修改本地项目代码适用于以git源码安装graphrag方式,参考:https://blog.csdn.net/EEEric_/article/details/143951187
注意:下面所修改的代码文件对应于 graphrag的 v0.4.1 的版本:https://github.com/microsoft/graphrag/tree/v0.4.1
若版本不匹配修改的文件和内容会有差异!
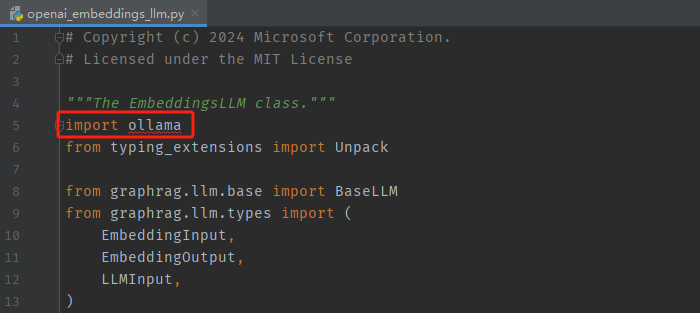
1、修改文件:graphrag/llm/openai/openai_embeddings_llm.py
- 修改点1
import ollama
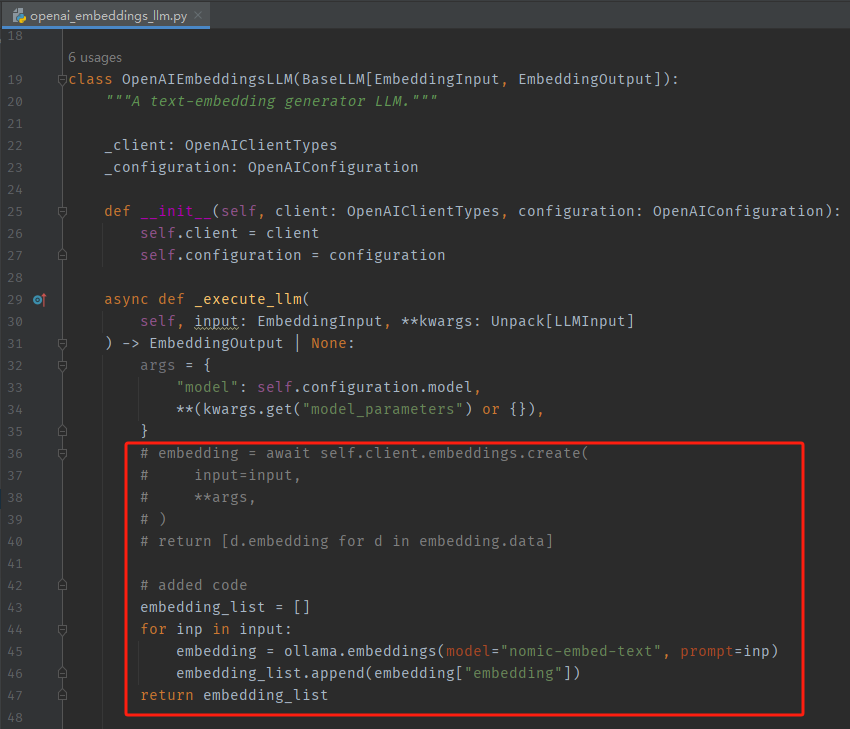
- 修改点2
       embedding_list = []
        for inp in input:
            embedding = ollama.embeddings(model="nomic-embed-text",prompt=inp)
            embedding_list.append(embedding["embedding"])
        return embedding_list
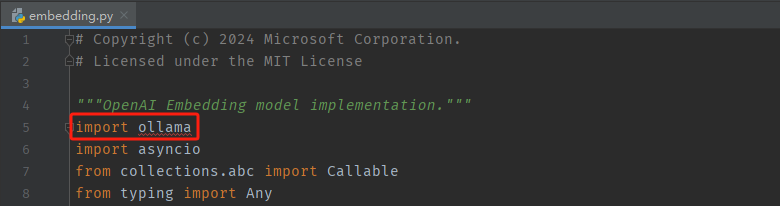
2、修改文件:graphrag/graphrag/query/llm/oai/embedding.py
我们本地调用ollama提供的模型服务,需要注释掉官方原代码(原代码默认调用OpenAI的GPT模型)。
- 修改点1
import ollama
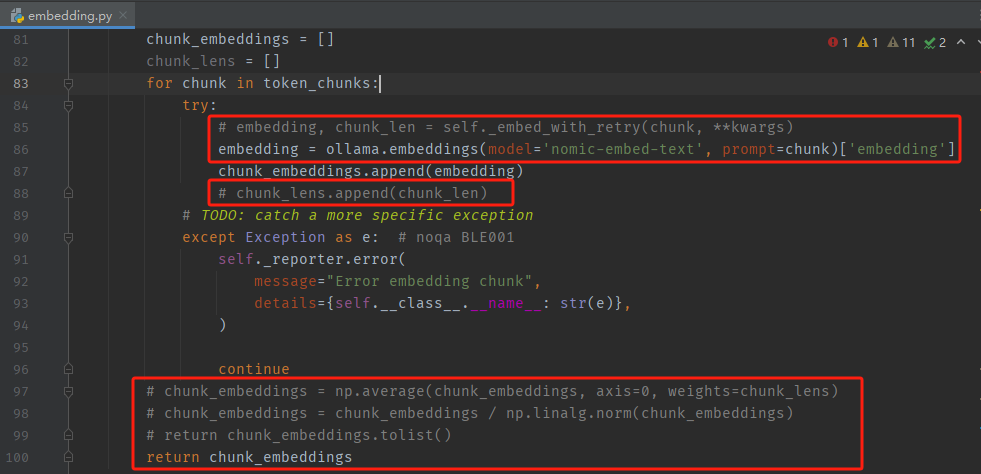
- 修改点2
embedding = ollama.embeddings(model='nomic-embed-text', prompt=chunk)['embedding']
return chunk_embeddings
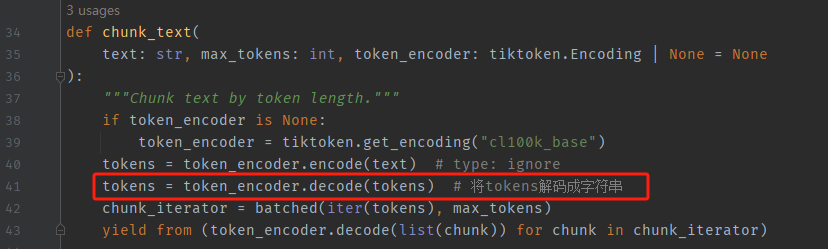
3、修改文件:graphrag/graphrag/query/llm/text_utils.py
tokens = token_encoder.decode(tokens) # 将tokens解码成字符串
2.2 文件替换
文件替换的方式适用于基于 pip install graphrag 的方式直接安装 graphrag ,参考:https://blog.csdn.net/qq_56109145/article/details/143663314
直接将替换文件替换到Python的虚拟环境中安装包对应位置即可。
感谢哔哩哔哩up主@深圳大学城市空间信息提供的替换文件。
网盘链接: https://pan.baidu.com/s/1li35HD80IulxJntWcI9DFw?pwd=s53j
提取码: s53j
三、构建GraphRAG的索引
graphrag index --root ./ragtest
这一过程耗时较长,所用时间和在 Input 文件夹中数据大小和你所使用的模型大小有关。
成功结束之后如下图所示:
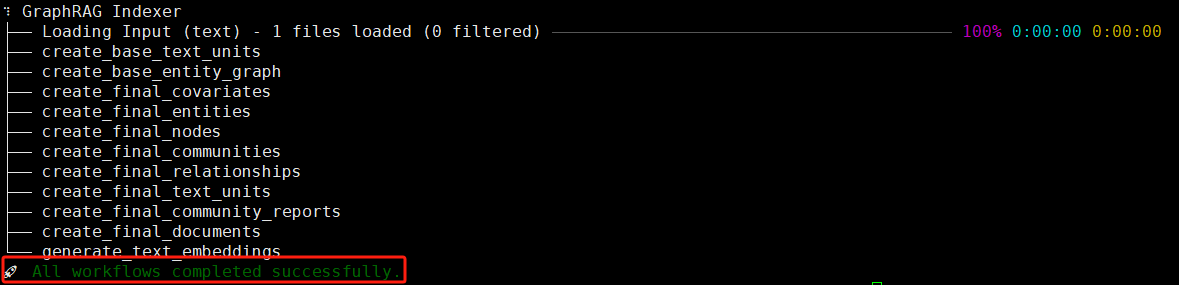
这里,3000行的book.txt花费了4个小时才构建完毕,速度确实比较慢。
四、执行查询
GraphRAG提供了两种查询方式:
- 全局查询:更侧重全文理解
- 局部查询:更侧重细节
4.1 全局查询
执行全局查询(global search):
graphrag query --root ./ragtest --method global --query "What is the main topic of this article?"
结果展示:
4.2 局部查询
进行局部查询还需修改源码,具体步骤参考博客:GraphRAG+Ollama实现本地部署(最全,非常详细,保姆教程)
几个博客教程中的局部查询都是基于 graphrag-local-ollama 实现,Gihub地址:https://github.com/TheAiSingularity/graphrag-local-ollama
1、下载源代码
git clone https://github.com/TheAiSingularity/graphrag-local-ollama.git
cd graphrag-local-ollama/
2、参考 graphrag 的步骤 安装依赖包、创建GraphRAG目录、创建input/目录用于存放原始文档、初始化项目、修改settings.yaml 文件、修改配置文件等步骤。
3、安装 langchain_community
pip install langchain_community
4、修改源码文件:graphrag-local-ollama/graphrag/query/llm/oai/embedding.py
将待修改的源码文件文件替换为下述内容:
# Copyright (c) 2024 Microsoft Corporation.
# Licensed under the MIT License
"""OpenAI Embedding model implementation."""

import asyncio
from collections.abc import Callable
from typing import Any

import numpy as np
import tiktoken
from tenacity import (
    AsyncRetrying,
    RetryError,
    Retrying,
    retry_if_exception_type,
    stop_after_attempt,
    wait_exponential_jitter,
)

from graphrag.query.llm.base import BaseTextEmbedding
from graphrag.query.llm.oai.base import OpenAILLMImpl
from graphrag.query.llm.oai.typing import (
    OPENAI_RETRY_ERROR_TYPES,
    OpenaiApiType,
)
from graphrag.query.llm.text_utils import chunk_text
from graphrag.query.progress import StatusReporter

from langchain_community.embeddings import OllamaEmbeddings

class OpenAIEmbedding(BaseTextEmbedding, OpenAILLMImpl):
    """Wrapper for OpenAI Embedding models."""

    def __init__(
        self,
        api_key: str | None = None,
        azure_ad_token_provider: Callable | None = None,
        model: str = "text-embedding-3-small",
        deployment_name: str | None = None,
        api_base: str | None = None,
        api_version: str | None = None,
        api_type: OpenaiApiType = OpenaiApiType.OpenAI,
        organization: str | None = None,
        encoding_name: str = "cl100k_base",
        max_tokens: int = 8191,
        max_retries: int = 10,
        request_timeout: float = 180.0,
        retry_error_types: tuple[type[BaseException]] = OPENAI_RETRY_ERROR_TYPES,  # type: ignore
        reporter: StatusReporter | None = None,
    ):
        OpenAILLMImpl.__init__(
            self=self,
            api_key=api_key,
            azure_ad_token_provider=azure_ad_token_provider,
            deployment_name=deployment_name,
            api_base=api_base,
            api_version=api_version,
            api_type=api_type,  # type: ignore
            organization=organization,
            max_retries=max_retries,
            request_timeout=request_timeout,
            reporter=reporter,
        )

        self.model = model
        self.encoding_name = encoding_name
        self.max_tokens = max_tokens
        self.token_encoder = tiktoken.get_encoding(self.encoding_name)
        self.retry_error_types = retry_error_types

    def embed(self, text: str, **kwargs: Any) -> list[float]:
        """
        Embed text using OpenAI Embedding's sync function.

        For text longer than max_tokens, chunk texts into max_tokens, embed each chunk, then combine using weighted average.
        Please refer to: https://github.com/openai/openai-cookbook/blob/main/examples/Embedding_long_inputs.ipynb
        """
        token_chunks = chunk_text(
            text=text, token_encoder=self.token_encoder, max_tokens=self.max_tokens
        )
        chunk_embeddings = []
        chunk_lens = []
        for chunk in token_chunks:
            try:
                embedding, chunk_len = self._embed_with_retry(chunk, **kwargs)
                chunk_embeddings.append(embedding)
                chunk_lens.append(chunk_len)
            except Exception as e:  # noqa BLE001
                self._reporter.error(
                    message="Error embedding chunk",
                    details={self.__class__.__name__: str(e)},
                )
                continue
        chunk_embeddings = np.average(chunk_embeddings, axis=0, weights=chunk_lens)
        chunk_embeddings = chunk_embeddings / np.linalg.norm(chunk_embeddings)
        return chunk_embeddings.tolist()

    async def aembed(self, text: str, **kwargs: Any) -> list[float]:
        """
        Embed text using OpenAI Embedding's async function.

        For text longer than max_tokens, chunk texts into max_tokens, embed each chunk, then combine using weighted average.
        """
        token_chunks = chunk_text(
            text=text, token_encoder=self.token_encoder, max_tokens=self.max_tokens
        )
        chunk_embeddings = []
        chunk_lens = []
        embedding_results = await asyncio.gather(*[
            self._aembed_with_retry(chunk, **kwargs) for chunk in token_chunks
        ])
        embedding_results = [result for result in embedding_results if result[0]]
        chunk_embeddings = [result[0] for result in embedding_results]
        chunk_lens = [result[1] for result in embedding_results]
        chunk_embeddings = np.average(chunk_embeddings, axis=0, weights=chunk_lens)  # type: ignore
        chunk_embeddings = chunk_embeddings / np.linalg.norm(chunk_embeddings)
        return chunk_embeddings.tolist()

    def _embed_with_retry(
        self, text: str | tuple, **kwargs: Any
    ) -> tuple[list[float], int]:
        try:
            retryer = Retrying(
                stop=stop_after_attempt(self.max_retries),
                wait=wait_exponential_jitter(max=10),
                reraise=True,
                retry=retry_if_exception_type(self.retry_error_types),
            )
            for attempt in retryer:
                with attempt:
                    embedding = (
                        OllamaEmbeddings(
                            model=self.model,
                        ).embed_query(text)
                        or []
                    )
                    return (embedding, len(text))
        except RetryError as e:
            self._reporter.error(
                message="Error at embed_with_retry()",
                details={self.__class__.__name__: str(e)},
            )
            return ([], 0)
        else:
            # TODO: why not just throw in this case?
            return ([], 0)

    async def _aembed_with_retry(
        self, text: str | tuple, **kwargs: Any
    ) -> tuple[list[float], int]:
        try:
            retryer = AsyncRetrying(
                stop=stop_after_attempt(self.max_retries),
                wait=wait_exponential_jitter(max=10),
                reraise=True,
                retry=retry_if_exception_type(self.retry_error_types),
            )
            async for attempt in retryer:
                with attempt:
                    embedding = (
                        await OllamaEmbeddings(
                            model=self.model,
                        ).embed_query(text) or [] )
                    return (embedding, len(text))
        except RetryError as e:
            self._reporter.error(
                message="Error at embed_with_retry()",
                details={self.__class__.__name__: str(e)},
            )
            return ([], 0)
        else:
            # TODO: why not just throw in this case?
            return ([], 0)
5、进行索引,构建图
graphrag index --root ./ragtest
6、执行局部查询(local search):
graphrag query --root ./ragtest --method local --query "What is the main topic of this article?"
结果展示:
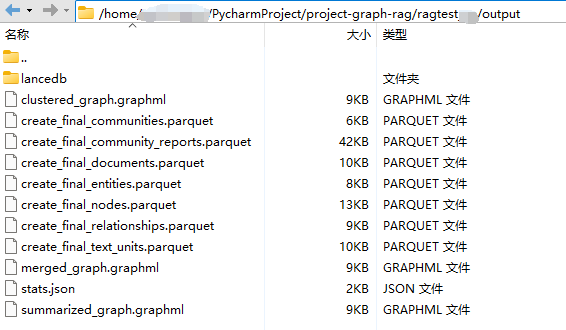
五、可视化
上述构建索引结束,会在output文件夹中生成一些列文件,如下所示:
目前已经有一些工具可支持GraphGAG的可视化。
(1)Neo4j
Neo4j是由 Neo4j Inc. 开发的图数据库管理系统,是图数据库技术领域的领导者。Neo4j 存储的数据元素包括节点、连接它们的边以及节点和边的属性。
基于Neo4j的可视化参考博客:GraphRAG:知识图谱+RAG技术
(2)gephi
将可视化生成的 graphrag/ragtest/output/summarized_graph.graphml 文件上传至gephi进行可视化(具体可根据gephi官方教程操作)。
- gephi下载地址:https://gephi.org/users/download/
- gephi使用教程:https://gephi.org/users/quick-start/
(3)GraphRAG Visualizer
GraphRAG Visualizer:用于可视化和探索微软GraphRAG框架生成数据的Web工具,支持2D/3D图可视化、数据表格展示、搜索功能等。可以通过上传GraphRAG索引管道生成的parquet文件,实现在本地查看和分析数据,包括文档、文本单元、社区、协变量等节点及其关系。
六、提取自定义实体类别
1、修改settings.yaml文件中实体类别如下位置:
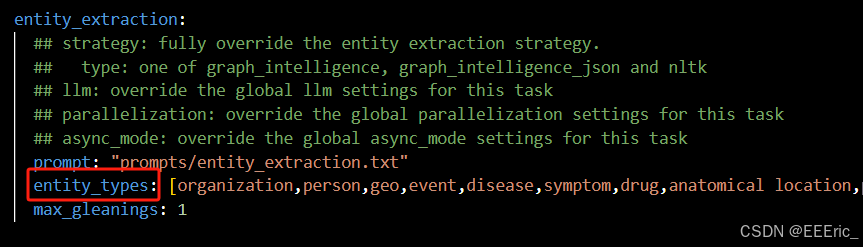
2、手动调整prompt自定义实体
参考博客:【LLM大模型】GraphRAG手调Prompt提取自定义实体


 1558
1558

 被折叠的 条评论
为什么被折叠?
被折叠的 条评论
为什么被折叠?
 到【灌水乐园】发言


