


英文原网页查看。
修订:20201115
使用矩阵转换点云
在本教程中,我们将学习如何使用4x4矩阵转换点云。我们将对加载的点云应用旋转和平移,然后显示结果。
该程序能够加载一个PCD或PLY文件;对其应用矩阵变换,并显示原始和变换后的点云。
代码
首先,在您最喜欢的编辑器中创建一个文件,例如matrix_transform.cpp,并在其中放置以下代码:
#include <iostream>

#include <pcl/io/pcd_io.h>
#include <pcl/io/ply_io.h>
#include <pcl/point_cloud.h>
#include <pcl/console/parse.h>
#include <pcl/common/transforms.h>
#include <pcl/visualization/pcl_visualizer.h>

// 此函数显示帮助功能
void
showHelp(char * program_name)
{
  std::cout << std::endl;
  std::cout << "Usage: " << program_name << " cloud_filename.[pcd|ply]" << std::endl;
  std::cout << "-h:  Show this help." << std::endl;
}

// 这是main主函数
int
main (int argc, char** argv)
{
  // 显示帮助
  if (pcl::console::find_switch (argc, argv, "-h") || pcl::console::find_switch (argc, argv, "--help")) {
    showHelp (argv[0]);
    return 0;
  }

  // 获取参数中的点云文件名 | 处理PCD和PLY文件
  std::vector<int> filenames;
  bool file_is_pcd = false;

  filenames = pcl::console::parse_file_extension_argument (argc, argv, ".ply");

  if (filenames.size () != 1)  {
    filenames = pcl::console::parse_file_extension_argument (argc, argv, ".pcd");

    if (filenames.size () != 1) {
      showHelp (argv[0]);
      return -1;
    } else {
      file_is_pcd = true;
    }
  }

  // 加载文件 | 处理PCD和PLY文件
  pcl::PointCloud<pcl::PointXYZ>::Ptr source_cloud (new pcl::PointCloud<pcl::PointXYZ> ());

  if (file_is_pcd) {
    if (pcl::io::loadPCDFile (argv[filenames[0]], *source_cloud) < 0)  {
      std::cout << "Error loading point cloud " << argv[filenames[0]] << std::endl << std::endl;
      showHelp (argv[0]);
      return -1;
    }
  } else {
    if (pcl::io::loadPLYFile (argv[filenames[0]], *source_cloud) < 0)  {
      std::cout << "Error loading point cloud " << argv[filenames[0]] << std::endl << std::endl;
      showHelp (argv[0]);
      return -1;
    }
  }

  /*提醒:变换矩阵是如何工作的:
           |-------> 这一列是平移变换
    | 1 0 0 x |  \
    | 0 1 0 y |   }-> 左边是3x3单位矩阵(没有旋转)
    | 0 0 1 z |  /
    | 0 0 0 1 |    -> 我们不用这行(它必须保持0,0,0,1)
    方法 #1: 使用Matrix4f
    这是“人工”方法,完美的理解,但容易出错!
  */
  Eigen::Matrix4f transform_1 = Eigen::Matrix4f::Identity();

  // 定义一个旋转矩阵 (参考 https://en.wikipedia.org/wiki/Rotation_matrix)
  float theta = M_PI/4; // 以弧度为单位的旋转角度
  transform_1 (0,0) = std::cos (theta);
  transform_1 (0,1) = -sin(theta);
  transform_1 (1,0) = sin (theta);
  transform_1 (1,1) = std::cos (theta);
  //    (行, 列)
  // 在x轴上定义2.5米的平移量.
  transform_1 (0,3) = 2.5;

  // 打印变换矩阵
  printf ("Method #1: using a Matrix4f\n");
  std::cout << transform_1 << std::endl;

  /*  方法 #2:使用Affine3f
    这种方法更简单,更不容易出错
  */
  Eigen::Affine3f transform_2 = Eigen::Affine3f::Identity();

  // 在x轴上定义2.5米的平移量.
  transform_2.translation() << 2.5, 0.0, 0.0;

  // 与之前相同的旋转矩阵以弧度为单位的绕Z轴转角
  transform_2.rotate (Eigen::AngleAxisf (theta, Eigen::Vector3f::UnitZ()));

  // 打印变换矩阵
  printf ("\nMethod #2: using an Affine3f\n");
  std::cout << transform_2.matrix() << std::endl;

  // 执行转换
  pcl::PointCloud<pcl::PointXYZ>::Ptr transformed_cloud (new pcl::PointCloud<pcl::PointXYZ> ());
  // 您可以应用transform_1或transform_2;它们是一样的
  pcl::transformPointCloud (*source_cloud, *transformed_cloud, transform_2);

  // 可视化
  printf(  "\nPoint cloud colors :  white  = original point cloud\n"
      "                        red  = transformed point cloud\n");
  pcl::visualization::PCLVisualizer viewer ("Matrix transformation example");

   // 为点云定义R、G、B颜色
  pcl::visualization::PointCloudColorHandlerCustom<pcl::PointXYZ> source_cloud_color_handler (source_cloud, 255, 255, 255);
  // 我们将点云添加到查看器并传递颜色处理句柄
  viewer.addPointCloud (source_cloud, source_cloud_color_handler, "original_cloud");

  pcl::visualization::PointCloudColorHandlerCustom<pcl::PointXYZ> transformed_cloud_color_handler (transformed_cloud, 230, 20, 20); // 红色
  viewer.addPointCloud (transformed_cloud, transformed_cloud_color_handler, "transformed_cloud");

  viewer.addCoordinateSystem (1.0, "cloud", 0);
  viewer.setBackgroundColor(0.05, 0.05, 0.05, 0); // Setting background to a dark grey
  viewer.setPointCloudRenderingProperties (pcl::visualization::PCL_VISUALIZER_POINT_SIZE, 2, "original_cloud");
  viewer.setPointCloudRenderingProperties (pcl::visualization::PCL_VISUALIZER_POINT_SIZE, 2, "transformed_cloud");
  //viewer.setPosition(800, 400); // 设置visualiser窗口位置

  while (!viewer.wasStopped ()) { // 显示可视化器,直到按下“q”键
    viewer.spinOnce ();
  }

  return 0;
}
解释
现在,让我们逐步分解代码。
#include <iostream>

#include <pcl/io/pcd_io.h>
#include <pcl/io/ply_io.h>
#include <pcl/point_cloud.h>
#include <pcl/console/parse.h>
#include <pcl/common/transforms.h>
#include <pcl/visualization/pcl_visualizer.h>
包括我们将使用的头文件。#include <pcl/common/transforms.h>允许我们使用pcl::transformPointCloud函数。
// 此函数将显示帮助功能
void
showHelp(char * program_name)
{
  std::cout << std::endl;
  std::cout << "Usage: " << program_name << " cloud_filename.[pcd|ply]" << std::endl;
  std::cout << "-h:  Show this help." << std::endl;
}
如果用户没有提供足够的参数,此函数用于显示帮助。
  // 显示帮助
  if (pcl::console::find_switch (argc, argv, "-h") || pcl::console::find_switch (argc, argv, "--help")) {
    showHelp (argv[0]);
    return 0;
  }
我们解析命令行上的参数,使用**-h或-help**将显示帮助,这将终止程序
  //从参数中得到点云文件名 | 适用于PCD和PLY文件
  std::vector<int> filenames;
  bool file_is_pcd = false;

  filenames = pcl::console::parse_file_extension_argument (argc, argv, ".ply");

  if (filenames.size () != 1)  {
    filenames = pcl::console::parse_file_extension_argument (argc, argv, ".pcd");

    if (filenames.size () != 1) {
      showHelp (argv[0]);
      return -1;
    } else {
      file_is_pcd = true;
    }
  }
我们在参数中查找.ply或.pcd文件名,如果没有找到则终止程序。布尔参数 file_is_pcd将帮助我们加载PCD或PLY文件。
  //加载电云文件 | 适用于PCD和PLY文件
  pcl::PointCloud<pcl::PointXYZ>::Ptr source_cloud (new pcl::PointCloud<pcl::PointXYZ> ());

  if (file_is_pcd) {
    if (pcl::io::loadPCDFile (argv[filenames[0]], *source_cloud) < 0)  {
      std::cout << "Error loading point cloud " << argv[filenames[0]] << std::endl << std::endl;
      showHelp (argv[0]);
      return -1;
    }
  } else {
    if (pcl::io::loadPLYFile (argv[filenames[0]], *source_cloud) < 0)  {
      std::cout << "Error loading point cloud " << argv[filenames[0]] << std::endl << std::endl;
      showHelp (argv[0]);
      return -1;
    }
  }
现在,我们加载PCD/PLY文件,并检查文件是否已成功加载。否则,终止程序。
  /*提醒:变换矩阵是如何工作的:
           |-------> 这一列是平移变换
    | 1 0 0 x |  \
    | 0 1 0 y |   }-> 左边是3x3单位矩阵(没有旋转)
    | 0 0 1 z |  /
    | 0 0 0 1 |    -> 我们不用这行(它必须保持0,0,0,1)
    方法 #1: 使用Matrix4f
    这是“人工”方法,完美的理解,但容易出错!
  */
  Eigen::Matrix4f transform_1 = Eigen::Matrix4f::Identity();
  }
这是创建变换矩阵的第一种方法。这将帮助您理解转换矩阵是如何工作的。用单位矩阵初始化4x4矩阵;
    |  1  0  0  0  |
i = |  0  1  0  0  |
    |  0  0  1  0  |
    |  0  0  0  1  |
注意
当数相乘时,单位矩阵等价于“1”;它改变不了什么。它是一个方阵,主对角线上是1,其它地方是0。
这意味着没有转换(没有旋转和平移),我们不用矩阵的最后一行。
前3行和列(左上角)是旋转矩阵,最后一列的前3行是平移。
  // 定义一个旋转矩阵 (参考 https://en.wikipedia.org/wiki/Rotation_matrix)
  float theta = M_PI/4; // 以弧度为单位的旋转角度
  transform_1 (0,0) = std::cos (theta);
  transform_1 (0,1) = -sin(theta);
  transform_1 (1,0) = sin (theta);
  transform_1 (1,1) = std::cos (theta);
  //    (行, 列)
  // 在x轴上定义2.5米的平移量.
  transform_1 (0,3) = 2.5;

  // 打印变换矩阵
  printf ("Method #1: using a Matrix4f\n");
  std::cout << transform_1 << std::endl;
这里我们定义了绕Z轴45°(PI/4)旋转和沿X轴的平移。这就是我们刚刚定义的变换
    |  cos(θ) -sin(θ)  0.0 |
R = |  sin(θ)  cos(θ)  0.0 |
    |  0.0     0.0     1.0 |

t = < 2.5, 0.0, 0.0 >
  /*  方法 #2:使用Affine3f
    这种方法更简单,更不容易出错
  */
  Eigen::Affine3f transform_2 = Eigen::Affine3f::Identity();

  // 在x轴上定义2.5米的平移量.
  transform_2.translation() << 2.5, 0.0, 0.0;

  // 与之前相同的旋转矩阵以弧度为单位的绕Z轴转角
  transform_2.rotate (Eigen::AngleAxisf (theta, Eigen::Vector3f::UnitZ()));

  // 打印变换矩阵
  printf ("\nMethod #2: using an Affine3f\n");
  std::cout << transform_2.matrix() << std::endl;
第二种方法更容易理解,也更不容易出错。如果你想做几个旋转,一定要小心;旋转是不可交换的!这意味着大多数情况下:rotA * rotB != rotB * rotA。
 // 执行转换
  pcl::PointCloud<pcl::PointXYZ>::Ptr transformed_cloud (new pcl::PointCloud<pcl::PointXYZ> ());
  // 您可以应用transform_1或transform_2;它们是一样的
  pcl::transformPointCloud (*source_cloud, *transformed_cloud, transform_2);
现在我们将这个矩阵应用到点云source_cloud上,并将结果保存到新创建的transformed_cloud中。
 // 可视化
  printf(  "\nPoint cloud colors :  white  = original point cloud\n"
      "                        red  = transformed point cloud\n");
  pcl::visualization::PCLVisualizer viewer ("Matrix transformation example");

   // 为点云定义R、G、B颜色
  pcl::visualization::PointCloudColorHandlerCustom<pcl::PointXYZ> source_cloud_color_handler (source_cloud, 255, 255, 255);
  // 我们将点云添加到查看器并传递颜色处理句柄
  viewer.addPointCloud (source_cloud, source_cloud_color_handler, "original_cloud");

  pcl::visualization::PointCloudColorHandlerCustom<pcl::PointXYZ> transformed_cloud_color_handler (transformed_cloud, 230, 20, 20); // 红色
  viewer.addPointCloud (transformed_cloud, transformed_cloud_color_handler, "transformed_cloud");

  viewer.addCoordinateSystem (1.0, "cloud", 0);
  viewer.setBackgroundColor(0.05, 0.05, 0.05, 0); // Setting background to a dark grey
  viewer.setPointCloudRenderingProperties (pcl::visualization::PCL_VISUALIZER_POINT_SIZE, 2, "original_cloud");
  viewer.setPointCloudRenderingProperties (pcl::visualization::PCL_VISUALIZER_POINT_SIZE, 2, "transformed_cloud");
  //viewer.setPosition(800, 400); // 设置visualiser窗口位置

  while (!viewer.wasStopped ()) { // 显示可视化器,直到按下“q”键
    viewer.spinOnce ();
  }

  return 0;
然后我们使用PCLVisualizer将结果可视化。原始点云将显示为白色,转换后的点云将显示为红色。将显示coordoniates轴。我们还设置了可视化程序的背景颜色和点显示大小。
编译和运行程序
在CMakeLists.txt文件中添加以下行:
cmake_minimum_required(VERSION 2.6 FATAL_ERROR)

project(pcl-matrix_transform)

find_package(PCL 1.7 REQUIRED)

include_directories(${PCL_INCLUDE_DIRS})
link_directories(${PCL_LIBRARY_DIRS})
add_definitions(${PCL_DEFINITIONS})

add_executable (matrix_transform matrix_transform.cpp)
target_link_libraries (matrix_transform ${PCL_LIBRARIES})
完成可执行文件后,运行它,将路径传递给PCD或PLY文件。要重现如下所示的结果,可以下载cube.ply文件:
$ ./matrix_transform cube.ply
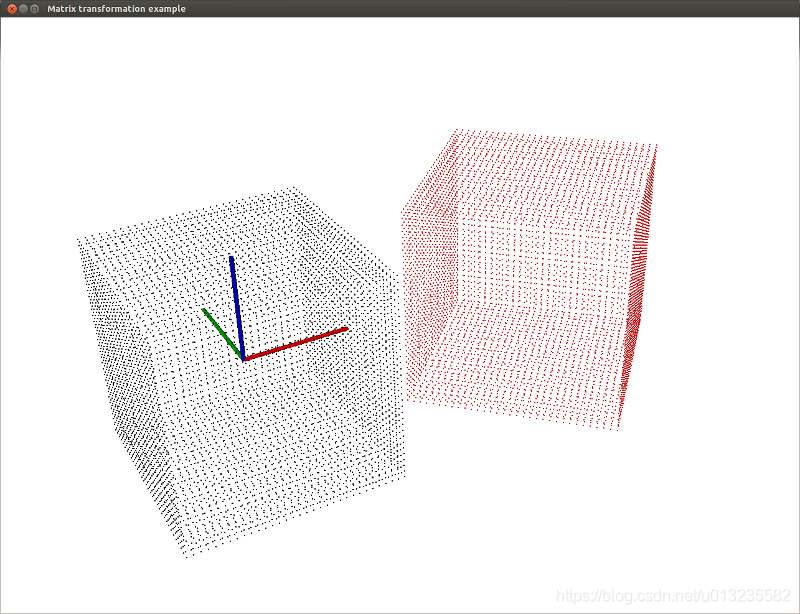
你会看到类似的结果:
./matrix_transform cube.ply
[pcl::PLYReader] /home/victor/cube.ply:12: property 'list uint8 uint32 vertex_indices' of element 'face' is not handled
Method #1: using a Matrix4f
 0.707107 -0.707107         0       2.5
 0.707107  0.707107         0         0
        0         0         1         0
        0         0         0         1

Method #2: using an Affine3f
 0.707107 -0.707107         0       2.5
 0.707107  0.707107         0         0
        0         0         1         0
        0         0         0         1

Point cloud colors :  white   = original point cloud
                       red    = transformed point cloud
更多关于转换
现在,您已经成功地使用转换矩阵转换了一个点云。
如果你想变换一个点呢?一个向量?
在三维空间中定义一个点,该点有三个坐标;x y z(在笛卡尔坐标系中)
如何用4x4矩阵乘以一个向量(三个坐标)?你就是不能!如果你不知道为什么,请参考维基百科上的矩阵乘法。
我们需要一个有四个分量的向量。最后一个分量是什么?这取决于你想做什么:
- 如果你想转换一个点:把1放在向量的末尾,这样平移就被考虑进去了。
- 如果你想变换矢量的方向:在矢量的末尾放0,忽略平移。
这里有一个例子,我们想转换以下向量:
[10, 5, 0, 3, 0, -1]
其中前三个分量定义原点坐标,后三个分量定义方向。
这个向量从点(10,5,0)开始到点(13,5,1)结束。
这是你需要做的转换向量:
[10, 5, 0,  1] * 4x4转换矩阵
[3,  0, -1, 0] * 4x4转换矩阵


 985
985


 被折叠的 条评论
为什么被折叠?
被折叠的 条评论
为什么被折叠?
 到【灌水乐园】发言


