


(1)实验目的
本实验旨在利用MicroPython编程语言控制ESP32模块实现使用定时器中断方式驱动HCSR04超声波测距传感器。
(2)实验材料
- ESP32模块
- PC(Windows)
- USB数据线
- HCSR04超声波测距传感器
- 杜邦线
其中,了解和认识HCSR04超声波测距传感器:
MicroPython中的HCSR04超声波传感器是一种常见的测距传感器,用于测量物体与传感器之间的距离。它通过发射超声波脉冲并接收其回波来计算出距离值。
使用MicroPython的HCSR04传感器,可以将其与适当的引脚连接,并通过编程控制来触发超声波的发射和接收过程。传感器会发射超声波脉冲,并计算从发射到接收回波所经历的时间,然后将其转换为距离值。
HCSR04传感器的工作原理基于声音在空气中的传播速度。它发射一个短脉冲的超声波信号,然后等待回波信号的接收。通过测量超声波往返的时间,可以计算出物体与传感器之间的距离。
在MicroPython中,可以使用相应的库函数来配置和操作HCSR04传感器。通常需要设置引脚的输入输出模式以及相关参数,然后调用相应的函数来触发测量并获取距离值。
HCSR04超声波传感器广泛应用于避障、智能车辆导航、距离测量等领域。例如,在机器人项目中,可以使用HCSR04传感器来检测前方是否有障碍物,并采取相应的措施避免碰撞;在智能家居中,可以利用HCSR04传感器实现自动门控制或水位监测等功能。
需要注意的是,HCSR04传感器的精度和可靠性受到环境条件和硬件平台的影响。例如,温度、湿度和物体表面等因素都可能对测量结果产生影响。在使用HCSR04传感器时,应该合理布置传感器位置,考虑环境因素,并根据具体应用需求进行适当的数据处理和滤波。
总之,MicroPython的HCSR04超声波传感器提供了一种方便、准确的方式来测量物体与传感器之间的距离。通过适当的硬件连接和编程操作,可以实现对距离的获取和处理,并在各种嵌入式系统和物联网应用中实现相应的功能和应用。
(3)实验步骤
步骤1:连接ESP32模块与PC
- 使用USB线将ESP32模块与PC的USB口进行连接
- 确保ESP32模块在Thonny软件中能够被正确识别并建立连接
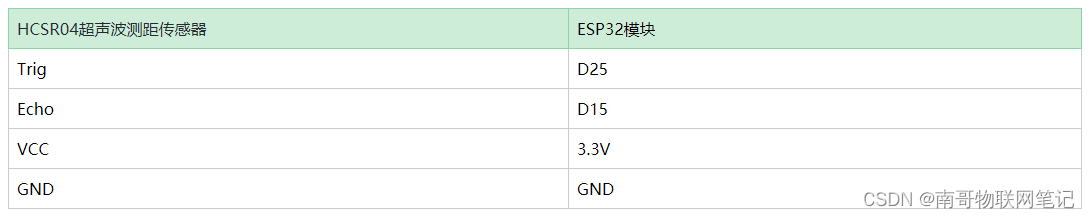
- 使用杜邦线按如下对应关系连线
步骤2:配置MicroPython开发环境
- 确保已经正确烧录 MicroPython固件
步骤3:编写脚本代码
- 打开Thonny软件,创建一个新的MicroPython脚本文件,文件名:main.py
- 在脚本文件中输入以下代码:
# -*- coding:utf-8 -*-
"""
无锡匠客物联网科技有限公司
技术支持:@NanGe(微信号:nange2012014158 | 公众号:南哥物联网笔记)
脚本名称: 超声波HC-SR04传感器
接线说明:超声波-->ESP32(GPIO)
            Trig-->D25
            Echo-->D15
            vcc-->3.3v
            GND-->GND
脚本执行现象: 脚本程序下载成功后,shell终端输出距离值
注意事项:
1、注意正负极不能接反,以防烧坏模块
"""

# 导入模块
from machine import Pin
from machine import time_pulse_us
from utime import sleep_us
from machine import Timer


#hcsr04超声波传感器驱动代码
__version__ = '0.2.1'
__author__ = 'Roberto Sánchez'
__license__ = "Apache License 2.0. https://www.apache.org/licenses/LICENSE-2.0"

class HCSR04:
    """
    Driver to use the untrasonic sensor HC-SR04.
    The sensor range is between 2cm and 4m.
    The timeouts received listening to echo pin are converted to OSError('Out of range')
    """
    # echo_timeout_us is based in chip range limit (400cm)
    def __init__(self, trigger_pin, echo_pin, echo_timeout_us=500*2*30):
        """
        trigger_pin: Output pin to send pulses
        echo_pin: Readonly pin to measure the distance. The pin should be protected with 1k resistor
        echo_timeout_us: Timeout in microseconds to listen to echo pin.
        By default is based in sensor limit range (4m)
        """
        self.echo_timeout_us = echo_timeout_us
        # Init trigger pin (out)
        self.trigger = Pin(trigger_pin, mode=Pin.OUT, pull=None)
        self.trigger.value(0)

        # Init echo pin (in)
        self.echo = Pin(echo_pin, mode=Pin.IN, pull=None)

    def _send_pulse_and_wait(self):
        """
        Send the pulse to trigger and listen on echo pin.
        We use the method `machine.time_pulse_us()` to get the microseconds until the echo is received.
        """
        self.trigger.value(0) # Stabilize the sensor
        sleep_us(5)
        self.trigger.value(1)
        # Send a 10us pulse.
        sleep_us(10)
        self.trigger.value(0)
        try:
            pulse_time = time_pulse_us(self.echo, 1, self.echo_timeout_us)
            # time_pulse_us returns -2 if there was timeout waiting for condition; and -1 if there was timeout during the main measurement. It DOES NOT raise an exception
            # ...as of MicroPython 1.17: http://docs.micropython.org/en/v1.17/library/machine.html#machine.time_pulse_us
            if pulse_time < 0:
                MAX_RANGE_IN_CM = const(500) # it's really ~400 but I've read people say they see it working up to ~460
                pulse_time = int(MAX_RANGE_IN_CM * 29.1) # 1cm each 29.1us
            return pulse_time
        except OSError as ex:
            if ex.args[0] == 110: # 110 = ETIMEDOUT
                raise OSError('Out of range')
            raise ex

    def distance_mm(self):
        """
        Get the distance in milimeters without floating point operations.
        """
        pulse_time = self._send_pulse_and_wait()
        # To calculate the distance we get the pulse_time and divide it by 2
        # (the pulse walk the distance twice) and by 29.1 becasue
        # the sound speed on air (343.2 m/s), that It's equivalent to
        # 0.34320 mm/us that is 1mm each 2.91us
        # pulse_time // 2 // 2.91 -> pulse_time // 5.82 -> pulse_time * 100 // 582
        mm = pulse_time * 100 // 582
        return mm

    def distance_cm(self):
        """
        Get the distance in centimeters with floating point operations.
        It returns a float
        """
        pulse_time = self._send_pulse_and_wait()
        # To calculate the distance we get the pulse_time and divide it by 2
        # (the pulse walk the distance twice) and by 29.1 becasue
        # the sound speed on air (343.2 m/s), that It's equivalent to
        # 0.034320 cm/us that is 1cm each 29.1us
        cms = (pulse_time / 2) / 29.1
        return cms


#定义hcsr04控制对象
hcsr04=HCSR04(trigger_pin=25,echo_pin=15)

#定时器0中断函数
def time0_irq(time0):
    distance_cm=hcsr04.distance_cm()
    #distance_mm=hcsr04.distance_cm()
    print("distance=%.2fCM"%distance_cm)

#程序入口
if __name__=="__main__":

    time0=Timer(0)#创建time0定时器对象
    time0.init(period=500,mode=Timer.PERIODIC,callback=time0_irq)

    #循环
    while True:
        pass
步骤4:保存代码文件:
- 将核心代码保存到PC机某个文件夹,文件名为main.py
步骤5:运行实验
- 确保Thonny中运行->配置解释器中的解释器选择MicroPython(ESP32)
- 在Thonny中直接单击运行按钮
(4)实验结果
成功运行代码后,每隔500ms传感器采集一次数据,并将获取超声波测出的距离值输出在Shell终端中
(5)总结
通过本实验,学会了使用MicroPython编程语言控制HCSR04超声波测距传感器采集数据


 3553
3553

 被折叠的 条评论
为什么被折叠?
被折叠的 条评论
为什么被折叠?
 到【灌水乐园】发言


