


 文章描述了使用Python的Pybullet库在测试环境中进行机械臂(Panda)抓取物体的实验,包括加载模型、设置环境、控制关节运动和抓取过程。展示了如何通过编程实现对机械臂动作的控制和物体抓取功能。
一、测试环境是否成功
import os
import pybullet as p
import pybullet_data as pd

p.connect(p.GUI)
pandaUid=p.loadURDF(os.path.join(pd.getDataPath(),"franka_panda/panda.urdf"),useFixedBase=True)

while True:
    p.stepSimulation()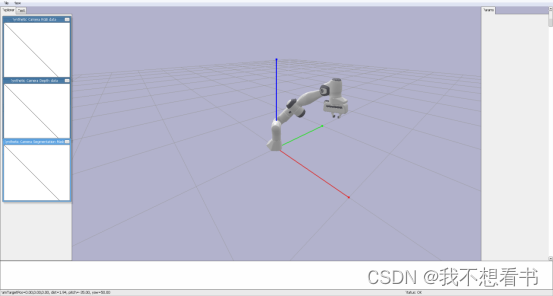
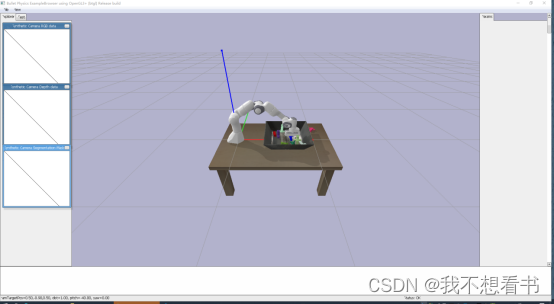
二、测试抓取以及相关功能
import pybullet as p
import pybullet_data as pd
import math
import time
# cameraTargetPosition=[0.55,-0.35,0.2]
p.connect(p.GUI) #打开视窗
p.setGravity(0,0,-10) #设置重力
# p.configureDebugVisualizer(p.COV_ENABLE_SINGLE_STEP_RENDERING)
p.setAdditionalSearchPath(pd.getDataPath()) #设置数据路径
p.resetDebugVisualizerCamera(cameraDistance=1,cameraYaw=0,\
                             cameraPitch=-40,cameraTargetPosition=[0.5,-0.9,0.5]) #设置相机参数

pandaUid=p.loadURDF("franka_panda/panda.urdf",useFixedBase=True) #加载机械臂
tableUid=p.loadURDF("table/table.urdf",basePosition=[0.5,0,-0.65]) #加载桌子
trayUid=p.loadURDF("tray/traybox.urdf",basePosition=[0.65,0,0]) #加载托盘

objectUid=p.loadURDF("random_urdfs/000/000.urdf",basePosition=[0.7,0,0.1]) #加载随机物体
object1Uid=p.loadURDF("random_urdfs/001/001.urdf",basePosition=[0.7,0.1,0.7])
object2Uid=p.loadURDF("random_urdfs/002/002.urdf",basePosition=[0.6,-0.2,0.7])
object3Uid=p.loadURDF("random_urdfs/003/003.urdf",basePosition=[0.8,0.1,0.7])
object4Uid=p.loadURDF("random_urdfs/004/004.urdf",basePosition=[0.7,-0.1,0.7])
object5Uid=p.loadURDF("random_urdfs/005/005.urdf",basePosition=[0.6,0.1,0.3])
object6Uid=p.loadURDF("random_urdfs/006/006.urdf",basePosition=[0.8,-0.2,0.4])
object7Uid=p.loadURDF("random_urdfs/007/007.urdf",basePosition=[0.6,0.2,0.4])
object8Uid=p.loadURDF("random_urdfs/008/008.urdf",basePosition=[0.7,-0.1,0.4])
object9Uid=p.loadURDF("random_urdfs/009/009.urdf",basePosition=[0.6,0.1,0.4])

state_durations=[200,200,200,200] #状态持续时间
control_dt=1./12. #控制步长
p.setTimeStep=control_dt #设置控制步长
state_t=0. #状态持续时间
current_state=0 #当前状态

while True:

    state_t+=control_dt #状态持续时间增加
    #p.configureDebugVisualizer(p.COV_ENABLE_SINGLE_STEP_RENDERING)

    if current_state==0:
        p.setJointMotorControl2(pandaUid,0,p.POSITION_CONTROL,0)
        p.setJointMotorControl2(pandaUid,1,p.POSITION_CONTROL,math.pi/4.)
        p.setJointMotorControl2(pandaUid,2,p.POSITION_CONTROL,0)
        p.setJointMotorControl2(pandaUid,3,p.POSITION_CONTROL,-math.pi/2.)
        p.setJointMotorControl2(pandaUid,4,p.POSITION_CONTROL,0)
        p.setJointMotorControl2(pandaUid,5,p.POSITION_CONTROL,3*math.pi/4)
        p.setJointMotorControl2(pandaUid,6,p.POSITION_CONTROL,-math.pi/4.)
        p.setJointMotorControl2(pandaUid,9,p.POSITION_CONTROL,0.08)
        p.setJointMotorControl2(pandaUid,10,p.POSITION_CONTROL,0.08)

    if current_state==1:
        p.setJointMotorControl2(pandaUid,1,p.POSITION_CONTROL,math.pi/4.+.15)
        p.setJointMotorControl2(pandaUid,3,p.POSITION_CONTROL,-math.pi/2.+.15)

    if current_state==2:
        p.setJointMotorControl2(pandaUid,9,p.POSITION_CONTROL,force=200)
        p.setJointMotorControl2(pandaUid,10,p.POSITION_CONTROL,force=200)

    if current_state==3:
        p.setJointMotorControl2(pandaUid,1,p.POSITION_CONTROL,math.pi/4.-1)
        p.setJointMotorControl2(pandaUid,3,p.POSITION_CONTROL,-math.pi/2.-1)

    if state_t>state_durations[current_state]:
        current_state+=1
        if current_state>=len(state_durations):
            current_state=0
        state_t=0

    p.stepSimulation()
效果如下


 3858
3858

 被折叠的 条评论
为什么被折叠?
被折叠的 条评论
为什么被折叠?
 到【灌水乐园】发言


