


效果演示
本次渡鸦要带大家在 Cocos Creator 3.4.1 中实现行星自转(绕任意轴旋转)、行星公转(绕任意点旋转)、镜头拉近/复位(平滑旋转)、行星环(自定义环形体)、行星轴(自定义胶囊体)等效果。Demo 下载见文末。
自定义环形体/胶囊体
编辑器提供的环形体和胶囊体,只能整体缩放,就会显得有些笨重。
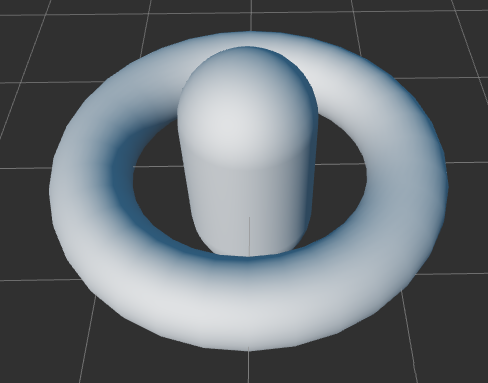
而 demo 中使用的环形体和胶囊体,均需要自定义参数才能实现理想的效果:
环形体:环面半径及管形大小
胶囊体:顶部和底部的半径及高度
Cocos Creator 提供了常用的几何体创建,并且可以根据几何体信息创建 mesh。在脚本中开启 executeInEditMode 模式后,就可以非常方便地在编辑器中调出想要的几何体。
环形体:
let torus = primitives.torus(this.radius, this.tube, {
    radialSegments: 128,
    tubularSegments: 128,
    arc: 2 * Math.PI * 1,
});
meshRenderer.mesh = utils.createMesh(torus);
编辑器调试
胶囊体:
let capsule = primitives.capsule(this._radiusTop, this._radiusBottom, this._height, {
    sides: 128,
    heightSegments: 128,
    capped: true,
    arc: 2 * Math.PI * 1,
});
meshRenderer.mesh = utils.createMesh(capsule);
编辑器调试
自转:绕任意轴旋转
3D 中表示物体的旋转通常有两种方式:欧拉角和四元数,每种方式都有各自的优缺点,这里简单介绍一下:
欧拉角由三个数字(x、y、z)组成,分别是围绕 X、Y、Z 轴旋转的角度值,所以具有更直观的可读性,更好理解。
四元数由四个数字(x、y、z、w)组成,但这些数字不代表轴或角度,它们只是经过运算后的数字,所以难以直观的理解,但好处是不受万向锁的影响。
编辑器的优势之一便是所见即所得,所以节点属性面板中的 Rotation 属性,便是用欧拉角表示的旋转。
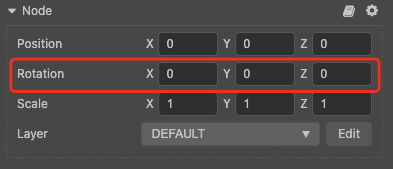
但在引擎内部,会将该欧拉角转变为四元数。同理,在代码中设置节点的 eulerAngles 属性,或者调用 setRotationFromEuler 函数时,引擎也会自动转换为四元数:
this.node.eulerAngles = v3(x, y, z);根据欧拉角,计算四元数:
Quat.fromEuler(out, x, y, z);源码实现:
/**
 * @en Calculates the quaternion with Euler angles, the rotation order is YZX
 * @zh 根据欧拉角信息计算四元数,旋转顺序为 YZX
 */
public static fromEuler<Out extends IQuatLike> (out: Out, x: number, y: number, z: number) {
    x *= halfToRad;
    y *= halfToRad;
    z *= halfToRad;

    const sx = Math.sin(x);
    const cx = Math.cos(x);
    const sy = Math.sin(y);
    const cy = Math.cos(y);
    const sz = Math.sin(z);
    const cz = Math.cos(z);

    out.x = sx * cy * cz + cx * sy * sz;
    out.y = cx * sy * cz + sx * cy * sz;
    out.z = cx * cy * sz - sx * sy * cz;
    out.w = cx * cy * cz - sx * sy * sz;

    return out;
}
Cocos Creator 当然也提供了根据四元数设置旋转的方法,直接设置 rotation 属性,或者调用 setRotation 函数:
this.node.rotation = quat(x, y, z, w);注意:编辑器面板中的 Rotation 属性是欧拉角,对应的是节点的 eulerAngles 属性,并不是 rotation 属性。
如果一个行星初始状态没有任何旋转,只是自转,即围绕 Y 轴 (0,1,0) 旋转,可以通过更改欧拉角的 y 值来实现:
let y = this.node.eulerAngles.y + this.speed;
this.node.setRotationFromEuler(this.node.eulerAngles.x, y, this.node.eulerAngles.z);
但真实的行星自转的角度各不相同。
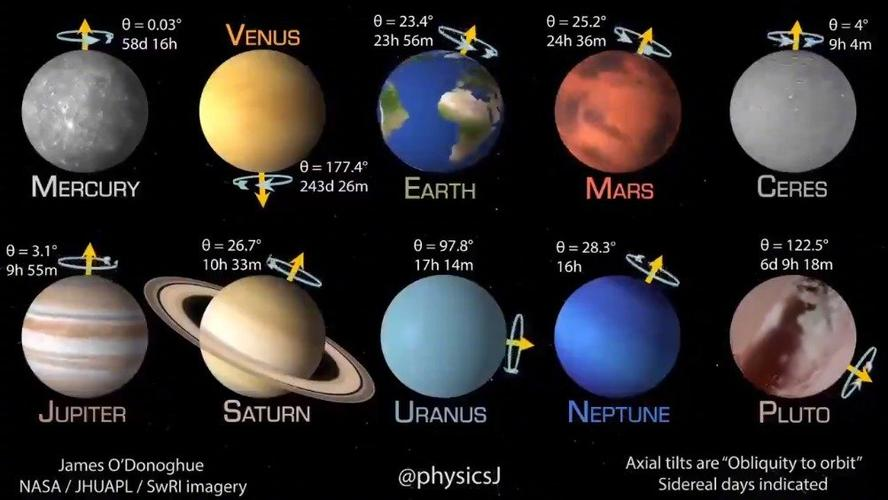
图源网络
这里也给球体增加一个胶囊体,来作为旋转轴,这样可以清晰的看到自转是否正确。
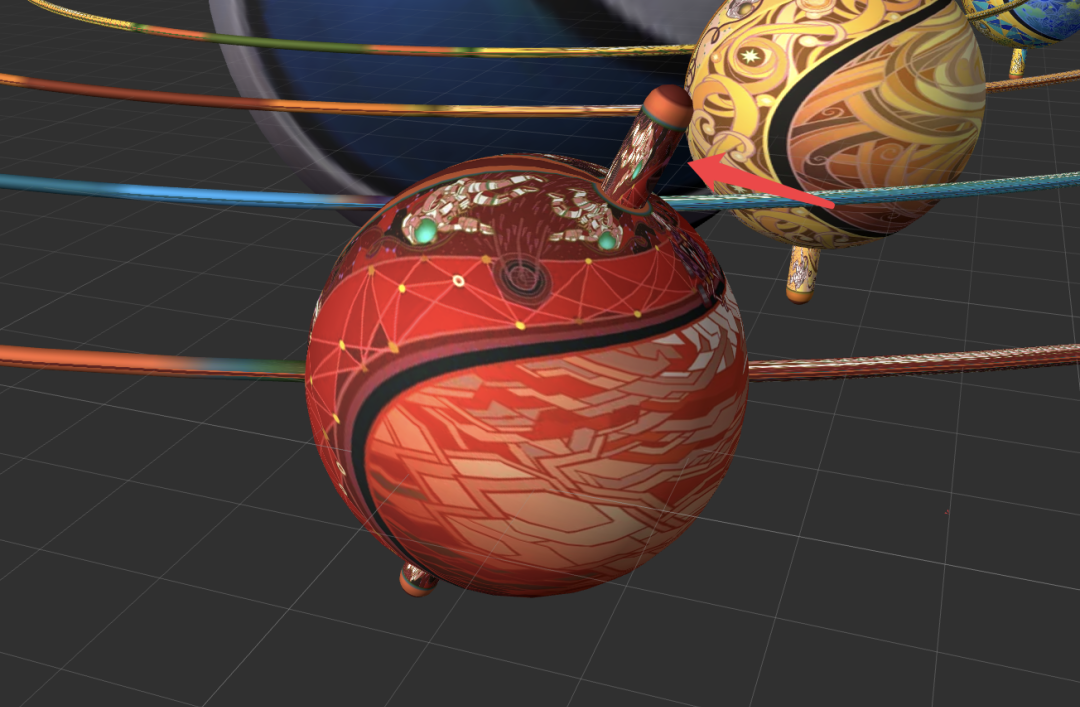
给行星设置一个初始的旋转,比如绕 Z 轴顺时针旋转 20°(即旋转 -20°),然后在编辑器中旋转模型。
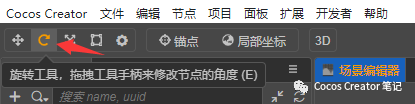
可以看到,虽然只是旋转了 Y 轴,但编辑器面板的 Rotation 属性中 X、Y、Z 属性都会随之变化。

此时如果代码还是通过更改欧拉角的 y 值的话,得到的结果是这样的。
这时需要使用四元数来旋转模型,根据当前已知条件,使用 Quat.rotateAround 来计算四元数。
四元数绕指定轴旋转一定角度后计算四元数:
Quat.rotateAround(out, this.node.rotation, axis, rad);源码实现:
/**
 * @en Sets the out quaternion to represent a radian rotation around a given rotation axis in world space
 * @zh 绕世界空间下指定轴旋转四元数
 * @param axis axis of rotation, normalized by default
 * @param rad radius of rotation
 */
public static rotateAround<Out extends IQuatLike, VecLike extends IVec3Like> (out: Out, rot: Out, axis: VecLike, rad: number) {
    // get inv-axis (local to rot)
    Quat.invert(qt_1, rot);
    Vec3.transformQuat(v3_1, axis, qt_1);
    // rotate by inv-axis
    Quat.fromAxisAngle(qt_1, v3_1, rad);
    Quat.multiply(out, rot, qt_1);
    return out;
}
接下来只要传入合适的参数,就可以得到旋转后的四元数。
out:旋转后的四元数
rot:当前四元数,通过 this.node.rotation 直接获取
rad:旋转弧度,通过 misc.degreesToRadians(angle) 将角度转为弧度
axis:旋转轴,此时应该是 Y 轴 (0,1,0) 旋转模型初始角度后的向量,利用向量四元数乘法,求出旋转后的轴
向量按照四元数旋转后计算向量:
Vec3.transformQuat(out, Vec3.UP, this.node.rotation);源码实现:
/**
 * @en Vector quaternion multiplication
 * @zh 向量四元数乘法
 */
public static transformQuat<Out extends IVec3Like> (out: Out, a: IVec3Like, q: IQuatLike) {
    // benchmarks: http://jsperf.com/quaternion-transform-Vec3-implementations
    // calculate quat * vec
    const ix = q.w * a.x + q.y * a.z - q.z * a.y;
    const iy = q.w * a.y + q.z * a.x - q.x * a.z;
    const iz = q.w * a.z + q.x * a.y - q.y * a.x;
    const iw = -q.x * a.x - q.y * a.y - q.z * a.z;

    // calculate result * inverse quat
    out.x = ix * q.w + iw * -q.x + iy * -q.z - iz * -q.y;
    out.y = iy * q.w + iw * -q.y + iz * -q.x - ix * -q.z;
    out.z = iz * q.w + iw * -q.z + ix * -q.y - iy * -q.x;
    return out;
}
串联起来之后,可以得到——
节点绕任意轴旋转指定角度:
rotateByAxis(axis: Vec3, angle: number) {
    let rotation = quat();
    let rad = misc.degreesToRadians(angle);
    // 绕世界空间下指定轴旋转四元数: 四元数绕指定轴旋转指定弧度后的四元数
    Quat.rotateAround(rotation, this.node.rotation, axis, rad);
    this.node.rotation = rotation;
}
最终效果
公转:绕任意点旋转
物体围绕某一点旋转时,更改的并不是自身的旋转角度,而是位置,就像圆规一样。
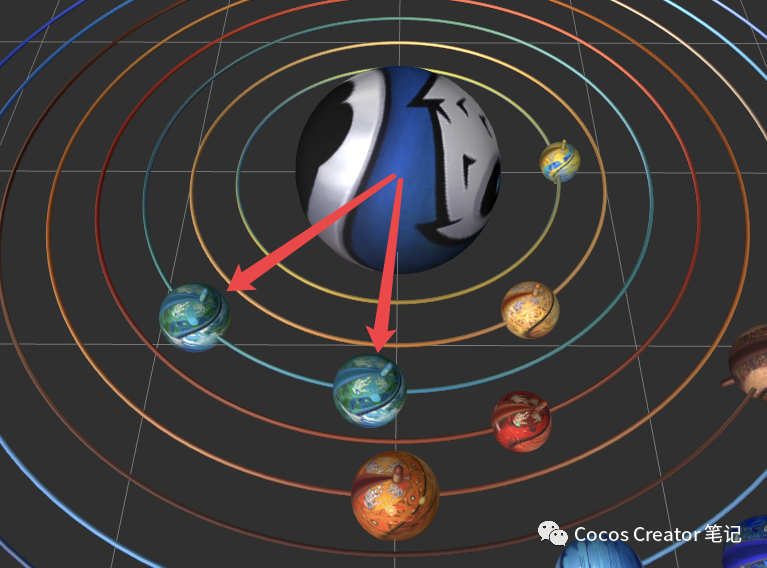
比如行星绕 Cocos 顺时针旋转 40°(即旋转 -40°),可以简单理解为从 Cocos 指向行星的向量旋转 -40°。
方向向量可以用向量减法直接求出:a - b = 由 b 指向 a 的向量。
Vec3.subtract(out, a, b);方向向量有了,然后就是旋转该方向向量,这里依然使用 Vec3.transformQuat,但 transformQuat 还需要知道当前的四元数,根据当前已知条件,使用 Quat.fromAxisAngle 来计算四元数。
根据旋转轴和旋转弧度计算四元数:
Quat.fromAxisAngle(out, axis, rad);源码实现:
/**
 * @en Calculates the quaternion from a given rotary shaft and a radian rotation around it.
 * @zh 根据旋转轴和旋转弧度计算四元数
 */
public static fromAxisAngle<Out extends IQuatLike, VecLike extends IVec3Like> (out: Out, axis: VecLike, rad: number) {
    rad *= 0.5;
    const s = Math.sin(rad);
    out.x = s * axis.x;
    out.y = s * axis.y;
    out.z = s * axis.z;
    out.w = Math.cos(rad);
    return out;
}
得到四元数后,使用 Vec3.transformQuat 旋转该方向向量:
Vec3.transformQuat(out, dir, quat);通过向量减法求得的方向向量,是相对于旋转点的偏移坐标,旋转后再加上旋转点坐标,得到的就是最终的目标位置:
Vec3.add(out, center, rotated);串联起来之后,可以得到——
某点绕任意点旋转一定角度后的坐标:
rotateByPoint(target: Vec3, center: Vec3, angle: number, axis: Vec3 = Vec3.UP): Vec3 {
    let quat = new Quat();
    let dir = new Vec3();
    let rotated = new Vec3();
    // 逐元素向量减法: 目标位置 - 中心位置 = 由中心位置指向目标位置的向量
    Vec3.subtract(dir, target, center);
    // 角度转弧度
    let rad = misc.degreesToRadians(angle);
    // 根据旋转轴和旋转弧度计算四元数: 绕指定轴旋转指定弧度后的四元数
    Quat.fromAxisAngle(quat, axis, rad);
    // 向量四元数乘法: 向量 * 四元数 = 该向量按照四元数旋转后的向量
    Vec3.transformQuat(rotated, dir, quat);
    // 逐元素向量加法: 中心点 + 旋转后的向量 = 旋转后的点
    Vec3.add(rotated, center, rotated);

    return rotated;
}
最终效果
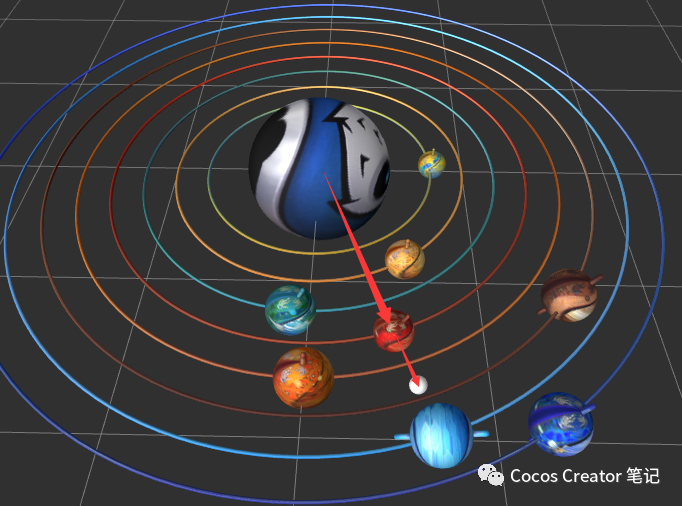
平滑旋转
demo 中点击 Cocos 外的行星,会将摄像机拉近到该行星,即位置和角度都贴近该行星。点击 Cocos 或空白区域,会恢复摄像机的初始位置和角度。
为了过渡更加平滑,这里使用 tween。
tween 官方文档:
https://docs.cocos.com/creator/manual/zh/tween
为了贴近观察点击的行星,将观察点(摄像机位置)设置为图中的白色球体,即 Cocos 与行星中心点连线延长线上的某个位置。
使用 tween 的话,需要知道目标位置及目标旋转角度。
计算位置——
根据两点坐标,计算延长线上某点的坐标:
let targetPosition = v3();
Vec3.subtract(targetPosition, targetPlanet.worldPosition, this.nodeCocos.worldPosition);
targetPosition.normalize().multiplyScalar(1.3);
Vec3.add(targetPosition, targetPlanet.worldPosition, targetPosition);
计算旋转——
根据当前位置,计算面向目标位置的四元数:
let dir = v3();
let targetRotaion = quat();
Vec3.subtract(dir, targetPosition, targetPlanet.worldPosition);
Quat.fromViewUp(targetRotaion, dir.normalize(), Vec3.UP);
根据视口的前方向和上方向计算四元数:
Quat.fromViewUp(targetRotaion, dir.normalize(), Vec3.UP);源码实现:
/**
 * @en Calculates the quaternion with the up direction and the direction of the viewport
 * @zh 根据视口的前方向和上方向计算四元数
 * @param view The view direction, it`s must be normalized.
 * @param up The view up direction, it`s must be normalized, default value is (0, 1, 0).
 */
public static fromViewUp<Out extends IQuatLike, VecLike extends IVec3Like> (out: Out, view: VecLike, up?: Vec3) {
    Mat3.fromViewUp(m3_1, view, up);
    return Quat.normalize(out, Quat.fromMat3(out, m3_1));
}
tween——
在 onUpdate 中使用四元数的球面插值:
let curRotation = this.mainCamera.node.worldRotation.clone();
let nextRotation = quat();
tween(this.mainCamera.node)
    .to(1, { position: targetPosition },
        {
            onUpdate: (target, ratio: number) => {
                Quat.slerp(nextRotation, curRotation, targetRotaion, ratio);
                this.mainCamera.node.worldRotation = nextRotation;
            },
        })
    .start();
最终效果
面向目标位置
当摄像机移动到行星观察点位置时,行星仍然以圆形轨迹运动,而摄像机需要一直观察该行星,即始终面向该行星。
这个 case 和平滑旋转中计算面向目标位置的四元数一致,当时是为了计算四元数作为旋转目标,这里是将摄像机节点直接面向目标位置,可以使用 Cocos Creator 提供的 lookAt 函数。
将节点面向目标位置:
this.mainCamera.node.lookAt(this.curPlanet.worldPosition);源码实现:
/**
 * @en Set the orientation of the node to face the target position, the node is facing minus z direction by default
 * @zh 设置当前节点旋转为面向目标位置,默认前方为 -z 方向
 * @param pos Target position
 * @param up Up direction
 */
public lookAt (pos: Readonly<Vec3>, up?: Readonly<Vec3>): void {
    this.getWorldPosition(v3_a);
    Vec3.subtract(v3_a, v3_a, pos);
    Vec3.normalize(v3_a, v3_a);
    Quat.fromViewUp(q_a, v3_a, up);
    this.setWorldRotation(q_a);
}
立方体模型可以更直观的看到 lookAt 的效果:
点击下载完整 demo。本文首发在渡鸦的个人公众号「Cocos Creator 笔记」上,欢迎关注、交流,查看更多引擎技术与游戏开发干货!
往期精彩


 3839
3839


 被折叠的 条评论
为什么被折叠?
被折叠的 条评论
为什么被折叠?
 到【灌水乐园】发言


