本文作者使用的opencv版本为4.5.2.52 系列教程均为这个版本
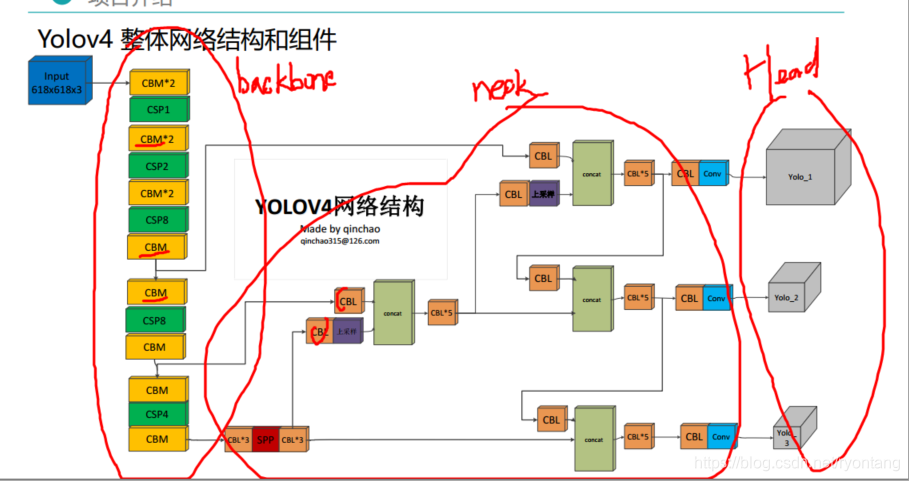
AlexeyAB大神! YOLOv4 拥有43.5%mAP+65FPS ,达到了精度速度最优平衡,
作者团队:Alexey Bochkovskiy&中国台湾中央研究院
论文链接:
https://arxiv.org/pdf/2004.10934.pdf
代码链接:
GitHub - AlexeyAB/darknet: YOLOv4 / Scaled-YOLOv4 / YOLO - Neural Networks for Object Detection (Windows and Linux version of Darknet )
首先准备一下yolov4的weight文件和cfg文件
链接:https://pan.baidu.com/s/1wvi4TUVgIT-LSrZ9ewN2dQ
提取码:ogk5
以下是代码的详解
1.导入所需的库:
import cv2
import numpy as np
import os
2.定义YOLOv4配置文件和权重文件的路径,以及类别名称文件的路径,还有阈值和非最大抑制的阈值。
modelConfiguration = 'yolov4.cfg'
modelWeights = 'yolov4.weights'
classFile = 'classes.txt'
confThreshold = 0.5
nmsThreshold = 0.3
3.读取类别名称文件并存储类别名称。
classNames = []
with open(classFile, 'rt') as f:
    classNames = f.read().rstrip('\n').split('\n')
4.加载YOLOv4模型并设置运行目标为CPU。
net = cv2.dnn.readNetFromDarknet(modelConfiguration, modelWeights)
net.setPreferableBackend(cv2.dnn.DNN_BACKEND_OPENCV)
net.setPreferableTarget(cv2.dnn.DNN_TARGET_CPU)
5.定义函数 findObjects,用于处理YOLOv4输出,找到目标并在图像上绘制边界框和类别标签。根据用户选择的运行模式(视频流或图片文件)进行不同的处理:如果 run_video 为 True,则进入视频流模式。
run_video = True
if run_video:
    # 打开摄像头
    cap = cv2.VideoCapture('video/4.mp4')

    # 视频保存相关设置
    # ...

    while True:
        # 读取视频帧
        success, img = cap.read()

        # 处理图像并绘制目标检测结果
        # ...

        # 将每一帧的结果写入视频文件
        out.write(result_img)

        cv2.imshow('YOLOv4 Detection', result_img)
        if cv2.waitKey(1) & 0xFF == ord('q'):
            break

    cap.release()
    out.release()
    cv2.destroyAllWindows()
6.否则进入图片文件模式。
else:
    # 从图片文件读取图像
    img_path = 'input_image/2007_005331.jpg'  # 替换为您的图片路径
    if os.path.exists(img_path):
        img = cv2.imread(img_path)

        # 处理图像并绘制目标检测结果
        # ...

        cv2.imshow('YOLOv4 Detection', result_img)
        cv2.imwrite('output_image/result_image.jpg', result_img)  # 将结果保存为图片文件
        cv2.waitKey(0)
        cv2.destroyAllWindows()
    else:
        print("图片文件不存在。请检查文件路径是否正确。")
请注意,在视频流模式下,代码会读取视频文件中的每一帧,进行目标检测并绘制边界框,然后将处理后的帧写入输出视频文件。在图片文件模式下,代码只对单张图片进行目标检测,并将结果显示在窗口中,并保存为输出图片文件。
请注意将路径替换为您实际的视频文件路径和图片文件路径,以便代码正确运行。
视频和图片的保存路径需要按自己的需求进行修改,也可以按照我的新建
全部代码
run_video = True 检测图片是需要关掉
img_path = 'input_image/2007_005331.jpg' # 替换为您的图片路径
import cv2
import numpy as np
import os

# YOLOv4配置文件和权重文件的路径
modelConfiguration = 'yolov4.cfg'
modelWeights = 'yolov4.weights'


# 类别名称文件的路径
classFile = 'classes.txt'

# 阈值和非最大抑制的阈值
confThreshold = 0.5
nmsThreshold = 0.3

# 读取类别名称文件
classNames = []
with open(classFile, 'rt') as f:
    classNames = f.read().rstrip('\n').split('\n')

# 加载YOLOv4模型
net = cv2.dnn.readNetFromDarknet(modelConfiguration, modelWeights)
net.setPreferableBackend(cv2.dnn.DNN_BACKEND_OPENCV)
net.setPreferableTarget(cv2.dnn.DNN_TARGET_CPU)


def findObjects(outputs, img):
    hT, wT, cT = img.shape
    bbox = []
    classIds = []
    confs = []

    for output in outputs:
        for det in output:
            scores = det[5:]
            classId = np.argmax(scores)
            confidence = scores[classId]
            if confidence > confThreshold:
                w, h = int(det[2] * wT), int(det[3] * hT)
                x, y = int((det[0] * wT) - w / 2), int((det[1] * hT) - h / 2)
                bbox.append([x, y, w, h])
                classIds.append(classId)
                confs.append(float(confidence))

    indices = cv2.dnn.NMSBoxes(bbox, confs, confThreshold, nmsThreshold)

    for i in indices:
        i = i[0]
        box = bbox[i]
        x, y, w, h = box[0], box[1], box[2], box[3]
        cv2.rectangle(img, (x, y), (x + w, y + h), (255, 0, 255), 2)
        cv2.putText(img, f'{classNames[classIds[i]]} {int(confs[i] * 100)}%',
                    (x, y - 10), cv2.FONT_HERSHEY_SIMPLEX, 0.6, (255, 0, 255), 2)

    # 返回包含检测结果的图像
    return img


# 选择运行模式:视频流或图片文件
run_video = True

if run_video:
    # 打开摄像头
    cap = cv2.VideoCapture('video/4.mp4')

    # 视频保存相关设置
    frame_width = int(cap.get(3))
    frame_height = int(cap.get(4))
    fps = int(cap.get(cv2.CAP_PROP_FPS))
    size = (frame_width, frame_height)
    fourcc = cv2.VideoWriter_fourcc(*'XVID')
    out = cv2.VideoWriter('video-output/output.mp4', fourcc, fps, size)

    while True:
        # 读取视频帧
        success, img = cap.read()

        blob = cv2.dnn.blobFromImage(img, 1 / 255.0, (416, 416), [0, 0, 0], crop=False)
        net.setInput(blob)

        layerNames = net.getLayerNames()
        outputNames = [layerNames[i[0] - 1] for i in net.getUnconnectedOutLayers()]

        outputs = net.forward(outputNames)
        result_img = findObjects(outputs, img)

        # 将每一帧的结果写入视频文件
        out.write(result_img)

        cv2.imshow('YOLOv4 Detection', result_img)
        if cv2.waitKey(1) & 0xFF == ord('q'):
            break

    cap.release()
    out.release()
    cv2.destroyAllWindows()
else:
    # 从图片文件读取图像
    img_path = 'input_image/2007_005331.jpg'  # 替换为您的图片路径
    if os.path.exists(img_path):
        img = cv2.imread(img_path)

        blob = cv2.dnn.blobFromImage(img, 1 / 255.0, (416, 416), [0, 0, 0], crop=False)
        net.setInput(blob)

        layerNames = net.getLayerNames()
        outputNames = [layerNames[i[0] - 1] for i in net.getUnconnectedOutLayers()]

        outputs = net.forward(outputNames)
        result_img = findObjects(outputs, img)

        cv2.imshow('YOLOv4 Detection', result_img)
        cv2.imwrite('output_image/result_image.jpg', result_img)  # 将结果保存为图片文件
        cv2.waitKey(0)
        cv2.destroyAllWindows()
    else:
        print("图片文件不存在。请检查文件路径是否正确。")


 8152
8152


 被折叠的 条评论
为什么被折叠?


