目录
有错误或没说清楚的地方欢迎评论指正,我会修改的,谢谢大家
参考:https://zhuanlan.zhihu.com/p/92339362
所谓相机标定,其实就是解决一件事,就是把机器人坐标系和相机坐标系联系起来,让他俩可以在同一个坐标系下工作。最后实现的效果就是点云中机器人的位置正好与机器人坐标系的机器人重合。我这里是眼在手外,也就是相机在固定位置,如下图所示。那么让我们开始。

由于手眼标定需要程序控制机械臂移动位姿,所以请先确保机械臂部分ros环境搭建完成,具体可以参考我前面一节,链接:https://blog.csdn.net/weixin_45702459/article/details/139293764
下载手眼标定ros包
老样子,在下载编译之前先把包安装一下,以免后面编译出错
以下是编译必要的包:
sudo apt-get install ros-noetic-visp以下是保证运行成功需要的库:
pip install transforms3d如果安装了anaconda的话需要先退出conda,然后transforms3d会安装到conda里,ros还是找不到(conda和ros真是兼兼又容容啊)
手眼标定所需要的包:
到自己的工作空间下,下载vision-visp,aruco_ros,easy_handeye,全部下载好之后编译
cd ~/catkin_RealSense_ws/src
git clone -b neotic-devel https://github.com/lagadic/vision_visp.git
git clone -b neotic-devel https://github.com/pal-robotics/aruco_ros
git clone https://github.com/IFL-CAMP/easy_handeye
cd ..
catkin_make
确保没有报错
不知名报错(编译成功就不用看)
第一次编译安装时出现过错误,但是当时只记录了解决过程,仅供参考
#include<cv.h>
#include<highgui.h>
改为
#include "opencv2/opencv.hpp"
#include "opencv2/highgui.hpp"
准备标定板
网站:https://chev.me/arucogen/

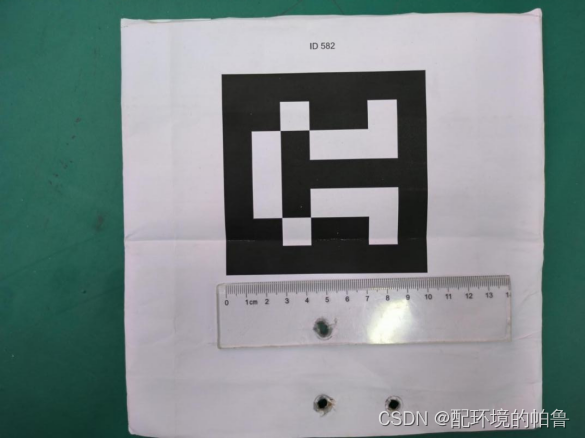
请一定要选择Original ArUco,Marker ID 和size可以自己选择,但是最好是id582,100mm,原尺寸打印,打印好之后可以量一下,这是我打印的结果,打印好之后就固定在机械臂末端。
编写launch文件
接下来就是写launch文件。这里不需要复制官方docs中的文档,例如
easy_handeye/docs/example_launch/ur5_kinect_calibration.launch
因为复制之后还是要大改的,不如一开始直接复制我的。
就在easy_handeye/easy_handeye/launch/中复制一个launch文件,然后重命名为
eye_to_hand_calibration.launch然后参考我的,稍后我会解释:
1.realsense(d435i)相机参考这个
<launch>
    <arg name="namespace_prefix" default="ur5_realsense_handeyecalibration" />

    <arg name="robot_ip" doc="The IP address of the UR5 robot" />

    <arg name="marker_size" doc="Size of the ArUco marker used, in meters" default="0.1" />
    <arg name="marker_id" doc="The ID of the ArUco marker used" default="582"/>

   <!-- start the realsen435 -->
    <include file="$(find realsense2_camera)/launch/rs_camera.launch" >
    </include>

    <!-- 2. start ArUco -->
    <node name="aruco_tracker" pkg="aruco_ros" type="single">
        <remap from="/camera_info" to="/camera/color/camera_info" />
        <remap from="/image" to="/camera/color/image_raw" />
        <param name="image_is_rectified" value="true"/>
        <param name="marker_size"        value="$(arg marker_size)"/>
        <param name="marker_id"          value="$(arg marker_id)"/>
        <param name="reference_frame"    value="camera_color_optical_frame"/>
        <param name="camera_frame"       value="camera_color_optical_frame"/>
        <param name="marker_frame"       value="camera_marker" />
    </node>


<!-- start the robot -->
    <include file="$(find ur_robot_driver)/launch/ur5_bringup.launch">

        <arg name="robot_ip" value="192.168.0.101" />
    </include>
    <include file="$(find ur5_moveit_config)/launch/ur5_moveit_planning_execution.launch">

    </include>


    <!-- 4. start easy_handeye -->
    <include file="$(find easy_handeye)/launch/calibrate.launch" >
        <arg name="namespace_prefix" value="$(arg namespace_prefix)" />
        <arg name="eye_on_hand" value="false" />

        <arg name="tracking_base_frame" value="camera_link" />
        <arg name="tracking_marker_frame" value="camera_marker" />
        <arg name="robot_base_frame" value="base" />

        <arg name="robot_effector_frame" value="tool0" />

        <arg name="freehand_robot_movement" value="false" />
        <arg name="robot_velocity_scaling" value="0.5" />
        <arg name="robot_acceleration_scaling" value="0.2" />
    </include>

</launch>
2.kinect2相机参考这个
<launch>
    <arg name="namespace_prefix" default="ur5_kinect_handeyecalibration" />

    <arg name="robot_ip" doc="The IP address of the UR5 robot" />

    <arg name="marker_size" doc="Size of the ArUco marker used, in meters" default="0.1" />
    <arg name="marker_id" doc="The ID of the ArUco marker used" default="582"/>

   <!-- start the kinectv2 -->
    <include file="$(find kinect2_bridge)/launch/kinect2_bridge.launch" >

    </include>

    <!-- 2. start ArUco -->
    <node name="aruco_tracker" pkg="aruco_ros" type="single">
        <remap from="/camera_info" to="/kinect2/hd/camera_info" />
        <remap from="/image" to="/kinect2/hd/image_color_rect" />
        <param name="image_is_rectified" value="true"/>
        <param name="marker_size"        value="$(arg marker_size)"/>
        <param name="marker_id"          value="$(arg marker_id)"/>
        <param name="reference_frame"    value="kinect2_rgb_optical_frame"/>
        <param name="camera_frame"       value="kinect2_rgb_optical_frame"/>
        <param name="marker_frame"       value="camera_marker" />
    </node>


<!-- start the robot -->
    <include file="$(find ur_robot_driver)/launch/ur5_bringup.launch">
        <arg name="robot_ip" value="192.168.0.101" />
    </include>
    <include file="$(find ur5_moveit_config)/launch/moveit_planning_execution.launch">
    </include>


    <!-- 4. start easy_handeye -->
    <include file="$(find easy_handeye)/launch/calibrate.launch" >
        <arg name="namespace_prefix" value="$(arg namespace_prefix)" />
        <arg name="eye_on_hand" value="false" />

        <arg name="tracking_base_frame" value="kinect2_rgb_optical_frame" />
        <arg name="tracking_marker_frame" value="camera_marker" />
        <arg name="robot_base_frame" value="base" />

        <arg name="robot_effector_frame" value="tool0" />

        <arg name="freehand_robot_movement" value="false" />
        <arg name="robot_velocity_scaling" value="0.5" />
        <arg name="robot_acceleration_scaling" value="0.2" />
    </include>

</launch>
这里不同相机的参数设置除了名字不同和启动节点不同以外其实都差不多。我按照顺序讲一下参数设置:
namespace_prefix,可以随便填,最后保存的yaml文件的名字取决于这个参数
marker_id和marker_size,一定要根据打印好的实物填写。
开启相机的节点,没啥好说的,不写的话一会再开个终端启动就行。(kinectv2记得要有tf)
/camera_info,个人理解是相机输出彩色图话题的最后变为/camera_info,例如realsense的camera/color/image_raw那就是/camera/color/camera_info
/image,填写相机的彩色图话题
reference_frame和camera_frame,填相机rgb的frame,一般在rviz测试相机的时候可以看到除了xxx_link以外还有其他frame,填带有rgb,color的关于彩色的frame
robot_ieye_on_handp,填写之前通信ur5时候的ip
eye_on_hand,我们这里是手在眼外,填false
tracking_base_frame,和上面一样,填写rgb的frame
robot_base_frame,这里我这里填base,base_link其实也可以,这俩都是固定不动的,到时候写tf变换的时候写对base还是base_link就行。
robot_effector_frame,末端好几个相同的坐标系,填哪个都行,我这里填tool0
剩余的保持默认即可。
手眼标定过程
写完launch后就可以运行了
roslaunch easy_handeye eye_to_hand_calibration.launch
出来三个界面
先把坐标系改为base
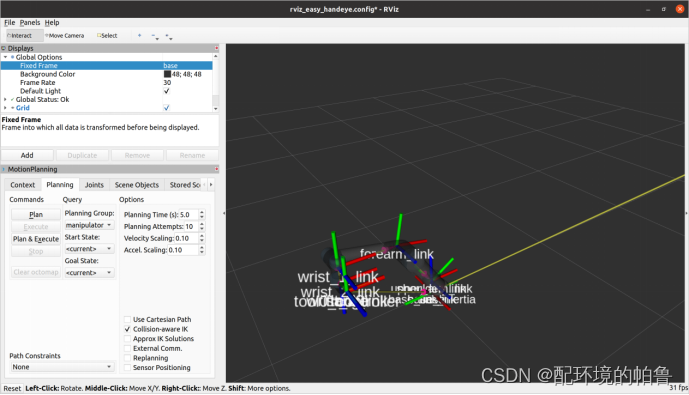
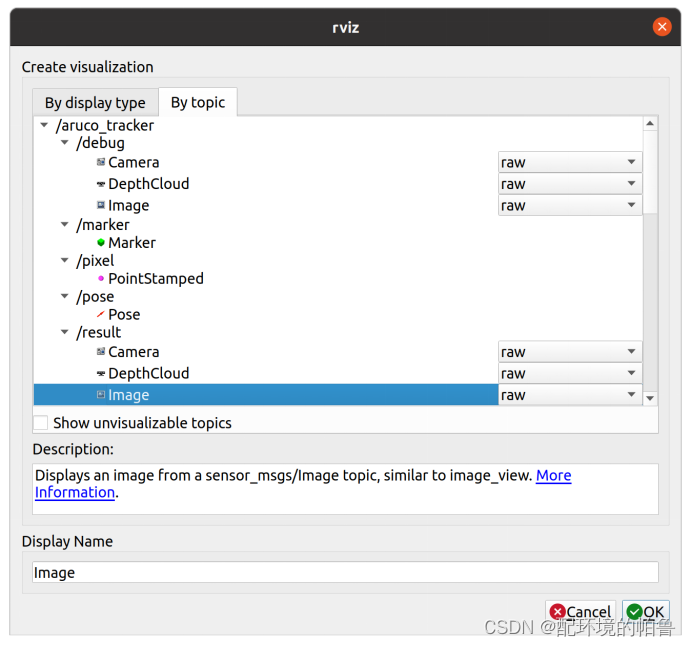
在rviz中添加识别标定框的图片
拖到world的旁边,好看一点。
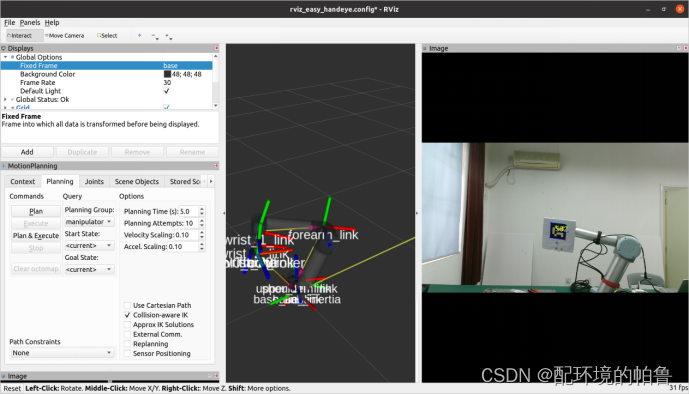
现在先用示教器把机器人位姿调好,点击check starting pose,如果ready那么就在面板中打开external control连接机器人(按照我的经验,机械臂最好像我这样成一个直角,然后标定板可以稍微往后一点,这样check的成功率更高一点)
顺序是这样的
next pose-plan-execute-take sample-next pose循环,期间execute会驱动机械臂达到新位姿(机械臂没有动那就是external control没开,重新开一下就可以继续)。中间有bad就继续next pose,少几个问题不大。直到进度条到达100%,再点击compute可以看到已经计算出想要的结果。

点击save保存结果。
到主文件夹,点击显示隐藏文件
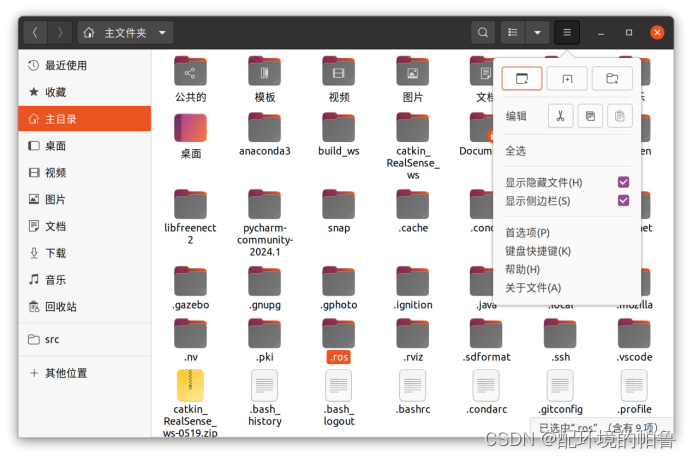
到.ros/easy_handeye就可以看见保存的yaml文件

来验证一下是否标定成功
编写启动的launch
在自己的ros包的launch文件夹下新建一个launch,我命名为tfpc.launch
1.这个是realsense的launch
<launch>
<!-- start the robot -->
  <include file="$(find ur_robot_driver)/launch/ur5_bringup.launch">

      <arg name="robot_ip" value="192.168.0.101" />
  </include>
  <include file="$(find ur5_moveit_config)/launch/moveit_planning_execution.launch">

  </include>

  <include file="$(find ur5_moveit_config)/launch/moveit_rviz.launch">

  </include>
  <arg name="serial_no"             default=""/>
  <arg name="json_file_path"        default=""/>
  <arg name="camera"                default="camera"/>

  <group ns="$(arg camera)">
    <include file="$(find realsense2_camera)/launch/includes/nodelet.launch.xml">
      <arg name="serial_no"         value="$(arg serial_no)"/>
      <arg name="json_file_path"    value="$(arg json_file_path)"/>
      <arg name="depth_width"       value="640"/>
      <arg name="depth_height"      value="480"/>
      <arg name="depth_fps"         value="30"/>
      <arg name="color_width"       value="640"/>
      <arg name="color_height"      value="480"/>
      <arg name="color_fps"         value="30"/>
      <arg name="enable_depth"      value="true"/>
      <arg name="enable_color"      value="true"/>
      <arg name="enable_infra1"     value="false"/>
      <arg name="enable_infra2"     value="false"/>
      <arg name="enable_fisheye"    value="false"/>
      <arg name="enable_gyro"       value="false"/>
      <arg name="enable_accel"      value="false"/>
      <arg name="enable_pointcloud" value="true"/>
      <arg name="enable_sync"       value="true"/>
      <arg name="tf_prefix"         value="$(arg camera)"/>
    </include>

   // static_transform_publisher x y z qx qy qz qw frame_id child_frame_id  period_in_ms
    <node pkg="tf" type="static_transform_publisher" name="ur5_broadcaster" args="1.1623376860373211 -0.25857278003739353 0.8248113633540481 0.09325668257499285 0.025937917828832036 -0.9924104304264454 0.07584163206715598 base camera_link 100" />

  </group>
</launch>
2.这个是kinect2的launch
<launch>
  <!-- 启动机器人 -->
  <include file="$(find ur_robot_driver)/launch/ur5_bringup.launch">
    <arg name="robot_ip" value="192.168.0.101" />
  </include>
  <include file="$(find ur5_moveit_config)/launch/moveit_planning_execution.launch" />
  <include file="$(find ur5_moveit_config)/launch/moveit_rviz.launch" />

  <!-- 启动kinectv2 -->
  <include file="$(find kinect2_bridge)/launch/kinect2_bridge.launch" />

  <!-- 使用static_transform_publisher发布静态变换 -->
  <!-- static_transform_publisher x y z qx qy qz qw frame_id child_frame_id  period_in_ms -->
 <node pkg="tf" type="static_transform_publisher" name="ur5_broadcaster" args="0.9277919959256734 -0.3724137538884511 0.6446675378222206 -0.5772908075790505 -0.5123884865426929 0.4567706589231451 0.4422147979094913 base kinect2_link" />

</launch>
把标定得到的数值按照注释的顺序填写到tf的节点中去,可以叫ai填也可以自己填。
运行自己的launch
roslaunch my_bag tfpc.launch把frame改为base,添加点云话题,就可以看见标定成功,至于说有点偏差,那是正常的,因为这种传统的手眼标定会有一系列的多种误差累积,觉得差的可以寻找新式的标定方法(本帖末尾会给出我找到的方法),现在有点偏差,到时候建包围盒建大一点就行。

我找到的方法,未实践:
https://github.com/pyni/handeye_calibration_with_depth_camera.git
https://github.com/pyni/quick_depth_handeye_calibration_without_calibration_board.git
https://github.com/sunhan1997/handeye_calibration_by_ICP.git


 517
517


 被折叠的 条评论
为什么被折叠?


