


目录
有错误或没说清楚的地方欢迎评论指正,我会修改的,谢谢大家
本来我想使用urdf精确过滤机械臂点云。但是后来我发现四个问题,主要是第四个:
1.这种滤波方法计算量太大,较简易滤波慢很多。
2.这俩相机点云波动挺大(特别是d435i),urdf滤波需要设置较大的膨胀区
3.标定导致的偏差使得膨胀区需要进一步扩大
4.我没跑通,只跑通了简易滤波
以下是urdf滤波的链接:
使用ros包:
 https://github.com/peci1/robot_body_filter
作者给出的演示:
改用简易滤波:
这个robot_body_filter包确实可以根据urdf模型和坐标系过滤掉特定形状的点云,但是经过实测和作者视频中的展示,发现实时性不够,所以还是转头使用pcl的各种简单滤波吧,
上面的这个包暂时不用
安装滤波ros包:
简易滤波ros包链接:GitHub - ADVRHumanoids/point_cloud2_filters
先安装一个filter包,不然编译成功,但运行缺东西。
sudo apt-get install ros-noetic-sensor-filters到自己的工作空间下,下载point_cloud2_filters并编译
cd ~/catkin_RealSense_ws/src
git clone https://github.com/ADVRHumanoids/point_cloud2_filters.git
cd ..
catkin_make
确保没有报错
参数及launch设置
进入到这个包的launch中,俩相机我准备了俩launch及其yaml,各位看着来,基本就是换个名字或者话题的差别。
d435_example.launch
<launch>
    <node pkg="sensor_filters" type="pointcloud2_filter_chain" output="screen" name="pointcloud2_filters">
        <remap from="~input" to="/camera/depth/color/points" />
        <remap from="~output" to="/camera/depth/color/points/filtered" />
        <rosparam command="load" file="$(find point_cloud2_filters)/config/d435_example.yaml" />
    </node>

    <node name="rqt_reconfigure" pkg="rqt_reconfigure" type="rqt_reconfigure" />
</launch>
k2_example.launch
<launch>
    <node pkg="sensor_filters" type="pointcloud2_filter_chain" output="screen" name="pointcloud2_filters">
        <remap from="~input" to="/kinect2/sd/points" />
        <remap from="~output" to="/kinect2/sd/points/filtered" />
        <rosparam command="load" file="$(find point_cloud2_filters)/config/k2_example.yaml" />
    </node>

    <node name="rqt_reconfigure" pkg="rqt_reconfigure" type="rqt_reconfigure" />

</launch>
这个launch中,主要是把input改为相机的点云话题,output理论上可以自己定,我这里改为原points/filtered。
之后是加载yaml文件,yaml细节我下面会给到。
在最后添加一个非常强力的ros插件
<node name="rqt_reconfigure" pkg="rqt_reconfigure" type="rqt_reconfigure" />这个到时候可以实时调节包围盒设置的参数,不需要再反复修改然后开关滤波节点。
接下来修改yaml,还是备份一下再修改:
d435_example.yaml或k2_example.yaml
output_queue_size: 1

cloud_filter_chain:
  - name: PassThroughFilter
    type: point_cloud2_filters/PassThroughFilterPointCloud2
    params:
      active: False
      input_frame: "xxxx_link"
      output_frame: "xxxx_link"
      keep_organized: True
      negative: False
      #user_filter_value: 3
      filter_field_name: "x"
      filter_limit_min: 0.5
      filter_limit_max: 0.8

  - name: CropBoxFilter
    type: point_cloud2_filters/CropBoxFilterPointCloud2
    params:
      active: True
      input_frame: "xxxx_link"
      output_frame: "xxxx_link"
      keep_organized: True
      negative: False
      #user_filter_value: 5
      min_x: -1
      max_x: 1
      min_y: -2
      max_y: 2
      min_z: 0.5
      max_z: 2

  - name: VoxelGridFilter
    type: point_cloud2_filters/VoxelGridFilterPointCloud2
    params:
      active: True
      input_frame: "xxxx_link"
      output_frame: "xxxx_link"
      leaf_size_x: 0.01
      leaf_size_y: 0.01
      leaf_size_z: 0.01
      # min_points_per_voxel: 5
      min_points_per_voxel: 10
      downsample_all_data: True
      filter_field_name: "y"
      filter_limit_min: -2
      filter_limit_max: 2
      negative: False

  - name: CropBoxFilterBase
    type: point_cloud2_filters/CropBoxFilterPointCloud2
    params:
      active: True
      input_frame: "base"
      output_frame: "xxxx_link"
      keep_organized: True
      negative: True
      #user_filter_value: 5
      min_x: -0.2
      max_x: 0.2
      min_y: -0.2
      max_y: 0.2
      min_z: 0
      max_z: 0.2

  - name: CropBoxFiltershoulder
    type: point_cloud2_filters/CropBoxFilterPointCloud2
    params:
      active: True
      input_frame: "shoulder_link"
      output_frame: "xxxx_link"
      keep_organized: True
      negative: True
      #user_filter_value: 5
      min_x: -0.08
      max_x: 0.08
      min_y: -0.08
      max_y: 0.09
      min_z: -0.77
      max_z: 0.62

  - name: CropBoxFilterUpper
    type: point_cloud2_filters/CropBoxFilterPointCloud2
    params:
      active: True
      input_frame: "upper_arm_link"
      output_frame: "xxxx_link"
      keep_organized: True
      negative: True
      #user_filter_value: 5
      min_x: -0.54
      max_x: 0.08
      min_y: -0.12
      max_y: 0.12
      min_z: 0.025
      max_z: 0.24

  - name: CropBoxFilterForearm
    type: point_cloud2_filters/CropBoxFilterPointCloud2
    params:
      active: True
      input_frame: "forearm_link"
      output_frame: "xxxx_link"
      keep_organized: True
      negative: True
      #user_filter_value: 5
      min_x: -0.45
      max_x: 0.1
      min_y: -0.1
      max_y: 0.08
      min_z: -0.075
      max_z: 0.105

  - name: CropBoxFilterWrist
    type: point_cloud2_filters/CropBoxFilterPointCloud2
    params:
      active: True
      input_frame: "wrist_1_link"
      output_frame: "xxxx_link"
      keep_organized: True
      negative: True
      #user_filter_value: 5
      min_x: -0.08
      max_x: 0.07
      min_y: -0.175
      max_y: 0.091
      min_z: -0.07
      max_z: 0.1

  - name: CropBoxFiltertool0
    type: point_cloud2_filters/CropBoxFilterPointCloud2
    params:
      active: True
      input_frame: "tool0"
      output_frame: "xxxx_link"
      keep_organized: True
      negative: True
      #user_filter_value: 5
      min_x: -0.09
      max_x: 0.09
      min_y: -0.05
      max_y: 0.05
      min_z: -0.2
      max_z: 0.05
d435i就把xxxx_link改为camera_link,kinect2就改为kinect2_link。
注意!
这个设置只是我自己实验室的设置yaml,只是个具体点的模板,之后还是得根据读者自己的情况进行调节。
滤波参数细节
以下是yaml中注意的点:
主要用到两种滤波,
CropBoxFilter用来建立包围盒去除机械臂工作区以外的背景点云或者机械臂本体点云,
VoxelGridFilter用来暴力滤除离群的点云,防止这些点云变为体素点干扰机械臂执行。
min_points_per_voxel的值越大,离群点过滤越明显,但是也会把有用的点云变得稀疏。
变量active:True/False 开启/关闭这个滤波
变量negtive:True/False 保留盒外点云/保留盒内点云,活用active和negtive可以实时查看挖走的点云部分,进而实时调节。
滤波可以设置任意个,但是注意名字需要不同。
input_frame可以理解为基于哪个坐标系建立包围盒,所以过滤机械臂点云那里的input_frame都是关节的坐标系。
output_frame一律填自己的相机frame。
rviz的坐标系的三个箭头红绿蓝分别是xyz,有箭头的方向是正方向。
其余没说到的参数可以自己调节看看。
运行滤波
全都写好之后就可以开启节点看看是不是过滤成功tfpc.launch,详情见前节,链接,其中包含启动机器人+启动相机+运行tf变换节点
Realsense
roslaunch my_bag tfpc.launch
roslaunch point_cloud2_filters d435_example.launch
kinect2
roslaunch my_bag tfpc.launch
roslaunch point_cloud2_filters k2_example.launch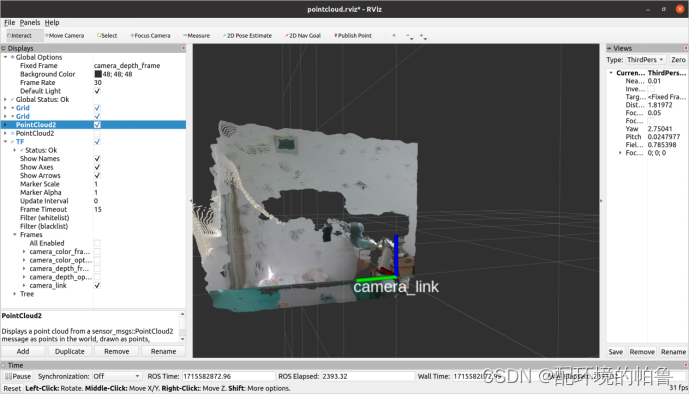
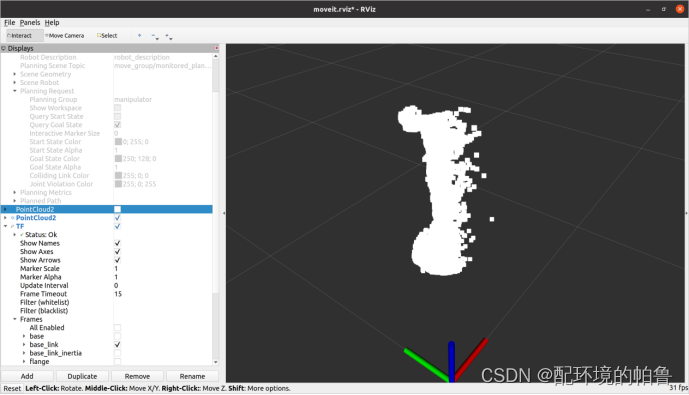
Rviz中订阅一下过滤后的点云话题,可以看见原点云(有背景)和经过滤波之后的点云(无背景)。
时间戳警告(不影响使用)
时间戳这边有点问题,但是不影响运行。尝试解决过,但是摸索了一上午,放弃了。目前已知无法解决问题的方法:ubuntu时间同步,改变tf发送频率,把tf改为tf2。
[ERROR] [1716863520.012014972]: Lookup would require extrapolation 0.011439795s into the past. Requested time 1716863519.945887089 but the earliest data is at time 1716863519.957326889, when looking up transform from frame [camera_link] to frame [forearm_link]滤波微调方法
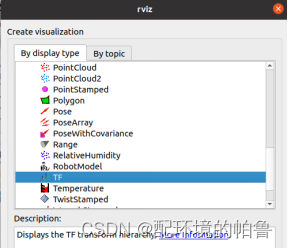
先在rviz中添加tf,添加好之后觉得坐标系太多可以在tf中的frames都取消掉,只保留自己想要的

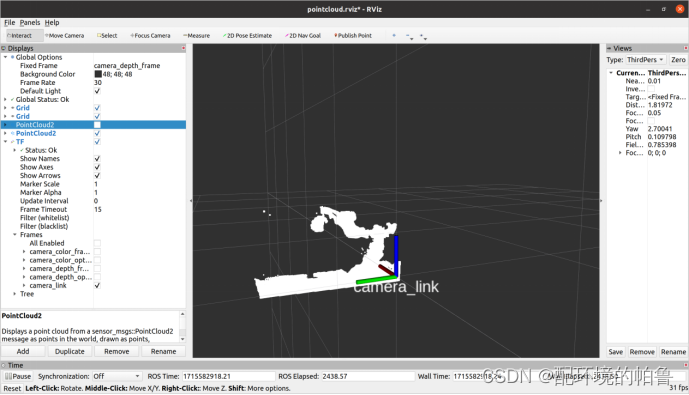
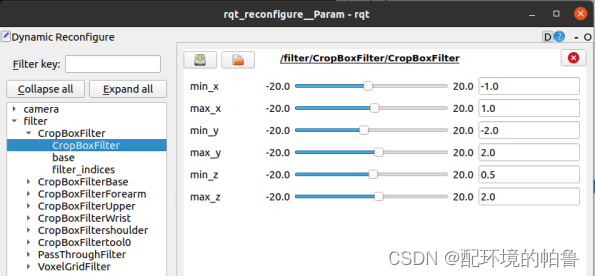
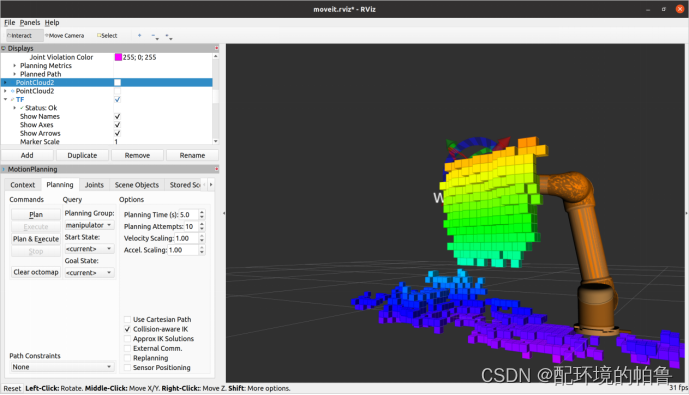
在rqt_reconfigure中可以看到所有设置的滤波,第一行调节包围盒数值。不要拖动,因为这是以米为单位的,修改右边数值,尽量以0.02为一个最小单位慢慢试。第二行active可以修改开启关闭,第三行negative可以选保留盒外还是盒里的点云,如下图就是negative开启时候的机械臂点云。
修改moveit的sensor3d中订阅中的点云话题
Ok,现在有了过滤后的点云,那么最后一步,把之前
src/universal_robot/ur5_moveit_config/config/sensors_3d.yaml中的点云话题改为过滤后的点云话题。
sensors:
  - filtered_cloud_topic: filtered_cloud
    max_range: 2.5
    max_update_rate: 5.0
    padding_offset: 0.01
    padding_scale: 1.0
    point_cloud_topic: /camera/depth/color/points/filtered
    # point_cloud_topic: /kinect2/sd/points/filtered
    # point_cloud_topic: /camera/depth/color/points
    # point_cloud_topic: /kinect2/sd/points
    point_subsample: 1
    sensor_plugin: occupancy_map_monitor/PointCloudOctomapUpdater
完成
至此,所有避障所需的设置就都好了,尝试一下
Realsense
roslaunch my_bag tfpc.launch
roslaunch point_cloud2_filters d435_example.launch
kinect2
roslaunch my_bag tfpc.launch
roslaunch point_cloud2_filters k2_example.launch
可以在motionplanning里驱动机械臂,也可以程序设置moveit让机械臂循环跑,具体请见链接。都是可以感知到周围环境的。
运行 demo03.py
未解决的问题
在感应到预定轨迹上有障碍物时机械臂就会停下来,我想让它停下来然后重规划。但是moveit默认是阻挡后机械臂回到起始点。目前尝试过的方法:把.go()添加一个参数wait=True,但是好像没用。可能需要编译安装moveit然后进行修改。期待后续有小伙伴可以解决。


 1万+
1万+

 被折叠的 条评论
为什么被折叠?
被折叠的 条评论
为什么被折叠?
 到【灌水乐园】发言


