基于多头注意力机制LSTM股价预测模型

1、多头注意力机制层的构建

class MultiHeadAttention(tf.keras.layers.Layer):
  def __init__(self, num_heads, d_model):
    super(MultiHeadAttention, self).__init__()
    self.num_heads = num_heads
    self.d_model = d_model

    assert d_model % self.num_heads == 0

    self.depth = d_model // self.num_heads

    self.wq = tf.keras.layers.Dense(d_model)
    self.wk = tf.keras.layers.Dense(d_model)
    self.wv = tf.keras.layers.Dense(d_model)

    self.dense = tf.keras.layers.Dense(d_model)

  def split_heads(self, x, batch_size):
    """Split the last dimension into (num_heads, depth).
    Transpose the result such that the shape is (batch_size, num_heads, seq_len, depth)
    """
    x = tf.reshape(x, (batch_size, -1, self.num_heads, self.depth))
    return tf.transpose(x, perm=[0, 2, 1, 3])

  def scaled_dot_product_attention(self, q, k, v, mask):
    """Calculate the attention weights.
    q, k, v must have matching leading dimensions.
    k, v must have matching penultimate dimension, i.e.: seq_len_k = seq_len_v.
    The mask has different shapes depending on its type(padding or look ahead) 
    but it must be broadcastable for addition.

    Args:
      q: query shape == (..., seq_len_q, depth)
      k: key shape == (..., seq_len_k, depth)
      v: value shape == (..., seq_len_v, depth_v)
      mask: Float tensor with shape broadcastable 
            to (..., seq_len_q, seq_len_k). Defaults to None.

    Returns:
      output, attention_weights
    """

    matmul_qk = tf.matmul(q, k, transpose_b=True)  # (..., seq_len_q, seq_len_k)

    # scale matmul_q
    # scale matmul_qk
    dk = tf.cast(tf.shape(k)[-1], tf.float32)
    scaled_attention_logits = matmul_qk / tf.math.sqrt(dk)

    # add the mask to the scaled tensor.
    if mask is not None:
      scaled_attention_logits += (mask * -1e9)  

    # softmax is normalized on the last axis (seq_len_k) so that the scores
    # add up to 1.
    attention_weights = tf.nn.softmax(scaled_attention_logits, axis=-1)  # (..., seq_len_q, seq_len_k)

    output = tf.matmul(attention_weights, v)  # (..., seq_len_q, depth_v)

    return output, attention_weights

  def call(self, v, k, q, mask):
    batch_size = tf.shape(q)[0]

    q = self.wq(q)  # (batch_size, seq_len, d_model)
    k = self.wk(k)  # (batch_size, seq_len, d_model)
    v = self.wv(v)  # (batch_size, seq_len, d_
    # split heads
    q = self.split_heads(q, batch_size)  # (batch_size, num_heads, seq_len_q, depth)
    k = self.split_heads(k, batch_size)  # (batch_size, num_heads, seq_len_k, depth)
    v = self.split_heads(v, batch_size)  # (batch_size, num_heads, seq_len_v, depth)

    # scaled dot product attention
    scaled_attention, attention_weights = self.scaled_dot_product_attention(q, k, v, mask)

    # concatenation of heads
    scaled_attention = tf.transpose(scaled_attention, perm=[0, 2, 1, 3])  # (batch_size, seq_len_q, num_heads, depth)
    concat_attention = tf.reshape(scaled_attention, 
                                  (batch_size, -1, self.d_model))  # (batch_size, seq_len_q, d_model)

    # final linear layer
    output = self.dense(concat_attention)  # (batch_size, seq_len_q, d_model)

    return output

2、构建股价预测模型

# Stock price prediction model
class StockPricePredictionModel(tf.keras.Model):
  def __init__(self, num_heads, d_model, num_lstm_units):
    super(StockPricePredictionModel, self).__init__()
    self.num_heads = num_heads
    self.f_model = d_model
    self.num_lstm_units = num_lstm_units

    self.multi_head_attention = MultiHeadAttention(self.num_heads, self.d_model)
    self.lstm = tf.keras.layers.LSTM(self.num_lstm_units, return_sequences=True)
    self.dense = tf.keras.layers.Dense(1)

  def call(self, inputs, mask):
    attention_output = self.multi_head_attention(inputs, input, input, mask)
    lstm_output = self.lstm(attention_output)
    prediction = self.dense(lstm_output)
    return prediction

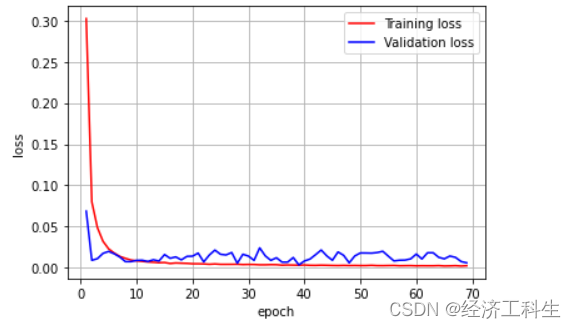
model = StockPricePredictionModel(num_heads=9, d_model=256, num_lstm_units=128)

3、模型训练与结果


  • 6
    点赞
  • 29
    收藏
    觉得还不错? 一键收藏
  • 打赏
    打赏
  • 5
    评论
实现多头注意力机制LSTM网络模型可以分为以下几个步骤: 1. 导入所需的库 ```python import torch import torch.nn as nn import torch.nn.functional as F ``` 2. 定义多头注意力机制的类 ```python class MultiHeadAttention(nn.Module): def __init__(self, n_heads, d_model, dropout): super(MultiHeadAttention, self).__init__() self.n_heads = n_heads self.d_k = d_model // n_heads self.q_linear = nn.Linear(d_model, d_model) self.v_linear = nn.Linear(d_model, d_model) self.k_linear = nn.Linear(d_model, d_model) self.dropout = nn.Dropout(dropout) self.out = nn.Linear(d_model, d_model) def forward(self, q, k, v, mask=None): bs = q.size(0) # perform linear operation and split into N heads k = self.k_linear(k).view(bs, -1, self.n_heads, self.d_k) q = self.q_linear(q).view(bs, -1, self.n_heads, self.d_k) v = self.v_linear(v).view(bs, -1, self.n_heads, self.d_k) # transpose to get dimensions bs * N * sl * d_model k = k.transpose(1,2) q = q.transpose(1,2) v = v.transpose(1,2) # calculate attention using function we will define next scores = self.attention(q, k, v, self.d_k, mask, self.dropout) # concatenate heads and put through final linear layer concat = scores.transpose(1,2).contiguous().view(bs, -1, self.n_heads*self.d_k) output = self.out(concat) return output ``` 在构建多头注意力机制的类时,我们首先需要定义每个头的数量、模型维度和丢失率。在构造函数中,我们定义了线性层,以将输入线性映射到查询、键和值空间。我们还使用了`nn.Dropout`来减少过拟合。在`forward`函数中,我们首先对输入进行线性变换,并将输出重塑为多头矩阵。然后我们执行一个自定义的`attention`函数,该函数将计算注意力权重,并将结果与值矩阵相乘。最后,我们将多头矩阵重新连接,并通过一个线性层输出。 3. 定义自定义的注意力函数 ```python def attention(q, k, v, d_k, mask=None, dropout=None): scores = torch.matmul(q, k.transpose(-2, -1)) / math.sqrt(d_k) if mask is not None: mask = mask.unsqueeze(1) scores = scores.masked_fill(mask == 0, -1e9) scores = F.softmax(scores, dim=-1) if dropout is not None: scores = dropout(scores) output = torch.matmul(scores, v) return output ``` 在自定义的注意力函数中,我们首先通过将查询矩阵和键矩阵相乘并除以`sqrt(d_k)`来计算得分。然后,我们可以选择应用掩码来避免将注意力权重分配给无关的值。接下来,我们对得分进行softmax操作,并在需要时应用dropout。最后,我们将注意力权重乘以值矩阵,以获得最终的输出。 4. 定义LSTM网络模型 ```python class LSTMModel(nn.Module): def __init__(self, input_dim, hidden_dim, output_dim, n_layers, n_heads, dropout): super(LSTMModel, self).__init__() self.hidden_dim = hidden_dim self.n_layers = n_layers self.lstm = nn.LSTM(input_dim, hidden_dim, n_layers, batch_first=True, bidirectional=True) self.attention = MultiHeadAttention(n_heads, hidden_dim*2, dropout) self.fc = nn.Linear(hidden_dim*2, output_dim) def forward(self, x): h0 = torch.zeros(self.n_layers*2, x.size(0), self.hidden_dim).to(device) c0 = torch.zeros(self.n_layers*2, x.size(0), self.hidden_dim).to(device) output, (hidden, cell) = self.lstm(x, (h0, c0)) # Apply attention attention_output = self.attention(output, output, output) # Concatenate hidden states from last layer hidden = torch.cat((hidden[-2,:,:], hidden[-1,:,:]), dim = 1) out = self.fc(hidden) return out ``` 在构建LSTM网络模型时,我们首先定义了输入维度、隐藏维度、输出维度、层数、多头数和丢失率。在构造函数中,我们定义了一个双向LSTM层和一个多头注意力层。在`forward`函数中,我们首先将输入通过LSTM层,并获取隐藏状态。然后,我们将LSTM的输出输入多头注意力层。接下来,我们将最后一层的隐藏状态连接起来,并通过一个线性层输出。 5. 实例化模型并训练 ```python # 定义超参数 input_dim = 10 hidden_dim = 32 output_dim = 1 n_layers = 2 n_heads = 4 dropout = 0.2 learning_rate = 0.001 num_epochs = 10 # 实例化模型 model = LSTMModel(input_dim, hidden_dim, output_dim, n_layers, n_heads, dropout).to(device) # 定义损失函数和优化器 criterion = nn.MSELoss() optimizer = torch.optim.Adam(model.parameters(), lr=learning_rate) # 训练模型 for epoch in range(num_epochs): for i, (inputs, targets) in enumerate(train_loader): inputs, targets = inputs.to(device), targets.to(device) optimizer.zero_grad() outputs = model(inputs) loss = criterion(outputs, targets) loss.backward() optimizer.step() if (i+1) % 10 == 0: print('Epoch [{}/{}], Step [{}/{}], Loss: {:.4f}'.format(epoch+1, num_epochs, i+1, len(train_loader), loss.item())) ``` 在实例化模型并定义损失函数和优化器之后,我们可以开始训练模型。在每个epoch中,我们通过迭代训练数据集中的每个批次来更新模型。最后,我们可以使用训练好的模型进行预测。

“相关推荐”对你有帮助么?

  • 非常没帮助
  • 没帮助
  • 一般
  • 有帮助
  • 非常有帮助
提交
评论 5
添加红包

请填写红包祝福语或标题

红包个数最小为10个

红包金额最低5元

当前余额3.43前往充值 >
需支付:10.00
成就一亿技术人!
领取后你会自动成为博主和红包主的粉丝 规则
hope_wisdom
发出的红包

打赏作者

经济工科生

你的鼓励将是我创作的最大动力

¥1 ¥2 ¥4 ¥6 ¥10 ¥20
扫码支付:¥1
获取中
扫码支付

您的余额不足,请更换扫码支付或充值

打赏作者

实付
使用余额支付
点击重新获取
扫码支付
钱包余额 0

抵扣说明:

1.余额是钱包充值的虚拟货币,按照1:1的比例进行支付金额的抵扣。
2.余额无法直接购买下载,可以购买VIP、付费专栏及课程。

余额充值