


class LiftSplatShoot(nn.Module):
    def __init__(self, grid_conf, data_aug_conf, outC):
        super(LiftSplatShoot, self).__init__()
        self.grid_conf = grid_conf  # 保存网格配置
        self.data_aug_conf = data_aug_conf  # 保存数据增强配置

        dx, bx, nx = gen_dx_bx(self.grid_conf['xbound'],
                                              self.grid_conf['ybound'],
                                              self.grid_conf['zbound'],
                                              )  # 生成网格单元大小、网格原点和网格大小
        self.dx = nn.Parameter(dx, requires_grad=False)  # 将dx转为不可训练参数
        self.bx = nn.Parameter(bx, requires_grad=False)  # 将bx转为不可训练参数
        self.nx = nn.Parameter(nx, requires_grad=False)  # 将nx转为不可训练参数

        self.downsample = 16  # 下采样因子
        self.camC = 64  # 相机特征通道数
        self.frustum = self.create_frustum()  # 创建视锥体
        self.D, _, _, _ = self.frustum.shape  # 获取视锥体的深度维度
        self.camencode = CamEncode(self.D, self.camC, self.downsample)  # 创建相机编码模块
        self.bevencode = BevEncode(inC=self.camC, outC=outC)  # 创建鸟瞰图编码模块

    def create_frustum(self):
        ogfH, ogfW = self.data_aug_conf['final_dim']  # 获取数据增强后的图像尺寸
        fH, fW = ogfH // self.downsample, ogfW // self.downsample  # 计算下采样后的图像尺寸
        ds = torch.arange(*self.grid_conf['dbound'], dtype=torch.float).view(-1, 1, 1).expand(-1, fH, fW)  # 生成深度维度的张量
        D, _, _ = ds.shape  # 获取深度维度的大小
        xs = torch.linspace(0, ogfW - 1, fW, dtype=torch.float).view(1, 1, fW).expand(D, fH, fW)  # 生成x方向的网格
        ys = torch.linspace(0, ogfH - 1, fH, dtype=torch.float).view(1, fH, 1).expand(D, fH, fW)  # 生成y方向的网格

        frustum = torch.stack((xs, ys, ds), -1)  # 堆叠x, y, z坐标,形成视锥体
        return nn.Parameter(frustum, requires_grad=False)  # 返回不可训练的视锥体参数

    def get_geometry(self, rots, trans, intrins, post_rots, post_trans):
        B, N, _ = trans.shape  # 获取批量大小和相机数量
        points = self.frustum - post_trans.view(B, N, 1, 1, 1, 3)  # 减去数据增强后的平移
        points = torch.inverse(post_rots).view(B, N, 1, 1, 1, 3, 3).matmul(points.unsqueeze(-1))  # 应用逆旋转矩阵

        points = torch.cat((points[:, :, :, :, :, :2] * points[:, :, :, :, :, 2:3],
                        points[:, :, :, :, :, 2:3]
                        ), 5)  # 反归一化,恢复图像坐标

        combine = rots.matmul(torch.inverse(intrins))  # 组合旋转和逆内参矩阵
        points = combine.view(B, N, 1, 1, 1, 3, 3).matmul(points).squeeze(-1)  # 应用组合矩阵
        points += trans.view(B, N, 1, 1, 1, 3)  # 加上平移向量

        return points  # 返回几何点坐标

    def get_cam_feats(self, x):
        B, N, C, imH, imW = x.shape  # 获取输入图像的形状

        x = x.view(B*N, C, imH, imW)  # 重塑为(batch_size * num_cameras, channels, height, width)
        x = self.camencode(x)  # 编码相机特征
        x = x.view(B, N, self.camC, self.D, imH//self.downsample, imW//self.downsample)  # 重塑为(batch_size, num_cameras, camC, depth, height//downsample, width//downsample)
        x = x.permute(0, 1, 3, 4, 5, 2)  # 重新排列维度为(batch_size, num_cameras, depth, height//downsample, width//downsample, camC)

        return x  # 返回相机特征

    def voxel_pooling(self, geom_feats, x):
        B, N, D, H, W, C = x.shape  # 获取x的形状
        Nprime = B*N*D*H*W  # 计算展平后的大小

        x = x.reshape(Nprime, C)  # 展平成(Nprime, C)

        geom_feats = ((geom_feats - (self.bx - self.dx/2.)) / self.dx).long()  # 将几何特征归一化并转为整数索引
        geom_feats = geom_feats.view(Nprime, 3)  # 重塑为(Nprime, 3)
        batch_ix = torch.cat([torch.full([Nprime//B, 1], ix,
                             device=x.device, dtype=torch.long) for ix in range(B)])  # 创建批次索引
        geom_feats = torch.cat((geom_feats, batch_ix), 1)  # 组合几何特征和批次索引

        kept = (geom_feats[:, 0] >= 0) & (geom_feats[:, 0] < self.nx[0])\
            & (geom_feats[:, 1] >= 0) & (geom_feats[:, 1] < self.nx[1])\
            & (geom_feats[:, 2] >= 0) & (geom_feats[:, 2] < self.nx[2])  # 过滤掉超出范围的点
        x = x[kept]  # 保留有效的x
        geom_feats = geom_feats[kept]  # 保留有效的几何特征

        ranks = geom_feats[:, 0] * (self.nx[1] * self.nx[2] * B)\
            + geom_feats[:, 1] * (self.nx[2] * B)\
            + geom_feats[:, 2] * B\
            + geom_feats[:, 3]  # 计算每个点的排名
        sorts = ranks.argsort()  # 对排名排序
        x, geom_feats, ranks = x[sorts], geom_feats[sorts], ranks[sorts]  # 按排序结果重新排列

        x, geom_feats = cumsum_trick(x, geom_feats, ranks)  # 累积和技巧

        final = torch.zeros((B, C, self.nx[2], self.nx[0], self.nx[1]), device=x.device)  # 创建结果张量
        final[geom_feats[:, 3], :, geom_feats[:, 2], geom_feats[:, 0], geom_feats[:, 1]] = x  # 填充结果张量

        final = torch.cat(final.unbind(dim=2), 1)  # 合并Z维度

        return final  # 返回最终结果

    def get_voxels(self, x, rots, trans, intrins, post_rots, post_trans):
        geom = self.get_geometry(rots, trans, intrins, post_rots, post_trans)  # 获取几何信息
        x = self.get_cam_feats(x)  # 获取相机特征

        x = self.voxel_pooling(geom, x)  # 进行体素池化

        return x  # 返回体素特征

    def forward(self, x, rots, trans, intrins, post_rots, post_trans):
        x = self.get_voxels(x, rots, trans, intrins, post_rots, post_trans)  # 获取体素特征
        x = self.bevencode(x)  # 进行鸟瞰图编码
        return x  # 返回最终输出
    def __init__(self, grid_conf, data_aug_conf, outC):
        super(LiftSplatShoot, self).__init__()
        self.grid_conf = grid_conf  # 保存网格配置
        self.data_aug_conf = data_aug_conf  # 保存数据增强配置

        dx, bx, nx = gen_dx_bx(self.grid_conf['xbound'],
                                              self.grid_conf['ybound'],
                                              self.grid_conf['zbound'],
                                              )  # 生成网格单元大小、网格原点和网格大小
        self.dx = nn.Parameter(dx, requires_grad=False)  # 将dx转为不可训练参数
        self.bx = nn.Parameter(bx, requires_grad=False)  # 将bx转为不可训练参数
        self.nx = nn.Parameter(nx, requires_grad=False)  # 将nx转为不可训练参数

        self.downsample = 16  # 下采样因子
        self.camC = 64  # 相机特征通道数
        self.frustum = self.create_frustum()  # 创建视锥体
        self.D, _, _, _ = self.frustum.shape  # 获取视锥体的深度维度
        self.camencode = CamEncode(self.D, self.camC, self.downsample)  # 创建相机编码模块
        self.bevencode = BevEncode(inC=self.camC, outC=outC)  # 创建鸟瞰图编码模块
gen_dx_bx:函数用于生成网格参数。
self.downsample:是图像下采样因子,用于减少计算复杂度。
self.camC:是相机特征通道数。
self.frustum:是由create_frustum方法创建的视锥体。
CamEncode和BevEncode是两个特征编码模块
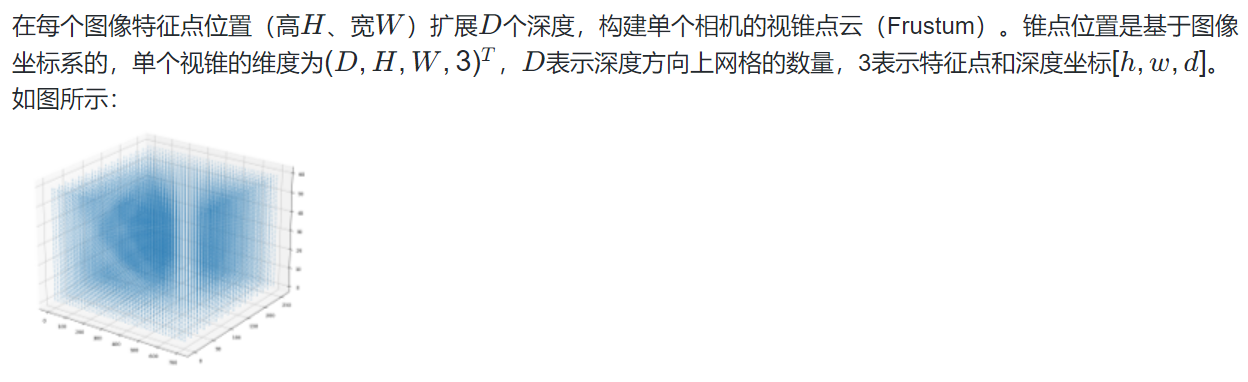
创建视锥体网格
用于将图像平面的坐标映射到3D空间中。
    def create_frustum(self):
        ogfH, ogfW = self.data_aug_conf['final_dim']  # 获取数据增强后的图像尺寸
        fH, fW = ogfH // self.downsample, ogfW // self.downsample  # 计算下采样后的图像尺寸
        ds = torch.arange(*self.grid_conf['dbound'], dtype=torch.float).view(-1, 1, 1).expand(-1, fH, fW)  # 生成深度维度的张量
        D, _, _ = ds.shape  # 获取深度维度的大小
        xs = torch.linspace(0, ogfW - 1, fW, dtype=torch.float).view(1, 1, fW).expand(D, fH, fW)  # 生成x方向的网格
        ys = torch.linspace(0, ogfH - 1, fH, dtype=torch.float).view(1, fH, 1).expand(D, fH, fW)  # 生成y方向的网格

        frustum = torch.stack((xs, ys, ds), -1)  # 堆叠x, y, z坐标,形成视锥体
        return nn.Parameter(frustum, requires_grad=False)  # 返回不可训练的视锥体参数
根据输入参数计算点云在车辆坐标系中的位置。
    def get_geometry(self, rots, trans, intrins, post_rots, post_trans):
        B, N, _ = trans.shape  # 获取批量大小和相机数量
        # 抵消数据增强及预处理对像素的变化
        points = self.frustum - post_trans.view(B, N, 1, 1, 1, 3)  # 减去数据增强后的平移
        points = torch.inverse(post_rots).view(B, N, 1, 1, 1, 3, 3).matmul(points.unsqueeze(-1))  # 应用逆旋转矩阵

        points = torch.cat((points[:, :, :, :, :, :2] * points[:, :, :, :, :, 2:3],
                        points[:, :, :, :, :, 2:3]
                        ), 5)  # 反归一化,恢复图像坐标

        combine = rots.matmul(torch.inverse(intrins))  # 组合旋转和逆内参矩阵
        points = combine.view(B, N, 1, 1, 1, 3, 3).matmul(points).squeeze(-1)  # 应用组合矩阵
        points += trans.view(B, N, 1, 1, 1, 3)  # 加上平移向量
抵消数据增强及预处理对像素的变化公式:

图像坐标系 -> 归一化相机坐标系 -> 相机坐标系 -> 车身坐标系

得到

   def voxel_pooling(self, geom_feats, x):
        B, N, D, H, W, C = x.shape  # 获取x的形状
        Nprime = B*N*D*H*W  # 计算展平后的大小

        x = x.reshape(Nprime, C)  # 展平成(Nprime, C)

        geom_feats = ((geom_feats - (self.bx - self.dx/2.)) / self.dx).long()  # 将几何特征归一化并转为整数索引
        geom_feats = geom_feats.view(Nprime, 3)  # 重塑为(Nprime, 3)
        batch_ix = torch.cat([torch.full([Nprime//B, 1], ix,
                             device=x.device, dtype=torch.long) for ix in range(B)])  # 创建批次索引
        geom_feats = torch.cat((geom_feats, batch_ix), 1)  # 组合几何特征和批次索引

        kept = (geom_feats[:, 0] >= 0) & (geom_feats[:, 0] < self.nx[0])\
            & (geom_feats[:, 1] >= 0) & (geom_feats[:, 1] < self.nx[1])\
            & (geom_feats[:, 2] >= 0) & (geom_feats[:, 2] < self.nx[2])  # 过滤掉超出范围的点
        x = x[kept]  # 保留有效的x
        geom_feats = geom_feats[kept]  # 保留有效的几何特征

        ranks = geom_feats[:, 0] * (self.nx[1] * self.nx[2] * B)\
            + geom_feats[:, 1] * (self.nx[2] * B)\
            + geom_feats[:, 2] * B\
            + geom_feats[:, 3]  # 计算每个点的排名
        sorts = ranks.argsort()  # 对排名排序
        x, geom_feats, ranks = x[sorts], geom_feats[sorts], ranks[sorts]  # 按排序结果重新排列

        x, geom_feats = cumsum_trick(x, geom_feats, ranks)  # 累积和技巧

        final = torch.zeros((B, C, self.nx[2], self.nx[0], self.nx[1]), device=x.device)  # 创建结果张量
        final[geom_feats[:, 3], :, geom_feats[:, 2], geom_feats[:, 0], geom_feats[:, 1]] = x  # 填充结果张量

        final = torch.cat(final.unbind(dim=2), 1)  # 合并Z维度

        return final  # 返回最终结果

    def get_voxels(self, x, rots, trans, intrins, post_rots, post_trans):
        geom = self.get_geometry(rots, trans, intrins, post_rots, post_trans)  # 获取几何信息
        x = self.get_cam_feats(x)  # 获取相机特征

        x = self.voxel_pooling(geom, x)  # 进行体素池化

        return x  # 返回体素特征

    def forward(self, x, rots, trans, intrins, post_rots, post_trans):
        x = self.get_voxels(x, rots, trans, intrins, post_rots, post_trans)  # 获取体素特征
        x = self.bevencode(x)  # 进行鸟瞰图编码
        return x  # 返回最终输出
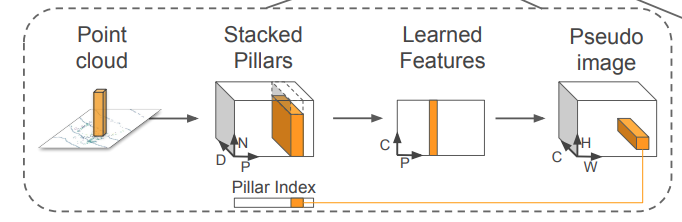
跟pointpillar的效果一样


 1万+
1万+


 被折叠的 条评论
为什么被折叠?
被折叠的 条评论
为什么被折叠?
 到【灌水乐园】发言


