


六、图形介绍
现在你可以创建循环了,是时候继续学习如何创建图形了。本章涵盖:
- 计算机如何处理 x,y 坐标。它不像你在数学课上学到的坐标系。
- 如何指定颜色?有数百万种颜色可供选择,告诉计算机使用什么颜色并不像只说“红色”那么简单
- 如何打开空白窗口进行绘图?每个艺术家都需要画布。
- 如何画直线、矩形、椭圆和圆弧?
计算机坐标系统
笛卡尔坐标系,如下图所示( https://commons.wikimedia.org/wiki/File:Cartesian_coordinates_2D.svg ),是大多数人在绘制图形时习惯使用的系统。这是学校教的体系。计算机使用一个相似但有些不同的坐标系统。要理解它的不同之处,需要快速了解一下计算机的历史。
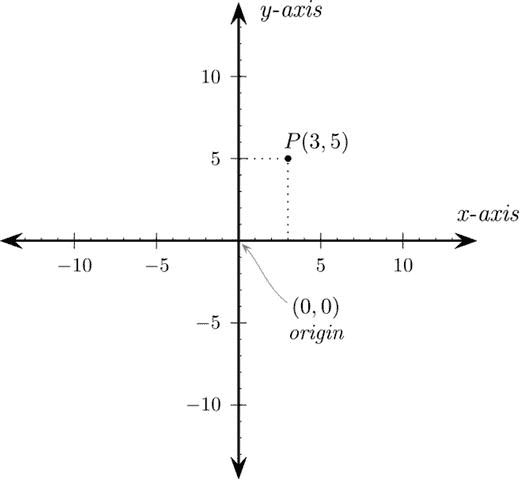
笛卡尔坐标系
在 80 年代早期,大多数计算机系统是基于文本的,不支持图形。下一张图( https://en.wikipedia.org/wiki/File:Visicalc.png )显示了在 80 年代流行的苹果]电脑上运行的早期电子表格程序。当在屏幕上定位文本时,程序员从顶部开始,称之为第 1 行。屏幕继续向下显示 24 行,横向显示 40 个字符。
文本屏幕
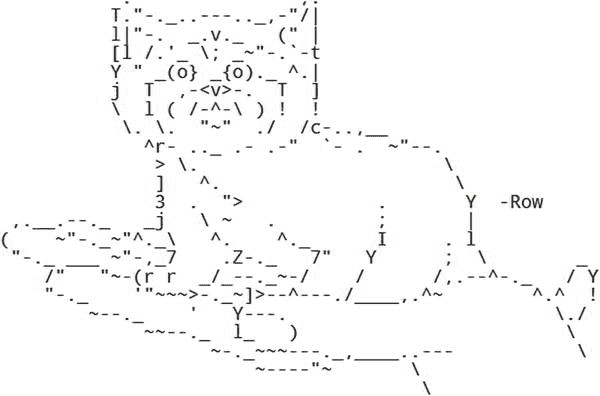
后来,字符集扩展到包括盒子和其他原始绘图形状。人物可以用不同的颜色来画。如图所示,图形变得更高级了。在网上搜索“ASCII 艺术”,可以找到更多的例子。
Spaceware 文本屏幕
一旦计算机能够控制图形的单个像素,基于文本的坐标系统就被卡住了。
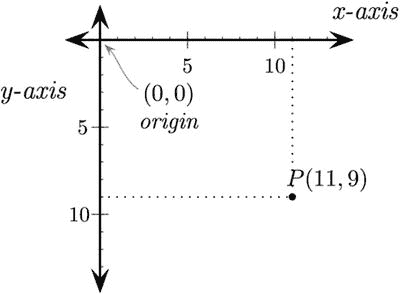
计算机坐标系统
x 坐标的工作原理与笛卡尔坐标系相同。但是 y 坐标反了。与笛卡尔图形中的零 y 坐标位于图形底部不同,零 y 坐标位于计算机屏幕的顶部。随着 y 值的上升,计算机坐标位置在屏幕上下移,就像文本行而不是标准的笛卡尔图形。见上图。
另外,请注意,屏幕覆盖了右下象限,而笛卡尔坐标系通常聚焦于右上象限。可以在负坐标绘制项目,但它们将被绘制到屏幕之外。当形状的一部分不在屏幕上时,这很有用。计算机会计算出屏幕外是什么,程序员不需要太担心。
Pygame 库
为了使图形更容易处理,我们将使用“Pygame”Pygame 是一个其他人编写的代码库,它简化了:
- 绘制图形形状
- 显示位图图像
- 有生命的
- 与键盘、鼠标和游戏手柄互动
- 播放声音
- 检测物体碰撞的时间
Pygame 程序需要做的第一件事是加载和初始化 Pygame 库。每一个使用 Pygame 的程序都应该以下面几行开始:
# Import a library of functions called ’pygame’
import pygame
# Initialize the game engine
pygame.init()
如果您还没有安装 Pygame,那么在“开始之前”一节中可以找到安装 Pygame 的说明。如果你的电脑上没有安装 Pygame,当你试图运行import pygame时会得到一个错误。
重要提示:import pygame查找名为pygame的库文件。如果一个程序员创建了一个名为pygame.py的新程序,计算机将会导入那个文件!这将阻止任何 pygame 程序运行,直到那个pygame.py文件被删除。
彩色
接下来,我们需要添加定义程序颜色的变量。颜色由三种颜色定义:红色、绿色和蓝色。你听说过 RGB 显示器吗?这就是这个术语的由来。红绿蓝。对于旧的显示器,你可以坐得离显示器很近,分辨出单独的 RGB 颜色。至少在你妈妈告诉你不要坐得离电视太近之前。这对于今天的高分辨率显示器来说是很难做到的。
RGB 三元组的每个元素都是一个从 0 到 255 的数字。零表示没有颜色,255 表示显示器显示尽可能多的颜色。这些颜色以叠加的方式组合在一起,因此如果指定了所有三种颜色,监视器上的颜色将显示为白色。(这与墨水和颜料的工作原理不同。)
Python 中的列表用方括号或圆括号括起来。(第八章详细介绍了列表和两种类型的区别。)列表中的各个数字用逗号分隔。下面是一个创建变量并将它们设置为三个数列表的例子。稍后将使用这些列表来指定颜色。
# Define some colors
BLACK = ( 0, 0, 0)
WHITE = ( 255, 255, 255)
GREEN = ( 0, 255, 0)
RED = ( 255, 0, 0)
为什么这些变量都是大写的?记得从第二章回来,不变的变量叫做常数。我们不期望黑色的颜色会改变;它是一个常数。我们用全部大写字母来命名变量,以此来表示变量是常量。如果我们期望一种颜色发生变化,就像我们有sky_color在太阳下山时发生变化,那么这个变量应该全部是小写字母。
在空闲时使用交互式 shell,尝试定义这些变量并打印出来。如果上面的五种颜色不是你要找的颜色,你可以自己定义。要选择一种颜色,找到一个在线的“颜色选择器”,如下图所示。一个这样的拾色器在: http://www.colorpicker.com/
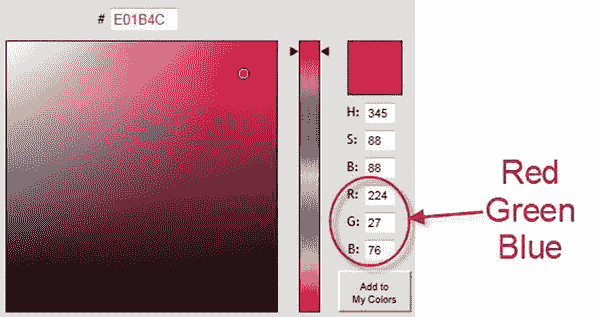
颜色选择器
额外:一些颜色选择器以十六进制指定颜色。如果以 0x 开头,可以输入十六进制数。例如:
WHITE = (0xFF, 0xFF, 0xFF)
最终,程序在绘制圆弧时将需要使用π的值,因此这是我们在程序中定义包含π值的变量的好时机。(也可以从数学库中导入这个作为math.pi。)
PI = 3.141592653
打开窗户
到目前为止,我们开发的程序只能将文本打印到屏幕上。那些程序不像大多数现代程序那样打开任何窗口。打开窗口的代码并不复杂。下面是所需的代码,它创建一个宽度为 700 像素、高度为 500 的窗口:
size = (700, 500)
screen = pygame.display.set_mode(size)
为什么是set_mode?为什么不是open_window?原因是这个命令实际上可以做的不仅仅是打开一个窗口。它还可以创建以全屏模式运行的游戏。这将删除开始菜单,标题栏,并让游戏控制屏幕上的一切。因为这种模式使用起来稍微复杂一些,而且大多数人更喜欢窗口游戏,所以我们将跳过对全屏游戏的详细讨论。但是如果你想了解更多关于全屏游戏的信息,可以查看 pygame 的显示命令的文档。
还有,为什么是size = (700, 500)而不是size = 700, 500?同样的原因,我们把颜色定义放在括号里。Python 通常不能在一个变量中存储两个数字(高度和宽度)。唯一的方法是将数字存储为一个列表。列表需要圆括号或方括号。(从技术上讲,一组数字周围的括号更准确地称为元组或不可变列表。用方括号括起来的列表就叫做列表。一个有经验的 Python 开发人员可能不愿意将括号中的数字列表称为列表而不是元组。你也可以说size = 700, 500,它将默认为一个元组,但我更喜欢用括号。)列表在第八章的中有详细介绍。
要设置窗口的标题(显示在标题栏中),请使用以下代码行:
pygame.display.set_caption("Professor Craven’s Cool Game")
与用户互动
仅用目前编写的代码,程序就会创建一个窗口并立即挂起。用户不能与窗口交互,甚至不能关闭它。所有这些都需要编程。需要添加代码,以便程序在循环中等待,直到用户单击“退出”
这是程序中最复杂的部分,还不需要完全理解它。但是有必要对它的作用有个概念,所以花点时间研究一下,提出问题。
# Loop until the user clicks the close button.
done = False
# Used to manage how fast the screen updates
clock = pygame.time.Clock()
# -------- Main Program Loop -----------
while not done:
# --- Main event loop
for event in pygame.event.get(): # User did something
if event.type == pygame.QUIT: # If user clicked close
done = True # Flag that we are done so we exit this loop
# --- Game logic should go here
# --- Drawing code should go here
# First, clear the screen to white. Don’t put other drawing commands
# above this, or they will be erased with this command.
screen.fill(WHITE)
# --- Go ahead and update the screen with what we’ve drawn.
pygame.display.flip()
# --- Limit to 60 frames per second
clock.tick(60)
最后,我们将添加代码来处理键盘和鼠标点击。该代码将位于第 9 行主事件循环注释的下方。用于确定子弹何时发射以及物体如何移动的代码将放在第 14 行游戏逻辑的注释下面。我们将在后面的章节中讨论这一点。要绘制的代码将放在下面,屏幕的第 20 行用白色填充。
事件处理循环
警惕!程序员遇到的最令人沮丧的问题之一是搞乱事件处理循环。这个“事件处理”代码处理所有的击键、鼠标按钮点击和其他几种类型的事件。例如,您的循环可能如下所示:
for event in pygame.event.get():
if event.type == pygame.QUIT:
print("User asked to quit.")
elif event.type == pygame.KEYDOWN:
print("User pressed a key.")
elif event.type == pygame.KEYUP:
print("User let go of a key.")
elif event.type == pygame.MOUSEBUTTONDOWN:
print("User pressed a mouse button")
事件(如按键)都在一个列表中。程序使用一个for循环来遍历每个事件。使用一系列的if语句,代码判断出发生了什么类型的事件,处理该事件的代码放入if语句中。
所有的if语句应该在一个for循环中一起运行。在复制和粘贴代码时,一个常见的错误是没有合并来自两个程序的循环,而是有两个事件循环。
# Here is one event loop
for event in pygame.event.get():
if event.type == pygame.QUIT:
print("User asked to quit.")
elif event.type == pygame.KEYDOWN:
print("User pressed a key.")
elif event.type == pygame.KEYUP:
print("User let go of a key.")
# Here the programmer has copied another event loop
# into the program. This is BAD. The events were already
# processed.
for event in pygame.event.get():
if event.type == pygame.QUIT:
print("User asked to quit.")
elif event.type == pygame.MOUSEBUTTONDOWN:
print("User pressed a mouse button")
第 2 行的for循环抓取了所有的用户事件。第 13 行的for循环不会抓取任何事件,因为它们已经在前一个循环中处理过了。
另一个典型问题是开始绘制,然后试图完成事件循环:
for event in pygame.event.get():
if event.type == pygame.QUIT:
print("User asked to quit.")
elif event.type == pygame.KEYDOWN:
print("User pressed a key.")
pygame.draw.``rect
# This is code that processes events. But it is not in the
# ’for’ loop that processes events. It will not act reliably.
if event.type == pygame.KEYUP:
print("User let go of a key.")
elif event.type == pygame.MOUSEBUTTONDOWN:
print("User pressed a mouse button")
这将导致程序忽略一些键盘和鼠标命令。为什么呢?for循环处理一个列表中的所有事件。因此,如果有两个键被点击,for循环将处理这两个键。在上面的例子中,if语句不在for循环中。如果有多个事件,if语句将只针对最后一个事件运行,而不是所有事件。
处理每一帧
游戏每一帧的基本逻辑和顺序:
- 未完成时:
- 对于每个事件(按键、鼠标点击等)。):
- 使用一系列的
if语句运行代码来处理每个事件。
- 使用一系列的
- 对于每个事件(按键、鼠标点击等)。):
- 运行计算来确定物体移动到哪里,当物体碰撞时会发生什么,等等。
- 清空屏幕。
- 画出一切。
如果不把这些步骤混在一起,程序会更容易阅读和理解。不要做一些计算,一些绘图,一些更多的计算,一些更多的绘图。另外,看看这和第二章中的计算器是如何相似的。获取用户输入,运行计算,并输出答案。同样的模式也适用于此。
将图像绘制到屏幕上的代码发生在 while 循环中。时钟刻度设置为 10 时,窗口的内容将每秒绘制 10 次。如果它发生得太快,计算机就会变慢,因为它所有的时间都花在更新屏幕上了。如果它根本不在循环中,屏幕就不能正常重绘。如果绘图在循环之外,屏幕最初可能会显示图形,但如果窗口最小化,或者如果另一个窗口放在前面,图形将不会重新出现。
结束程序
现在,在空闲状态下运行这个 Pygame 程序时,点击一个窗口的“关闭”按钮仍然会导致程序崩溃。这是一个麻烦,因为它需要大量点击来关闭一个崩溃的程序。
问题是,即使循环已经退出,程序也没有告诉计算机关闭窗口。通过调用下面的命令,程序将关闭所有打开的窗口并根据需要退出。
pygame.quit()
清除屏幕
下面的代码清除了白色背景窗口中的所有内容。记住变量WHITE在前面被定义为三个 RGB 值的列表。
# Clear the screen and set the screen background
screen.fill(WHITE)
这应该在发出任何绘图命令之前完成。在程序绘制图形后清除屏幕会导致用户只看到一个空白屏幕。
第一次创建窗口时,它的背景是黑色的。清空屏幕仍然很重要,因为有几件事可能会阻止这个窗口开始清空。一个程序不应该假设它有一个空白的画布来绘制。
翻转屏幕
非常重要!画完后必须翻转显示屏。计算机不会在你绘制图形时显示它们,因为这会导致屏幕闪烁。这将等待显示屏幕,直到程序完成绘制。下面的命令将图形“翻转”到屏幕上。
不包含这个命令将意味着程序只是显示一个空白屏幕。翻转后的任何绘图代码都不会显示。
# Go ahead and``update
pygame.display.flip()
打开一个空白窗口
让我们把我们讨论过的所有内容纳入一个完整的程序。这段代码可以作为 Pygame 程序的基础模板。它会打开一个空白窗口,等待用户按下关闭按钮。
在网站上,如果你点击“示例”按钮,你可以选择“图形示例”,然后你会发现这个文件为 pygame_base_template.py。
"""
Pygame base template for opening a window
Sample Python/Pygame Programs
Simpson College Computer Science
http://programarcadegames.com/
http://simpson.edu/computer-science/
Explanation video:http://youtu.be/vRB_983kUMc
"""
import pygame
# Define some colors
BLACK = (0, 0, 0)
WHITE = (255, 255, 255)
GREEN = (0, 255, 0)
RED = (255, 0, 0)
pygame.init()
# Set the width and height of the screen [width, height]
size = (700, 500)
screen = pygame.display.set_mode(size)
pygame.display.set_caption("My Game")
# Loop until the user clicks the close button.
done = False
# Used to manage how fast the screen updates
clock = pygame.time.Clock()
# -------- Main Program Loop -----------
while not done:
# --- Main event loop
for event in pygame.event.get():
if event.type == pygame.QUIT:
done = True
# --- Game logic should go here
# --- Drawing code should go here
# First, clear the screen to white. Don’t put other drawing commands
# above this, or they will be erased with this command.
screen.fill(WHITE)
# ---``Go
pygame.display.flip()
# --- Limit to 60 frames per second
clock.tick(60)
# Close the window and quit.
# If you forget this line, the program will ’hang’
# on exit if running from IDLE.
pygame.quit()
图纸介绍
这里有一个你可以画的东西的列表: http://www.pygame.org/docs/ref/draw.html
程序可以画出矩形、多边形、圆形、椭圆形、弧形和直线。我们还将介绍如何用图形显示文本。位图图形,如图像,包含在第十二章的中。如果您决定查看 pygame 参考,您可能会看到如下函数定义:
pygame.draw.rect(Surface, color, Rect, width=0): return Rect
混淆的一个常见原因是行中写着width=0的部分。这意味着如果你不提供宽度,它将默认为零。因此,这个函数调用:
pygame.draw.rect(screen, RED, [55, 50, 20, 25])
与此函数调用相同:
pygame.draw.rect(screen, RED, [55, 50, 20, 25], 0)
: return Rect告诉你这个函数返回一个矩形,就是传入的那个矩形。你可以忽略这部分。
尝试复制该行并将width = 0放在括号中是行不通的。
# This fails and the error the computer gives you is
# really hard to understand.
pygame.draw.rect(screen, RED, [55, 50, 20, 25], width=0)
画线
下面的代码示例显示了如何在屏幕上画线。它将在屏幕上绘制一条 5 像素宽的从(0,0)到(100,100)的绿线。记住GREEN是一个变量,它在前面被定义为三个 RGB 值的列表。
# Draw on the screen a green line from (0, 0) to (100, 100)
# that is 5 pixels wide.
pygame.draw.line(screen, GREEN, [0, 0], [100, 100], 5)
使用前面示例中的基本模板,并添加代码来画线。阅读注释,找出将代码放在哪里的确切位置。尝试用不同的粗细、颜色和位置绘制线条。画几条线。
绘制带有环和偏移的线
程序可以一遍又一遍地重复事情。下一个代码示例使用循环反复绘制一条线。程序可以使用这种技术绘制多条线,甚至画出整辆车。
将画线命令放入循环中会导致在屏幕上绘制多条线。但是有个问题。如果每条线都有相同的起点和终点坐标,那么每条线都将绘制在另一条线的顶部。看起来就像只画了一条线。
为了解决这个问题,有必要在每次循环中偏移坐标。所以第一次循环时,变量y_offset为零。下面代码中的线是从(0,10)画到(100,110)的。下一次通过循环y_offset增加 10。这将导致绘制的下一条线具有新的坐标(0,20)和(100,120)。每次循环都是这样,将每一行的坐标下移 10 个像素。
# Draw on the screen several lines from (0, 10) to (100, 110)
# 5 pixels wide using a while loop
y_offset = 0
while y_offset < 100:
pygame.draw.line(screen,RED,[0,10+y_offset],[100,110+y_offset],5)
y_offset = y_offset + 10
同样的代码可以用一个for循环更容易地完成:
# Draw on the screen several lines from (0,10) to (100,110)
# 5 pixels wide using a for loop
for y_offset in range(0, 100, 10):
pygame.draw.line(screen,RED,[0,10+y_offset],[100,110+y_offset],5)
运行此代码并尝试对偏移量使用不同的更改。尝试使用不同的值创建偏移。尝试不同的值,直到它的工作原理变得清晰。
例如,这是一个使用正弦和余弦创建更复杂的偏移集的循环,并生成下图所示的图像。
for i in range(200):
radians_x = i / 20
radians_y = i / 6
x = int(75 * math.sin(radians_x)) + 200
y = int(75 * math.cos(radians_y)) + 200
pygame.draw.line(screen, BLACK, [x,y], [x+5,y], 5)
复杂偏移
可以在一个for循环中绘制多个元素,如下图所示,这个代码绘制了多个 X。
for x_offset in range(30, 300, 30):
pygame.draw.line(screen,BLACK,[x_offset,100],[x_offset-10,90],2)
pygame.draw.``line

多个 X
画一个矩形
当绘制矩形时,计算机需要矩形左上角(原点)的坐标,以及高度和宽度。
该图显示了一个矩形(和一个椭圆,将在后面解释),其原点在(20,20),宽度为 250,高度为 100。当指定一个矩形时,计算机需要一个由这四个数字按(x,y,宽度,高度)顺序排列的列表。
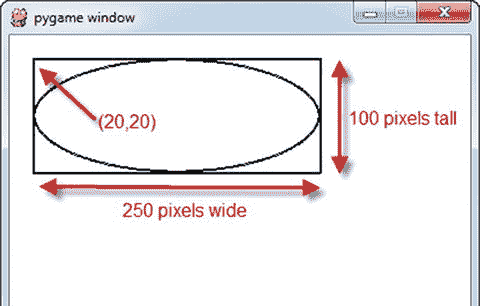
画一个椭圆
下一个代码示例绘制这个矩形。列表中的前两个数字将左上角定义为(20,20)。接下来的两个数字首先指定 250 像素的宽度,然后指定 100 像素的高度。
末尾的 2 指定 2 个像素的线宽。数字越大,矩形周围的线条越粗。如果该数字为 0,则矩形周围不会有边框。而是用指定的颜色填充。
# Draw a rectangle
pygame.draw.rect(screen,BLACK,[20,20,250,100],2)
画一个椭圆
椭圆的绘制就像矩形一样。指定矩形的边界,计算机在这些边界内绘制一个椭圆。
使用椭圆时最常见的错误是认为起点指定了椭圆的中心。现实中,起点什么都不画。它是包含椭圆的矩形的左上角。
回头看这幅图,你可以看到一个 250 像素宽,100 像素高的椭圆。包含它的 250x100 矩形的左上角位于(20,20)。请注意,在(20,20)处实际上没有绘制任何内容。将两者绘制在彼此之上,可以更容易地看到椭圆是如何指定的。
# Draw an ellipse, using a rectangle as the outside boundaries
pygame.draw.ellipse(screen, BLACK, [20,20,250,100], 2)
画弧线
如果一个程序只需要画椭圆的一部分怎么办?这可以通过arc命令来完成。该命令类似于ellipse命令,但它包括要绘制的弧的开始和结束角度。角度以弧度为单位。见下图。
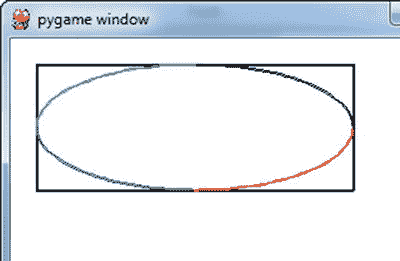
弧
下面的代码示例绘制了四个圆弧,显示圆的四个不同象限。每个象限都用不同的颜色绘制,以便更容易看到弧段。这段代码的结果如上图所示。
# Draw an arc as part of an ellipse. Use radians to determine what
# angle to draw.
pygame.draw.arc(screen, GREEN, [100,100,250,200], PI/2, PI, 2)
pygame.draw.arc(screen, BLACK, [100,100,250,200], 0, PI/2, 2)
pygame.draw.arc(screen, RED, [100,100,250,200],3*PI/2, 2*PI, 2)
pygame.draw.arc(screen, BLUE, [100,100,250,200], PI, 3*PI/2, 2)
绘制多边形
下一行代码绘制一个多边形。三角形由(100,100) (0,200)和(200,200)三个点定义。可以根据需要列出任意多的点。请注意这些点是如何列出的。每个点是一个由两个数字组成的列表,这些点本身嵌套在另一个包含所有这些点的列表中。该代码绘制了下图中可以看到的内容。
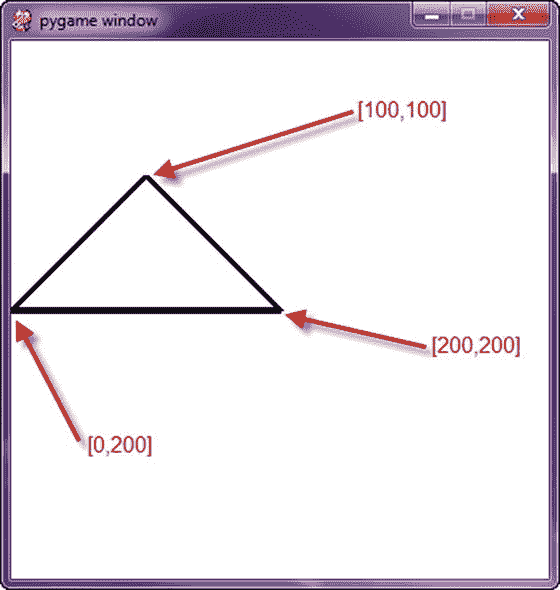
多边形
# This draws a triangle using the polygon command
pygame.draw.polygon(screen, BLACK, [[100,100], [0,200], [200,200]], 5)
绘图文本
文本稍微复杂一些。有三件事需要做。首先,程序创建一个变量来保存将要使用的字体的信息,比如字体和字体大小。
第二,程序创建文本的图像。一种想法是,该程序用所需的字母雕刻出一个“图章”,可以蘸上墨水印在纸上。
第三件要做的事情是程序告诉这个文本图像应该在屏幕上的什么地方被标记(或者“blit”)。
这里有一个例子:
# Select the``font
font = pygame.font.SysFont(’Calibri’, 25, True, False)
# Render the text. "True" means anti-aliased text.
# Black is the color. The variable BLACK was defined
# above as a list of [0, 0, 0]
# Note: This line creates an image of the letters,
# but does not put it on the screen yet.
text = font.render("My text", True, BLACK)
# Put the image of the text on the screen at 250x250
screen.blit(text, [250, 250])
想把分数打印到屏幕上?这就有点复杂了。这不起作用:
text = font.render("Score: ", score, True, BLACK)
为什么呢?一个程序不能像print语句一样只是给font.render添加额外的项。只能向命令发送一个字符串;因此,score 的实际值需要追加到“Score:”字符串中。但这也不管用:
text = font.render("Score: " + score, True, BLACK)
如果 score 是一个整型变量,计算机不知道如何把它加到一个字符串上。你,程序员,必须把乐谱转换成字符串。然后像这样把字符串加在一起:
text = font.render("Score: " + str(score), True, BLACK)
现在你知道如何打印分数了。如果你想打印一个定时器,那就需要打印格式,这将在后面的章节中讨论。查看timer.py示例的在线部分示例代码:
ProgramArcadeGames.com/python_examples/f.php?file=timer.py
完整的节目列表
这是本章讨论的程序的完整列表。该程序以及其他程序可以从以下网站下载:
ProgramArcadeGam es。com/ index。php?章节=示例 _ 代码
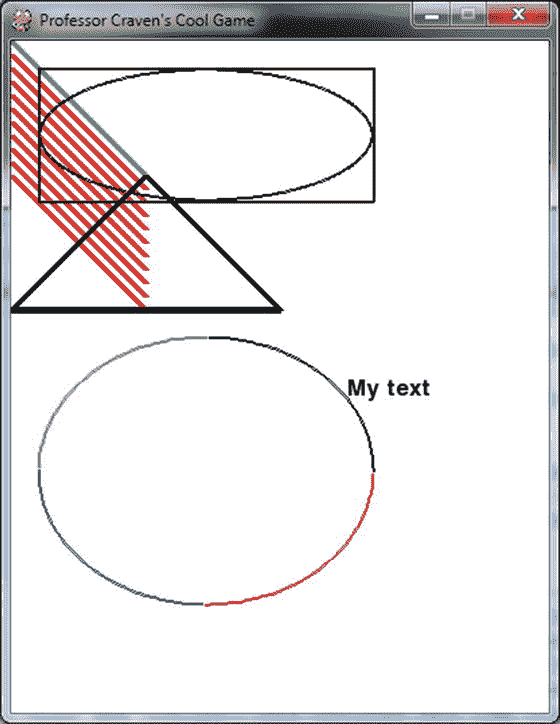
示例程序的结果
"""
Simple graphics demo
Sample Python/Pygame Programs
http://programarcadegames.com/
"""
# Import a``library
import pygame
# Initialize the game engine
pygame.init()
# Define some colors
BLACK = (0, 0, 0)
WHITE = (255, 255, 255)
BLUE = (0, 0, 255)
GREEN = (0, 255, 0)
RED = (255, 0, 0)
PI = 3.141592653
# Set the height and width of the screen
size = (400, 500)
screen = pygame.display.set_mode(size)
pygame.display.set_caption("Professor Craven’s Cool Game")
# Loop until the user clicks the close button.
done = False
clock = pygame.time.Clock()
# Loop as long as done == False
while not done:
for event in pygame.event.get(): # User did something
if event.type == pygame.QUIT: # If user clicked close
done = True # Flag that we are done so we exit this loop
# All drawing code happens after the for loop and but
# inside the main while not done loop.
# Clear the``screen
screen.fill(WHITE)
# Draw on the screen a line from (0,0) to (100,100)
# 5 pixels wide.
pygame.draw.line(screen, GREEN, [0, 0], [100, 100], 5)
# Draw on the screen several lines from (0,10) to (100,110)
# 5 pixels wide using a loop
for y_offset in range(0, 100, 10):
pygame.draw.line(screen, RED, [0, 10 + y_offset], [100, 110 + y_offset], 5)
# Draw a rectangle
pygame.draw.rect(screen, BLACK, [20, 20, 250, 100], 2)
# Draw an ellipse, using a rectangle as the outside boundaries
pygame.draw.ellipse(screen, BLACK, [20, 20, 250, 100], 2)
# Draw an arc as part of an ellipse.
# Use radians to determine what angle to draw.
pygame.draw.arc(screen, BLACK, [20, 220, 250, 200], 0, PI / 2, 2)
pygame.draw.arc(screen, GREEN, [20, 220, 250, 200], PI / 2, PI, 2)
pygame.draw.arc(screen, BLUE, [20, 220, 250, 200], PI, 3 * PI / 2, 2)
pygame.draw.arc(screen, RED, [20, 220, 250, 200], 3 * PI / 2, 2 * PI, 2)
# This draws a triangle using the polygon command
pygame.draw.polygon(screen, BLACK, [[100, 100], [0, 200], [200, 200]], 5)
# Select the font to use, size, bold, italics
font = pygame.font.SysFont(’Calibri’, 25, True, False)
# Render the text. "True" means anti-aliased text.
# Black is the color. This creates an image of the
# letters, but does not put it on the screen
text = font.render("My text", True, BLACK)
# Put the image of the text on the screen at 250x250
screen.blit(text, [250, 250])
# Go ahead and update the screen with what we’ve drawn.
# This MUST happen after all the other drawing commands.
pygame.display.flip()
#``This
# Leave this out and we will use all CPU we can.
clock.tick(60)
# Be IDLE friendly
pygame.quit()
回顾
多项选择测验
If a box is drawn starting at (x,y) coordinate (0,0), where will it be on the screen? Upper left Lower left Upper right Lower right Center f.It won’t display If the screen width and height are both 400 pixels, and a rectangle is drawn starting at (0,400), where will it display? Upper left Lower left Upper right Lower right Center It won’t display In computer graphics, as x and y coordinates increase in value, a point will move: Down and to the right Up and to the right Down and to the left Up and to the left Nowhere What color would be defined by (0, 0, 0)? Black Red Green Blue White What color would be defined by (0, 255, 0)? Black Red Green Blue White What color would be defined by (255, 255, 255)? Black Red Green Blue White What code will open up a window 400 pixels high and 800 pixels wide? size = [800, 400] screen = pygame.display.set_mode(size) size = [400, 800] screen = pygame.display.set_mode(size) size = 800,400 screen = pygame.display.set_mode(size) size = 400,800 screen = pygame.display.set_mode(size) screen = pygame.display.open_window(800, 400) screen = pygame.display.open_window(400, 800) What is the main program loop? It processes user input, updates objects, and draws the screen in each frame of the game. It runs once for the entire game. It loops once for each life that the player has. It loops once for each level of the game. Where does this code go? clock = pygame.time.Clock() The code is placed after the main program loop. The code is placed inside the main program loop. This code is placed before the main program loop. Where does this code go, and what does it do? clock.tick(20) The code is place after the main program loop and pauses 20 milliseconds. The code is place after the main program loop and limits the game to 20 frames per second. The code is placed inside the main program loop and limits the game to 20 frames per second. This code is placed before the main program loop and limits the game to 20 frames per second. The code is placed inside the main program loop and pauses 20 milliseconds. Changing this code from 20 to 30 will cause what to happen? clock.tick(20) Nothing. The game will run faster. The game will run slower. What does this code do? pygame.display.flip() Nothing. Clears the screen. Displays everything that has been drawn so far. Flips the screen from left to right. Flips the screen from top to bottom. What code will draw a line from x, y coordinates (0, 0) to (100, 100)? pygame.draw.line(screen, GREEN, [0,0,100,100], 5) pygame.draw.line(screen, GREEN, 0, 0, 100, 100, 5) pygame.draw.line(screen, GREEN, [0, 0], [100, 100], 5) pygame.draw.line(GREEN, screen, 0, 0, 100, 100, 5) pygame.draw.line(5, GREEN, [0, 0], [100, 100], screen) What will this code draw? offset = 0 while offset < 100: pygame.draw.line(screen, RED, [50+offset,20], [50+offset,60], 5) offset = offset + 10 Ten vertical lines, 10 pixels apart, with a starting x coordinate of 50 and an ending coordinate of 140. Ten horizontal lines, 10 pixels part, with a starting y coordinate of 50 and an ending coordinate of 150. Ten vertical lines, 5 pixels apart, with a starting x coordinate of 50 and an ending coordinate of 100. Ten vertical lines, 10 pixels apart, with a starting x coordinate of 10 and an ending coordinate of 110. Ten vertical lines, 5 pixels apart, with a starting x coordinate of 10 and an ending coordinate of 150. Ten lines, all drawn on top of each other. How wide will this ellipse be? pygame.draw.ellipse(screen, BLACK, [0, 0, 100, 100], 2) 100 pixels 99 pixels 101 pixels 50 pixels 49 pixels Where will the center of this ellipse be? pygame.draw.ellipse(screen, BLACK, [1, 1, 3, 3], 1) (1, 1) (3, 3) (2, 2)
简答工作表
Explain how the computer coordinate system differs from the standard Cartesian coordinate system. There are two main differences. List both. Before a Python Pygame program can use any functions like pygame.display.set_mode(), what two lines of code must occur first? Explain how WHITE = (255, 255, 255) represents a color. When do we use variable names for colors in all uppercase, and when do we use variable names for colors in all lowercase? (This applies to all variables, not just colors.) What does the pygame.display.set_mode() function do? What does this for event in pygame.event.get() loop do? What is pygame.time.Clock used for? For this line of code: pygame.draw.line(screen, GREEN, [0, 0], [100, 100], 5)
screen是做什么的?[0, 0]是做什么的?[100, 100]是做什么的?5是做什么的?
What is the best way to repeat something over and over in a drawing? When drawing a rectangle, what happens if the specified line width is zero? Describe the ellipse drawn in the code below.
- 原点坐标的 x,y 是什么?
- 原点坐标说明了什么?圆心?
- 椭圆的长度和宽度是多少?
pygame.draw.ellipse(screen, BLACK, [20, 20, 250, 100], 2) When drawing an arc, what additional information is needed over drawing an ellipse? Describe, in general, what are the three steps needed when printing text to the screen using graphics? When drawing text, the first line of the three lines needed to draw text should actually be outside the main program loop. It should only run once at the start of the program. Why is this? You may need to ask. What are the coordinates of the polygon that the code below draws? pygame.draw.polygon(screen, BLACK, [[50,100],[0,200],[200,200],[100,50]], 5) What does pygame.display.flip() do? What does pygame.quit() do? Look up online how the pygame.draw.circle works. Get it working and paste a working sample here. I only need the one line of code that draws the circle, but make sure it is working by trying it out in a full working program.
锻炼
查看附录中本章附带的练习“创建图片”。
七、回到循环
游戏包含许多复杂的循环。这是一个学习如何成为循环专家的挑战章节。如果你能理解这一章中的问题,在它结束时,你可以证明自己是一个循环专家。
如果成为循环专家不是你的目标,至少确保你能写出前八个问题的答案。那会给你足够的知识来继续这本书。(此外,作为一个循环专家从来没有给任何人带来过约会。除了土拨鼠日电影里的那个人。)
网上有答案的视频讲解,答案代码动画。只需点击“步骤”按钮,看看代码是如何运行的。
打印语句结束字符
默认情况下,print语句在输出内容的末尾放一个回车。正如我们在第一章中所解释的,回车符是一个将下一行输出移动到下一行的字符。大多数时候这是我们想要的。有时候不是。如果我们想在同一行上继续打印,我们可以改变最后打印的默认字符。这是我们更改结束字符之前的一个示例:
print("Pink")
print("Octopus")
…它将打印出:
Pink
Octopus
但是如果我们希望代码输出在同一行上打印,可以通过使用一个新选项来设置end字符来实现。例如:
print("Pink", end="")
print("Octopus")
这将打印:
PinkOctopus
我们也可以使用空格,而不是将其设置为空字符串:
print("Pink", end=" ")
print("Octopus")
这将打印:
Pink Octopus
这是另一个使用变量的例子:
i = 0
print(i, end=" ")
i = 1
print(i, end=" ")
这将打印:
0 1
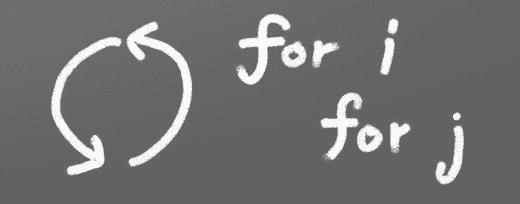
高级循环问题
Write code that will print 10 asterisks (*) like the following: * * * * * * * * * * Have this code print using a for loop, and print each asterisk individually, rather than just printing 10 asterisks with 1 print statement. This can be done in 2 lines of code: a for loop and a print statement. When you have figured it out, or given up, here is the answer: ProgramArcadeGames.com/chapters/06_back_to_looping/problem_1.php Write code that will print the following: * * * * * * * * * * * * * * * * * * * * * * * * * * * * * * * * * * * This is just like the prior problem but also printing 5 and 20 stars. Copy and paste from the prior problem, adjusting the for loop as needed. When you have figured it out, or given up, here is the answer: ProgramArcadeGames.com/chapters/06_back_to_looping/problem_2.php Use two for loops, one of them nested inside the other, to print the following 10x10 rectangle: * * * * * * * * * * * * * * * * * * * * * * * * * * * * * * * * * * * * * * * * * * * * * * * * * * * * * * * * * * * * * * * * * * * * * * * * * * * * * * * * To start, take a look at Problem 1. The code in Problem 1 generates 1 line of asterisks. It needs to be repeated 10 times. Work on this problem for at least 10 minutes before looking at the answer. When you have figured it out, or given up, here it is: ProgramArcadeGames.com/chapters/06_back_to_looping/10x10box.php Use two for loops, one of them nested, to print the following 5x10 rectangle: * * * * * * * * * * * * * * * * * * * * * * * * * * * * * * * * * * * * * * * * * * * * * * * * * * This is a lot like the prior problem. Experiment with the ranges on the loops to find exactly what the numbers passed to the range function control. When you have figured it out, or given up, here is the answer: ProgramArcadeGames.com/chapters/06_back_to_looping/problem_4.php Use two for loops, one of them nested, to print the following 20x5 rectangle: * * * * * * * * * * * * * * * * * * * * * * * * * * * * * * * * * * * * * * * * * * * * * * * * * * * * * * * * * * * * * * * * * * * * * * * * * * * * * * * * * * * * * * * * * * * * * * * * * * * * Again, like Problem 3 and Problem 4, but with different range values. When you have figured it out, or given up, here is the answer: ProgramArcadeGames.com/chapters/06_back_to_looping/problem_5.php Write code that will print the following: 0 1 2 3 4 5 6 7 8 9 0 1 2 3 4 5 6 7 8 9 0 1 2 3 4 5 6 7 8 9 0 1 2 3 4 5 6 7 8 9 0 1 2 3 4 5 6 7 8 9 0 1 2 3 4 5 6 7 8 9 0 1 2 3 4 5 6 7 8 9 0 1 2 3 4 5 6 7 8 9 0 1 2 3 4 5 6 7 8 9 0 1 2 3 4 5 6 7 8 9 Use two nested loops. Print the first line with a loop, and not with: print("0 1 2 3 4 5 6 7 8 9") Tip: First, create a loop that prints the first line. Then enclose it in another loop that repeats the line 10 times. Use either i or j variables for what the program prints. This example and the next one help reinforce what those index variables are doing. Work on this problem for at least 10 minutes before looking at the answer. The process of spending 10 minutes working on the answer is far more important than the answer itself. ProgramArcadeGames.com/chapters/06_back_to_looping/number_square_answer.php Adjust the prior program to print: 0 0 0 0 0 0 0 0 0 0 1 1 1 1 1 1 1 1 1 1 2 2 2 2 2 2 2 2 2 2 3 3 3 3 3 3 3 3 3 3 4 4 4 4 4 4 4 4 4 4 5 5 5 5 5 5 5 5 5 5 6 6 6 6 6 6 6 6 6 6 7 7 7 7 7 7 7 7 7 7 8 8 8 8 8 8 8 8 8 8 9 9 9 9 9 9 9 9 9 9 Answer: ProgramArcadeGames.com/chapters/06_back_to_looping/problem_7.php Write code that will print the following: 0 0 1 0 1 2 0 1 2 3 0 1 2 3 4 0 1 2 3 4 5 0 1 2 3 4 5 6 0 1 2 3 4 5 6 7 0 1 2 3 4 5 6 7 8 0 1 2 3 4 5 6 7 8 9 Tip: This is just Problem 6, but the inside loop no longer loops a fixed number of times. Don’t use range(10), but adjust that range amount. After working at least 10 minutes on the problem, here is the answer: ProgramArcadeGames.com/chapters/06_back_to_looping/top_right_triangle.php Make sure you can write out the code for this and the prior problems. Yes, this practice is work, but it will pay off later and you’ll save time in the long run. Write code that will print the following: 0 1 2 3 4 5 6 7 8 9 0 1 2 3 4 5 6 7 8 0 1 2 3 4 5 6 7 0 1 2 3 4 5 6 0 1 2 3 4 5 0 1 2 3 4 0 1 2 3 0 1 2 0 1 0 This one is difficult. Tip: Two loops are needed inside the outer loop that controls each row. First, a loop prints spaces, then a loop prints the numbers. Loop both these for each row. To start with, try writing just one inside loop that prints: 0 1 2 3 4 5 6 7 8 9 0 1 2 3 4 5 6 7 8 0 1 2 3 4 5 6 7 0 1 2 3 4 5 6 0 1 2 3 4 5 0 1 2 3 4 0 1 2 3 0 1 2 0 1 0 Then once that is working, add a loop after the outside loop starts and before the already existing inside loop. Use this new loop to print enough spaces to right justify the other loops. After working at least 10 minutes on the problem, here is the answer: ProgramArcadeGames.com/chapters/06_back_to_looping/bottom_left_triangle.php Write code that will print the following (Getting the alignment is hard, at least get the numbers): 1 2 3 4 5 6 7 8 9 2 4 6 8 10 12 14 16 18 3 6 9 12 15 18 21 24 27 4 8 12 16 20 24 28 32 36 5 10 15 20 25 30 35 40 45 6 12 18 24 30 36 42 48 54 7 14 21 28 35 42 49 56 63 8 16 24 32 40 48 56 64 72 9 18 27 36 45 54 63 72 81 Tip: Start by adjusting the code in Problem 1 to print: 0 0 0 0 0 0 0 0 0 0 0 1 2 3 4 5 6 7 8 9 0 2 4 6 8 10 12 14 16 18 0 3 6 9 12 15 18 21 24 27 0 4 8 12 16 20 24 28 32 36 0 5 10 15 20 25 30 35 40 45 0 6 12 18 24 30 36 42 48 54 0 7 14 21 28 35 42 49 56 63 0 8 16 24 32 40 48 56 64 72 0 9 18 27 36 45 54 63 72 81 Then adjust the code to print: 1 2 3 4 5 6 7 8 9 2 4 6 8 10 12 14 16 18 3 6 9 12 15 18 21 24 27 4 8 12 16 20 24 28 32 36 5 10 15 20 25 30 35 40 45 6 12 18 24 30 36 42 48 54 7 14 21 28 35 42 49 56 63 8 16 24 32 40 48 56 64 72 9 18 27 36 45 54 63 72 81 Finally, use an if to print spaces if the number being printed is less than 10. After working at least 10 minutes on the problem, here is the answer: ProgramArcadeGames.com/chapters/06_back_to_looping/multiplication_table.php Write code that will print the following: 1 1 2 1 1 2 3 2 1 1 2 3 4 3 2 1 1 2 3 4 5 4 3 2 1 1 2 3 4 5 6 5 4 3 2 1 1 2 3 4 5 6 7 6 5 4 3 2 1 1 2 3 4 5 6 7 8 7 6 5 4 3 2 1 1 2 3 4 5 6 7 8 9 8 7 6 5 4 3 2 1 Tip: first write code to print: 1 1 2 1 2 3 1 2 3 4 1 2 3 4 5 1 2 3 4 5 6 1 2 3 4 5 6 7 1 2 3 4 5 6 7 8 1 2 3 4 5 6 7 8 9 Then write code to print: 1 1 2 1 1 2 3 2 1 1 2 3 4 3 2 1 1 2 3 4 5 4 3 2 1 1 2 3 4 5 6 5 4 3 2 1 1 2 3 4 5 6 7 6 5 4 3 2 1 1 2 3 4 5 6 7 8 7 6 5 4 3 2 1 1 2 3 4 5 6 7 8 9 8 7 6 5 4 3 2 1 Then finish by adding spaces to print the final answer. After working at least 10 minutes on the problem, here is the answer: ProgramArcadeGames.com/chapters/06_back_to_looping/top_triangle.php Write code that will print the following: 1 1 2 1 1 2 3 2 1 1 2 3 4 3 2 1 1 2 3 4 5 4 3 2 1 1 2 3 4 5 6 5 4 3 2 1 1 2 3 4 5 6 7 6 5 4 3 2 1 1 2 3 4 5 6 7 8 7 6 5 4 3 2 1 1 2 3 4 5 6 7 8 9 8 7 6 5 4 3 2 1 1 2 3 4 5 6 7 8 1 2 3 4 5 6 7 1 2 3 4 5 6 1 2 3 4 5 1 2 3 4 1 2 3 1 2 1 This can be done by combining Problems 11 and 9. After working at least 10 minutes on the problem, here is the answer: ProgramArcadeGames.com/chapters/06_back_to_looping/three_quarters.php Write code that will print the following: 1 1 2 1 1 2 3 2 1 1 2 3 4 3 2 1 1 2 3 4 5 4 3 2 1 1 2 3 4 5 6 5 4 3 2 1 1 2 3 4 5 6 7 6 5 4 3 2 1 1 2 3 4 5 6 7 8 7 6 5 4 3 2 1 1 2 3 4 5 6 7 8 9 8 7 6 5 4 3 2 1 1 2 3 4 5 6 7 8 7 6 5 4 3 2 1 1 2 3 4 5 6 7 6 5 4 3 2 1 1 2 3 4 5 6 5 4 3 2 1 1 2 3 4 5 4 3 2 1 1 2 3 4 3 2 1 1 2 3 2 1 1 2 1 1 After working at least 10 minutes on the problem, here is the answer: ProgramArcadeGames.com/chapters/06_back_to_looping/full_diamond.php
回顾
多项选择测验
What does this code display? for i in range(3): print("*") * * * *** 0 1 2 012 What does this code display? for i in range(3): print(i, end="") * * * *** 0 1 2 012 What does this code display? for i in range(3): print("*", end="") for j in range(3): print("*", end="")
- 012012
*** *** *** *** *** ****** (6 asterisks) ********* (9 asterisks) What does this code display? for i in range(3): for j in range(3): print("*", end="")
- 012012
*** *** *** *** *** ****** (6 asterisks) ********* (9 asterisks) What does this code display? for i in range(3): for j in range(3): print("*", end="") print() (9 asterisks in a vertical line.) *** *** *** ********* (9 asterisks) What does this code display? for i in range(3): for j in range(3): print("*", end="") print() (9 asterisks in a vertical line.) *** *** *** ********* (9 asterisks) What does this code display? for i in range(3): for j in range(3): print("*", end="") print() (9 asterisks in a vertical line.) *** *** *** ********* (9 asterisks) What does this code display? for i in range(3): for j in range(3): print(i, end="") print() 000 111 222 012 012 012 012 345 678
简答工作表
对于前两个问题中的每一个,写出您对代码将会输出什么的最佳猜测。清楚地将此标记为您的猜测。然后运行代码并查看输出。写下你的猜测是否正确。如果不是,请简要描述不同之处及其原因。
预测代码将做什么对于编写程序和弄清楚为什么程序不按预期方式运行是很重要的。
What does this program print out? (Remember: TWO answers. Your guess and the actual result.) x = 0 while x < 10: print(x) x = x + 2 What does this program print out? x = 1 while x < 64: print(x) x = x * 2 Why is the and x >= 0 not needed? x = 0 while x < 10 and x >= 0: print(x) x = x + 2 What does this program print out? (0 pts) Explain. x = 5 while x >= 0: print(x) if x == "1": print("Blast off!") x = x - 1 Fix the following code so it doesn’t repeat forever, and keeps asking the user until he or she enters a number greater than zero: x = float(input("Enter a number greater than zero: ")) while x <= 0: print("Too small. Enter a number greater than zero: ") Fix the following code: x = 10 while x < 0: print(x) x - 1 print("Blast-off") What is wrong with this code? It runs but it has unnecessary code. Find all the unneeded code. Also, answer why it is not needed. i = 0 for i in range(10): print(i) i += 1 Explain why the values printed for x are so different. # Sample 1 x = 0 for i in range(10): x += 1 for j in range(10): x += 1 print(x) # Sample 2 x = 0 for i in range(10): x += 1 for j in range(10): x += 1 print(x)
锻炼
查看附录中本章附带的练习“Loopy Lab”。
八、列表简介
到目前为止,这本书已经展示了四种类型的数据:
- 字符串(字符串是“字符串”的缩写,正常人认为它是文本。)
- 整数
- 浮点
- 布尔代数学体系的
Python 可以用type函数显示一个值是什么类型的数据。
这个type函数对本书中的其他编程没有用,但是演示到目前为止介绍的数据类型是很有用的。在交互式 shell 中键入以下内容。(不要新建一个窗口,把这个作为程序打进去;没用的。)
type(3)
type(3.145)
type("Hi there")
type(True)
>>> type(3)
<class ’int’>
>>> type(3.145)
<class ’float’>
>>> type("Hi there")
<class ’str’>
>>> type(True)
<class ’bool’>
也可以对变量使用type函数来查看变量中的数据类型。
x = 3
type(x)
要收集的硬币不止一枚?使用列表!
本章介绍的两种新的数据类型是列表和元组。列表类似于另一种叫做数组的数据结构。列表可以调整大小,但数组不能。数据结构的课程会教你细节,但这超出了本书的范围。尝试在交互式 Python shell 中运行以下命令,并查看显示的内容:
type( (2, 3, 4, 5) )
type( [2, 3, 4, 5] )
使用列表
你已经创建了购物清单、待办事项清单、遗愿清单,但是你如何在电脑上创建一个清单呢?
甚至计算机也使用列表
使用 IDLE 的命令行尝试这些示例。要创建列表并将其打印出来,请尝试以下方法:
>>> x = [1,2]
>>> print(x)
[1, 2]
要打印列表中的单个元素:
>>> print(x[0])
1
这个带有项目位置的数字称为索引。请注意,列表位置从零开始。所以一个有 10 个元素的列表或数组在 spot [10]中没有元素。只有斑点[0]到[9]。创建一个包含 10 个条目的列表,却没有第 10 个条目,这可能会非常令人困惑,但是大多数计算机语言都是从 0 开始计数,而不是从 1 开始计数。
将列表想象成一个盛放数字的冰块托盘,如下图所示。这些值存储在每个托盘点内,写在托盘侧面的是从零开始的数字,用于标识每个点的位置。
不要混淆指数和价值!
请记住,在处理数字列表时,需要考虑两组数字:位置和值。位置,也称为索引,是指值所在的位置。该值是存储在该位置的实际数字。当使用列表或数组时,一定要考虑是否需要位置或值。
给定位置很容易得到值,但是给定值很难得到位置。第十六章致力于回答如何找到特定值的位置。
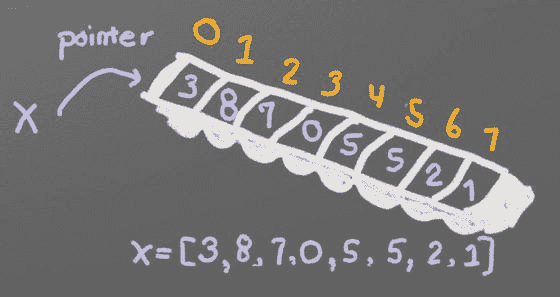
列表就像冰块托盘
程序可以给列表中的单个元素赋值。在下面的例子中,位置 0(不是 1)的第一个点被指定为数字 22。
>>> x[0] = 22
>>> print(x)
[22, 2]
此外,程序可以创建一个元组。这种数据类型的工作方式类似于列表,但有两个不同之处。首先,它是用圆括号而不是方括号创建的。第二,元组一旦创建就不可能改变。见下文:
>>> x = (1, 2)
>>> print(x)
(1, 2)
>>> print(x[0])
1
>>> x[0] = 22
Traceback (most recent call last):
File "<pyshell#18>", line 1, in <module>
x[0] = 22
TypeError: ’tuple’ object does not support item assignment
>>>
从上面代码的输出可以看出,我们不能给元组中的一个项赋值。为什么我们想要这个限制?首先,如果计算机知道值不会改变,它可以运行得更快。第二,一些我们不想改变的列表,比如红色的 RGB 颜色列表。红色不会改变;因此,不可变元组是更好的选择。
遍历列表
如果程序需要遍历列表中的每一项,比如打印出来,有两种类型的for循环可以做到这一点。
第一种在循环中迭代每一项的方法是使用 for-each 循环。这种类型的循环接受一组项,并对每个项循环一次代码。它将获取该项的一个副本,并将其存储在一个变量中进行处理。
命令的格式:for项目 _ 变量in列表 _ 名称:
以下是一些例子:
my_list = [101, 20, 10, 50, 60]
for item in my_list:
print(item)
101
20
10
50
60
程序也可以在列表中存储字符串:
my_list = ["Spoon", "Fork", "Knife"]
for item in my_list:
print(item)
Spoon
Knife
Fork
列表甚至可以包含其他列表。这将遍历主列表中的每一项,但不遍历子列表中的每一项。
my_list = [ [2,3], [4,3], [6,7] ]
for item in my_list:
print(item)
[2,3]
[4,3]
[6,7]
另一种遍历列表的方法是使用索引变量并直接访问列表,而不是通过每个条目的副本。为了使用索引变量,程序从 0 开始计数,直到列表的长度。如果有 10 个元素,循环必须从 0 到 9,总共 10 个元素。
列表的长度可以通过使用len函数得到。将它与range函数结合起来,允许程序遍历整个列表。
my_list = [101, 20, 10, 50, 60]
for i in range(len(my_list)):
print(my_list[i])
101
20
10
50
60
这种方法更复杂,但也更强大。因为我们直接使用列表元素,而不是副本,所以列表可以被修改。for-each 循环不允许修改原始列表。
添加到列表
通过使用append命令,可以向列表(而不是元组)添加新项目。例如:
my_list = [2, 4, 5, 6]
print(my_list)
my_list.append(9)
print(my_list)
[2, 4, 5, 6]
[2, 4, 5, 6, 9]
附注:如果追加时的性能是一个问题,那么理解一个列表是如何实现的就非常重要了。例如,如果一个列表被实现为数组数据类型,那么将一个条目添加到列表中就很像在一个装满鸡蛋的纸盒中添加一个新鸡蛋。一个新的鸡蛋纸盒必须有 13 个点。然后把 12 个鸡蛋挪过去。然后加入第 13 个鸡蛋。最后旧的鸡蛋纸盒被回收。因为这可能发生在函数的幕后,程序员可能会忘记这一点,让计算机做所有的工作。简单地告诉计算机制作一个有足够斑点的鸡蛋盒会更有效率。幸运的是,Python 没有将 list 实现为数组数据类型。但重要的是要注意你下学期的数据结构课,并了解所有这些是如何工作的。
要从头开始创建列表,需要创建一个空白列表,然后使用 append 函数。本示例根据用户输入创建一个列表:
my_list = [] # Empty list
for i in range(5):
userInput = input( "Enter an integer: ")
userInput = int( userInput )
my_list.append(userInput)
print(my_list)
Enter an integer: 4
[4]
Enter an integer: 5
[4, 5]
Enter an integer: 3
[4, 5, 3]
Enter an integer: 1
[4, 5, 3, 1]
Enter an integer: 8
[4, 5, 3, 1, 8]
如果一个程序需要创建一个具有相同值的特定长度的数组,一个简单的技巧是使用下面的代码:
# Create an array with 100 zeros.
my_list = [0] * 100
汇总或修改列表
创建数组的累计是一种常见的操作。这是如何做到的:
# Copy of the array to sum
my_list = [5,76,8,5,3,3,56,5,23]
# Initial sum should be zero
list_total = 0
# Loop from 0 up to the number of elements
# in the array:
for i in range(len(my_list)):
# Add element 0, next 1, then 2, etc.
list_total += my_list[i]
# Print the result
print(list_total)
同样的事情可以通过使用for循环迭代数组来完成,而不是通过一个范围来计数:
# Copy of the array to sum
my_list = [5, 76, 8, 5, 3, 3, 56, 5, 23]
# Initial sum should be zero
list_total = 0
# Loop through array, copying each item in the array into
# the variable named item.
for item in my_list:
# Add each item
list_total += item
# Print the result
print(list_total)
数组中的数字也可以通过使用for循环来改变:
# Copy of the array to modify
my_list = [5, 76, 8, 5, 3, 3, 56, 5, 23]
# Loop from 0 up to the number of elements
# in the array:
for i in range(len(my_list)):
# Modify the element by doubling it
my_list[i] = my_list[i] * 2
# Print the result
print(my_list)
然而,第 2 版不能将数组中的值加倍。为什么?因为一个item是数组中一个元素的副本。下面的代码是副本的两倍,而不是原始的数组元素。
# Copy of the array to modify
my_list = [5, 76, 8, 5, 3, 3, 56, 5, 23]
# Loop through each element in myArray
for item in my_list:
# This doubles item, but does not change the array
# because item is a copy of a single element.
item = item * 2
# Print the result
print(my_list)
分割字符串
字符串实际上是字符列表。它们可以像列表一样被处理,每个字母是一个单独的条目。使用两个版本的x运行以下代码:
x = "This is a sample string"
#x = "0123456789"
print("x=", x)
# Accessing a single character
print("x[0]=", x[0])
print("x[1]=", x[1])
# Accessing from the right side
print("x[-1]=", x[-1])
# Access 0-5
print("x[:6]=", x[:6])
# Access 6
print("x[6:]=", x[6:])
# Access 6-8
print("x[6:9]=", x[6:9])
Python 中的字符串可以和一些数学运算符一起使用。尝试下面的代码,看看 Python 做了什么:
a = "Hi"
b = "There"
c = "!"
print(a + b)
print(a + b + c)
print(3 * a)
print(a * 3)
print((a * 2) + (b * 2))
有可能得到一个字符串的长度。也可以用任何类型的数组来实现这一点。
a = "Hi There"
print(len(a))
b = [3, 4, 5, 6, 76, 4, 3, 3]
print(len(b))
因为字符串是一个数组,所以程序可以像数组一样遍历每个字符元素:
for character in "This is a test.":
print(character)
练习:从以下代码开始:
months = "JanFebMarAprMayJunJulAugSepOctNovDec"
n = int(input("Enter a month number: "))
打印用户输入的月份编号的三个月缩写。(计算字符串中的起始位置,然后使用我们刚刚学习的信息打印出正确的子字符串。)
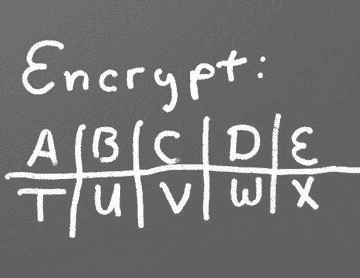
秘密代码
这段代码分别打印出字符串中的每个字母:
plain_text = "This is a test. ABC abc"
for c in plain_text:
print(c, end=" ")
计算机实际上并不在内存中存储字符串的字母;电脑储存一系列数字。每个数字代表一个字母。计算机用来将数字转换成字母的系统称为 Unicode。编码的全称是通用字符集转换格式 8 位,通常缩写为UTF-8。
Unicode 图表包含使用数字 0-127 的西方字母表。每个西文字母代表一个字节的内存。其他字母,如西里尔字母,可以用多个字节来表示每个字母。Unicode 图表的部分副本如下:
| 价值 | 性格;角色;字母 | 价值 | 性格;角色;字母 | 价值 | 性格;角色;字母 | 价值 | 性格;角色;字母 | | --- | --- | --- | --- | --- | --- | --- | --- | | Forty | ( | Sixty-one | = | Eighty-two | 稀有 | One hundred and three | g | | Forty-one | ) | Sixty-two | > | Eighty-three | S | One hundred and four | h | | forty-two | * | Sixty-three | ? | Eighty-four | T | One hundred and five | 我 | | Forty-three | + | Sixty-four | @ | eighty-five | U | One hundred and six | j | | forty-four | , | Sixty-five | A | Eighty-six | V | One hundred and seven | k | | Forty-five | - | Sixty-six | B | Eighty-seven | W | One hundred and eight | l | | Forty-six | 。 | Sixty-seven | C | Eighty-eight | X | One hundred and nine | m | | Forty-seven | / | sixty-eight | D | eighty-nine | Y | One hundred and ten | n | | Forty-eight | Zero | sixty-nine | E | Ninety | Z | One hundred and eleven | o | | forty-nine | one | Seventy | F | Ninety-one | [ | One hundred and twelve | p | | Fifty | Two | Seventy-one | G | Ninety-two | \ | One hundred and thirteen | q | | Fifty-one | three | seventy-two | H | Ninety-three | ] | One hundred and fourteen | r | | fifty-two | four | Seventy-three | 我 | Ninety-four | ^ | One hundred and fifteen | s | | Fifty-three | five | Seventy-four | J | Ninety-five | _ | One hundred and sixteen | t | | Fifty-four | six | Seventy-five | K | Ninety-six | ` | One hundred and seventeen | u | | Fifty-five | seven | Seventy-six | L | Ninety-seven | a | One hundred and eighteen | v | | fifty-six | eight | Seventy-seven | M | Ninety-eight | b | One hundred and nineteen | w | | Fifty-seven | nine | seventy-eight | 普通 | Ninety-nine | c | One hundred and twenty | x | | Fifty-eight | : | Seventy-nine | O | One hundred | d | One hundred and twenty-one | y | | Fifty-nine | ; | Eighty | P | One hundred and one | e | One hundred and twenty-two | z | | Sixty | < | Eighty-one | Q | One hundred and two | f | | |有关 ASCII(与西方字母表的 Unicode 具有相同的值)的更多信息,请参见: http://en.wikipedia.org/wiki/ASCII
要看解释 Unicode 之美的视频,请看这里: http://hackaday.com/2013/09/27/utf-8-the-most-elegant-hack
下一组代码使用 UTF-8 将前面示例中的每个字母转换为它的序数值:
plain_text = "This is a test. ABC abc"
for c in plain_text:
print(ord(c), end=" ")
下一个程序获取每个 UTF-8 值并加 1。然后,它打印新的 UTF-8 值,然后将该值转换回字母。
plain_text = "This is a test. ABC abc"
for c in plain_text:
x = ord(c)
x = x + 1
c2 = chr(x)
print(c2, end="")
下一个代码清单获取每个 UTF-8 值并加 1,然后将该值转换回字母。
# Sample Python/Pygame Programs
#http://programarcadegames.com/
# Explanation video:http://youtu.be/sxFIxD8Gd3A
plain_text = "This is a test. ABC abc"
encrypted_text = ""
for c in plain_text:
x = ord(c)
x = x + 1
c2 = chr(x)
encrypted_text = encrypted_text + c2
print(encrypted_text)
最后,最后一段代码获取每个 UTF-8 值并从中减去 1,然后将该值转换回字母。通过将前一个程序的输出提供给这个程序,它可以作为前一个例子编码的文本的解码器。
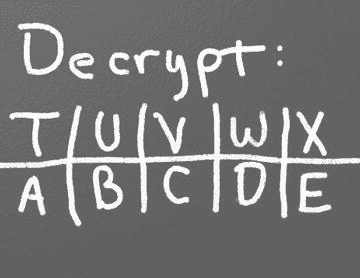
# Sample Python/Pygame Programs
#http://programarcadegames.com/
# Explanation video:http://youtu.be/sxFIxD8Gd3A
encrypted_text = "Uijt!jt!b!uftu/!BCD!bcd"
plain_text = ""
for c in encrypted_text:
x = ord(c)
x = x - 1
c2 = chr(x)
plain_text = plain_text + c2
print(plain_text)
关联数组
Python 并不局限于使用数字作为数组索引。也可以使用关联数组。关联数组的工作方式如下:
# Create an empty associative array
# (Note the curly braces.)
x = {}
# Add some stuff to it
x["fred"] = 2
x["scooby"] = 8
x["wilma"] = 1
# Fetch and print an item
print(x["fred"])
对于这本书来说,你并不真的需要关联数组,但是我认为有必要指出这是可能的。
回顾
多项选择测验
What code will print out the first element? x = [1, 2, 3, 4, 5] print(x[0]) print(x[1]) print(x(0)) print(x(1)) print(x) print([1]) What code will change the first element? x = [1, 2, 3, 4, 5] x[0] = 100 x = 100 x[1] = 100 [1] = 100 x(1) = 100 What code will print each element of my_list? my_list = [101, 20, 10, 50, 60] for item in my_list: print(item) for item in my_list: print(my_list) for item in range(my_list): print(item) for my_list in item: print(item) What code will add a new element to this list? my_list = [5, 6, 7] my_list[8] my_list(8) my_list.add(8) my_list.append(8) my_list.add[8] What code will sum all the elements in this list? my_array = [5, 76, 8, 5, 3, 3, 56, 5, 23] array_total = 0 for i in range(len(my_array)): array_total += my_array[i] array_total = 0 for i in range(my_array): array_total += my_array[i] array_total = 0 for i in range(len(my_array)): array_total += i i = 0 for i in range(len(my_array)): array_total += my_array i = 0 for i in my_array: array_total += my_array(i) What does this code print? my_array = [2, 4, 6] for i in range(3): print(my_array) 0 1 2 1 2 3 [2, 4, 6] [2, 4, 6] [2, 4, 6] 246 [2, 4, 6] 2 4 6 What does this code print? my_array = [2, 4, 6] for i in range(3): print(my_array[0])
0``12``2[2, 4, 6]``[2, 4, 6]246[2, 4, 6]2``4
What does this code print? my_array = [2, 4, 6] for i in range(3): print(i)
0``12``2[2, 4, 6]``[2, 4, 6]246[2, 4, 6]2``4
简答工作表
在下面的问题中,如果一个错误阻止了一个例子的运行,一定要在结果中提到它。还有,要精确。如果程序打印[1],不会说它打印 1。
List the four types of data we’ve covered, and give an example of each: What does this code print out? For this and the following problems, make sure you understand WHY it prints what it does. You don’t have to explain it, but if you don’t understand why, make sure to ask. Otherwise you are wasting your time doing these. my_list = [5, 2, 6, 8, 101] print(my_list[1]) print(my_list[4]) print(my_list[5]) What does this code print out? my_list=[5, 2, 6, 8, 101] for my_item in my_list: print(my_item) What does this code print out? my_list1 = [5, 2, 6, 8, 101] my_list2 = (5, 2, 6, 8, 101) my_list1[3] = 10 print(my_list1) my_list2[2] = 10 print(my_list2) What does this code print out? my_list = [3 * 5] print(my_list) my_list = [3] * 5 print(my_list) What does this code print out? my_list = [5] for i in range(5): my_list.append(i) print(my_list) What does this code print out? print(len("Hi")) print(len("Hi there.")) print(len("Hi") + len("there.")) print(len("2")) print(len(2)) What does this code print out? print("Simpson" + "College") print("Simpson" + "College"[1]) print( ("Simpson" + "College")[1] ) What does this code print out? word = "Simpson" for letter in word: print(letter) What does this code print out? word = "Simpson" for i in range(3): word += "College" print(word) What does this code print out? word = "Hi" * 3 print(word) What does this code print out? my_text = "The quick brown fox jumped over the lazy dogs." print("The 3rd spot is: " + my_text[3]) print("The -1 spot is: " + my_text[-1]) What does this code print out? s = "0123456789" print(s[1]) print(s[:3]) print(s[3:]) Write a loop that will take in a list of five numbers from the user, adding each to an array. Then print the array. Try doing this without looking at the book. Write a program that take an array like the following, and print the average. Use the len function, don’t just use 15, because that won’t work if the list size changes. (There is a sum function I haven’t told you about. Don’t use that. Sum the numbers individually as shown in the chapter.) my_list = [3,12,3,5,3,4,6,8,5,3,5,6,3,2,4]
锻炼
查看附录中本章附带的“冒险”练习。
九、动画介绍
为了开始我们的第一个动画,让我们从《??》第六章的基本 pygame 程序开始,它打开了一个空白屏幕。pygame_base_template.py的来源可以在这里找到: ProgramArcadeGames.com/python_examples/f.php?file=pygame_base_template.py
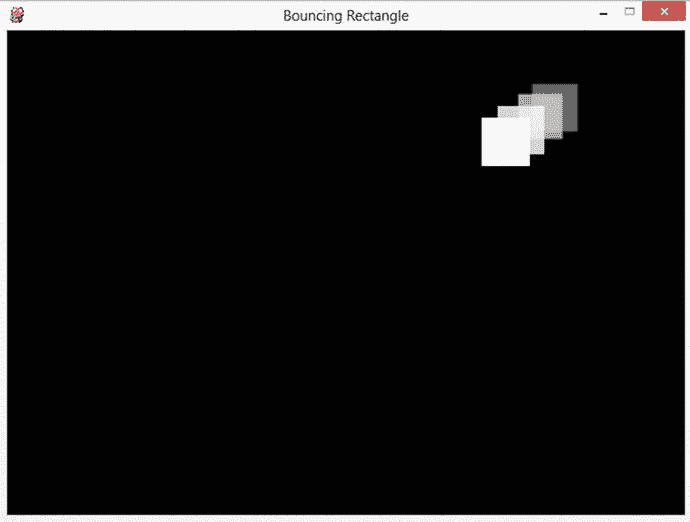
我们将编写一个程序,在黑色背景的屏幕上弹出一个白色的矩形。随意挑选你自己的颜色;只是要确保背景颜色不同于矩形的颜色!
第一步:从基础模板开始,将背景色从白色翻转为黑色。这段代码应该在第 46 行左右。
screen.fill(BLACK)
接下来,画出我们打算制作动画的矩形。一个简单的矩形就足够了。这段代码应该放在清空屏幕之后,翻转屏幕之前。
pygame.draw.rect(screen, WHITE, [50, 50, 50, 50])
每次通过循环,矩形将在(x,y)位置精确地(50,50)绘制。这由列表中的前两个 50 控制。在这些数字改变之前,正方形不会移动。
该矩形宽 50 像素,高 50 像素。尺寸由列表中的最后两个数字控制。我们也可以称这个矩形为正方形,因为它有相同的宽度和高度。我将坚持称它为矩形,因为所有的正方形也是矩形,并且取决于所使用的显示器和分辨率,像素并不总是正方形。如果你真的对这个主题感兴趣,可以查一下像素长宽比。
我们如何不断改变位置而不是停留在(50,50)?当然是用变量啦!下面的代码是实现这一目标的第一步:
rect_x = 50
pygame.draw.rect(screen, WHITE, [rect_x, 50, 50, 50])
要向右移动矩形,x可以每帧增加一。这段代码很接近,但并没有完全做到:
rect_x = 50
pygame.draw.rect(screen, WHITE, [rect_x, 50, 50, 50])
rect_x += 1
上面代码的问题是rect_x每次通过循环都被重置回 50。要解决这个问题,将rect_x的初始化移到循环之外。下一段代码将成功地将矩形向右滑动。
# Starting x position of the rectangle
# Note how this is outside the main while loop.
rect_x = 50
# -------- Main Program Loop -----------
while not done:
for event in pygame.event.get(): # User did something
if event.type == pygame.QUIT: # If user clicked close
done = True # Flag that we are done so we exit this loop
# Set the screen background
screen.fill(BLACK)
pygame.draw.rect(screen, WHITE, [rect_x, 50, 50, 50])
rect_x += 1
要更快地移动盒子,不要将rect_x增加 1,而是增加 5:
rect_x += 5
我们可以扩展这段代码,增加 x 和 y,使正方形同时向下和向右移动:
# Starting position of the rectangle
rect_x = 50
rect_y = 50
# -------- Main Program Loop -----------
while not done:
for event in pygame.event.get():
if event.type == pygame.QUIT:
done = True
# Set the screen background
screen.fill(BLACK)
# Draw the rectangle
pygame.draw.rect(screen, WHITE, [rect_x, rect_y, 50, 50])
# Move the rectangle starting point
rect_x += 5
rect_y += 5
盒子移动的方向和速度可以存储在一个矢量中。这使得移动物体的方向和速度很容易被改变。下一段代码展示了如何使用变量来存储(5,5)的 x 和 y 变化。
# Starting position of the rectangle
rect_x = 50
rect_y = 50
# Speed and direction of rectangle
rect_change_x = 5
rect_change_y = 5
# -------- Main Program Loop -----------
while done == False:
for event in pygame.event.get(): # User did something
if event.type == pygame.QUIT: # If user clicked close
done = True # Flag that we are done so we exit this loop
# Set the screen background
screen.fill(BLACK)
# Draw the rectangle
pygame.draw.rect(screen, WHITE, [rect_x, rect_y, 50, 50])
# Move the rectangle starting point
rect_x += rect_change_x
rect_y += rect_change_y
一旦盒子碰到屏幕的边缘,它就会继续前进。没有什么能让矩形从屏幕边缘反弹回来。为了反转方向,使矩形向右移动,一旦矩形到达屏幕的底部,rect_change_y需要从 5 变为-5。当rect_y大于屏幕高度时,矩形在底部。下面的代码可以进行检查并反转方向:
# Bounce the rectangle if needed
if rect_y > 450:
rect_change_y = rect_change_y * -1
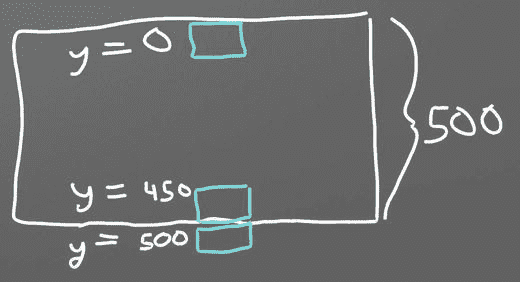
基于 y 坐标的矩形定位
为什么对照 450 查rect_y?如果屏幕是 500 像素高,那么检查 500 将是一个合乎逻辑的第一猜测。但是记住矩形是从矩形的左上角开始绘制的。如果矩形从 500 开始画,它会从 500 画到 550,在反弹之前完全离开屏幕。
考虑到矩形是 50 像素高,正确的反弹位置是: 500 − 50 = 450 500-50=450 500−50=450。
下面的代码将从 700x400 窗口的所有四个边反弹矩形:
# Bounce the rectangle if needed
if rect_y > 450 or rect_y < 0:
rect_change_y = rect_change_y * -1
if rect_x > 650 or rect_x < 0:
rect_change_x = rect_change_x * -1
对比矩形更复杂的形状感兴趣?基于rect_x和rect_y可以使用几个绘图命令。下面的代码在白色矩形内绘制了一个红色矩形。红色矩形在 x、y 方向上从白色矩形的左上角偏移 10 个像素。它在两个维度上都小了 20 个像素,导致红色矩形周围有 10 个白色像素。见上图。

中间有红色方块的白色矩形
# Draw a red rectangle inside the white one
pygame.draw.rect(screen, WHITE, [rect_x, rect_y, 50, 50])
pygame.draw.rect(screen, RED, [rect_x + 10, rect_y + 10,30, 30])
动画雪
只制作一个物品的动画还不够吗?需要更多动画?能够一次制作数百个物体的动画怎么样?让我们扩展上面的代码,学习如何制作许多物体的动画。
代码解释
要启动这个程序,从打开一个空白屏幕的基本 pygame 模板开始。同样,pygame_base_template.py的来源可以在这里找到:
ProgramArcadeGames.com/python_examples/f.php?file=pygame_base_template.py
通过使用随机数,可以为星星、雪或雨等事物创建 x,y 位置。尝试这个的最简单的方法是使用一个for循环在随机的 x,y 位置画圆。在主while循环中尝试下面的代码。
for i in range(50):
x = random.randrange(0, 400)
y = random.randrange(0, 400)
pygame.draw.circle(screen, WHITE, [x, y], 2)
试试看;这个程序有一个奇怪的问题!每秒二十次,每次通过循环,它在新的随机位置绘制雪。尝试调整雪花数量,看看它如何改变图像。
显然,我们需要随机放置雪花,并让它们保持在同一个位置。我们不想每秒钟生成 20 次新位置。我们需要保留一份他们在哪里的名单。该程序可以使用 python 列表来完成这项工作。这应该在主循环之前完成,否则程序会每 1/20 秒向列表中添加 50 个新雪花。
for i in range(50):
x = random.randrange(0, 400)
y = random.randrange(0, 400)
snow_list.append([x, y])
一旦雪花位置被添加,它们可以像普通列表一样被访问。以下代码将打印第一个位置的 x 和 y 坐标,存储在零位置:
print(snow_list[0])
如果我们只需要 x 或 y 坐标呢?我们在列表中有列表。主列表上有所有的坐标。在这个列表中,每个坐标都是一个 x 坐标(位置 0)和 y 坐标(位置 1)的列表。例如,这里有三个坐标:
[[34, 10],
[10, 50],
[20, 18]]
要打印位置 0 处的 y 坐标,首先选择坐标 0,然后选择位置 1 处的 y 值。代码将类似于:
print(snow_list[0][1])
要打印第 21 个坐标(位置 20)的 x 值,首先选择坐标 20,然后选择位置 0 的 x 值:
print(snow_list[20][0])
在主while循环中,程序可能会使用一个for循环来绘制雪列表中的每个项目。记住,len(snow_list)将返回雪花列表中元素的个数。
# Process each snow flake in the list
for i in range(len(snow_list)):
#``Draw
pygame.draw.circle(screen, WHITE, snow_list[i], 2)
记住,有两种类型的for循环。可以使用另一种类型的循环,它看起来像:
# Process A COPY of each snow flake’s location in the list
for xy_coord in snow_list:
# Draw the snow flake
pygame.draw.circle(screen, WHITE, xy_coord, 2)
然而,因为我们计划修改雪花的位置,所以我们不能使用这种类型的for循环,因为我们将修改雪花位置的副本的位置,而不是实际雪花的位置。
如果程序要让数组中的所有对象向下移动,比如雪,那么扩展上面创建的for循环将导致 y 坐标增加:
# Process each snow flake in the list
for i in range(len(snow_list)):
# Draw the snow flake
pygame.draw.circle(screen, WHITE, snow_list[i], 2)
# Move the snow flake down one pixel
snow_list[i][1] += 1
这使得雪向下移动,但是一旦离开屏幕,就没有新的东西出现了。通过添加下面的代码,雪将重置到屏幕顶部的一个随机位置:
# If the snow flake has moved off the bottom of the screen
if snow_list[i][1] > 400:
# Reset it just above the top
y = random.randrange(-50, -10)
snow_list[i][1] = y
# Give it a new x position
x = random.randrange(0, 400)
snow_list[i][0] = x
还可以向列表中添加内容,并为屏幕上的每个项目提供不同的大小、形状、颜色、速度和方向。然而,这变得很复杂,因为需要在列表中保存多种类型的数据。现在我们将保持它的简单,但是一旦我们在第十二章中学习了“类”,管理多个对象的不同属性将变得容易。
完整的节目列表
"""
Animating multiple objects using a list.
Sample Python/Pygame Programs
http://programarcadegames.com/
Explanation video:http://youtu.be/Gkhz3FuhGoI
"""
# Import a library of functions called ’pygame’
import pygame
import random
# Initialize the game engine
pygame.init()
BLACK = [0, 0, 0]
WHITE = [255, 255, 255]
# Set the height and width of the screen
SIZE = [400, 400]
screen = pygame.display.set_mode(SIZE)
pygame.display.set_caption("Snow Animation")
# Create an empty array
snow_list = []
# Loop 50 times and add a snow flake in a random x,y position
for i in range(50):
x = random.randrange(0, 400)
y = random.randrange(0, 400)
snow_list.append([x, y])
clock = pygame.time.Clock()
# Loop until the user clicks the close button.
done = False
while not done:
for event in pygame.event.get(): # User did something
if event.type == pygame.QUIT: # If user clicked close
done = True # Flag that we are done so we exit this loop
# Set the screen background
screen.fill(BLACK)
# Process each snow flake in the list
for i in range(len(snow_list)):
# Draw the snow flake
pygame.draw.circle(screen, WHITE, snow_list[i], 2)
# Move the snow flake down one pixel
snow_list[i][1] += 1
# If the snow flake has moved off the bottom of the screen
if snow_list[i][1] > 400:
# Reset it just above the top
y = random.randrange(-50, -10)
snow_list[i][1] = y
# Give it a new x position
x = random.randrange(0, 400)
snow_list[i][0] = x
# Go ahead and update the screen with what we’ve drawn.
pygame.display.flip()
clock.tick(20)
pygame.quit()
这个例子显示了每片雪花向同一个方向移动。如果每个项目都需要单独制作动画,并有自己的方向,该怎么办?如果你的游戏需要这个,请看第十三章关于如何使用职业。附录中的“类和图形”练习指导你如何制作数百个不同的动画项目,每个项目都有自己的方向。
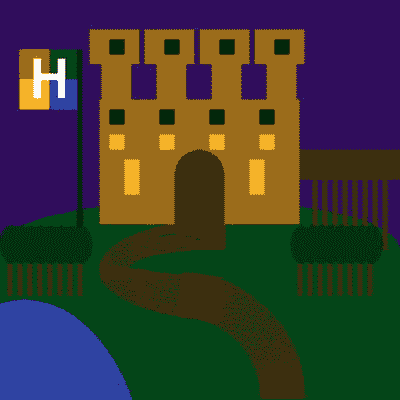
三维动画
从一个 2D 环境扩展到一个包含游戏物理的 3D 环境并不像看起来那么难。虽然这超出了本书的范围,但还是值得看看它是如何做到的。
有一个免费的 3D 程序叫做 Blender,它有一个“游戏引擎”,允许程序员创建 3D 游戏。游戏中的 3D 对象可以附加 Python 代码来控制它们在游戏中的动作。
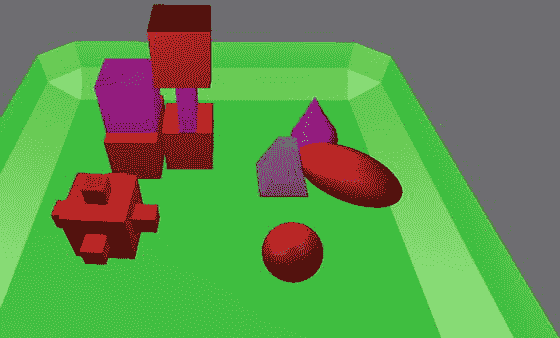
基于搅拌机的游戏
看上图。这显示了一个绿色托盘,里面有几个对象。蓝色对象由 Python 脚本控制,该脚本使它在托盘周围移动,撞到其他对象。如下所示的脚本具有许多与 2D 程序相同的特性。有一个主循环,有一个 x,y 位置的列表,还有控制向量的变量。
主程序循环由 Blender 控制。清单中显示的 python 代码由 Blender 为游戏呈现的每个“帧”调用。这就是 Python 代码没有显示主程序循环的原因。然而,它确实存在。
蓝色对象的位置以 x,y,z 格式保存。可以通过使用blue_object.position变量来访问和更改它。数组位置 0 保存 x,位置 1 保存 y,位置 2 保存 z 位置。
这个 Blender 示例使用关联数组位置,而不是在这个转换器的 2D 示例中使用的change_x和change_y变量:
blue_object["x_change"]
blue_object["y_change"]
if语句检查蓝色物体是否已经到达屏幕边界,方向是否需要反转。与 2D 奥运会中使用的像素不同,物体的位置可以是浮点数类型。要将项目定位在 5 和 6 之间,允许将其位置设置为 5.5。
# Import Blender Game Engine
import bge
# Get a reference to the blue object
cont = bge.logic.getCurrentController()
blue_object = cont.owner
# Print the x,y coordinates where the blue object is
print(blue_object.position[0], blue_object.position[1] )
# Change x,y coordinates according to x_change and
# y_change. x_change and y_change are game properties
# associated with the blue object.
blue_object.position[0] += blue_object["x_change"]
blue_object.position[1] += blue_object["y_change"]
# Check to see of the object has gone to the edge.
# If so reverse direction. Do so with all 4 edges.
if blue_object.position[0] > 6 and blue_object["x_change"] > 0:
blue_object["x_change"] *= -1
if blue_object.position[0] < -6 and blue_object["x_change"] < 0:
blue_object["x_change"] *= -1
if blue_object.position[1] > 6 and blue_object["y_change"] > 0:
blue_object["y_change"] *= -1
if blue_object. position[1] < -6 and blue_object["y_change"] < 0:
blue_object["y_change"] *= -1
Blender 可从: http://www.blender.org/ 下载
完整的 blender 示例文件可在: ProgramArcadeGames.com/chapters/08_intro_to_animation/simple_block_move.blend 获得。
回顾
多项选择测验
In the bouncing rectangle program, if rect_change_x is positive and rect_change_y is negative, which way will the rectangle travel? Up Up and right Right Down and right Down Down and left Left Up and left In the bouncing rectangle program, if rect_change_x is zero and rect_change_y is positive, which way will the rectangle travel? Up Up and right Right Down and right Down Down and left Left Up and left This code is supposed to draw a white rectangle. But when the program is run, no rectangle shows up. Why? import pygame # Define some colors BLACK = ( 0, 0, 0) WHITE = ( 255, 255, 255) pygame.init() # Set the height and width of the screen size = [700, 500] screen = pygame.display.set_mode(size) # Loop until the user clicks the close button. done = False # Used to manage how fast the screen updates clock = pygame.time.Clock() # -------- Main Program Loop ----------- while not done: for event in pygame.event.get(): if event.type == pygame.QUIT: done = True # Set the screen background screen.fill(BLACK) # Draw the rectangle pygame.draw.rect(screen, WHITE, [50, 50, 50, 50]) # Limit to 20 frames per second clock.tick(20) # Be IDLE friendly. If you forget this line, the program will ’hang’ # on exit. pygame.quit() The rectangle dimensions are offscreen. There is no flip command. The rectangle is the same color as the background. The rectangle is drawn outside the main program loop. The rectangle is too small to see. The rectangle should be drawn earlier in the code. This code is supposed to draw a white rectangle. But when the program is run, no rectangle shows up. Curiously, when the user hits the close button, the rectangle briefly appears before the program closes. Why? import pygame # Define some colors BLACK = ( 0, 0, 0) WHITE = ( 255, 255, 255) pygame.init() # Set the height and width of the screen size = [700, 500] screen = pygame.display.set_mode(size) # Loop until the user clicks the close button. done = False # Used to manage how fast the screen updates clock = pygame.time.Clock() # -------- Main Program Loop ----------- while not done: for event in pygame.event.get(): if event.type == pygame.QUIT: done = True # Set the screen background screen.fill(BLACK) # Draw the rectangle pygame.draw.rect(screen, WHITE, [50, 50, 50, 50]) # Limit to 20 frames per second clock.tick(20) # Go ahead and update the screen with what we’ve drawn. pygame.display.flip() # Be IDLE friendly. If you forget this line, the program will ’hang’ # on exit. pygame.quit() The rectangle dimensions are offscreen. The flip is unindented and doesn’t show until after the program ends. The rectangle is the same color as the background. The rectangle is drawn outside the main program loop. The rectangle is too small to see. The flip should be done before the rectangle is drawn. This version of “The Bouncing Rectangle” doesn’t work. The rectangle won’t move. Why? import pygame # Define some colors BLACK = ( 0, 0, 0) WHITE = ( 255, 255, 255) pygame.init() # Set the height and width of the screen size = [700, 500] screen = pygame.display.set_mode(size) #Loop until the user clicks the close button. done = False # Used to manage how fast the screen updates clock = pygame.time.Clock() # Speed and direction of rectangle rect_change_x = 5 rect_change_y = 5 # -------- Main Program Loop ----------- while not done: for event in pygame.event.get(): if event.type == pygame.QUIT: done=True # Starting position of the rectangle rect_x = 50 rect_y = 50 # Move the rectangle starting point rect_x += rect_change_x rect_y += rect_change_y # Bounce the ball if needed if rect_y > 450 or rect_y < 0: rect_change_y = rect_change_y * -1 if rect_x > 650 or rect_x < 0: rect_change_x = rect_change_x * -1 # Set the screen background screen.fill(BLACK) # Draw the rectangle pygame.draw.rect(screen, WHITE, [rect_x, rect_y, 50, 50]) # Limit to 20 frames per second clock.tick(20) # Go ahead and update the screen with what we’ve drawn. pygame.display.flip() # Be IDLE friendly. If you forget this line, the program will ’hang’ # on exit. pygame.quit () pygame.draw.rect doesn’t change where the rectangle is drawn based on the variables. rect_x and rect_y are reset to 50 each time through the loop. The 50,50 in the draw command also needs to be changed to rect_x,rect_y The lines to adjust rect_x and rect_y need to be outside the while loop. What is the correct code to make the rectangle bounce of the left and right sides of the screen? if rect_x > 450 or rect_x < 0: rect_x = rect_x * -1 if rect_x > 450 or rect_x < 0: rect_change_x = rect_change_x * -1 if rect_y > 450 or rect_y < 0: rect_y = rect_y * -1 if rect_y > 450 or rect_y < 0: rect_change_y = rect_change_y * -1 Why does this code not work for drawing stars? for i in range(50): x = random.randrange(0,400) y = random.randrange(0,400) pygame.draw.circle(screen, WHITE, [x, y], 2) The stars are drawn offscreen. The variable i should be used when drawing stars. The stars get brand-new locations each time a frame is drawn. The stars are drawn too small to be seen. The x and y coordinates are reversed.
简答工作表
Why does using this code in the main loop not work to move the rectangle? rect_x = 50 pygame.draw.rect(screen, WHITE, [rect_x, 50, 50, 50]) rect_x += 1 The example code to bounce a rectangle used a total of four variables. What did each variable represent? If the screen is 400 pixels tall, and the shape is 20 pixels high, at what point should the code check to see if the shape is in contact with the bottom of the screen. Explain what is wrong with the following code (explain it, don’t just correct the code): if rect_y > 450 or rect_y < 0: rect_y = rect_y * -1 A student is animating a stick figure. He creates separate variables for tracking the position of the head, torso, legs, and arms. When the figure moves to the right he adds one to each of the variables. Explain an easier way to do this that only requires one pair of x, y variables. When drawing a starry background, explain why it doesn’t work to put code like this in the main program loop: for i in range(50): x = random.randrange(0, 400) y = random.randrange(0, 400) pygame.draw.circle(screen, WHITE, [x, y], 2) Explain how to animate dozens of items at the same time. If you have a list of coordinates like the following, what code would be required to print out the array location that holds the number 33? stars = [[ 3, 4], [33, 94], [ 0, 0]] This code example causes snow to fall: # Process each snow flake in the list for i in range(len(snow_list)): # Get the x and y from the lies x = snow_list[i][0] y = snow_list[i][1] # Draw the snow flake pygame.draw.circle(screen, WHITE, [x, y], 2) # Move the snow flake down one pixel snow_list[i][1] += 1 So does the example below. Explain why this example works as well. # Process each snow flake in the list for i in range(len(snow_list)): # Draw the snow flake pygame.draw.circle(screen, WHITE, snow_list[i], 2) # Move the snow flake down one pixel snow_list[i][1] += 1 Take a look at the radar_sweep.py program. You can find this example under the “graphics examples” subsection on the examples page. The radar_sweep.py is near the end of that list. Explain how this program animates the sweep to go in a circle.
锻炼
查看附录中本章附带的练习“动画”。
十、函数
使用函数有两个原因。首先,它们使代码更容易阅读和理解。其次,它们允许代码被多次使用。
想象一组绘制如下所示的树的代码。为此,程序员执行以下命令:
pygame.draw.rect(screen, BROWN, [60, 400, 30, 45])
pygame.draw.polygon(screen, GREEN, [[150, 400], [75, 250], [0, 400]])
pygame.draw.polygon(screen, GREEN, [[140, 350], [75, 230], [10, 350]])
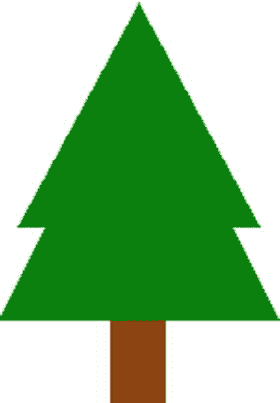
简单树
这三行代码看起来并不像是在画一棵树!如果我们有多棵树或者复杂的物体,就很难理解正在画的是什么。
通过定义一个函数,我们可以使程序更容易阅读。要定义一个函数,首先使用def命令。在def命令之后是函数名。在这种情况下,我们称之为draw_tree。我们对函数名使用与变量名相同的规则。
函数名后面是一组括号和一个冒号。该函数的所有命令都将在内部缩进。请参见下面的示例:
def draw_tree():
pygame.draw.rect(screen, BROWN, [60, 400, 30, 45])
pygame.draw.polygon(screen, GREEN, [[150, 400], [75, 250], [0, 400]])
pygame.draw.polygon(screen, GREEN, [[140, 350], [75, 230], [10, 350]])
就其本身而言,这段代码不会导致树的绘制。它会告诉计算机如何做draw_tree。您必须调用函数来实际运行函数中的代码,并绘制树:
draw_tree()
有了定义要绘制的不同事物的整个函数库,最终的程序可能看起来像这样:
draw_tree()
draw_house()
draw_car()
draw_killer_bunny()
记住draw_tree有三行代码。这些命令中的每一个,像draw_house,都有多行代码。通过使用函数,我们可以重复命令,而不必重复其中包含的所有代码,从而使程序变得更小。
函数名非常重要。如果函数名是描述性的,那么即使非程序员也应该能够阅读一组代码并了解发生了什么。函数名遵循与变量名相同的规则,应该以小写字母开头。
函数参数
函数可以带参数。很有可能,你已经在数学课上用过参数了。在下面的球体体积公式中,函数 v 有一个参数:r,它代表半径。这个函数可以用来确定任何球体的体积,不管它的半径是多少。这些参数用于根据传递给函数的参数改变结果,从而增加函数的灵活性。

例如,我们名为draw_tree()的函数在一个特定的地方绘制树。但是该函数可以更改为接受一个指定在何处绘制树的参数。例如draw_tree(screen, 0, 230)将在(0,230)的(x,y)位置绘制树。
调整树的函数可能如下所示:
def draw_tree(screen, x, y):
pygame.draw.rect(screen, BROWN, [60+x, 170+y, 30, 45])
pygame.draw.polygon(screen, GREEN, [[150+x,170+y],[75+x,20+y], [x,170+y]])
pygame.draw.polygon(screen, GREEN, [[140+x,120+y], [75+x,y], [10+x,120+y]])
这将允许我们在任何我们喜欢的地方画多棵树:
draw_tree(screen, 0, 230)
draw_tree(screen, 200, 230)
draw_tree(screen, 400, 230)
这里有一个不同的函数,可以不使用图形运行。这个函数将计算并打印出一个球体的体积:
def volume_sphere(radius):
pi = 3.141592653589
volume = (4 / 3) * pi * radius ** 3
print("The volume is", volume)
参数是在调用函数时赋值的,而不是在定义函数时。
函数的名字是volume_sphere。进入函数的数据将存储在一个名为radius的新变量中。生成的体积被打印到屏幕上。radius变量在这里没有得到一个值。新程序员经常会感到困惑,因为在定义函数时,参数变量没有赋值,所以看起来不合法。当函数被调用时,参数被赋予一个值。
要调用此函数,请使用:
volume_sphere(22)
函数中的radius变量被创建并用值 22 初始化。一旦执行到达对该函数的调用,就运行该函数的代码。
如果我们需要传入多个值呢?可以向函数传递多个参数,每个参数用逗号分隔:
def volume_cylinder(radius, height):
pi = 3.141592653589
volume = pi * radius ** 2 * height
print("The volume is", volume)
该函数可以通过以下方式调用:
volume_cylinder(12, 3)
参数是按顺序做的,所以radius会得到 12,height会得到 3 的值。
返回和捕获值
不幸的是,这些示例函数是有限的。为什么?如果一个人想用volume_cylinder函数来计算六瓶装啤酒的体积,那是行不通的。它只打印出一个圆柱体的体积。不可能将一个气缸体积的函数结果用在一个等式中,然后乘以 6 来得到六个气缸的体积。
返回值
这可以通过使用一个return语句来解决。例如:
# Add two numbers and return the results
def sum_two_numbers(a, b):
result = a + b
return result
Return 不是函数,不使用括号。不要做return(result)。
这只让我们走了一半。因为如果我们现在调用这个函数,不会发生什么。数字相加。他们会回到我们身边。但我们对结果无动于衷。
# This doesn’t do much, because we don’t capture the result
sum_two_numbers(22, 15)
捕获返回值
我们需要捕捉结果。我们通过设置一个变量等于函数返回值来实现:
# Store the function’s result into a variable
my_result = sum_two_numbers(22, 15)
print(my_result)
现在结果没有丢失。它存储在my_result中,我们可以打印或使用其他方式。
改进 volume_cylinder 示例
def volume_cylinder(radius, height):
pi = 3.141592653589
volume = pi * radius ** 2 * height
return volume
因为有了return,这个函数可以在以后作为方程式的一部分来计算六个装的体积,如下所示:
six_pack_volume = volume_cylinder(2.5, 5) * 6
从volume_cylinder返回的值进入等式并乘以 6。
打印值的函数和返回值的函数有很大的区别。看看下面的代码,并尝试一下。
# Function that prints the result
def sum_print(a, b):
result = a + b
print(result)
# Function that returns the results
def sum_return(a, b):
result = a + b
return result
# This prints the sum of 4+4
sum_print(4, 4)
# This does not
sum_return(4, 4)
# This will not set x1 to the sum
# It actually gets a value of ’None’
x1 = sum_print(4, 4)
# This will
x2 = sum_return(4, 4)
第一次使用函数时,看到这样的代码并不罕见:
def calculate_average(a, b):
""" Calculate an average of two numbers """
result = (a * b) / 2
return result
# Pretend you have some code here
x = 45
y = 56
# Wait, how do I print the result of this?
calculate_average(x, y)
我们如何打印calculate_average的结果?程序不能打印出result,因为这个变量只存在于函数内部。相反,使用变量来获取结果:
def calculate_average(a, b):
""" Calculate an average of two numbers """
result = (a * b) / 2
return result
# Pretend you have some code here
x = 45
y = 56
average = calculate_average(x, y)
print(average)
记录函数
Python 中的函数通常有一个注释作为函数的第一条语句。这个注释用三个双引号分隔,称为 docstring。一个函数可能看起来像:
def volume_cylinder(radius, height):
"""Returns volume of a cylinder given radius, height."""
pi = 3.141592653589
volume = pi * radius ** 2 * height
return volume
在函数中使用文档字符串的好处在于,可以使用 http://sphinx-doc.org/ 这样的工具将注释提取出来并放到记录代码的网站上。大多数语言都有类似的工具,可以帮助您轻松编写代码。当您开始处理更大的程序时,这可以节省大量时间。
变量作用域
函数的使用引入了作用域的概念。作用域是指代码中变量处于活动状态并且可以被访问的地方。例如,看看下面的代码:
# Define a simple function that sets
# x equal to 22
def f():
x = 22
# Call the function
f()
# This fails, x only exists in f()
print(x)
最后一行会产生一个错误,因为 x 只存在于f()函数内部。这个变量是在调用f()时创建的,一旦f()结束,它所使用的内存就会被释放。
这就是事情变得复杂的地方。
一个更令人困惑的规则是访问在f()函数之外创建的变量。在下面的代码中,x是在f()函数之前创建的,因此可以从f()函数内部读取。
# Create the x variable and set to 44
x = 44
# Define a simple function that prints x
def f():
print(x)
# Call the function
f()
只有在函数不改变值的情况下,才可以在函数内部读取在函数之前创建的变量。这段代码与上面的代码非常相似,将会失败。计算机会声称它不知道x是什么。
# Create the x variable and set to 44
x = 44
# Define a simple function that prints x
def f():
x += 1
print(x)
# Call the function
f()
与 Python 相比,其他语言在变量和范围的创建方面有更复杂的规则。因为 Python 简单明了,所以它是一种很好的入门语言。
传递副本
函数通过创建原始函数的副本来传递它们的值。例如:
# Define a simple function that prints x
def f(x):
x += 1
print(x)
# Set y
y = 10
# Call the function
f(y)
# Print y to see if it changed
print(y)
即使f()函数增加了传递给它的值,y的值也不会改变。函数中作为参数列出的每个变量都是一个全新的变量。该变量的值是从调用它的地方复制的。
这在前面的例子中相当简单。令人困惑的是,调用函数的代码和函数本身是否有同名的变量。下面的代码与前面的清单相同,但是它没有使用y,而是使用了x。
# Define a simple function that prints x
def f(x):
x += 1
print(x)
# Set x
x = 10
# Call the function
f(x)
# Print x to see if it changed
print(x)
输出与使用y的程序相同。尽管函数和周围的代码都使用x作为变量名,但实际上有两个不同的变量。一个变量x存在于函数内部,另一个变量x存在于函数外部。
函数调用函数
一个函数调用另一个函数是完全可能的。例如,假设定义了如下函数:
def arm_out(which_arm, palm_up_or_down):
# code would go here
def hand_grab(hand, arm):
# code goes here
然后可以创建另一个函数来调用其他函数:
def macarena():
arm_out("right", "down")
arm_out("left", "down")
arm_out("right", "up")
arm_out("left", "up")
hand_grab("right", "left arm")
hand_grab("left", "right arm")
# etc
主要函数和全局
全局变量纯粹是邪恶的。
随着程序变得越来越大,保持代码的组织性和函数性是很重要的。Python 允许我们在“缩进级别 0”编写代码这描述了我们到目前为止编写的大部分代码。我们的代码排在左边,不包含在函数中。
这种哲学就像把你的衣服堆在地板中间,或者把你所有的工具堆在工作台上。只有当你没有太多东西的时候,它才起作用。即使你没有太多的东西,它仍然是凌乱的。
你所有的代码和变量都应该放在函数中。这将使你的代码有条理。当你需要追踪程序中的错误时,它也会有所帮助。在“缩进级别 0”创建的变量称为全局变量。全局变量是一件非常糟糕的事情。为什么呢?因为任何地方的任何一段代码都可以改变它们的值。如果你有一个 50,000 行的程序,每一行代码都可以改变全局变量。相反,如果您将变量保存在函数中,那么只有函数中的代码可以更改变量。因此,如果变量中有一个意外值,您只需要查看函数中大约 50 行代码。否则你必须检查整个程序中的每一行代码!
用 Python 编写程序的一个更好的方法是遵循以下模式:
def main():
print("Hello world.")
main()
在这种情况下,我通常在缩进级别 0 运行的所有代码都放在了main函数中。文件的最后一行调用main。
但是等等!我们还需要解决另一个问题。在第十五章中,我们将讨论如何把我们的程序分成多个文件。我们可以使用import命令从我们创建的其他模块中引入函数。如果我们在这个模块上使用import命令,它会自动开始运行main函数。我们不想那样。我们希望导入它的程序控制函数何时被调用。
为了解决这个问题,我们可以让我们的程序检查一个由 Python 自动定义的全局变量。(我知道,我刚才说全局变量不好,对吧?)那个变量叫做__name__,前后有两个下划线。我们可以检查它,看看这段代码是否正在被导入或运行。如果代码正在运行,Python 会自动将该变量的值设置为__main__。通过使用if语句,我们将只在代码运行时调用main函数。否则代码将只定义main函数。导入它的代码可以在需要时调用该函数。
所有 Python 代码都应该这样运行:
def main():
print("Hello world.")
if __name__ == "__main__":
main()
我喜欢将 Python 作为第一语言的原因之一是,除非你需要,否则不需要使用这种复杂性。其他语言,比如 Java,不管你的程序有多小,都需要它。
为了使本书更简单,我们没有使用这种模式展示我们的例子。但是在这本书之后,你的程序可能会变得足够复杂,如果你不“把你所有的衣服都扔进一堆”,生活会变得更容易。
如果你对编程非常感兴趣,试着从现在开始用这种方式编写你的程序。虽然开始时可能会有一点挑战,但它会使以后编写程序变得更容易。这也是了解如何正确管理数据及其范围的好方法。
这里有一个例子,展示了如何使用这个模式来做基本的 pygame 模板:programarcadegames.com/python_examples/f.php?file=pygame_base_template_proper.py
不需要使用这个模板。如果你把衣服堆在地板中间,我一会儿没问题。我很高兴你穿着衣服。(对于爱整洁的人来说,当我们读到 Python 类这一章时,我们可以更清楚地理解这个程序。)
简短的例子
对于下面的每一个例子,想想会打印出什么。检查一下你是否正确。如果你没有猜对,花时间去理解为什么。
# Example 1
def a():
print("A")
def b():
print("B")
def c():
print("C")
a()
# Example 2
def a():
b()
print("A")
def b():
c()
print("B")
def c():
print("C")
a()
# Example 3
def a():
print("A")
b()
def b():
print("B")
c()
def c():
print("C")
a()
# Example 4
def a():
print("A start")
b()
print("A end")
def b():
print("B start")
c()
print("B end")
def c():
print("C start and end")
a()
# Example 5
def a(x):
print("A start, x =",x)
b(x + 1)
print("A end, x =",x)
def b(x):
print("B start, x =",x)
c(x + 1)
print("B end, x =",x)
def c(x):
print("C start and end, x =",x)
a(5)
# Example 6
def a(x):
x = x + 1
x = 3
a(x)
print(x)
# Example 7
def a(x):
x = x + 1
return x
x = 3
a(x)
print(x)
# Example 8
def a(x):
x = x + 1
return x
x = 3
x = a(x)
print(x)
# Example 9
def a(x, y):
x = x + 1
y = y + 1
print(x, y)
x = 10
y = 20
a(y, x)
# Example 10
def a(x, y):
x = x + 1
y = y + 1
return x
return y
x = 10
y = 20
z = a(x, y)
print(z)
# Example 11
def a(x, y):
x = x + 1
y = y + 1
return x, y
x = 10
y = 20
z = a(x, y)
print(z)
# Example 12
def a(x, y):
x = x + 1
y = y + 1
return x, y
x = 10
y = 20
x2, y2 = a(x, y) # Most computer languages don’t support this
print(x2)
print(y2)
# Example 13
def a(my_data):
print("function a, my_data = ", my_data)
my_data = 20
print("function a, my_data = ", my_data)
my_data = 10
print("global scope, my_data =", my_data)
a(my_data)
print("global scope, my_data =", my_data)
# Example 14
def a(my_list):
print("function a, list = ", my_list)
my_list = [10, 20, 30]
print("function a, list = ", my_list)
my_list = [5, 2, 4]
print("global scope, list =", my_list)
a(my_list)
print("global scope, list =", my_list)
# Example 15
# New concept!
# Covered in more detail in Chapter``13
def a(my_list):
print("function a, list = ", my_list)
my_list[0] = 1000
print("function a, list = ", my_list)
my_list = [5, 2, 4]
print("global scope, list =", my_list)
a(my_list)
print("global scope, list =", my_list)
泥球游戏示例
"""
This is a sample text-only game that demonstrates the use of functions.
The game is called "Mudball" and the players take turns lobbing mudballs
at each other until someone gets hit.
"""
import math
import random
def print_instructions():
""" This function prints the instructions. """
# You can use the triple-quote string in a print statement to
# print multiple lines.
print("""
Welcome to Mudball! The idea is to hit the other player with a mudball.
Enter your angle (in degrees) and the amount of PSI to charge your gun
with.
""")
def calculate_distance(psi, angle_in_degrees):
""" Calculate the distance the mudball flies. """
angle_in_radians = math.radians(angle_in_degrees)
distance = .5 * psi ** 2 * math.sin(angle_in_radians) * math.cos(angle_in_radians)
return distance
def get_user_input(name):
""" Get the user input for psi and angle. Return as a list of two
numbers. """
# Later on in the ’exceptions’ chapter, we will learn how to modify
# this code to not crash the game if the user types in something that
# isn’t a valid number.
psi = float(input(name + " charge the gun with how many psi? "))
angle = float(input(name + " move the gun at what angle? "))
return psi, angle
def get_player_names():
""" Get a list of names from the players. """
print("Enter player names. Enter as many players as you like.")
done = False
players = []
while not done:
player = input("Enter player (hit enter to quit): ")
if len(player) > 0:
players.append(player)
else:
done = True
print()
return players
def process_player_turn(player_name, distance_apart):
""" The code runs the turn for each player.
If it returns False, keep going with the game.
If it returns True, someone has won, so stop. """
psi, angle = get_user_input(player_name)
distance_mudball = calculate_distance(psi, angle)
difference = distance_mudball - distance_apart
# By looking ahead to the chapter on print formatting, these
# lines could be made to print the numbers is a nice formatted
# manner.
if difference > 1:
print("You went", difference, "yards too far!")
elif difference < -1:
print("You were", difference * -1, "yards too short!")
else:
print("Hit!", player_name, "wins!")
return True
print()
return False
def main():
""" Main program. """
# Get the game started.
print_instructions()
player_names = get_player_names()
distance_apart = random.randrange(50, 150)
# Keep looking until someone wins
done = False
while not done:
# Loop for each player
for player_name in player_names:
# Process their turn
done = process_player_turn(player_name, distance_apart)
# If someone won, ’break’ out of this loop and end the game.
if done:
break
if __name__ == "__main__":
main()
回顾
多项选择测验
What does this code print? def f(): print("f") def g(): print("g") print("a") f a g f g a a f g What does this code print? def f(): print("f") def g(): print("g") g() print("a") f() f a g g a f f g a a f g What does this code print? def f(a): print(a) a = 5 f(a + 1) 0 5 Nothing 6 a+1 a What does this code print? def f(a, b): print(a) print(b) a = 1 b = 2 f(b, a) 1 2 2 1 a b b a What does this code print? def f(a): return a + 1 b = f(5) print(b) 5 6 a+1 b a What is wrong with this code? def sum_list(list): sum = 0 for item in list: sum + = item return sum list=[45, 2, 10, -5, 100] print(sum_list(list)) The return statement should print the sum instead. The return statement should be unindented one tab stop. The return statement should be unindented two tab stops. The variable i should be used instead of item. The sum_list function may not be placed inside the print statement. What will this print? a = 3 def f(): print(a) f() f 3 Nothing An error, a is undefined. What will this print? a = 3 def f(): a = a + 1 print(a) f() f 4 Nothing An error, a is undefined. What will this print? def f(a): return a + 1 print( f( f(5) ) ) 5 6 7 An error. What will this print? def foo(): x = 3 print("foo has been called") x = 10 print("x=", x) foo() print("x=", x) x= 10 foo has been called x= 10 x= 3 foo has been called x= 10 x= 10 foo has been called x= 3 An error.
简答工作表
对于下面的代码,写一个关于它将输出什么的预测。然后运行代码并声明您的预测是否准确。如果你的预测不正确,确保你明白为什么。
Block 1 (Remember, guess AND actual.) for i in range(5): print(i + 1) Block 2 for i in range(5): print(i) i = i + 1 Block 3 x = 0 for i in range(5): x += 1 print(x) Block 4 x = 0 for i in range(5): for j in range(5): x += 1 print(x) Block 5 for i in range(5): for j in range(5): print(i, j) Block 6 for i in range(5): for j in range(5): print("*", end="") print() Block 7 for i in range(5): for j in range(5): print("*", end="") print() Block 8 for i in range(5): for j in range(5): print("*", end="") print() Block 9 # This is supposed to sum a list of numbers # What is the mistake here? my_list = [5, 8, 10, 4, 5] i = 0 for i in my_list: i = i + my_list[i] print(i) Block 10 for i in range(5): x = 0 for j in range(5): x += 1 print(x) Block 11 import random play_again = "y" while play_again == "y": for i in range(5): print(random.randrange(2), end="") print() play_again = input("Play again? ") print("Bye!") Block 12 def f1(x): print(x) y = 3 f1(y) Block 13 def f2(x): x = x + 1 print(x) y = 3 f2(y) print(y) Block 14 def f3(x): x = x + 1 print(x) x = 3 f3(x) print(x) Block 15 def f4(x): z = x + 1 print(z) x = 3 f4(x) print(z) Block 16 def foo(x): x = x + 1 print("x=", x) x = 10 print("x=", x) foo(x) print("x=", x) Block 17 def f(): print("f start") g() h() print("f end") def g(): print("g start") h() print("g end") def h(): print("h") f() Block 18 def foo(): x = 3 print("foo has been called") x = 10 print("x=", x) foo() print("x=", x) Block 19 (This demonstrates a new concept that won’t be fully explained until Chapter 13.) def a(x): print("a", x) x = x + 1 print("a", x) x = 1 print("main", x) a(x) print("main", x) def b(y): print("b", y[1]) y[1] = y[1] + 1 print("b", y[1]) y=[123, 5] print("main", y[1]) b(y) print("main", y[1]) def c(y): print("c", y[1]) y = [101, 102] print("c", y[1]) y = [123, 5] print("main", y[1]) c(y) print("main", y[1])
校正码
下一节涉及到查找代码中的错误。如果你找不到错误,可以查看在线视频,寻找答案和错误的解释。
Correct the following code: (Don’t let it print out the word “None.”) def sum(a, b, c): print(a + b + c) print(sum(10, 11, 12)) Correct the following code: (x should increase by one, but it doesn’t.) def increase(x): return x + 1 x = 10 print("X is", x, " I will now increase x." ) increase(x) print("X is now", x) Correct the following code: def print_hello: print("Hello") print_hello() Correct the following code: def count_to_ten(): for i in range[10]: print(i) count_to_ten() Correct the following code: def sum_list(list): for i in list: sum = i return sum list = [45, 2, 10, -5, 100] print(sum_list(list)) Correct the following code: (This almost reverses the string. What is wrong?) def reverse(text): result = "" text_length = len(text) for i in range(text_length): result = result + text[i * -1] return result text = "Programming is the coolest thing ever." print(reverse(text)) Correct the following code: def get_user_choice(): while True: command = input("Command: ") if command = f or command = m or command = s or command = d or command = q: return command print("Hey, that’s not a command. Here are your options:" ) print("f - Full speed ahead") print("m - Moderate speed") print("s - Status") print("d - Drink") print("q - Quit") user_command = get_user_choice() print("You entered:", user_command)
对于此部分,编写满足以下各项的代码:
Write a function that prints out “Hello World.” Write code that will call the function in the prior problem. Write a function that prints out “Hello Bob” and will take a parameter to let the caller specify the name. Do not put an input statement inside the function! Use a parameter. Write code that will call the function in the prior problem. Write a function that will take two numbers as parameters (not as input from the user) and print their product (i.e., multiply them). Write code that will call the prior function. Write a function that takes in two parameters. The first parameter will be a string named phrase. The second parameter will be a number named count. Print phrase to the screen count times. (e.g., the function takes in “Hello” and 5 then prints “Hello” five times.) Write code to call the previous function. Write code for a function that takes in a number and returns the square of that number. (I’m not asking for the square root but the number squared.) Note, this function should RETURN the answer, not print it out. Write code to call the function above and print the output. Write a function that takes three numbers as parameters and returns the centrifugal force. The formula for centrifugal force is:  F is force, m is mass, r is radius, and v is angular velocity. Write code to call the function above and display the result. Write a function that takes a list of numbers as a parameter and prints out each number individually using a
 for loop.
锻炼
查看附录,了解本章附带的练习“函数”。


 320
320

 被折叠的 条评论
为什么被折叠?
被折叠的 条评论
为什么被折叠?
 到【灌水乐园】发言


