GUI分析
界面结构体
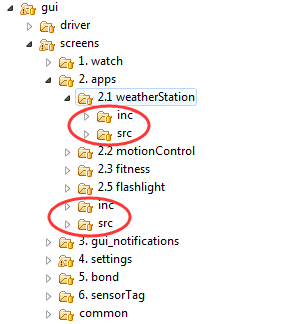
screens下每一个文件夹对应一个功能显示界面。
watch是唤醒默认界面。app是在上面默认界面下点击menu,进入的界面。
上图中,每到一个文件夹下,显示的是src inc 对应的界面。
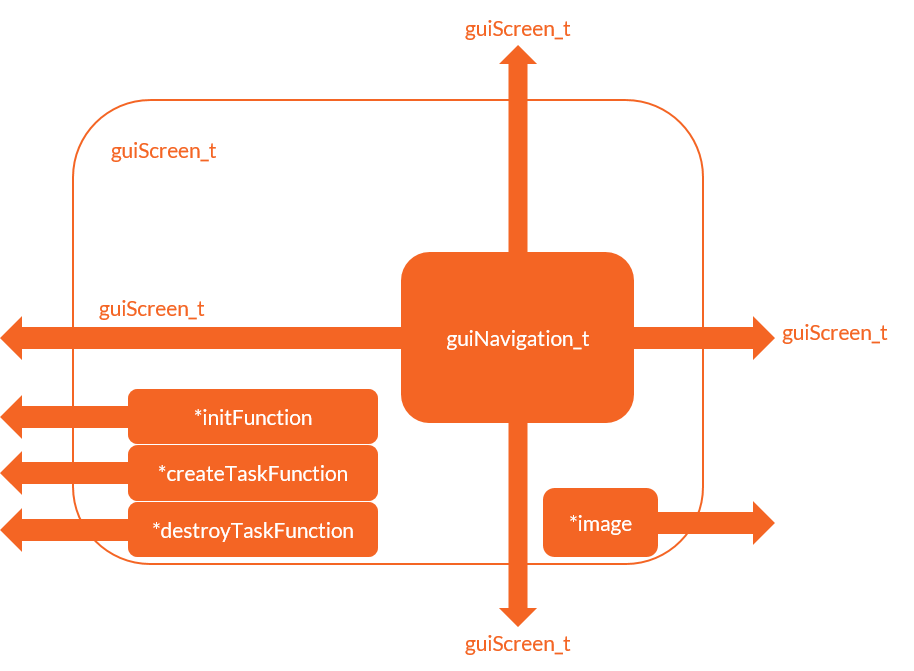
这是界面数据结构
struct GuiTtem这个结构体有五个成员:
- 上下左右四个按键对应的显示界面结构体指针
- 显示图片的地址
- 初始化函数
- 任务创建函数
- 任务删除函数
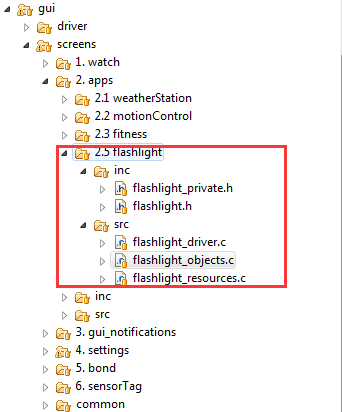
下面我们分析2.5 flashlight下的五个文件,来了解每一个界面的实现。
flashlight_objects.c
flashlightScreen 界面数据结构体定义
 /** flashlight app screen */
 guiScreen_t flashlightScreen =
 {
   .navigation =
   {
           .up     = &gui_motionControl_coverScreen,
           .down   = &fitnessScreen,
           .left   = &appsScreen,
           .right  = NULL
   },

   .image = flashlight_screen_bmp,

   .initFunction        = flashlight_Init,
   .createTaskFunction  = flashlight_CreateTasks,
   .destroyTaskFunction = flashlight_DestroyTasks
 };
flashlight_resources.c
界面显示图片数组定义
const uint8_t
    flashlight_screen_bmp[18438] =
    {
        0x00,0x10,
        0x60,0x00,
        0x60,0x00,
        ......
     }
flashlight_private.h
界面显示图片数组声明
#define FLASHLIGHT_STACK_SIZE ( 0x400 )
#define FLASHLIGHT_PRIO       ( HEXIWEAR_APP_PRIO )

extern guiImage_t
     flashlight_icon;

extern const uint8_t
    flashlight_screen_bmp[18438],
    flashlight_off_bmp[4806],
    flashlight_on_bmp[4806];
flashlight.h
结构体成员函数声明
/**
 * [flashlight_Init description]
 * @param param [description]
 */
void flashlight_Init( void* param );
/**
 * [flashlight_CreateTasks description]
 * @param param [description]
 */
void flashlight_CreateTasks( void* param );
/**
 * [flashlight_DestroyTasks description]
 * @param param [description]
 */
void flashlight_DestroyTasks( void* param );
flashlight_driver.c
结构体成员函数定义
void flashlight_Init( void* param )
{
    GuiDriver_ImageAddToScr( &flashlight_icon );
    GuiDriver_RegisterForNavigation( GUI_NAVIGATION_RIGHT );
}
界面如何切换

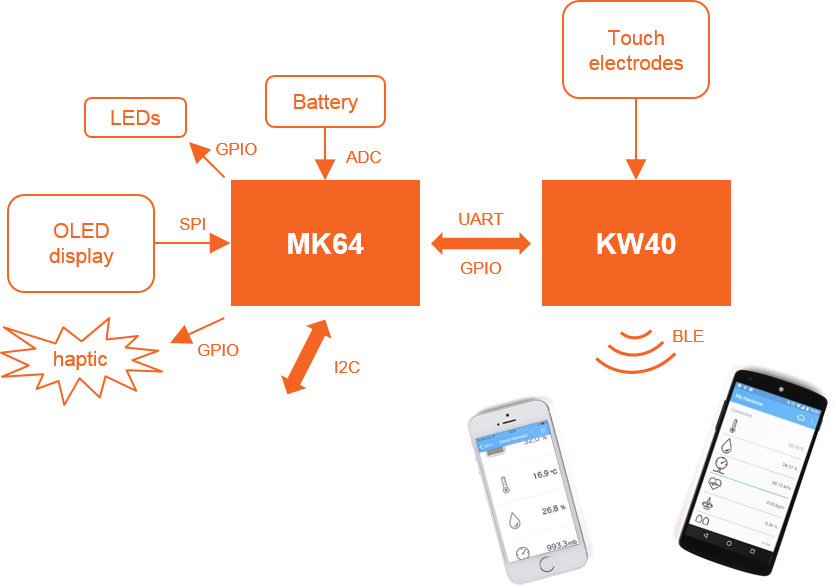
界面切换是根据KW40通过UART给MK64的信息来决定的。所以我们去寻找两个芯片的通信部分,也就是intf下,找到通信的内容,找到对内容的决策,就能知道界面怎么切换的。
intf/inc/host_mcu_interface.h
/** packet types */

typedef enum
{
    packetType_pressUp          = 0, /**< touch press up */
    packetType_pressDown        = 1, /**< touch press down */
    packetType_pressLeft        = 2, /**< touch press left */
    packetType_pressRight       = 3, /**< touch press right */
    packetType_slide            = 4, /**< touch slide */
    ......
}
全局搜索packetType_pressUp;
gui/driver/src/gui_driver.c
gui_status_t GuiDriver_ButtonsHandler(hostInterface_packet_t* packet)
{
    gui_status_t
        status = GUI_STATUS_SUCCESS;


        guiNavigationDir_t navigationDir;

        switch(packet->type)
        {
            case packetType_pressUp:
            {
                navigationDir = GUI_NAVIGATION_UP;
                break;
            }
......
}
现在找到GuiDriver_ButtonsHandler这个按键处理函数啦!
static void PacketHandler( hostInterface_packet_t* self )
{
  switch( self->type )
  {
    // buttons
    case packetType_pressUp:
    case packetType_pressDown:
    case packetType_pressLeft:
    case packetType_pressRight:
    {
        RTC_UpdateAlarm();
        //haptic_Vibrate();

//        if ( true == isWakingTouch )
//        {
//            isWakingTouch = false;
            power_TurnScreenON();
//        }
//        else
        {
            GuiDriver_ButtonsHandler( self );
        }

        break;
    }
......
}
这是package信息contents处理函数;
/intf/src/host_mcu_interface_rx.c
static void HostInterface_RxTask( task_param_t param )
{
  hostInterface_packet_t
    tmpPkt;

  while (1)
  {
    osa_status_t
      status = HostInterface_RxQueueMsgGet( &tmpPkt );

    if ( kStatus_OSA_Success == status )
    {

#ifdef gHostInterface_TxConfirmationEnable
      // acknowledge the packet reception
      if ( 1 == ( tmpPkt.start2 & 0x01 ) )
      {
          HostInterface_EventSendOkPacketSet();
      }
#endif

      // handle the packet's content
      PacketHandler( &tmpPkt );
    }
  }
}
这是Host接口接受处理任务Task
函数调用流程如下:
HEXIWEAR_startup—>
status |= HostInterface_Init();—>
HostInterface_RxInit—>
OSA_TaskCreate ( HostInterface_RxTask,…)—>
PacketHandler—>
GuiDriver_ButtonsHandler—->
navigationDir(全局变量) = GUI_NAVIGATION_UP; GuiDriver_Navigation(navigationDir, NULL); —>
case GUI_NAVIGATION_UP: {ptrNewScreen = navigation->up;}
界面切换就发生在gui_driver.c下的GuiDriver_Navigation函数;
- end action for the current screen
- update the current gui item
- starting action for the new screen:
-
- 初始化 initFunction
-
- 绘图
-
- post-load action for the new screen createTaskFunction
界面
#
sensors : I2C
OLED : SPI
extern_flash :
intf : KW40 interface uart
notifications : Haptic feedback
power: 板级电量管理:OLED BATT


 1万+
1万+

 被折叠的 条评论
为什么被折叠?


