


- unity编辑器扩展很方便,可以省掉很多制作其他工具的时间(比如技能编辑器,特效编辑器等,都是数据结构的导入导出)
- 可以直接在 Scene 、Inspector 或者新建一个 Window 中编辑
1、Inspector
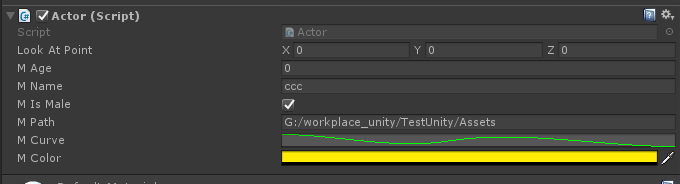
在 Inspector 中最简单的就是直接把脚本中的成员变量设置为 public,直接就可以在显示出来编辑。
public class Actor : MonoBehaviour {

    #region public member
    public Vector3 lookAtPoint = Vector3.zero;
    public int mAge;
    public string mName;
    public bool mIsMale;
    public string mPath;
    public AnimationCurve mCurve;
    public Color mColor;
    #endregion
}
针对脚本定制编辑panel
- 新建一个 Editor 文件夹(啥地方都行),unity会自动监测,自动生成vs的工程目录结构。
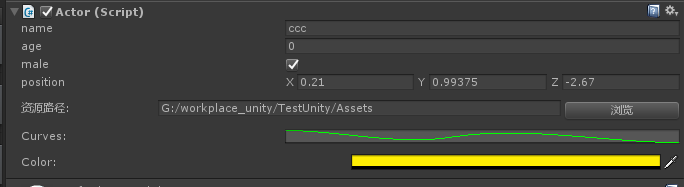
- 在 Editor 文件夹下create个编辑器脚本 ActorEditor.cs (可以随意,一般以Editor为后缀),脚本继承 Editor,重写 OnInspectorGUI 方法,这个方法每帧调用绘制 编辑panel
using UnityEngine;
using UnityEngine.UI;
using System.Collections;
using UnityEditor;

[CustomEditor(typeof(Actor))] //编辑对应的脚本
public class ActorEditor : Editor
{

    //private string mPath1 = "";
    private Actor mActor;

    public override void OnInspectorGUI()
    {
        Actor t = (Actor)target;
        mActor = t;

        t.mName = EditorGUILayout.TextField("name", t.mName);
        t.mAge = EditorGUILayout.IntField("age", t.mAge);
        t.mIsMale = ETCGuiTools.Toggle("male", t.mIsMale);
        t.transform.position = EditorGUILayout.Vector3Field("position", t.transform.position);

        EditorGUILayout.Space();
        EditorGUILayout.BeginHorizontal(); //被Horizontal包的会显示在同一行
        GUILayout.Label("资源路径:");
        t.mPath = EditorGUILayout.TextField(t.mPath);
        if (GUILayout.Button("浏览"))
            EditorApplication.delayCall += Save; //点击按钮调用的方法
        EditorGUILayout.EndHorizontal();

        EditorGUILayout.Space();
        EditorGUILayout.BeginHorizontal();
        t.mCurve = EditorGUILayout.CurveField("Curves:", t.mCurve);
        EditorGUILayout.EndHorizontal();

        EditorGUILayout.Space();
        EditorGUILayout.BeginHorizontal();
        EditorGUILayout.LabelField("Color:");
        t.mColor = EditorGUILayout.ColorField(t.mColor);
        EditorGUILayout.EndHorizontal();
    }

    /// <summary>
    /// 选择资源存储路径
    /// </summary>
    void Save()
    {
        string path = EditorUtility.OpenFolderPanel("选择要存储的路径", "", "");
        if (path.Length != 0)
        {
            //mPath1 = path;
            mActor.mPath = path; //貌似这里只能通过成员实现,不能传参数。可能是异步的原因
            EditorUtility.FocusProjectWindow();
        }
    }
2、Window
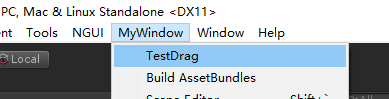
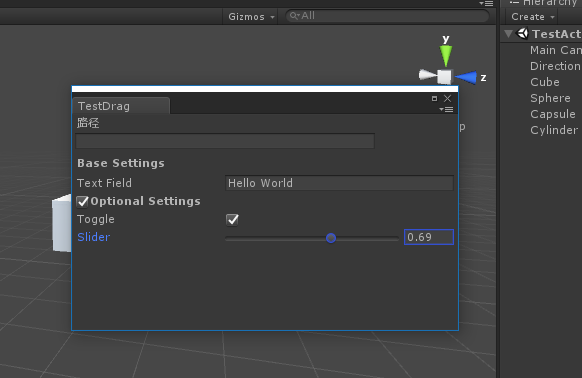
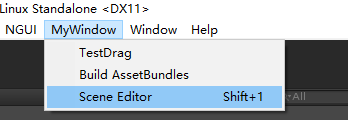
同样也是create个脚本 TestDrag 丢在 Editor 文件夹下。TestDrag 继承 EditorWindow ,写个静态方法 Init 上面用属性标注 [MenuItem("MyWindow/TestDrag")],意思就是会在菜单栏 MyWindow/TestDrag中点击触发弹出TestDrag 的编辑 window,然后重写 OnGUI() 方法具体定制显示需要编辑的东东
using UnityEngine;
using System.Collections;
using UnityEditor;

public class TestDrag : EditorWindow
{
    string path;
    Rect rect;
    bool groupEnabled = true;
    string myString = "Hello World";
    bool myBool = true;
    float myFloat = 1.23f;

    [MenuItem("MyWindow/TestDrag")] //触发弹出TestDrag window的按钮
    static void Init()
    {
        EditorWindow.GetWindow(typeof(TestDrag));
    }

    void OnGUI() //绘制window
    {
        EditorGUILayout.LabelField("路径", EditorStyles.boldLabel);
        //获得一个长300的框
        rect = EditorGUILayout.GetControlRect(GUILayout.Width(300));
        //将上面的框作为文本输入框
        path = EditorGUI.TextField(rect, path);

        //如果鼠标正在拖拽中或拖拽结束时,并且鼠标所在位置在文本输入框内
        if ((Event.current.type == EventType.DragUpdated
        || Event.current.type == EventType.DragExited)
        && rect.Contains(Event.current.mousePosition))
        {
            //改变鼠标的外表
            DragAndDrop.visualMode = DragAndDropVisualMode.Generic;
            if (DragAndDrop.paths != null && DragAndDrop.paths.Length > 0)
            {
                path = DragAndDrop.paths[0];
            }
        }

        //---------
        GUILayout.Label("Base Settings", EditorStyles.boldLabel);
        myString = EditorGUILayout.TextField("Text Field", myString);

        groupEnabled = EditorGUILayout.BeginToggleGroup("Optional Settings", groupEnabled);
        myBool = EditorGUILayout.Toggle("Toggle", myBool);
        myFloat = EditorGUILayout.Slider("Slider", myFloat, -3, 3);
        EditorGUILayout.EndToggleGroup();
    }
}
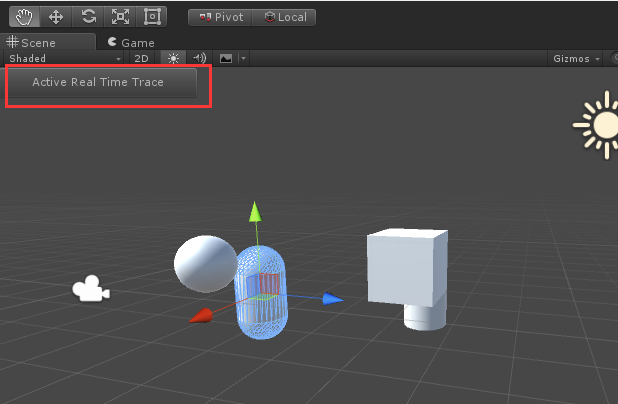
3、Scene
同样也是create个脚本 SceneRealTimeFocusEditor 丢在 Editor 文件夹下。
在场景中显示一些按钮、文字什么的
using UnityEngine;
using UnityEngine.UI;
using System.Collections;
using UnityEditor;

/// <summary>
/// Scene中的按钮扩展:
/// </summary>
[CustomEditor(typeof(MonoBehaviour), true)]
public class SceneRealTimeFocusEditor : Editor
{
    public void OnEnable()
    {
        active = false;
    }
    public void OnDisable()
    {
        active = false;
    }

    private bool active = false;
    void OnSceneGUI()
    {
        GameObject[] gos = Selection.gameObjects;
        if (gos != null)
        //if (Selection.activeTransform != null)
        {

            Handles.BeginGUI();
            GUILayout.BeginArea(new Rect(0, 0, 200, 200));
            if (!active)
            {
                if (GUILayout.Button("Active Real Time Trace", GUILayout.Height(30)))
                {
                    active = true;
                }
            }
            else
            {
                if (GUILayout.Button("Close Real Time Trace", GUILayout.Height(30)))
                {
                    active = false;
                }
            }
            GUILayout.EndArea();
            Handles.EndGUI();

            if (active)
            {
                SceneView.lastActiveSceneView.pivot = gos[0].transform.position;
                //SceneView.lastActiveSceneView.pivot = Selection.activeTransform.position;
                SceneView.lastActiveSceneView.Repaint();
            }
        }
    }
}
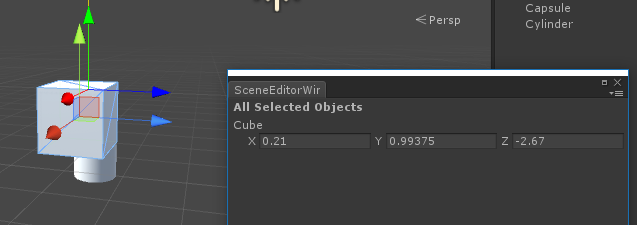
4、附上一个场景对象实时追踪
using UnityEngine;
using UnityEditor;
using System.Collections;
using System.Text;

/// <summary>
/// 实时显示场景中的对象
/// </summary>
public class SceneEditorWindow : EditorWindow
{

    RaycastHit _hitInfo;
    SceneView.OnSceneFunc _delegate;
    static SceneEditorWindow _windowInstance;

    private GameObject[] mSelectObjs = null;

    [MenuItem("MyWindow/Scene Editor #`")] //快捷方式:shift+`
    static void Init()
    {
        if (_windowInstance == null)
        {
            _windowInstance = EditorWindow.GetWindow(typeof(SceneEditorWindow)) as SceneEditorWindow;
            _windowInstance._delegate = new SceneView.OnSceneFunc(OnSceneFunc);
            SceneView.onSceneGUIDelegate += _windowInstance._delegate;

        }
    }

    void OnEnable()
    {
    }

    void OnDisable()
    {
    }

    void OnDestroy()
    {
        if (_delegate != null)
        {
            SceneView.onSceneGUIDelegate -= _delegate;
        }
    }

    void OnSelectionChange()
    {
        mSelectObjs = Selection.gameObjects;
    }

    void OnGUI()
    {
        EditorGUILayout.LabelField("All Selected Objects", EditorStyles.boldLabel);

        if (mSelectObjs != null)
        {
            for (int i = 0; i < mSelectObjs.Length; ++i)
            {
                EditorGUILayout.BeginHorizontal();
                GameObject go = mSelectObjs[i];
                EditorGUILayout.Vector3Field(go.name, go.transform.position);
                EditorGUILayout.EndHorizontal();
            }
        }
    }

    void OnInspectorGUI()
    {
        Debug.Log("OnInspectorGUI");
    }

    static public void OnSceneFunc(SceneView sceneView)
    {
        _windowInstance.CustomSceneGUI(sceneView);
    }

    void CustomSceneGUI(SceneView sceneView)
    {
        Camera cameara = sceneView.camera;
        Ray ray = HandleUtility.GUIPointToWorldRay(Event.current.mousePosition);
        if (Physics.Raycast(ray, out _hitInfo, 10000, -1))
        {
            //Debug.DrawRay(ray.origin, ray.direction, Color.yellow);
            Vector3 origin = _hitInfo.point;
            origin.y += 100;
            if (Physics.Raycast(origin, Vector3.down, out _hitInfo))
            {
                Handles.color = Color.yellow;
                Handles.DrawLine(_hitInfo.point, origin);
                float arrowSize = 1;
                Vector3 pos = _hitInfo.point;
                Quaternion quat;
                Handles.color = Color.green;
                quat = Quaternion.LookRotation(Vector3.up, Vector3.up);
                Handles.ArrowCap(0, pos, quat, arrowSize);
                Handles.color = Color.red;
                quat = Quaternion.LookRotation(Vector3.right, Vector3.up);
                Handles.ArrowCap(0, pos, quat, arrowSize);
                Handles.color = Color.blue;
                quat = Quaternion.LookRotation(Vector3.forward, Vector3.up);
                Handles.ArrowCap(0, pos, quat, arrowSize);
                //Handles.DrawLine(pos + new Vector3(0, 3, 0), pos);
            }
        }
        SceneView.RepaintAll();
    }
}


 1758
1758


 被折叠的 条评论
为什么被折叠?
被折叠的 条评论
为什么被折叠?
 到【灌水乐园】发言


