


参考资料&原文链接
什么是生命周期
以下摘自百度百科:
生命周期就是指一个对象的生老病死。
生命周期(Life Cycle)的概念应用很广泛,特别是在政治、经济、环境、技术、社会等诸多领域经常出现,其基本涵义可以通俗地理解为“从摇篮到坟墓”(Cradle-to-Grave)的整个过程。对于某个产品而言,就是从自然中来回到自然中去的全过程,也就是既包括制造产品所需要的原材料的采集、加工等生产过程,也包括产品贮存、运输等流通过程,还包括产品的使用过程以及产品报废或处置等废弃回到自然过程,这个过程构成了一个完整的产品的生命周期。
生命周期简单来说就是一个对象从出生到死亡的全过程。
比如:刚来到这个世界上要和世界说「Hello,World!」的婴儿,再到后来长高一点变成了小朋友,还有能认识很多和他一样的小朋友,这将是他们最快乐的童年时光;接下来他们会开始学习很多的知识,某一天他们会悄悄的进入青春期,变成想要探索整个世界的少年;也许会在读中学的时候因为某一件小事而种下了一颗种子,并在心里暗暗发誓一定朝这个方向努力;而有的人直到大学过了大半都是浑浑噩噩,不知未来不知去向;大学毕业工作后才知道生活原来如此艰难,每一个人都是勇敢的斗士,包括自己,只有少部分人依然坚持着自己的梦想,不畏艰险;直到工作几年后,大部分少年已经被磨平了棱角,再无年少时的意气风发,他们只想有一个属于自己的家;人至中年,四十而立,上有父母下有子女,顶着巨大的压力努力的撑起一个家。
UMG也一样,UMG也有创建、Tick、销毁的一个过程,这个过程就是一个完整的生命周期。
为什么我们要关注生命周期
因为我们希望正确的事情总是在正确的时机发生。
例如:我们对人类幼崽的期望就是希望他能健康平安,在他读书的时候我们又希望他能够好好学习,努力读书,在他合适的时候又希望他能带女朋友回家。
一样的,在UMG的生命周期中我们也希望在UMG的生命周期的各个阶段中能够做一些我们期望的事情。
例如:在操作这个控件之前,我至少要拿到这个控件的对象或者引用,不然随便一行与这个控件有关的代码都会让程序崩溃。那么我应该多久去获得这个控件呢?又应该多久去绑定相应事件呢?
UMG生命周期简单介绍
以下内容来自:GCCONF '20:UE4で作成するUIと最適化手法、【UE4】使用UMG创建UI,了解内部机制及相应优化方法。
先从蓝图开始,蓝图稍微简单一些:
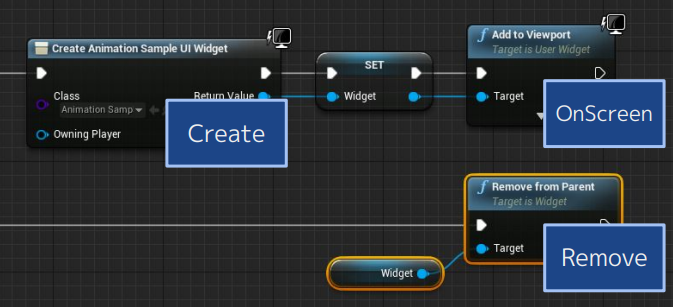
Widget生命周期的五个步骤:

UMG生命周期流程图解
Create
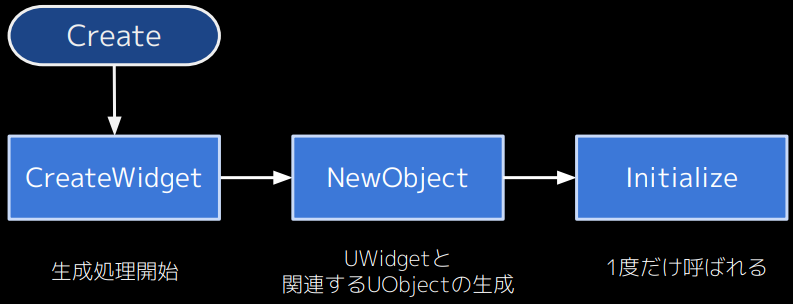
Create -> 开始生成过程 -> 与UObject相关的UObject的生成 -> Initialize只调用一次的初始化。
注意:
- 为什么这里要强调「Initialize只调用一次的初始化」呢,因为在这之前的有些过程还会反复调用,比如说在PIE里面在保存/编译/打开Widget时就会反复调用,在游戏里面只会调用一次。
- 这里只是创建,并没有添加到视口,添加到视口以后才会真正的显示到屏幕上面。
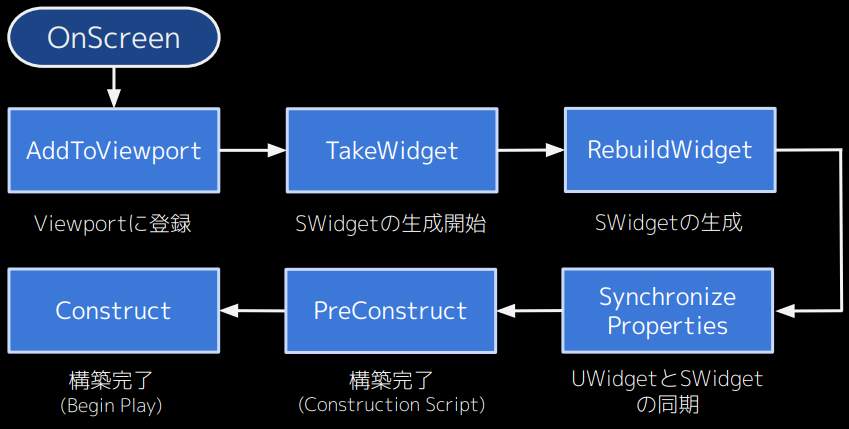
AddToViewport
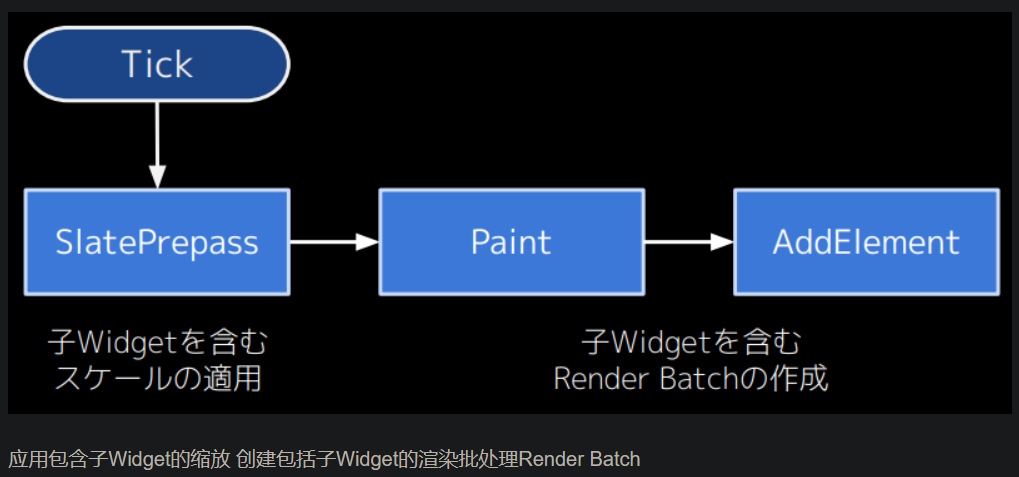
Tick
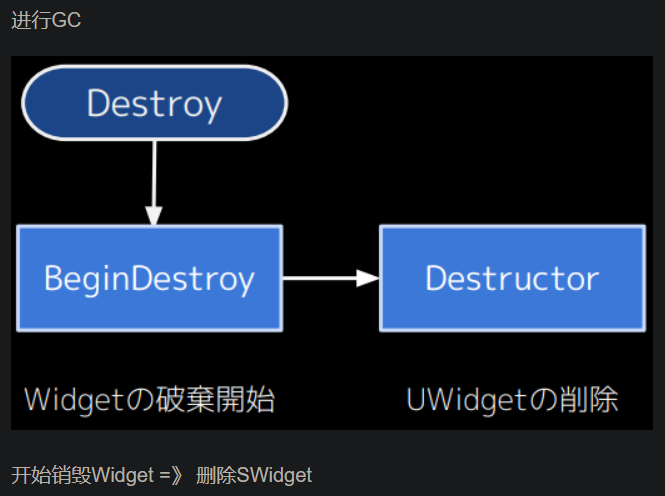
Remove

Destroy
UMG生命周期方法测试
新建测试文件
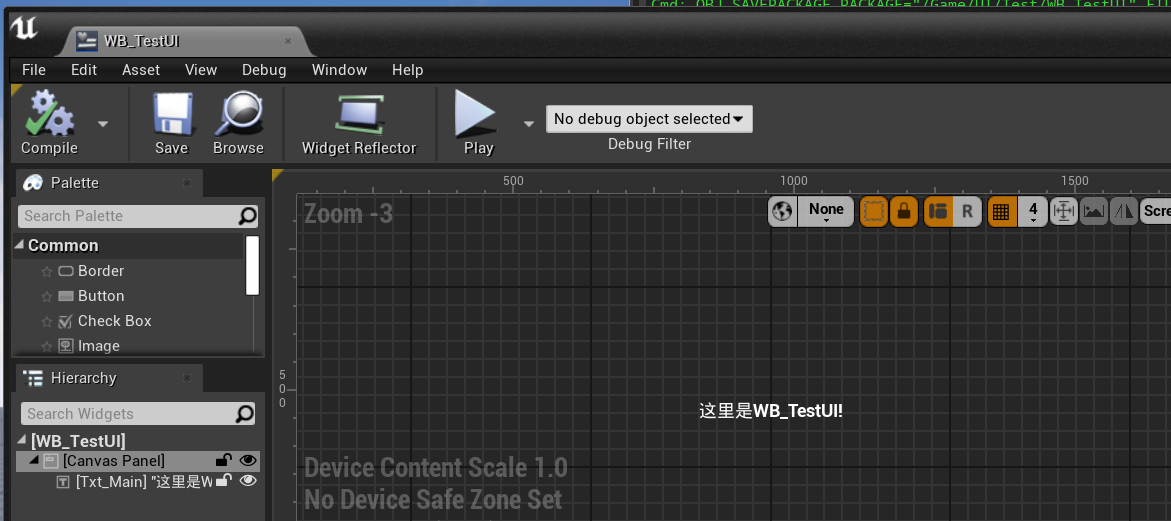
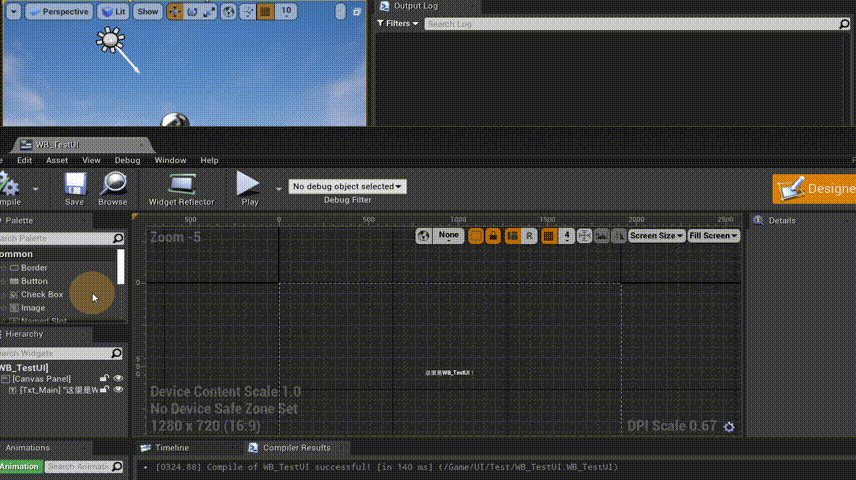
和前面一样,我整了个测试用的UI,名为「UWC_TestUI」,继承于「UUserWidget」。
public:
	//一个控件,测试BindWidget是多久在哪个生命周期调用赋值的
	UPROPERTY(Meta = (BindWidget))
	UTextBlock * Txt_Main = nullptr;
public:
	//所关注的生命周期的方法
virtual bool Initialize() override;
	virtual void NativeOnInitialized() override;
	virtual void AddToScreen(ULocalPlayer* LocalPlayer, int32 ZOrder) override;
	virtual void NativePreConstruct() override;
	virtual void NativeConstruct() override;
	virtual void NativeTick(const FGeometry& MyGeometry, float InDeltaTime) override;
	virtual void RemoveFromParent() override;
	virtual void NativeDestruct() override;
	virtual void BeginDestroy() override;
	virtual void FinishDestroy() override;
里面简单打印了一下:
bool UWC_TestUI::Initialize()
{
	UE_LOG(LogTemp,Warning,TEXT("UWC_TestUI:Initialize Txt_Main is nullptr : %d"),Txt_Main == nullptr ? true : false);
	return Super::Initialize();
}

void UWC_TestUI::NativeOnInitialized()
{
	UE_LOG(LogTemp,Warning,TEXT("UWC_TestUI:NativeOnInitialized Txt_Main is nullptr : %d"),Txt_Main == nullptr ? true : false);
	Super::NativeOnInitialized();
}

//other function...
为什么我会选择这些方法?
这几乎是UMG生命周期有关的所有方法了,蓝图里面的某些Event事件实际上是在C++代码里面调用的。
例如:蓝图中的EventPreConstruct:
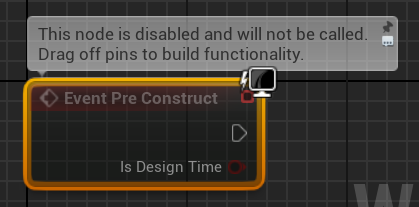
它实际上是由NativePreConstruct()调用的:
void UUserWidget::NativePreConstruct()
{
	PreConstruct(IsDesignTime());
}
而关注蓝图或者关注C++都是一样的,只不过我们关注的是C++代码比较多一点。这个会在下文分析。
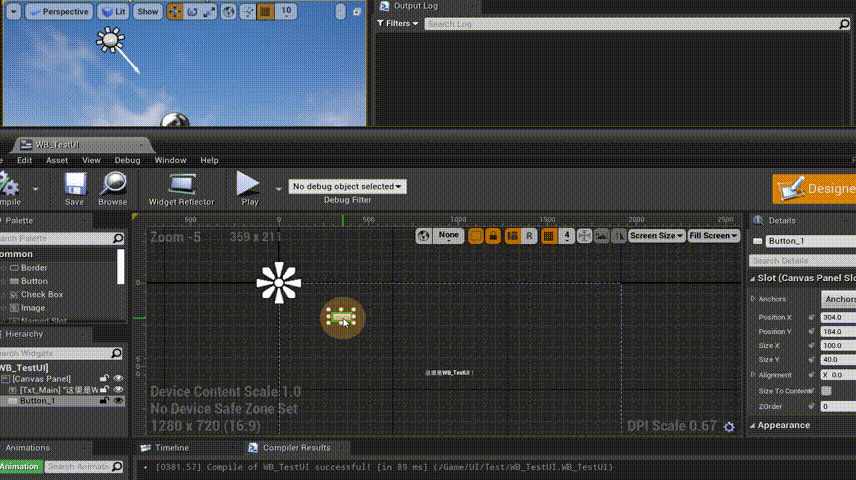
为什么会有一个Txt_Main来占坑?
因为也想顺便探寻一下BindWidget这个宏是在生命周期的哪个方法进行实际绑定的。
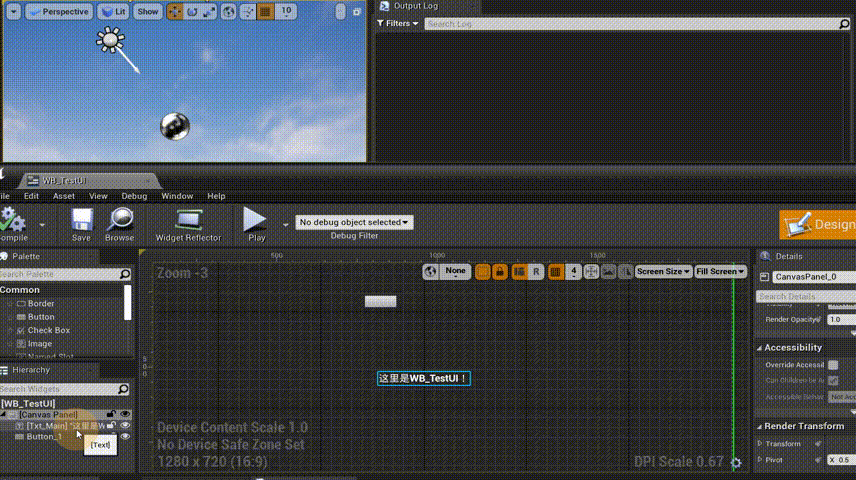
蓝图里面就放了一个Text,提示一下:
接下来测试:
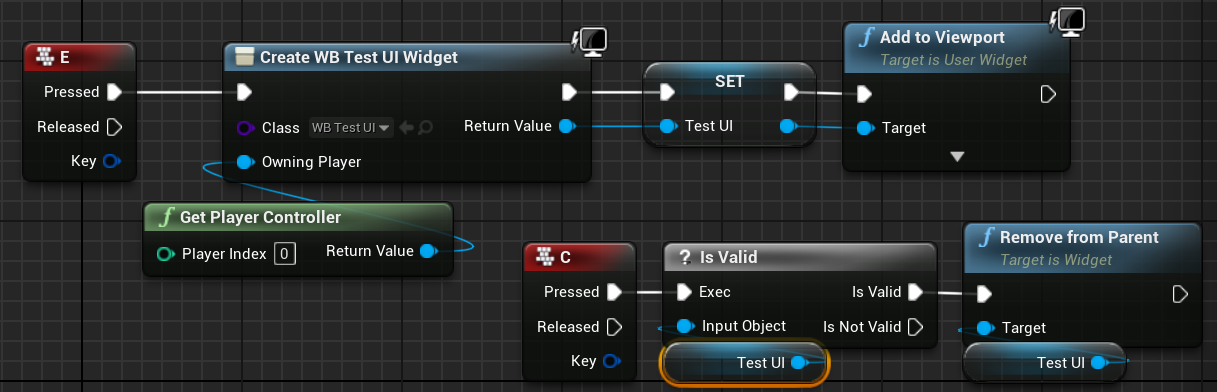
我就弄简单一点,在关卡蓝图里面写了,按下E的时候创建并添加到视口,按下C的时候从视口移除。
Game中的生命周期
可以看到,在Game时,UMG声明周期走的流程是:
bool Initialize() -> void NativeOnInitialized() -> void AddToScreen(ULocalPlayer* LocalPlayer, int32 ZOrder) -> void NativePreConstruct() -> void NativeConstruct() -> void NativeTick() -> void RemoveFromParent() -> void NativeDestruct()
还可以观察到:Txt_Main这个TextBlock的绑定是在bool Initialize()或void NativeOnInitialized()方法绑定的,盲猜是在前者。
PIE中的生命周期
PIE又分为很多情况,在UMG打开时、添加/拖拽/删除/Widget时、编译Widget时、保存Widget时。这些都会走不同的生命周期方法。
PIE-UMG打开时
在PIE中,UMG打开时依次调用的是:bool Initialize() -> void NativePreConstruct() 。
PIE-UMG添加控件时
在PIE中,UMG添加控件时依次调用的是:bool Initialize() -> void NativePreConstruct() 。
PIE-UMG拖拽控件时
在PIE中,UMG拖拽控件时依次调用的是:bool Initialize() -> void NativePreConstruct() 。
PIE-UMG删除控件时

在PIE中,UMG删除时依次调用的是:bool Initialize() -> void NativePreConstruct() 。
PIE-UMG修改控件内容时
在修改Widget内容时,居然什么都没调用 - -。直到点击编译才有了调用。
PIE-UMG编译时
在PIE中,UMG编译时依次调用的是:void BeginDestroy() -> void RemoveFromParent() -> void FinishDestroy() -> bool Initialize() -> void NativePreConstruct() 。
其中,前面四个会反复调用。
PIE-UMG保存时
在PIE中,UMG保存时依次调用的是:bool Initialize() 。
UUserWidget有关源码分析
Initialize
bool UUserWidget::Initialize()
{
// If it's not initialized initialize it, as long as it's not the CDO, we never initialize the CDO.
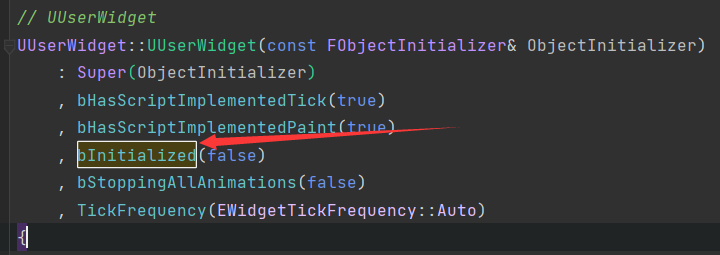
if (!bInitialized && !HasAnyFlags(RF_ClassDefaultObject))
{
bInitialized = true;
// If this is a sub-widget of another UserWidget, default designer flags and player context to match those of the owning widget
if (UUserWidget* OwningUserWidget = GetTypedOuter<UUserWidget>())
{
#if WITH_EDITOR
SetDesignerFlags(OwningUserWidget->GetDesignerFlags());
#endif
SetPlayerContext(OwningUserWidget->GetPlayerContext());
}
UWidgetBlueprintGeneratedClass* BGClass = Cast<UWidgetBlueprintGeneratedClass>(GetClass());
if (BGClass)
{
BGClass = GetWidgetTreeOwningClass();
}
// Only do this if this widget is of a blueprint class
if (BGClass)
{
BGClass->InitializeWidget(this);
}
else
{
InitializeNativeClassData();
}
if ( WidgetTree == nullptr )
{
WidgetTree = NewObject<UWidgetTree>(this, TEXT("WidgetTree"), RF_Transient);
}
else
{
WidgetTree->SetFlags(RF_Transient);
const bool bReparentToWidgetTree = false;
InitializeNamedSlots(bReparentToWidgetTree);
}
if (!IsDesignTime() && PlayerContext.IsValid())
{
NativeOnInitialized();
}
return true;
}
return false;
}
- 注意
bInitialized这个值在构造的时候都是false,只有在bool Initialize()在回改变这个值,标识此Widget已经初始化,防止二次调用。
- 继续看,下面这几行代码说了如果当前实例化的UI不是widget蓝图,而是一个C++ class,在触发
Initialize()之后,还会继续触发InitializeNativeClassData(),否则只触发Initialize()
UWidgetBlueprintGeneratedClass* BGClass = Cast<UWidgetBlueprintGeneratedClass>(GetClass());
		if (BGClass)
		{
			BGClass = GetWidgetTreeOwningClass();
		}

		// Only do this if this widget is of a blueprint class
		if (BGClass)
		{
			BGClass->InitializeWidget(this);
		}
		else
		{
			InitializeNativeClassData();
		}
InitializeNativeClassData()声明在UUserWidget中是这样的:
protected:
	/** The function is implemented only in nativized widgets (automatically converted from BP to c++) */
	virtual void InitializeNativeClassData() {}
- 最后触发了
NativeOnInitialized();。 - 在这个函数中你可以获得蓝图中的控件,像这样写:
bool UWC_TestUI::Initialize()
{
    //防止出现空指针异常
	if (!Super::Initialize())
	{
		return false;
	}

    if (UWidgetSwitcher*  WS_TabContentTemp = Cast<UWidgetSwitcher>(GetWidgetFromName(TEXT("WS_TabContent"))))
	{
		WS_TabContent = WS_TabContentTemp;
	}

	return true;
}
其中,WS_TabContent的声明是:
class UWidgetSwitcher* WS_TabContent;
或者在NativeOnInitialized()/NativeConstruct()中写。
除了在这里获得控件,你也可以在void NativeConstruct()中获得控件,方式是一样的。
或者你可以直接用BindWidget这个宏,然后什么都不用做了,更方便:
UPROPERTY(Meta = (BindWidget))
	class UWidgetSwitcher* WS_TabContent;
参考这里:虚幻官方文档-UMWidget::UPROPERTY 宏的有效元数据关键字。
NativeOnInitialized
// Native handling for SObjectWidget

void UUserWidget::NativeOnInitialized()
{
	OnInitialized();
}
这里可以看到,只是调用了一下给蓝图提供的函数OnInitialized();,它的声明是这样的:
/**
	 * Called once only at game time on non-template instances.
	 * While Construct/Destruct pertain to the underlying Slate, this is called only once for the UUserWidget.
	 * If you have one-time things to establish up-front (like binding callbacks to events on BindWidget properties), do so here.
	 */
	UFUNCTION(BlueprintImplementableEvent, BlueprintCosmetic, Category="User Interface")
	void OnInitialized();
这里注释说的很清楚了,绑定事件可以在这里做,比如Button的OnClick、OnHovered之类的。
AddToScreen
查看声明,发现需要一个ULocalPlayer*和一个层级。
/** Adds the widget to the screen, either to the viewport or to the player's screen depending on if the LocalPlayer is null. */
	virtual void AddToScreen(ULocalPlayer* LocalPlayer, int32 ZOrder);
其实AddToViewport、AddToPlayerScreen的本质都是调用的AddToScreen:
void UUserWidget::AddToViewport(int32 ZOrder)
{
	AddToScreen(nullptr, ZOrder);
}
bool UUserWidget::AddToPlayerScreen(int32 ZOrder)
{
	if ( ULocalPlayer* LocalPlayer = GetOwningLocalPlayer() )
	{
		AddToScreen(LocalPlayer, ZOrder);
		return true;
	}

	FMessageLog("PIE").Error(LOCTEXT("AddToPlayerScreen_NoPlayer", "AddToPlayerScreen Failed.  No Owning Player!"));
	return false;
}
它们的区别是:
AddToScreen需要手动传递一个ULocalPlayer*和一个ZOrder进去,这指定了添加到哪个Player上和Widget的层级。
AddToPlayerScreen只需要一个ZOrder,是因为它会在方法里面使用GetOwningLocalPlayer()尝试获取ULocalPlayer*,获取成功就调用AddToScreen以添加,否则就报错。
AddToViewport只需要一个ZOrder,ULocalPlayer*传的是一个nullptr。
NativePreConstruct
这个里面也是调用了给蓝图提供的事件:
void UUserWidget::NativePreConstruct()
{
	PreConstruct(IsDesignTime());
}
PreConstruct的声明是:
	/**
	 * Called by both the game and the editor.  Allows users to run initial setup for their widgets to better preview
	 * the setup in the designer and since generally that same setup code is required at runtime, it's called there
	 * as well.
	 *
	 * **WARNING**
	 * This is intended purely for cosmetic updates using locally owned data, you can not safely access any game related
	 * state, if you call something that doesn't expect to be run at editor time, you may crash the editor.
	 *
	 * In the event you save the asset with blueprint code that causes a crash on evaluation.  You can turn off
	 * PreConstruct evaluation in the Widget Designer settings in the Editor Preferences.
	 */vs
	UFUNCTION(BlueprintImplementableEvent, BlueprintCosmetic, Category="User Interface")
	void PreConstruct(bool IsDesignTime);
说的很清楚了。
- 第一,在Game和Editor中都会调用,以预览在设计器中的设置。
- 如果你调用了一些不期望在编辑器运行的东西,你可能会崩溃编辑器。可以用在【UE4】UMG_自定义UMG并实时预览中。
void NativeConstruct
void UUserWidget::NativeConstruct()
{
   Construct();
   UpdateCanTick();
}
这个方法就很简单了,也是调一下给蓝图的事件,然后更新一下是否能Tick,能Tick的话就开始Tick,否则就不Tick。
再看一眼Construct();
/**
 * Called after the underlying slate widget is constructed.  Depending on how the slate object is used
 * this event may be called multiple times due to adding and removing from the hierarchy.
 * If you need a true called-once-when-created event, use OnInitialized.
 */
UFUNCTION(BlueprintImplementableEvent, BlueprintCosmetic, Category="User Interface", meta=( Keywords="Begin Play" ))
void Construct();
这是提供给蓝图的节点,因为会调用多次,所以如果有需要真正的创建时调用一次的事件,请使用OnInitialized()。
void NativeTick
这个没什么好说的,就是每帧调用。不过要注意的是这一行:
SObjectWidget and UUserWidget have mismatching tick states or UUserWidget::NativeTick was called manually (Never do this)
RemoveFromParent
/**
	 * Removes the widget from its parent widget.  If this widget was added to the player's screen or the viewport
	 * it will also be removed from those containers.
	 */
	virtual void RemoveFromParent() override;
从其父小部件中删除小部件。如果这个小部件被添加到玩家的屏幕或视口,它也将从这些容器中删除。
NativeDestruct
void UUserWidget::NativeDestruct()
{
	StopListeningForAllInputActions();
	Destruct();
}
这里面停止了输入监听,比如监听键盘和鼠标的输入,可以在这里面搜索InputComponent以查看相关代码。
/**
	 * Called when a widget is no longer referenced causing the slate resource to destroyed.  Just like
	 * Construct this event can be called multiple times.
	 */
	UFUNCTION(BlueprintImplementableEvent, BlueprintCosmetic, Category="User Interface", meta=( Keywords="End Play, Destroy" ))
	void Destruct();
这个Widget不再被引用时调用。一样的,会被调用多次。
总结
Widget生命周期的五个步骤
在Game中
bool Initialize() -> void NativeOnInitialized() -> void AddToScreen(ULocalPlayer* LocalPlayer, int32 ZOrder) -> void NativePreConstruct() -> void NativeConstruct() -> void NativeTick() -> void RemoveFromParent() -> void NativeDestruct()
在PIE中
UMG打开:bool Initialize() -> void NativePreConstruct() 。
UMG添加控件:bool Initialize() -> void NativePreConstruct() 。
UMG拖拽控件:bool Initialize() -> void NativePreConstruct() 。
UMG删除控件:bool Initialize() -> void NativePreConstruct() 。
修改Widget内容,什么都没调用,点击编译才有调用。
UMG编译:void BeginDestroy() -> void RemoveFromParent() -> void FinishDestroy() -> bool Initialize() -> void NativePreConstruct() 。
其中,前面四个会反复调用。
UMG保存:bool Initialize() 。
获得控件和绑定事件
BindWidget这个宏是在Initialize()中完成绑定的。
绑定控件也可以手动在Initialize()或NativeOnInitialized()或NativeConstruct()中做。
那么怎么选择呢?
通过上面的分析可以知道在PIE中会调用Initialize()或NativeOnInitialized(),如果你想在PIE中就绑定(例如在PIE中预览自定义UMG就需要)并执行更新的预览的代码的话就在这里绑定。
如果你只是想在游戏中运行时才使用的话那么就在NativeConstruct()中绑定。
绑定事件在NativeOnInitialized()中做。不过要注意需要先得到控件再绑定事件,并且绑定的那个函数要加上UFUNCTION()宏。
在PIE中实时预览自定义UMG
重写Initialize():初始化并获得控件,别忘了避免空指针异常。
重写NativePreConstruct():这里写预览相关的代码,例如设置颜色、字体等。
详情请点这里:【UE4】UMG_自定义UMG并实时预览.


 2600
2600

 被折叠的 条评论
为什么被折叠?
被折叠的 条评论
为什么被折叠?
 到【灌水乐园】发言


