


一、参考文档
mm3d文档:https://mmdetection3d.readthedocs.io/zh-cn/latest/get_started.html
mm3d版本对应:https://blog.csdn.net/XCCCCZ/article/details/134315977
mm3d github:https://github.com/open-mmlab/mmdetection3d/tree/v1.4.0
mmdetection github:https://github.com/open-mmlab/mmdetection
二、版本对应关系
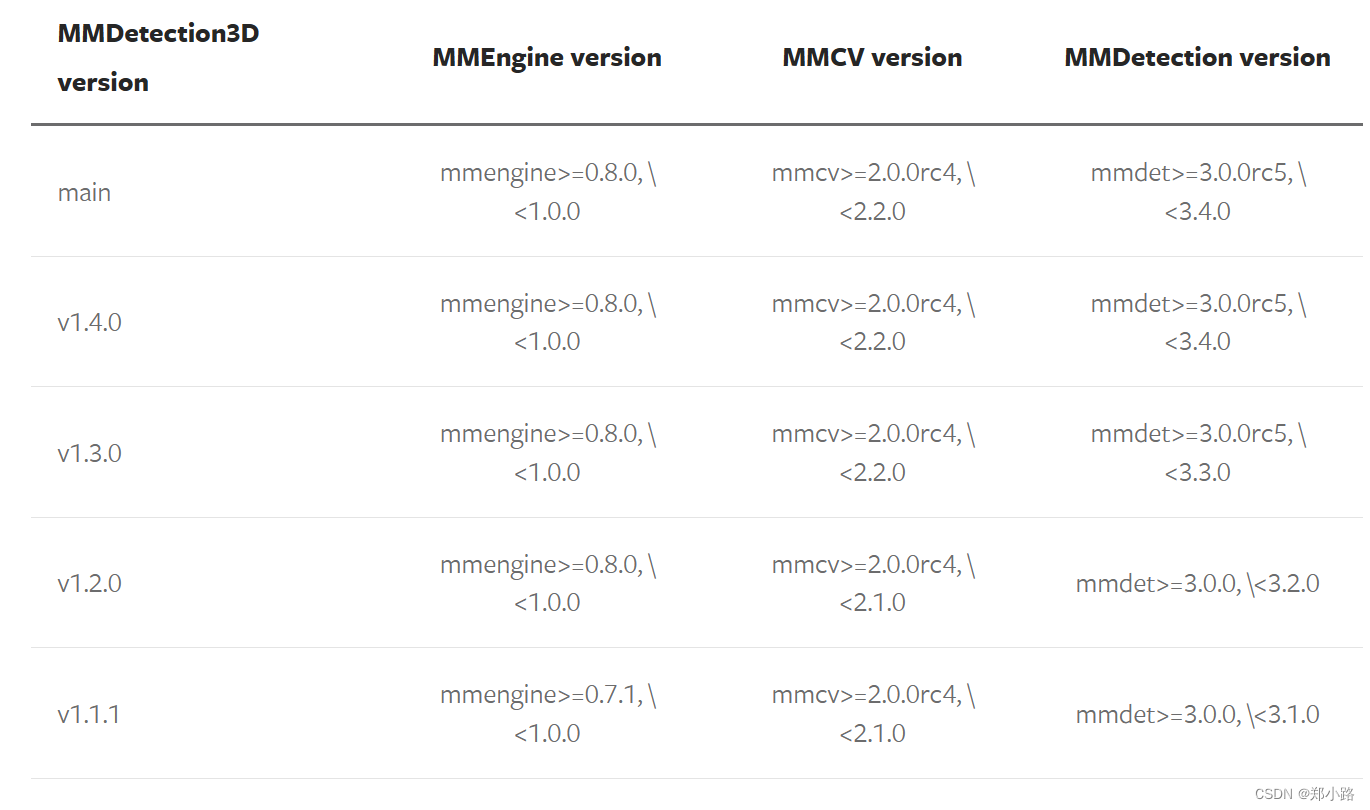
详细信息可参考官方文档:mmdetection3d版本对应关系
三、安装步骤:
- 新建环境
conda create --name mm3d1.4.0 python=3.8 -y
conda activate mm3d1.4.0
MMDetection3D works on Linux, Windows (experimental support) and macOS. It requires Python 3.7+, CUDA 9.2+, and PyTorch 1.6+.
- 安装pytorch
pip install torch==1.12.0+cu113 torchvision==0.13.0+cu113 torchaudio==0.12.0 --extra-index-url https://download.pytorch.org/whl/cu113
- 安装mmengine和mmcv
pip install mmengine==0.8.0 -i https://pypi.douban.com/simple/
pip install mmcv==2.0.0rc4  -f https://download.openmmlab.com/mmcv/dist/cu113/torch1.12.0/index.html
补充:由于torch和cuda对mmcv的版本有一定限制,所以当您的torch和cuda版本与本教程不同时,需要检查是否有您指定的对应版本的mmcv,没有的话会一直卡在Building wheel for mmcv(setup.py),便捷的检查方法可用看是否有相应的.html网站。
可以使用镜像源
pip install xxx -i https://pypi.douban.com/simple/
pip install -r req.txt -i https://pypi.douban.com/simple/
- 安装mmdetection
git clone -b 'v3.0.0rc5' https://github.com/open-mmlab/mmdetection.git --single-branch mmdetection
cd mmdetection
pip install -v -e . -i https://pypi.douban.com/simple/
cd ..
- 安装mmdetection3d
git clone -b 'v1.4.0' https://github.com/open-mmlab/mmdetection3d.git --single-branch mmdetection3d
cd mmdetection3d
pip install -v -e . -i https://pypi.douban.com/simple/
cd ..
“-v” 指详细说明,或更多的输出
“-e” 表示在可编辑模式下安装项目,因此对代码所做的任何本地修改都会生效,从而无需重新安装
四、安装测试
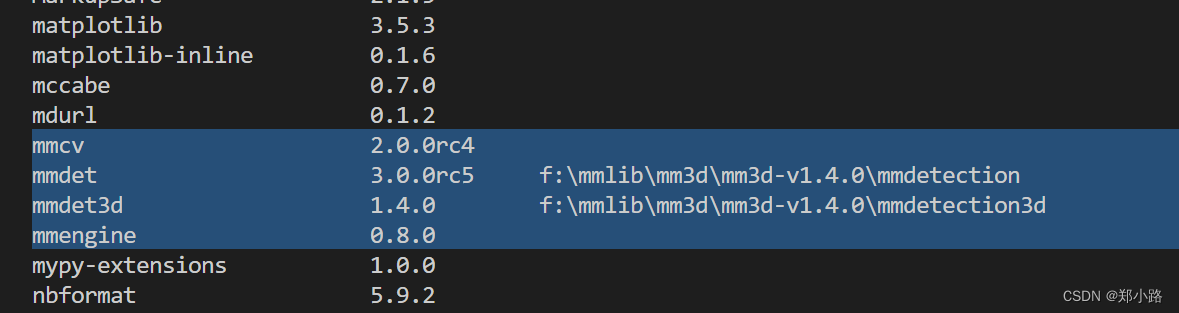
pip list显示:
输出mmdet3d版本:


 9025
9025


 被折叠的 条评论
为什么被折叠?
被折叠的 条评论
为什么被折叠?
 到【灌水乐园】发言


