


在上一篇博客我介绍了Unity新版AssetBundle系统的一些知识点,在这篇博客中,我用一个小小的Demo来实践一下(Demo的开发工具为Unity5.3.5 + VS2015,请注意IDE版本)。
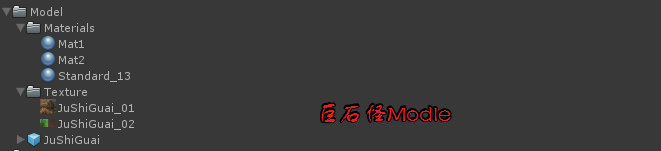
先准备一个Modle,资源结构如下所示
预制体JuShiGuai使用了材质球Mat1,Mat2,而Mat1,Mat2又分别使用了JuShiGuai_01,JuShiGuai_02两个贴图文件。
下面就长话短说直接上代码,具体的用法可以参见上一篇博客
1.设置Modle下的资源的AssetBundleName
- Mat1 : materials/mat1.unity3d
- Mat2 : materials/mat2.unity3d
- JuShiGuai_01 : texture/jushiguai_01.unity3d
- JuShiGuai_02 : texture/jushiguai_02.unity3d
- JuShiGuai : jushiguai.unity3d
这儿我直接按原有目录设置,具体情况在实际使用中有待商榷
2.编写AssetBundle打包代码
- 为了方便路径的管理,这儿采用我再 Unity 中管理Tag的方式来管理
创建AssetBundleConfig.cs,管理路径
using UnityEngine;
using System.Collections;

/*****************************************************************************
* @author : zyx
* @date : 2016/11/16 15:15
* @instructions : 设置打包AssetBundle用的的相关路径
*****************************************************************************/
public class AssetBundleConfig : MonoBehaviour {

    //AssetBundle打包后存储的路径
    public static string ASSETBUNDLE_PATH = Application.dataPath + "/StreamingAssets/";

    //资源地址
    public static string APPLICATION_PATH = Application.dataPath + "/";

    //工程根目录地址
    public static string PROJECT_PATH = APPLICATION_PATH.Substring(0, APPLICATION_PATH.Length - 7);

    //AssetBundle打包的后缀名
    public static string SUFFIX = ".assetbundle";
}- 2.创建 AssetBundleBuild.cs,打包AssetBundle
这儿我使用了LZ4压缩格式,保证包的大小和加载速度额均衡
using UnityEngine;
using System.Collections;
using UnityEditor;

/*****************************************************************************
* @author : zyx
* @date : 2016/11/16 15:16
* @instructions : AssetBundle打包
*****************************************************************************/
public class AssetBundleBuild : MonoBehaviour {
    [MenuItem("AssetBundle Editor/AssetBundle Build")]
    static void AssetBundlesBuild()
    {
        //注:第一个存放AssetBundle的路径取相对地址
        BuildPipeline.BuildAssetBundles(AssetBundleConfig.ASSETBUNDLE_PATH.Substring(AssetBundleConfig.PROJECT_PATH.Length),
            BuildAssetBundleOptions.DeterministicAssetBundle|BuildAssetBundleOptions.ChunkBasedCompression,
            BuildTarget.StandaloneWindows64
            );
    }
}- 代码编译后会在Unity工具栏挂载
AssetBundle Editor栏,点击菜单栏AssetBundle Build就会自动对所有设置了assetbundleName的代码进行打包
3.编写AssetBundle加载代码
在传统的方法中,我们加载一个资源,总是加载资源的依赖项–>加载资源–>卸载依赖项,但是当一个资源频繁被其他资源依赖,这样无疑会造成性能问题。
一个可行的解决方案是:我们可以把加载好的资源用字典存着,下次如果还需要加载这个依赖项就可以直接从字典里面读取,程序运行结束后在卸载字典中加载的AssetBundle.
当然可能还会有更好的加载方案,比如统计一个资源的被依赖次数和使用频率,然后定义一个时间周期,将不活跃的资源定期销毁
这儿我就采用字典的方案,把加载好的资源用字典存着
- 创建 AssetBundleLoad.cs
using UnityEngine;
using System.Collections;
using System.Collections.Generic;
/*****************************************************************************
* @author : zyx
* @date : 2016/11/16 15:20
* @instructions : AssetBundle的加载,采用字典存贮依赖项,避免频繁地加载和卸载AssetBundle
*****************************************************************************/
public class AssetBundleLoad : MonoBehaviour
{
private static AssetBundleManifest manifest = null;
private static Dictionary<string, AssetBundle> assetBundleDic = new Dictionary<string, AssetBundle>();
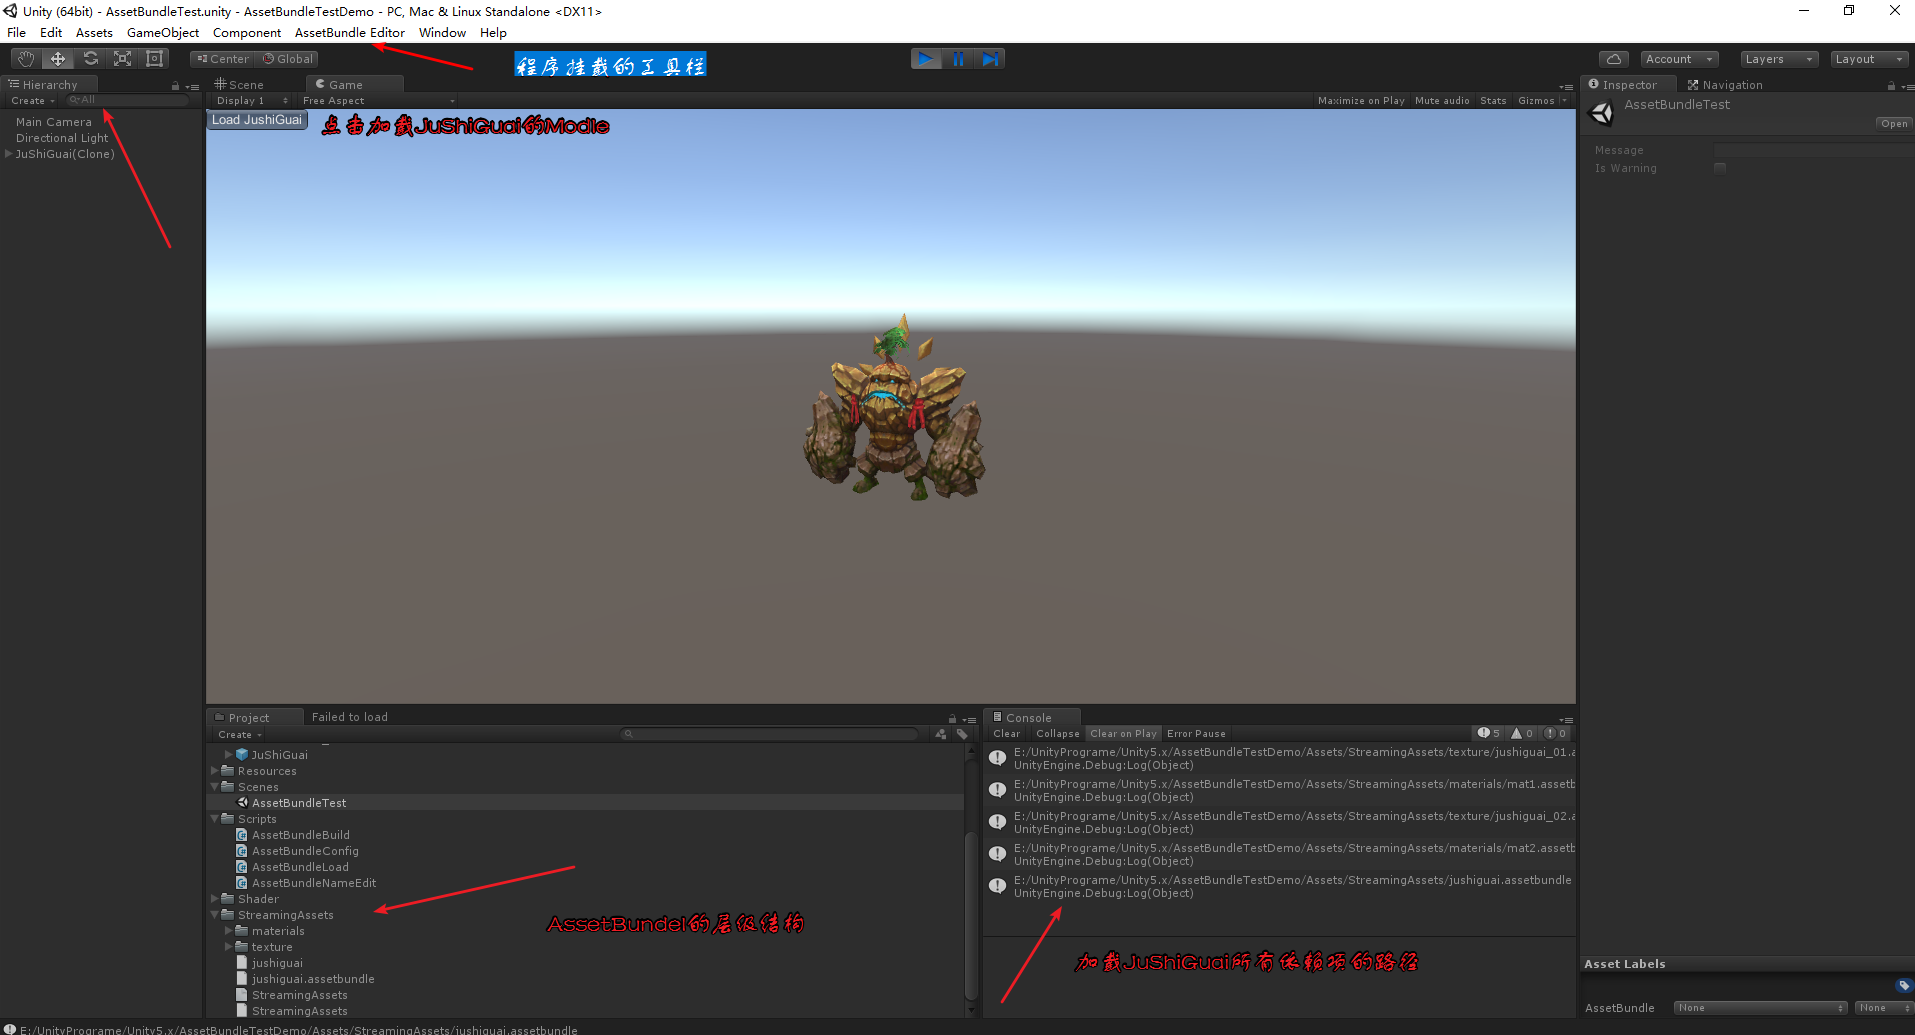
void OnGUI()
{
if (GUILayout.Button("Load JushiGuai"))
{
StartCoroutine(InstanceAsset("jushiguai"));
}
}
public AssetBundle LoadAssetBundle(string Url)
{
if (assetBundleDic.ContainsKey(Url))
return assetBundleDic[Url];
if (manifest == null)
{
//Debug.Log(AssetBundleConfig.ASSETBUNDLE_PATH);
AssetBundle manifestAssetBundle = AssetBundle.LoadFromFile(AssetBundleConfig.ASSETBUNDLE_PATH + "StreamingAssets");
manifest = (AssetBundleManifest)manifestAssetBundle.LoadAsset("AssetBundleManifest");
}
if (manifest != null)
{
//获取当前加载AssetBundle的所有依赖项的路径
string[] objectDependUrl = manifest.GetAllDependencies(Url);
foreach (string tmpUrl in objectDependUrl)
{
//通过递归调用加载所有依赖项
LoadAssetBundle(tmpUrl);
}
Debug.Log(AssetBundleConfig.ASSETBUNDLE_PATH + Url);
assetBundleDic[Url] = AssetBundle.LoadFromFile(AssetBundleConfig.ASSETBUNDLE_PATH + Url);
return assetBundleDic[Url];
}
return null;
}
private IEnumerator InstanceAsset(string assetBundleName)
{
string assetBundlePath = assetBundleName + AssetBundleConfig.SUFFIX;
int index = assetBundleName.LastIndexOf('/');
string realName = assetBundleName.Substring(index + 1, assetBundleName.Length - index - 1);
yield return LoadAssetBundle(assetBundlePath);
if (assetBundleDic.ContainsKey(assetBundlePath) && assetBundleDic[assetBundlePath] != null)
{
Object tmpObj = assetBundleDic[assetBundlePath].LoadAsset(realName);
yield return Instantiate(tmpObj);
assetBundleDic[assetBundlePath].Unload(false);
}
yield break;
}
}最后一张层序运行截图奉上
4.assetbundleName的自动化设置和清除
新版的AssetBundle虽然提出了AssetBundleName这样一个新的方法。但是在实际工程中,如果对于每个资源都手动添加设置Name。一来会十分麻烦,二来容易出错,三来不方便管理。所以在实际项目中,我们需要一个方法对于一些资源进行批量命名。
一个可行的方案就是,在工程中把资源分类的放好,我们直接读取资源的相对路径+名字,设置为它的assetbundleName,这样AssetBundle打包之后就会有和源资源相同的目录层级结构,更便于管理
- 创建AssetBundleNameEdit.cs动态的设置清除assetbundleName
using UnityEngine;
using System.Collections;
using UnityEditor;
using System.IO;

/*****************************************************************************
* @author : zyx
* @date : 2016/11/16 16:47
* @instructions : 添加工具栏,一键式添加,移除AssetBundleName
*****************************************************************************/
public class AssetBundleNameEdit : MonoBehaviour
{

    [MenuItem("AssetBundle Editor/SetAssetBundleName")]
    static void SetResourcesAssetBundleName()
    {
        //只读取当前选中的目录,排除子目录
        Object[] SelectedAsset = Selection.GetFiltered(typeof(Object), SelectionMode.Assets | SelectionMode.ExcludePrefab);
        //此处添加需要命名的资源后缀名,注意大小写。
        string[] Filtersuffix = new string[] { ".prefab", ".mat", ".dds" };
        if (SelectedAsset.Length == 0) return;
        foreach (Object tmpFolder in SelectedAsset)
        {
            string fullPath = AssetBundleConfig.PROJECT_PATH + AssetDatabase.GetAssetPath(tmpFolder);
            //Debug.Log(fullPath);
            if (Directory.Exists(fullPath))
            {
                DirectoryInfo dir = new DirectoryInfo(fullPath);
                var files = dir.GetFiles("*", SearchOption.AllDirectories);
                for (var i = 0; i < files.Length; ++i)
                {
                    var fileInfo = files[i];
                    //显示进度条
                    EditorUtility.DisplayProgressBar("设置AssetBundleName名称", "正在设置AssetBundleName名称中...", 1.0f * i / files.Length);
                    foreach (string suffix in Filtersuffix)
                    {
                        if (fileInfo.Name.EndsWith(suffix))
                        {
                            string path = fileInfo.FullName.Replace('\\', '/').Substring(AssetBundleConfig.PROJECT_PATH.Length);
                            //资源导入器
                            var importer = AssetImporter.GetAtPath(path);
                            if (importer)
                            {
                                string name = path.Substring(fullPath.Substring(AssetBundleConfig.PROJECT_PATH.Length).Length + 1);
                                importer.assetBundleName = name.Substring(0, name.LastIndexOf('.')) + AssetBundleConfig.SUFFIX;
                            }
                        }
                    }
                }
            }

        }
        //删除所有未使用的assetBundle资产数据库名称
        AssetDatabase.RemoveUnusedAssetBundleNames();
        EditorUtility.ClearProgressBar();
    }


    //输出所有AssetBundleName
    [MenuItem("AssetBundle Editor/GetAllAssetBundleName")]

    static void GetAllAssetBundleName()
    {

        string[] names = AssetDatabase.GetAllAssetBundleNames();

        foreach (var name in names)
        {
            Debug.Log(name);
        }

    }


    [MenuItem("AssetBundle Editor/ClearAssetBundleName")]

    static void ClearResourcesAssetBundleName()
    {
        UnityEngine.Object[] SelectedAsset = Selection.GetFiltered(typeof(Object), SelectionMode.Assets | SelectionMode.ExcludePrefab);
        //此处添加需要清除的资源后缀名,注意大小写。
        string[] Filtersuffix = new string[] { ".prefab", ".mat", ".dds" };
        if (SelectedAsset.Length == 0) return;
        foreach (Object tmpFolder in SelectedAsset)
        {
            string fullPath = AssetBundleConfig.PROJECT_PATH + AssetDatabase.GetAssetPath(tmpFolder);
            if (Directory.Exists(fullPath))
            {
                DirectoryInfo dir = new DirectoryInfo(fullPath);
                var files = dir.GetFiles("*", SearchOption.AllDirectories);
                for (var i = 0; i < files.Length; ++i)
                {
                    var fileInfo = files[i];
                    EditorUtility.DisplayProgressBar("清除AssetBundleName名称", "正在清除AssetBundleName名称中...", 1.0f * i / files.Length);
                    foreach (string suffix in Filtersuffix)
                    {
                        if (fileInfo.Name.EndsWith(suffix))
                        {
                            string path = fileInfo.FullName.Replace('\\', '/').Substring(AssetBundleConfig.PROJECT_PATH.Length);
                            var importer = AssetImporter.GetAtPath(path);
                            if (importer)
                            {
                                importer.assetBundleName = null;
                            }
                        }
                    }
                }
            }
        }
        EditorUtility.ClearProgressBar();
        AssetDatabase.RemoveUnusedAssetBundleNames();
    }
}
代码编译后会在之前的工具栏AssetBundle Editor下多挂载几个选项,选中某个目录,点击菜单栏选项SetAssetBundleName(ClearAssetBundleName)就会自动对所有选中目录进行assetbundleName的添加(移除)
关于从服务器加载的实现等有空在补上。
最后附上Demo的git地址(Click here!)
注:Demo的开发工具为Unity5.3.5 + VS2015,请注意IDE版本


 1689
1689

 被折叠的 条评论
为什么被折叠?
被折叠的 条评论
为什么被折叠?
 到【灌水乐园】发言


