


目录
1 windows系统
1.1 colmap安装与配置
只有装了cuda的才可以进行MVS,否则只能过sfm的稀疏重建
colmap的使用文档(教程)
https://colmap.github.io/install.html
colmap的github链接
GitHub - colmap/colmap: COLMAP - Structure-from-Motion and Multi-View Stereo
参考安装链接
【三维重建】利用开源软件colmap实现基于图像的三维重建_哔哩哔哩_bilibili
安装问题:
1)colmap版本更新(反正下载最新版的就可以了)
1.2 colmap使用
1)在总project文件夹下为每个项目创建一个项目文件夹(例如DTU_test)
2)在项目文件夹下创建images文件夹,里面存放多视角图片
3)打开colmap(bat文件),然后选择创建新项目(new project),database也在项目文件夹创建,名字取成项目名称即可,然后选择好自己创建的images文件夹。database里面会存放相机内参信息。
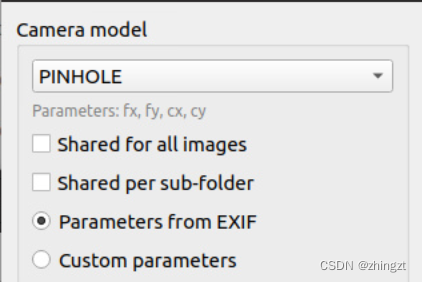
4)特征提取,选择feature extraction(注意这里的相机模型类型选成pinhole,parameters from exif(一般照片自带))
5)特征匹配,feature matching,参数直接默认,run就可以了(DTU数据集只需要十几秒就可以了)
6) 选择reconstruction,start reconstruction,就可以进行相机位姿预测、并生成可视化的图
注意:到这里稀疏重建就结束了!作为中间过程,可以做个保存。
如果想要中间的执行文件(便于后续colmap继续读取)的话,直接File-export model-(新建一个sparse文件夹)-选择这个文件夹导出。此时sparse文件夹下会有如下几个文件:cameras.bin,images.bin,points.bin, project.ini
如果想要txt形式的相机内外参等,File-export model as text。同样选择上面的sparse文件夹就可以了。
如果想要稀疏点云,可以在命令行中执行如下代码,当然直接export model as,然后选择保存成ply也是可以的。
colmap model_converter --input_path sparse --output_path sparse/sparse.ply --output_type PLY
7)dense reconstruction,select(可以自己创建一个dense文件夹,然后选择),此后就会在这个文件夹下进行密集匹配与重建。
8)undistortion(畸变校正,大概是通过内参进行校正)
9)点击stereo,进行密集重建和匹配,会为每张图生成他的深度图
10)fusion,深度图融合,生成点云(稠密点云)
11)poisson,泊松mesh重建(效果还是不错的),某些破损的面可以通过mesh进行修补。同时纹理贴图的效果还是非常不错的,可以看到标牌上的字之类的。具体示例如下,以DTU数据集的SCAN9为例。
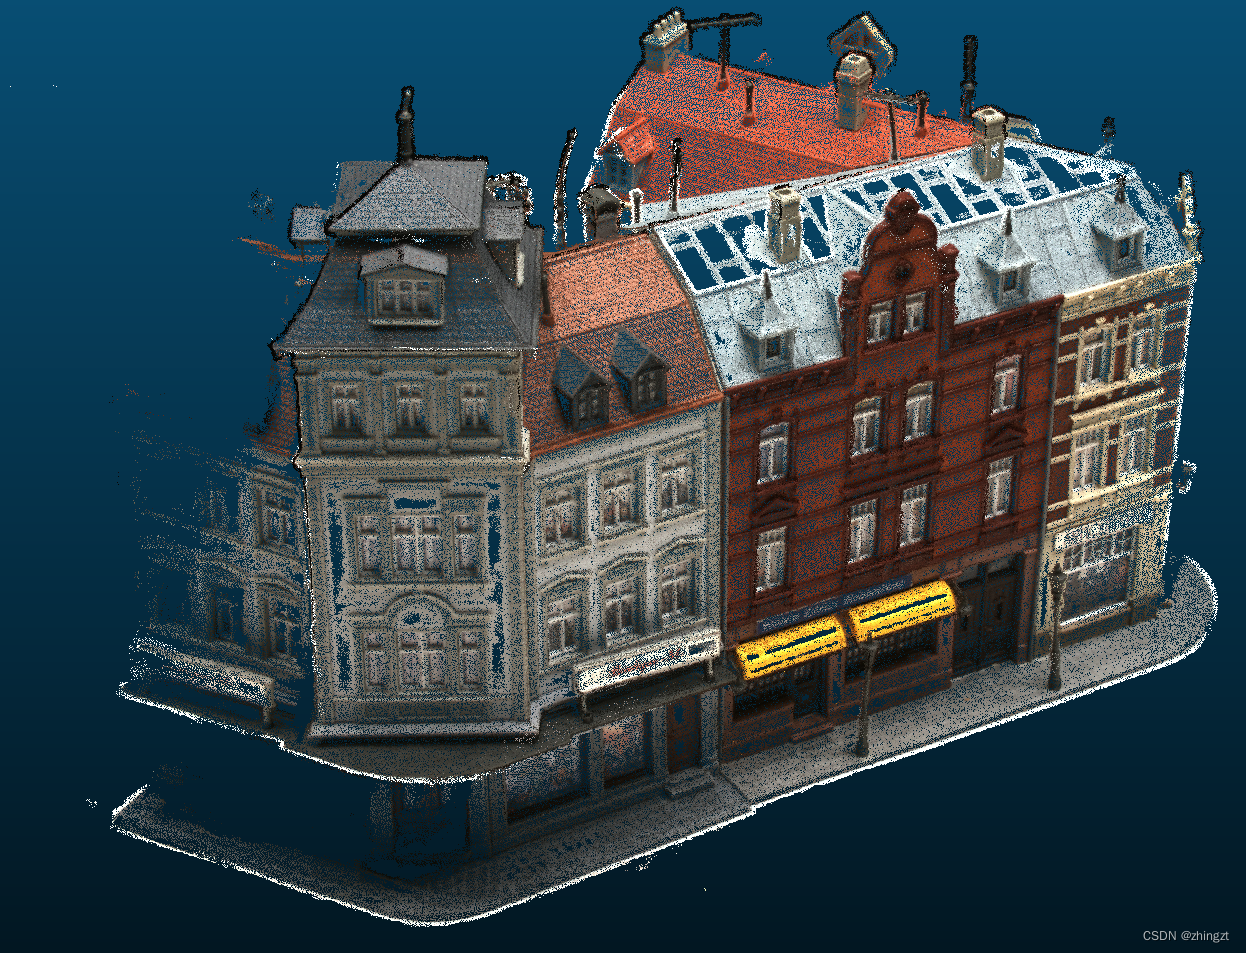
稠密点云
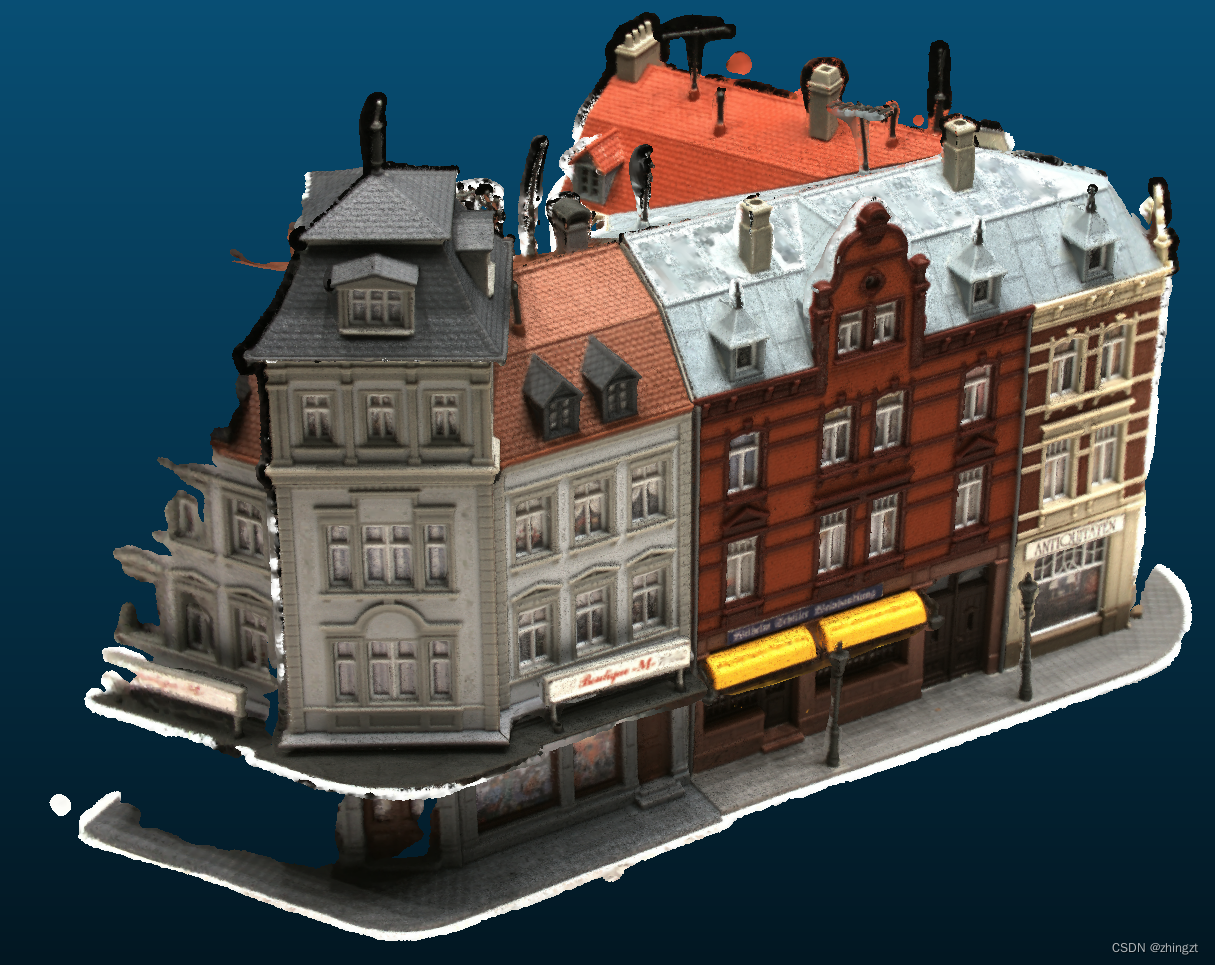
有纹理贴图的mesh化模型
1.3 colmap重启动
多次读取,步骤中间插入,可以参考。
COLMAP利用已知相机内外参重建NeRF的blender模型_colmap nerf_zParquet的博客-CSDN博客
1.3.1 colmap稀疏重建的内容的保存和读取
比如我希望做完稀疏重建后停掉,之后再怎么读取稀疏重建后的内容,然后继续做稠密重建呢?
读取:
1)前提:执行完6) start reconstruction之后,需要根据1.2中的内容进行export model。
2)File-open project-选择project.ini文件即可
3)File-import model-选择sparse文件夹 open即可。
4)后续可以正常进行稠密重建
1.3.2 colmap稀疏重建内容的格式转化
text2bin
colmap model_converter --input_path sparse --output_path sparse --output_type binbin2ply
colmap model_converter --input_path sparse --output_path sparse/sparse.ply --output_type PLYbin2txt
colmap model_converter --input_path sparse --output_path sparse --output_type TXT
2 ubuntu系统
为什么用ubuntu系统,(1)因为服务器是ubuntu系统的 (2)因为ubuntu下面可以用源码进行操作,还可以跟mvsnet放在一起,肯定是更方便的
注意这个系统必须要有gui界面(无论是物理显示屏还是虚拟显示屏),否则会出现后续的一系列问题,一般是没啥问题的。
2.1 ubuntu版本的colmap编译
(16条消息) colmap安装(ubuntu 18.04系统)_pxt999的博客-CSDN博客_colmap安装
参考上述文章进行安装
问题1:
编译colmap时候cmake .. 时,出现了如下报错
runtime library [libmpfr.so.6] in /usr/lib/x86_64-linux-gnu may be hidden by files in: /D/anaconda/lib
runtime library [libgmp.so.10] in /usr/lib/x86_64-linux-gnu may be hidden by files in: /D/anaconda/lib
大概是由于跟anaconda的环境有点冲突,所以最好能够屏蔽anaconda环境
尝试了如下做法
1、conda deactivate 退出anaconda环境,没有成功
2、更换path,没有成功
3、想法是把lib下面libmpfr.so.6开头的文件全都移动到某个文件夹里,自己把他屏蔽掉,编译完再把他移出来,尝试一下!记得最后把他移动回去!
mkdir /D/anaconda/lib/zt_lib
mv /D/anaconda/lib/libmpfr.so.6* /D/anaconda/lib/zt_lib
mv /D/anaconda/lib/libgmp.so.10* /D/anaconda/lib/zt_lib
mv /D/anaconda/lib/zt_lib/* /D/anaconda/lib  # 最后把他移动回去
可以避免anaconda冲突的问题了,但是又出现了新的问题:
问题2:
还是在cmake的时候出现的问题
Target "colmap_cuda" links to target "CUDA::cusparse" but the target was not found. Perhaps a find_package() call is missing for an IMPORTED target, or an ALIAS target is missing?尝试了如下做法:
1、是不是cuda坏了?
nvidia-smi确实报错了(报错和解决如下所示)
Failed to initialize NVML: Driver/library version mismatch - HarryPotterIsDead! - 博客园 (cnblogs.com)
虽然解决了cuda的问题,但是还是没啥用,该报错还是报错
2、在colmap自己的issue里找到了答案
When I run cmake .. ,Bug occurs. · Issue #1699 · colmap/colmap · GitHub
似乎是因为cmake的版本的问题
pip install cmake --upgrade
hash -r
升级了cmake之后,终于编译通过了!
所以以后记得可以在github里的issue里找,尤其是一些比较出名的project。
问题3:
make -j8 的时候连续出现一大片的LIBTIFF报错(最后还是报错了)
/usr/bin/ld: /usr/lib/gcc/x86_64-linux-gnu/9/../../../x86_64-linux-gnu/libfreeimage.so: undefined reference to `TIFFTileRowSize@LIBTIFF_4.0'
/usr/bin/ld: /usr/lib/gcc/x86_64-linux-gnu/9/../../../x86_64-linux-gnu/libfreeimage.so: undefined reference to `TIFFReadDirectory@LIBTIFF_4.0'
/usr/bin/ld: /usr/lib/gcc/x86_64-linux-gnu/9/../../../x86_64-linux-gnu/libfreeimage.so: undefined reference to `TIFFFieldTag@LIBTIFF_4.0'
/usr/bin/ld: /usr/lib/gcc/x86_64-linux-gnu/9/../../../x86_64-linux-gnu/libfreeimage.so: undefined reference to `TIFFCurrentDirectory@LIBTIFF_4.0'
/usr/bin/ld: /usr/lib/gcc/x86_64-linux-gnu/9/../../../x86_64-linux-gnu/libfreeimage.so: undefined reference to `TIFFIsTiled@LIBTIFF_4.0'
/usr/bin/ld: /usr/lib/gcc/x86_64-linux-gnu/9/../../../x86_64-linux-gnu/libfreeimage.so: undefined reference to `TIFFIsByteSwapped@LIBTIFF_4.0'
/usr/bin/ld: /usr/lib/gcc/x86_64-linux-gnu/9/../../../x86_64-linux-gnu/libfreeimage.so: undefined reference to `TIFFDefaultStripSize@LIBTIFF_4.0'
/usr/bin/ld: /usr/lib/gcc/x86_64-linux-gnu/9/../../../x86_64-linux-gnu/libfreeimage.so: undefined reference to `TIFFComputeStrip@LIBTIFF_4.0'
/usr/bin/ld: /usr/lib/gcc/x86_64-linux-gnu/9/../../../x86_64-linux-gnu/libfreeimage.so: undefined reference to `TIFFReadTile@LIBTIFF_4.0'
/usr/bin/ld: /usr/lib/gcc/x86_64-linux-gnu/9/../../../x86_64-linux-gnu/libfreeimage.so: undefined reference to `TIFFWriteScanline@LIBTIFF_4.0'
/usr/bin/ld: /D/anaconda/lib/libQt5Core.so.5.15.2: undefined reference to `std::__exception_ptr::exception_ptr::_M_release()@CXXABI_1.3.13'
/usr/bin/ld: /usr/lib/gcc/x86_64-linux-gnu/9/../../../x86_64-linux-gnu/libfreeimage.so: undefined reference to `TIFFGetField@LIBTIFF_4.0'
/usr/bin/ld: /usr/lib/gcc/x86_64-linux-gnu/9/../../../x86_64-linux-gnu/libfreeimage.so: undefined reference to `TIFFScanlineSize@LIBTIFF_4.0'
/usr/bin/ld: /usr/lib/gcc/x86_64-linux-gnu/9/../../../x86_64-linux-gnu/libfreeimage.so: undefined reference to `TIFFFieldWithTag@LIBTIFF_4.0'
/usr/bin/ld: /usr/lib/gcc/x86_64-linux-gnu/9/../../../x86_64-linux-gnu/libfreeimage.so: undefined reference to `TIFFTileSize@LIBTIFF_4.0'
/usr/bin/ld: /usr/lib/gcc/x86_64-linux-gnu/9/../../../x86_64-linux-gnu/libfreeimage.so: undefined reference to `TIFFWriteDirectory@LIBTIFF_4.0'
/usr/bin/ld: /usr/lib/gcc/x86_64-linux-gnu/9/../../../x86_64-linux-gnu/libfreeimage.so: undefined reference to `TIFFFieldName@LIBTIFF_4.0'
/usr/bin/ld: /usr/lib/gcc/x86_64-linux-gnu/9/../../../x86_64-linux-gnu/libfreeimage.so: undefined reference to `TIFFFieldReadCount@LIBTIFF_4.0'
/usr/bin/ld: /usr/lib/gcc/x86_64-linux-gnu/9/../../../x86_64-linux-gnu/libfreeimage.so: undefined reference to `TIFFGetTagListEntry@LIBTIFF_4.0'
/usr/bin/ld: /usr/lib/gcc/x86_64-linux-gnu/9/../../../x86_64-linux-gnu/libfreeimage.so: undefined reference to `TIFFClose@LIBTIFF_4.0'
/usr/bin/ld: /usr/lib/gcc/x86_64-linux-gnu/9/../../../x86_64-linux-gnu/libfreeimage.so: undefined reference to `TIFFClientOpen@LIBTIFF_4.0'
/usr/bin/ld: /usr/lib/gcc/x86_64-linux-gnu/9/../../../x86_64-linux-gnu/libfreeimage.so: undefined reference to `TIFFSetTagExtender@LIBTIFF_4.0'
/usr/bin/ld: /usr/lib/gcc/x86_64-linux-gnu/9/../../../x86_64-linux-gnu/libfreeimage.so: undefined reference to `TIFFGetTagListCount@LIBTIFF_4.0'
/usr/bin/ld: /usr/lib/gcc/x86_64-linux-gnu/9/../../../x86_64-linux-gnu/libfreeimage.so: undefined reference to `TIFFGetFieldDefaulted@LIBTIFF_4.0'
/usr/bin/ld: /usr/lib/gcc/x86_64-linux-gnu/9/../../../x86_64-linux-gnu/libfreeimage.so: undefined reference to `TIFFSwabArrayOfLong@LIBTIFF_4.0'
/usr/bin/ld: /usr/lib/gcc/x86_64-linux-gnu/9/../../../x86_64-linux-gnu/libfreeimage.so: undefined reference to `TIFFFieldPassCount@LIBTIFF_4.0'
/usr/bin/ld: /D/anaconda/lib/libQt5Widgets.so.5.15.2: undefined reference to `std::__throw_bad_array_new_length()@GLIBCXX_3.4.29'
/usr/bin/ld: /usr/lib/gcc/x86_64-linux-gnu/9/../../../x86_64-linux-gnu/libfreeimage.so: undefined reference to `TIFFSetSubDirectory@LIBTIFF_4.0'
/usr/bin/ld: /usr/lib/gcc/x86_64-linux-gnu/9/../../../x86_64-linux-gnu/libfreeimage.so: undefined reference to `TIFFStripSize@LIBTIFF_4.0'
/usr/bin/ld: /usr/lib/gcc/x86_64-linux-gnu/9/../../../x86_64-linux-gnu/libfreeimage.so: undefined reference to `TIFFFieldDataType@LIBTIFF_4.0'
/usr/bin/ld: /usr/lib/gcc/x86_64-linux-gnu/9/../../../x86_64-linux-gnu/libfreeimage.so: undefined reference to `_TIFFDataSize@LIBTIFF_4.0'
/usr/bin/ld: /usr/lib/gcc/x86_64-linux-gnu/9/../../../x86_64-linux-gnu/libfreeimage.so: undefined reference to `TIFFReadRGBAImage@LIBTIFF_4.0'
/usr/bin/ld: /usr/lib/gcc/x86_64-linux-gnu/9/../../../x86_64-linux-gnu/libfreeimage.so: undefined reference to `TIFFReadEncodedStrip@LIBTIFF_4.0'
/usr/bin/ld: /usr/lib/gcc/x86_64-linux-gnu/9/../../../x86_64-linux-gnu/libfreeimage.so: undefined reference to `TIFFSetField@LIBTIFF_4.0'
/usr/bin/ld: /usr/lib/gcc/x86_64-linux-gnu/9/../../../x86_64-linux-gnu/libfreeimage.so: undefined reference to `TIFFMergeFieldInfo@LIBTIFF_4.0'
/usr/bin/ld: /usr/lib/gcc/x86_64-linux-gnu/9/../../../x86_64-linux-gnu/libfreeimage.so: undefined reference to `TIFFDataWidth@LIBTIFF_4.0'
/usr/bin/ld: /D/anaconda/lib/libQt5Core.so.5.15.2: undefined reference to `std::__exception_ptr::exception_ptr::_M_addref()@CXXABI_1.3.13'
/usr/bin/ld: /usr/lib/gcc/x86_64-linux-gnu/9/../../../x86_64-linux-gnu/libfreeimage.so: undefined reference to `TIFFSetDirectory@LIBTIFF_4.0'
/usr/bin/ld: /usr/lib/gcc/x86_64-linux-gnu/9/../../../x86_64-linux-gnu/libfreeimage.so: undefined reference to `TIFFReadEXIFDirectory@LIBTIFF_4.0'是和anaconda的libtiff冲突了(和qt、gui有关)
尝试了其他方法都没成功(包括更改PATH,在cmakelist中加内容)
最后还是最暴力的卸载了anaconda中的libtiff
conda uninstall libtiff如果不通过的话可以多卸载几次(每次不通过一定要用如下命令把build文件夹下的内容全部删掉,否则重新make也没用)
rm -rf *问题4
由于服务器不具备图形化界面,所以不能有GUI,只能将GUI_ENABLED设置为FALSE
需要重新编译(刚刚编译好的东西需要uninstall一下)
1、回退编译进度
cd xxx/build  # 先进入到build文件夹
sudo make uninstall  # 卸载
rm -rf *  # 删除bulid文件夹下的编译进度
2、查看一下根目录(也就是最大的那个目录colmap)下面的CMAKELIST.txt,里面其实写到了一些关于GUI_ENABLED的东西
所以其实只要在用到GUI_ENABLED之前将其设为FALSE就可以。
set(GUI_ENABLED FALSE)确实解决了GUI的问题
问题5
似乎编译出了一个用不上cuda的colmap
ERROR: Cannot use Sift GPU without CUDA or OpenGL support; set SiftExtraction.use_gpu or SiftMatching.use_gpu to false.
不要直接git clone最新的colmap,在旁边的release下载3.7的source code就可以了。
问题6
‘LocalParameterization’ is not a member of ‘ceres’
似乎是ceres的版本太高了,打算将2.1退回到2.0版本,因为看到有人2.0成功了。
问题7
'GL_LUMINANCE' was not declared in this scope
因为,Disabling GUI will also disable OpenGL(这是colmap设定好了的)
而不用openGL的话,sift_gpu用不了,所以到头来,CUDA和GUI必须要有。
后续就再也没遇到过报错了,一路都顺下来了,也能正常的做特征提取了(在有gui的前提下),但是过程中还是遇到了一些cuda的warning,不确定是不是有问题,还是打算重新编译一下,据说是要用2.1版本的ceres加固定c++14进行编译。
cmake .. -DCUDA_ENABLED=ON -DCUDA_NVCC_FLAGS="--std c++14" # 可以固定c++14版本编译完之后没有什么区别,所以也无所谓了。
问题8
fatal error: cusolverDn.h主要是由于没有安装cuda版本,所以无法编译。
安装ceres-solver出现fatal error: cusolverDn.h_chenhaoooooooo的博客-CSDN博客
问题9
make的时候在如下步骤报错:
Built target flann

make: *** [Makefile:136:all]
这个报错没有能对应到什么实质性的东西,也很难查到相对应的解决方案。
但我们在回滚看整个make过程的时候又发现了如下问题:
nvcc fatal : Unsupported gpu architecture 'compute_35'这个报错查下来主要是由于cuda版本和gpu不对应。
查了下cuda版本
nvcc --version确实显示了cuda12.1,和原先的cuda11.4完全不同了,因此确实cuda被动过了。
因此应该切换回cuda11.4,只要改软连接就可以了。
sudo rm -rf /usr/local/cuda    #删除之前创建的软链接
sudo ln -s /usr/local/cuda-11.4 /usr/local/cuda    #创建链接到cuda11.4的软链接
nvcc --version    #查看当前cuda版本
这样就成功了,如下colmap可以正常编译了。
问题10(记一次恐怖的colmap重编译经历)
由于我们是使用远程teamviewer链接服务器,突然teamviewer崩溃了,也考虑到teamviewer本身也不是那么好用,所以我们考虑卸载teamviewer,安装其他的远程控制软件实现。最后选定了todesk。但是上述的一系列安装卸载等等似乎破坏了环境。
所以就在执行如下命令调用colmap的时候出现了如下问题:
QOpenGLWidget: Failed to create context大概的原因:可能是qt环境错了,按照colmap中的issue指定qt位置也不对(主要是也不知道什么qt是对的)
Help - QOpenGLWidget: failed to create context · Issue #749 · colmap/colmap · GitHub
最后还是重编译才成功的,但是重编译也有很多小问题,反正挺麻烦的。
2.2 colmap使用
参照官方github和教程文档
GitHub - colmap/colmap: COLMAP - Structure-from-Motion and Multi-View Stereo
Tutorial — COLMAP 3.8 documentation
(24条消息) COLMAP简明教程 重建 转化深度图 导出相机参数 导入相机参数 命令行_BigYouYou的博客-CSDN博客_colmap导出相机参数
2.2.1 gui使用
1)命令行输入colmap gui打开gui界面
2)其余操作和windows系统完全一致(参考本文的1.2)
2.2.2 命令行使用


 388
388

 被折叠的 条评论
为什么被折叠?
被折叠的 条评论
为什么被折叠?
 到【灌水乐园】发言


