


老版NGUI的Example 1里面提供演示NGUI中使用UIAnchor组件实现GUI对齐功能,新版本的NGUI的Example例子貌似不再使用UIAnchor了,而是演示Widget内置的Anchor的新功能,我学Uinty3d的时候,NGUI已经是比较新的版本了,所以这里分析一下新Anchor的功能.Anchor其实并不复杂,Anchor的意思就是锚点或抛锚,只要设置了UIWidget的Anchor属性,就可以挂到任意节点上面,随着抛锚的位置变化而变化。
下面是新版Anchor用到的类的介绍:
一.AnchorPoint 锚点类,UIRect的内部的嵌套类
public Transform target;//抛锚目标点
public Camera targetCam;//目标相机
public UIRect rect;//目标的UIRect组件
public float relative = 0f; //相对距离比例
public int absolute = 0;//锚点跟目标的边距离
GetSides(Transform relativeTo)) // 获得目标变相对于当前的局部矩形范围
二.UIRect 抽象类,Widget的父类,所有UI组件的祖宗
UIRect里面有4跟Achor相关的关键属性:
public AnchorPoint leftAnchor = new AnchorPoint();// 左边锚点
public AnchorPoint rightAnchor = new AnchorPoint(1f);// 右边锚点
public AnchorPoint bottomAnchor = new AnchorPoint();// 底部锚点
public AnchorPoint topAnchor = new AnchorPoint(1f);// 顶部锚点
//锚点更新类型,决定什么时候执行锚点逻辑OnUpdate表示每帧执行,OnEnable表示脚本激活的时候执行
public AnchorUpdate updateAnchors = AnchorUpdate.OnUpdate;
Update () 方法:
//如果锚点的更新类型是OnUpdate
if (updateAnchors == AnchorUpdate.OnUpdate || mUpdateAnchors)
{
mUpdateFrame = frame;
mUpdateAnchors = false;
bool anchored = false;
//如果锚点目标存在 则执行目标的Update方法
if (leftAnchor.target)
{
anchored = true;
if (leftAnchor.rect != null && leftAnchor.rect.mUpdateFrame != frame)
leftAnchor.rect.Update();
}
if (bottomAnchor.target)
{
anchored = true;
if (bottomAnchor.rect != null && bottomAnchor.rect.mUpdateFrame != frame)
bottomAnchor.rect.Update();
}
......中间省略
// 更新锚点对齐逻辑
if (anchored) OnAnchor();
}
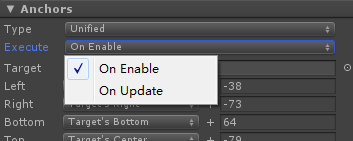
从上面的方法可以看出,当锚点更新类型是OnUpdate时,会先调用目标的Update方法,如果自顶向下都有锚点且都是OnUpdate类型,就会一直递归至顶层开始顺序调用OnAnchor,而且每帧都会调用,这会很消耗cpu,非常蛋疼,所以在AnchorUpdate类型最好不要设置为OnUpdate ,应该设置为OnEnable,如下图:
如果锚点的目标也有锚点的话,比如A的锚点目标是B,B的锚点是C,如果存在这种多层锚点的情况,设置为OnEnable可能会有问题,所以尽量不要出现多层的情况.
三.UIWidget类 实现锚点的具体逻辑
OnAnchor()方法 更新锚点相关逻辑
部分代码:
//如果4个顶点绑定到同一个对象上
if (leftAnchor.target == bottomAnchor.target &&
leftAnchor.target == rightAnchor.target &&
leftAnchor.target == topAnchor.target)
{
//获得父对象相对于当前对象的4条边的位置,顺序是左,上,右,下
Vector3[] sides = leftAnchor.GetSides(parent);
if (sides != null)
{
// 左边位置 = 父对象左边位置 + 左边边距 (leftAnchor的relative为0,lerp运算得出结果是sides[0].x)
lt = NGUIMath.Lerp(sides[0].x, sides[2].x, leftAnchor.relative) + leftAnchor.absolute;
// 右边位置 = 父对象右边位置 + 右边边距 (rightAnchor的relative为1,Lerp运算得出结果是sides[2].x)
rt = NGUIMath.Lerp(sides[0].x, sides[2].x, rightAnchor.relative) + rightAnchor.absolute;
// 底部位置 = 父对象底部位置 + 底部边距 (bottomAnchor的relative为0,Lerp运算得出结果是sides[3].y)
bt = NGUIMath.Lerp(sides[3].y, sides[1].y, bottomAnchor.relative) + bottomAnchor.absolute;
// 顶部位置 = 父对象顶部位置 + 顶部边距 (topAnchor的relative为1,Lerp运算得出结果是sides[1].y)
tt = NGUIMath.Lerp(sides[3].y, sides[1].y, topAnchor.relative) + topAnchor.absolute;
}
}
//relative并不一定是固定的,如果如果目标的锚点位置设置为center的话,relative会设置为0.5
......
//计算新的位置,和大小
Vector3 newPos = new Vector3(Mathf.Lerp(lt, rt, pvt.x), Mathf.Lerp(bt, tt, pvt.y), pos.z);
int w = Mathf.FloorToInt(rt - lt + 0.5f);
int h = Mathf.FloorToInt(tt - bt + 0.5f);
cachedTransform.localPosition = newPos;
mWidth = w;
mHeight = h;

总结:当设置了锚点目标的时候,锚点对象就的空间属性就不仅由自己决定了,对象会通过父节点的位置和大小变化情况,而更新自己的位置和大小。Anchor类型最好设置为OnEnable,尽量不要出现多层锚点.


 1501
1501


 被折叠的 条评论
为什么被折叠?
被折叠的 条评论
为什么被折叠?
 到【灌水乐园】发言


