


深度学习目标检测算法通过大量训练学习火灾烟雾数据集 建立基于深度学习YOLO V8的火灾烟雾检测识别系统
文章目录
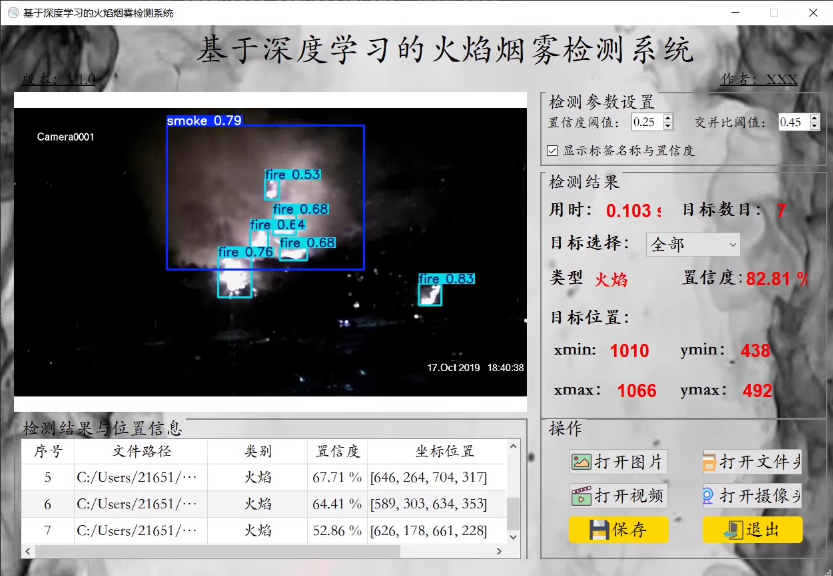
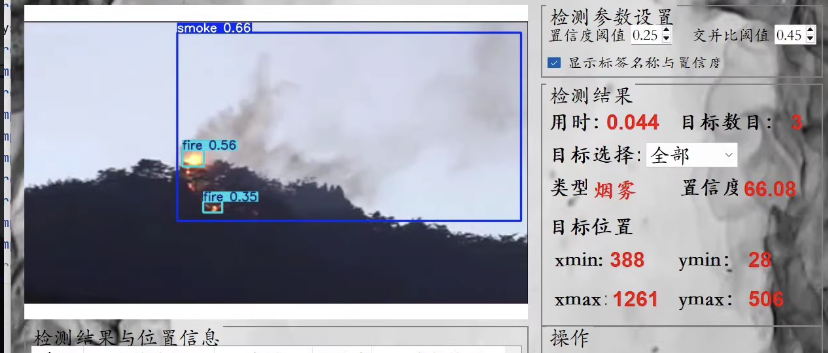
基于深度学习YOLO V8的火灾烟雾检测识别系统
数据集
类别:[“fire”,“smoke”]
构建一个基于YOLOv8的火灾烟雾监控检测识别系统,涉及多个步骤:数据准备、环境搭建、模型训练、超参数配置、模型推理、批量推理以及性能评估。以下是详细的实现步骤和代码示例。
1. 数据准备
数据集结构
确保你的数据集结构如下:
fire_smoke_dataset/
├── images/
│   ├── train/
│   └── val/
└── labels/
    ├── train/
    └── val/
数据标注
每个图像文件对应一个.txt文件,格式为YOLO适用的标注格式,每行包含类别ID和边界框信息(归一化后的中心点坐标和宽高)。
例如:
0 0.5 0.5 0.2 0.2
1 0.7 0.3 0.1 0.1
数据划分
将数据集按比例划分为训练集和验证集(例如9:1)。
import os
import random
from shutil import copyfile

# 定义数据集路径
dataset_path = 'fire_smoke_dataset'
images_path = os.path.join(dataset_path, 'images')
labels_path = os.path.join(dataset_path, 'labels')

# 创建目录
os.makedirs(images_path, exist_ok=True)
os.makedirs(labels_path, exist_ok=True)

# 获取所有图像文件
image_files = [f for f in os.listdir(dataset_path) if f.endswith('.jpg') or f.endswith('.png')]
random.shuffle(image_files)

# 按比例划分训练集和验证集
train_ratio = 0.9
train_size = int(len(image_files) * train_ratio)
train_images = image_files[:train_size]
val_images = image_files[train_size:]

# 复制文件到对应的目录
for img_file in train_images:
    label_file = img_file.replace('.jpg', '.txt').replace('.png', '.txt')
    copyfile(os.path.join(dataset_path, img_file), os.path.join(images_path, 'train', img_file))
    copyfile(os.path.join(dataset_path, label_file), os.path.join(labels_path, 'train', label_file))

for img_file in val_images:
    label_file = img_file.replace('.jpg', '.txt').replace('.png', '.txt')
    copyfile(os.path.join(dataset_path, img_file), os.path.join(images_path, 'val', img_file))
    copyfile(os.path.join(dataset_path, label_file), os.path.join(labels_path, 'val', label_file))
2. 环境搭建
安装依赖
# 创建并激活虚拟环境
conda create -n fire_smoke_detection python=3.8
conda activate fire_smoke_detection

# 安装YOLOv8和相关库
pip install ultralytics
3. 数据配置
在fire_smoke_dataset/目录下创建一个名为data.yaml的数据配置文件,内容如下:
train: ./fire_smoke_dataset/images/train/
val: ./fire_smoke_dataset/images/val/

nc: 2
names: ['fire', 'smoke']
4. 模型训练
使用YOLOv8进行训练
yolo task=detect mode=train model=yolov8s.pt data=fire_smoke_dataset/data.yaml epochs=100 imgsz=640 batch=16
5. 配置超参数
在训练过程中,可以通过修改配置文件来设置超参数。以下是一些常见的超参数及其说明:
epochs: 训练周期数,默认值通常为100。batch: 批处理大小,默认值取决于你的硬件能力。imgsz: 输入图像尺寸,默认640像素。可以根据需要调整以提高性能或精度。lr0: 初始学习率,默认值通常为0.01。
例如,在命令行中使用如下命令进行训练:
yolo task=detect mode=train model=yolov8s.pt data=fire_smoke_dataset/data.yaml epochs=100 imgsz=640 batch=16 lr0=0.01
6. 模型推理
单张图片推理
from ultralytics import YOLO
import cv2

# 加载预训练模型
model = YOLO('runs/detect/train/weights/best.pt')

# 单张图片推理
def infer_image(image_path):
    results = model(image_path)
    annotated_frame = results[0].plot()
    return annotated_frame

# 示例:对单张图片进行火灾烟雾检测
annotated_frame = infer_image('path/to/test_image.jpg')
cv2.imshow('Fire and Smoke Detection', annotated_frame)
cv2.waitKey(0)
cv2.destroyAllWindows()
7. 批量推理
import os

def batch_infer_images(directory):
    for filename in os.listdir(directory):
        if filename.endswith(".jpg") or filename.endswith(".png"):
            image_path = os.path.join(directory, filename)
            annotated_frame = infer_image(image_path)
            cv2.imwrite(f"output_{filename}", annotated_frame)

# 示例:对目录中的所有图片进行火灾烟雾检测
batch_infer_images('fire_smoke_dataset/images/val')
8. 性能评估
mAP计算
YOLOv8自带评估功能,可以在验证集上计算mAP。
yolo task=detect mode=val model=runs/detect/train/weights/best.pt data=fire_smoke_dataset/data.yaml imgsz=640
自定义评估脚本
如果你想要更详细的评估指标,比如针对特定类别的准确率和召回率,可以编写自定义脚本。
from sklearn.metrics import precision_recall_fscore_support

def evaluate_model(model, dataset):
    all_preds = []
    all_labels = []

    for images, labels in dataset:
        preds = model(images)
        pred_classes = [int(pred.cls[0]) for pred in preds]
        true_classes = labels.numpy().flatten()

        all_preds.extend(pred_classes)
        all_labels.extend(true_classes)

    precision, recall, f1, _ = precision_recall_fscore_support(all_labels, all_preds, average='weighted')
    print(f'Precision: {precision:.2f}, Recall: {recall:.2f}, F1 Score: {f1:.2f}')

# 示例:评估模型性能
evaluate_model(model, val_dataset)
根据你提供的项目结构和文件列表,我将为你提供一个完整的代码框架,包括数据准备、环境搭建、模型训练、超参数配置、模型推理、批量推理以及性能评估等步骤。以下是每个部分的详细说明和示例代码。
1. 数据准备
数据集结构
确保你的数据集结构如下:
datasets/
├── images/
│   ├── train/
│   └── val/
└── labels/
    ├── train/
    └── val/
数据标注
每个图像文件对应一个.txt文件,格式为YOLO适用的标注格式,每行包含类别ID和边界框信息(归一化后的中心点坐标和宽高)。
例如:
0 0.5 0.5 0.2 0.2
1 0.7 0.3 0.1 0.1
数据划分
将数据集按比例划分为训练集和验证集(例如9:1)。
# datasets/data_split.py
import os
import random
from shutil import copyfile

def split_dataset(dataset_path, output_path, train_ratio=0.9):
    # 创建目录
    os.makedirs(os.path.join(output_path, 'images', 'train'), exist_ok=True)
    os.makedirs(os.path.join(output_path, 'images', 'val'), exist_ok=True)
    os.makedirs(os.path.join(output_path, 'labels', 'train'), exist_ok=True)
    os.makedirs(os.path.join(output_path, 'labels', 'val'), exist_ok=True)

    # 获取所有图像文件
    image_files = [f for f in os.listdir(dataset_path) if f.endswith('.jpg') or f.endswith('.png')]
    random.shuffle(image_files)

    # 按比例划分训练集和验证集
    train_size = int(len(image_files) * train_ratio)
    train_images = image_files[:train_size]
    val_images = image_files[train_size:]

    # 复制文件到对应的目录
    for img_file in train_images:
        label_file = img_file.replace('.jpg', '.txt').replace('.png', '.txt')
        copyfile(os.path.join(dataset_path, img_file), os.path.join(output_path, 'images', 'train', img_file))
        copyfile(os.path.join(dataset_path, label_file), os.path.join(output_path, 'labels', 'train', label_file))

    for img_file in val_images:
        label_file = img_file.replace('.jpg', '.txt').replace('.png', '.txt')
        copyfile(os.path.join(dataset_path, img_file), os.path.join(output_path, 'images', 'val', img_file))
        copyfile(os.path.join(dataset_path, label_file), os.path.join(output_path, 'labels', 'val', label_file))

# 使用示例
split_dataset('path/to/dataset', 'path/to/output')
2. 环境搭建
安装依赖
在UIProgram目录下创建一个requirements.txt文件,列出所有需要的依赖包。
ultralytics
opencv-python
numpy
torch
然后使用以下命令安装依赖:
pip install -r requirements.txt
3. 数据配置
在datasets目录下创建一个名为data.yaml的数据配置文件,内容如下:
train: ./images/train/
val: ./images/val/

nc: 2
names: ['fire', 'smoke']
4. 模型训练
训练脚本
在UIProgram目录下创建一个train.py文件,用于训练模型。
# UIProgram/train.py
from ultralytics import YOLO

def train_model(data_yaml, model='yolov8s.pt', epochs=100, imgsz=640, batch=16):
    model = YOLO(model)
    results = model.train(data=data_yaml, epochs=epochs, imgsz=imgsz, batch=batch)
    return results

if __name__ == "__main__":
    data_yaml = 'datasets/data.yaml'
    train_model(data_yaml)
5. 配置超参数
在训练过程中,可以通过修改配置文件来设置超参数。以下是一些常见的超参数及其说明:
epochs: 训练周期数,默认值通常为100。batch: 批处理大小,默认值取决于你的硬件能力。imgsz: 输入图像尺寸,默认640像素。可以根据需要调整以提高性能或精度。lr0: 初始学习率,默认值通常为0.01。
6. 模型推理
单张图片推理
在UIProgram目录下创建一个detect_tools.py文件,用于单张图片推理。
# UIProgram/detect_tools.py
from ultralytics import YOLO
import cv2

def infer_image(model_path, image_path):
    model = YOLO(model_path)
    results = model(image_path)
    annotated_frame = results[0].plot()
    return annotated_frame

if __name__ == "__main__":
    model_path = 'runs/detect/train/weights/best.pt'
    image_path = 'path/to/test_image.jpg'
    annotated_frame = infer_image(model_path, image_path)
    cv2.imshow('Fire and Smoke Detection', annotated_frame)
    cv2.waitKey(0)
    cv2.destroyAllWindows()
7. 批量推理
在UIProgram目录下创建一个imgTest.py文件,用于批量图片推理。
# UIProgram/imgTest.py
import os
from detect_tools import infer_image

def batch_infer_images(model_path, directory):
    for filename in os.listdir(directory):
        if filename.endswith(".jpg") or filename.endswith(".png"):
            image_path = os.path.join(directory, filename)
            annotated_frame = infer_image(model_path, image_path)
            cv2.imwrite(f"output_{filename}", annotated_frame)

if __name__ == "__main__":
    model_path = 'runs/detect/train/weights/best.pt'
    directory = 'path/to/images'
    batch_infer_images(model_path, directory)
8. 性能评估
mAP计算
YOLOv8自带评估功能,可以在验证集上计算mAP。
yolo task=detect mode=val model=runs/detect/train/weights/best.pt data=datasets/data.yaml imgsz=640
自定义评估脚本
在UIProgram目录下创建一个evaluate.py文件,用于自定义评估。
# UIProgram/evaluate.py
from sklearn.metrics import precision_recall_fscore_support
from ultralytics import YOLO
import torch

def evaluate_model(model_path, dataset):
    model = YOLO(model_path)
    all_preds = []
    all_labels = []

    for images, labels in dataset:
        preds = model(images)
        pred_classes = [int(pred.cls[0]) for pred in preds]
        true_classes = labels.numpy().flatten()

        all_preds.extend(pred_classes)
        all_labels.extend(true_classes)

    precision, recall, f1, _ = precision_recall_fscore_support(all_labels, all_preds, average='weighted')
    print(f'Precision: {precision:.2f}, Recall: {recall:.2f}, F1 Score: {f1:.2f}')

if __name__ == "__main__":
    model_path = 'runs/detect/train/weights/best.pt'
    dataset = ...  # 加载你的验证集数据
    evaluate_model(model_path, dataset)
如何在YOLOv8基础上构建火灾烟雾监控检测识别系统的完整指南,包括数据准备、环境搭建、模型训练、超参数配置、模型推理、批量推理以及性能评估代码。关键代码示例。


 682
682

 被折叠的 条评论
为什么被折叠?
被折叠的 条评论
为什么被折叠?
 到【灌水乐园】发言


