


引言:前两周,「Cocos Star Writer」Nowpaper 在《笼中窥梦》视错觉效果的实现中使用了 RenderToTexture 技术,本次 Nowpaper 将继续拓展 RenderToTexture 的使用法。
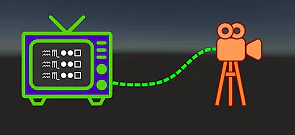
RenderToTexture 是个非常有趣的技术,它能够将一个摄像机画面渲染成纹理,然后和材质结合,让某一个 Mesh 显示成指定的画面。在游戏开发中,它被广泛用于实现镜子、监视器画面、瞄准镜、传送门,甚至用户界面显示、动态纹理喷涂等。

在 Cocos Creator 3.4 以后的版本中,RenderToTexture 技术已经相对完善,使用起来也更加方便。在我之前的传送门分享中,传送门里的画面就使用了这个技术来实现,当时还得写一些代码,而现在只需要在编辑器中编辑,就可以轻松实现可渲染纹理了。
今天我们将继续拓展一下,使用 RenderToTexture 做一个瞄准镜以及显示指定摄像机的画面监视器。
PS.源码和视频教程见文末。本次使用的是 v3.5。
准备
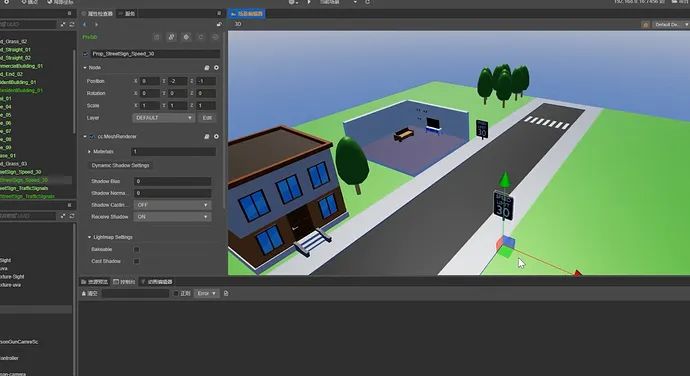
首先新建一个项目并搭建游戏场景。我这里就搭建一个简单的街道,包含一些物体,让场景看起来稍微不那么单调。
瞄准镜
一般来说当角色瞄准的时候,我们可以看到在镜头中,显示的画面被放大,视觉更加前向。
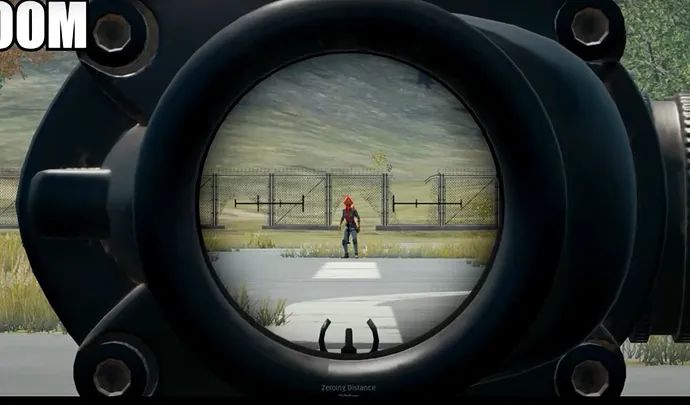
这个效果的原理其实就是:在枪械的瞄准位置增加一个摄像机,然后将摄像机的画面渲染到一个纹理上。
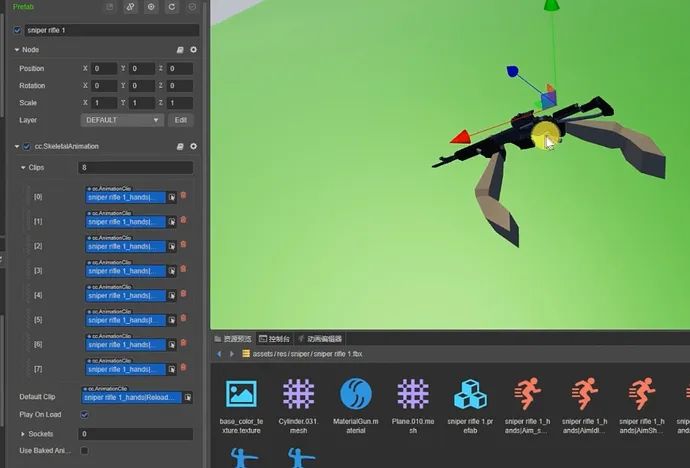
这样的话事情就简单了。我准备了一个枪械,它带有瞄准动画,现在为他增加一个第一人称摄像机,通过调整让它看起来比较合适。
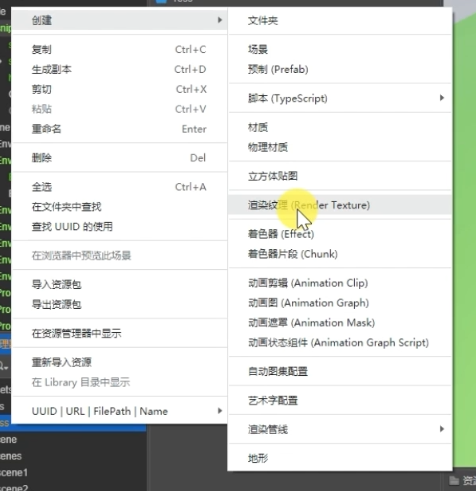
现在新建一个可渲染纹理:
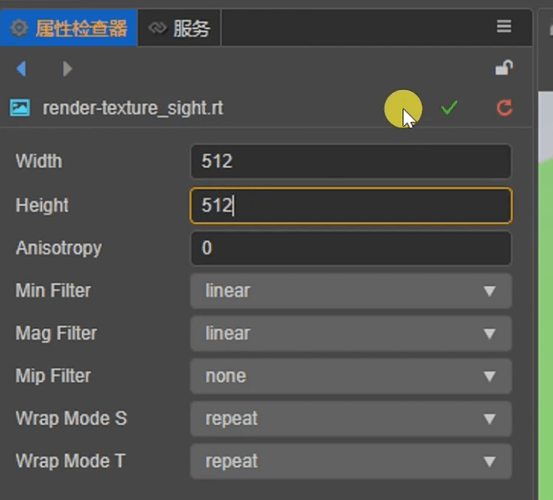
图像宽高数值默认都是1,这个需要我们依据自己的情况作修改,通常是按照视口的大小比例来调整。如果要想完美适配的话,最好是代码中作一些控制,在这里我们就直接使用 512x512:
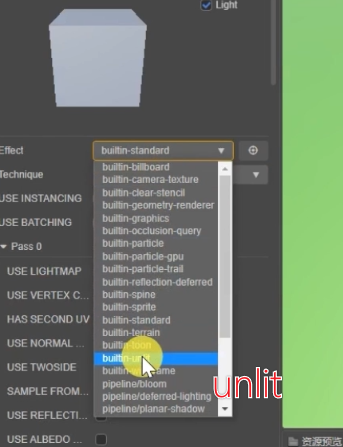
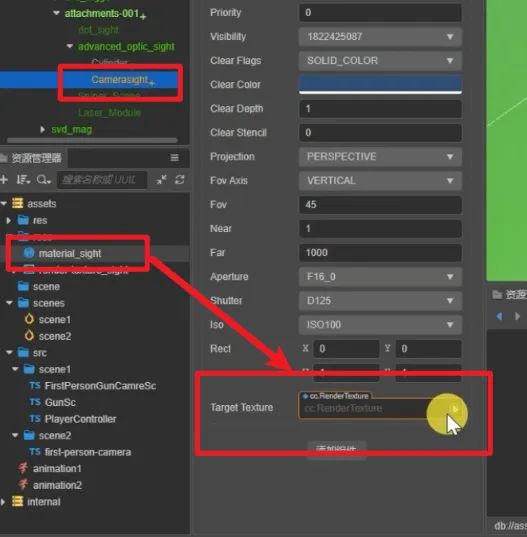
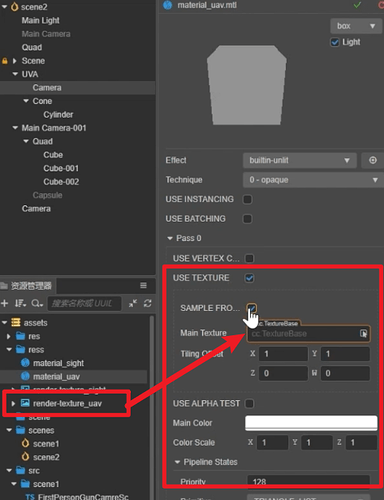
现在再创建一个材质:
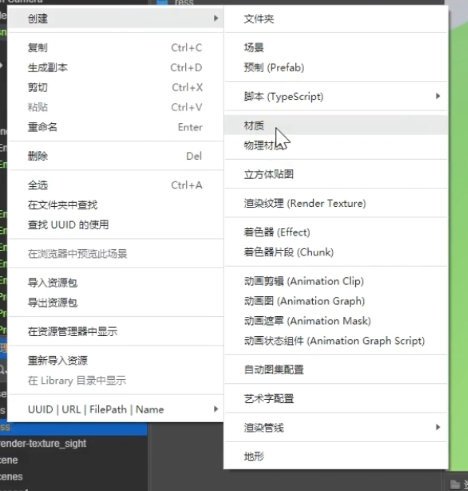
着色器选择为内置-unlit:
开启 UseTexture,勾选 RTTexture 选项,将刚刚新建的可渲染纹理拖动进下面的引用中:

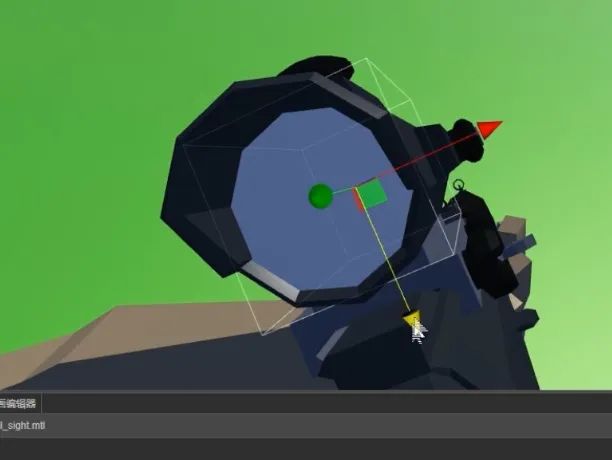
现在为瞄准镜建立一个圆形面片。一般来说建模师会提供一个,在这里我们就直接自己放个圆柱形,通过节点调整到对应的 Node 中:

现在选择枪械的动画,去掉动画预烘培:
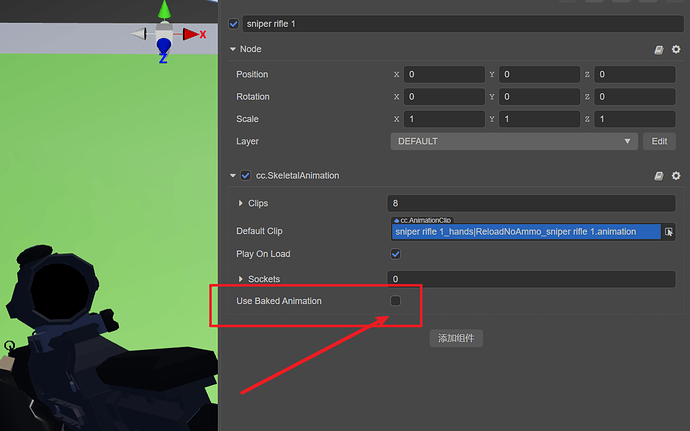
关于动画控制脚本,在这里就不提供了,播放 Animation 的指定动画即可:
选择这个圆柱,将它的材质更换为刚刚创建的瞄准镜材质:

接下来在瞄准组件中添加一个摄像机,并且调整好位置,拍摄倍率直接修改 Fov 数值即可:
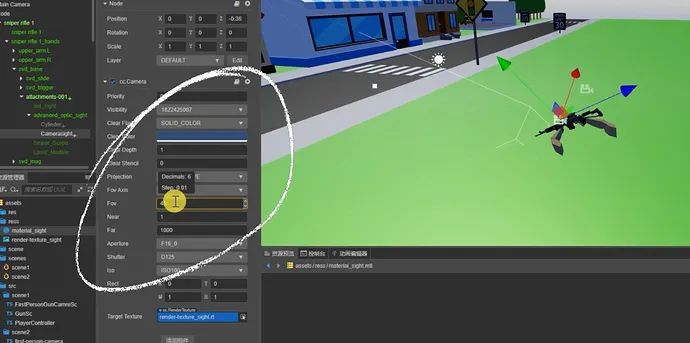
根据摄像机预览画面,调整好数值以后,往下拉到最下面,在 RenderToTexture 中,将之前建立的名为「瞄准镜」的可渲染纹理,拖进其中:
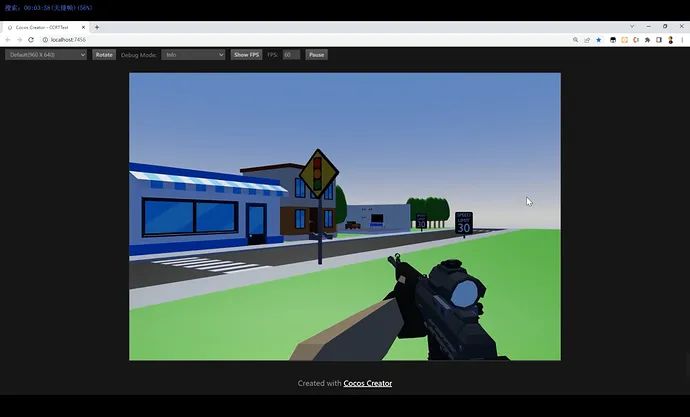
如果一切顺利,我们可能直接就在编辑器中看到效果。现在运行一下(我这里使用了自定义脚本,让瞄准的动作看起来更加准确),你可以看到在瞄准镜中已经有了放大的画面,我们再走动一下瞄准不同的地方试试:
到此为止,瞄准镜的实现就已经搞定了,是不是很简单呢,下面我们试一下监视器效果。
监视器
在很多游戏中,玩家可以通过监视器屏幕看到摄像头传来的数据,这类效果同样也是使用 RenderToTexture 实现。本次我们将做一个无人机控制板+一个街头的摄像机。
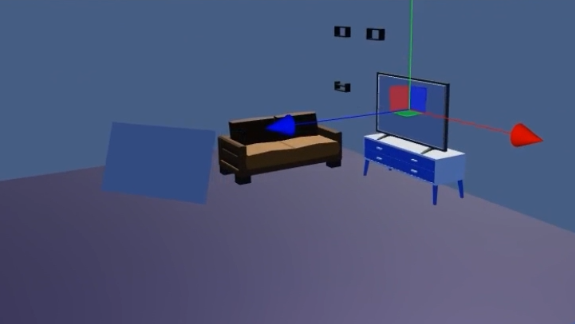
同样也是使用前面搭建的街景,在这个房间场景中,我们用一个框框来表示无人机控制板;而监视器的画面则直接投射到电视中。完成了这两个后,将空间中的面片放置到准确位置,并且放置一个摄像机观察场景:

新建一个可渲染纹理,命名为「无人机」,同样建立一个材质,着色器选内置-unlit,然后选择 UseTexture,勾选 RT,下面选择对应的可渲染纹理。这里我们就不新建监视器的渲染纹理和材质了,直接使用之前瞄准镜的即可:
现在分别建立两个摄像机,为方便观察将无人机简单做成一个小飞机的样子:
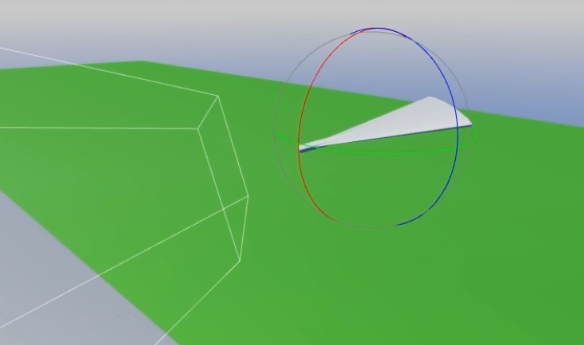
然后将街头摄像机摆好俯视即可,适当地作一些脚本完成控制,这些脚本如下:
first-person-camera.ts 来自官方例子工程:
import { _decorator, Component, math, systemEvent, SystemEvent, KeyCode, game, cclegacy, Touch, EventKeyboard, EventMouse } from "cc";
const { ccclass, property, menu } = _decorator;
const v2_1 = new math.Vec2();
const v2_2 = new math.Vec2();
const v3_1 = new math.Vec3();
const qt_1 = new math.Quat();
const id_forward = new math.Vec3(0, 0, 1);
const KEYCODE = {
 W: 'W'.charCodeAt(0),
 S: 'S'.charCodeAt(0),
 A: 'A'.charCodeAt(0),
 D: 'D'.charCodeAt(0),
 Q: 'Q'.charCodeAt(0),
 E: 'E'.charCodeAt(0),
 w: 'w'.charCodeAt(0),
 s: 's'.charCodeAt(0),
 a: 'a'.charCodeAt(0),
 d: 'd'.charCodeAt(0),
 q: 'q'.charCodeAt(0),
 e: 'e'.charCodeAt(0),
 SHIFT: KeyCode.SHIFT_LEFT ,
};

@ccclass("COMMON.FirstPersonCamera")
@menu("common/FirstPersonCamera")
export class FirstPersonCamera extends Component {

 @property
 moveSpeed = 1;

 @property
 moveSpeedShiftScale = 5;

 @property({ slide: true, range: [0.05, 0.5, 0.01] })
 damp = 0.2;

 @property
 rotateSpeed = 1;

 _euler = new math.Vec3();
 _velocity = new math.Vec3();
 _position = new math.Vec3();
 _speedScale = 1;

 onLoad() {
  math.Vec3.copy(this._euler, this.node.eulerAngles);
  math.Vec3.copy(this._position, this.node.position);
 }

 onDestroy() {
  this._removeEvents();
 }

 onEnable() {
  this._addEvents();
 }

 onDisable() {
  this._removeEvents();
 }
 update(dt: number) {
  // position
  math.Vec3.transformQuat(v3_1, this._velocity, this.node.rotation);
  math.Vec3.scaleAndAdd(this._position, this._position, v3_1, this.moveSpeed * this._speedScale);
  math.Vec3.lerp(v3_1, this.node.position, this._position, dt / this.damp);
  this.node.setPosition(v3_1);
  // rotation
  math.Quat.fromEuler(qt_1, this._euler.x, this._euler.y, this._euler.z);
  math.Quat.slerp(qt_1, this.node.rotation, qt_1, dt / this.damp);
  this.node.setRotation(qt_1);
 }

 private _addEvents() {
  systemEvent.on(SystemEvent.EventType.MOUSE_WHEEL, this.onMouseWheel, this);
  systemEvent.on(SystemEvent.EventType.KEY_DOWN, this.onKeyDown, this);
  systemEvent.on(SystemEvent.EventType.KEY_UP, this.onKeyUp, this);
  systemEvent.on(SystemEvent.EventType.TOUCH_MOVE, this.onTouchMove, this);
  systemEvent.on(SystemEvent.EventType.TOUCH_END, this.onTouchEnd, this);
 }

 private _removeEvents() {
  systemEvent.off(SystemEvent.EventType.MOUSE_WHEEL, this.onMouseWheel, this);
  systemEvent.off(SystemEvent.EventType.KEY_DOWN, this.onKeyDown, this);
  systemEvent.off(SystemEvent.EventType.KEY_UP, this.onKeyUp, this);
  systemEvent.off(SystemEvent.EventType.TOUCH_MOVE, this.onTouchMove, this);
  systemEvent.off(SystemEvent.EventType.TOUCH_END, this.onTouchEnd, this);
 }

 onMouseWheel(e: EventMouse) {
  const delta = -e.getScrollY() * this.moveSpeed / 24; // delta is positive when scroll down
  math.Vec3.transformQuat(v3_1, id_forward, this.node.rotation);
  math.Vec3.scaleAndAdd(v3_1, this.node.position, v3_1, delta);
  this.node.setPosition(v3_1);
 }

 onKeyDown(e: EventKeyboard) {
  const v = this._velocity;
  if (e.keyCode === KEYCODE.SHIFT) { this._speedScale = this.moveSpeedShiftScale; }
  else if (e.keyCode === KEYCODE.W || e.keyCode === KEYCODE.w) { if (v.z === 0) { v.z = -1; } }
  else if (e.keyCode === KEYCODE.S || e.keyCode === KEYCODE.s) { if (v.z === 0) { v.z = 1; } }
  else if (e.keyCode === KEYCODE.A || e.keyCode === KEYCODE.a) { if (v.x === 0) { v.x = -1; } }
  else if (e.keyCode === KEYCODE.D || e.keyCode === KEYCODE.d) { if (v.x === 0) { v.x = 1; } }
  else if (e.keyCode === KEYCODE.Q || e.keyCode === KEYCODE.q) { if (v.y === 0) { v.y = -1; } }
  else if (e.keyCode === KEYCODE.E || e.keyCode === KEYCODE.e) { if (v.y === 0) { v.y = 1; } }
 }

 onKeyUp(e: EventKeyboard) {
  const v = this._velocity;
  if (e.keyCode === KEYCODE.SHIFT) { this._speedScale = 1; }
  else if (e.keyCode === KEYCODE.W || e.keyCode === KEYCODE.w) { if (v.z < 0) { v.z = 0; } }
  else if (e.keyCode === KEYCODE.S || e.keyCode === KEYCODE.s) { if (v.z > 0) { v.z = 0; } }
  else if (e.keyCode === KEYCODE.A || e.keyCode === KEYCODE.a) { if (v.x < 0) { v.x = 0; } }
  else if (e.keyCode === KEYCODE.D || e.keyCode === KEYCODE.d) { if (v.x > 0) { v.x = 0; } }
  else if (e.keyCode === KEYCODE.Q || e.keyCode === KEYCODE.q) { if (v.y < 0) { v.y = 0; } }
  else if (e.keyCode === KEYCODE.E || e.keyCode === KEYCODE.e) { if (v.y > 0) { v.y = 0; } }
 }

 onTouchMove(e: Touch) {
  e.getStartLocation(v2_1);
  if (v2_1.x > cclegacy.winSize.width * 0.4) { // rotation
   e.getDelta(v2_2);
   this._euler.y -= v2_2.x * 0.5;
   this._euler.x += v2_2.y * 0.5;
  } else { // position
   e.getLocation(v2_2);
   math.Vec2.subtract(v2_2, v2_2, v2_1);
   this._velocity.x = v2_2.x * 0.01;
   this._velocity.z = -v2_2.y * 0.01;
  }
 }

 onTouchEnd(e: Touch) {
  e.getStartLocation(v2_1);
  if (v2_1.x < cclegacy.winSize.width * 0.4) { // position
   this._velocity.x = 0;
   this._velocity.z = 0;
  }
 }

 changeEnable() {
  this.enabled = !this.enabled;
 }
}
PlayerController.ts:
import { _decorator, Component, Node, KeyCode, EventKeyboard, RigidBody, Vec3, v3, input, Input } from 'cc';
const { ccclass, property } = _decorator;


@ccclass('PlayerController')
export class PlayerController extends Component {
    @property
    moveSpeed = 10;
    @property
    rotSpeed = 90;
    private keyMap = {};
    start() {

        input.on(Input.EventType.KEY_DOWN,this.onKeyDown,this);
        input.on(Input.EventType.KEY_UP,this.onKeyUp,this);
    }
    setRotSpeed(value){
        this.rotSpeed = value;
    }
    private onKeyDown(e: EventKeyboard) {
        this.keyMap[e.keyCode] = true;
    }
    private onKeyUp(e: EventKeyboard) {
        this.keyMap[e.keyCode] = false;
    }
    private vec3:Vec3 = v3();
    update(deltaTime: number) {
        if (this.keyMap[KeyCode.KEY_W]) {
            Vec3.add(this.vec3,this.node.position,this.node.forward.clone().multiplyScalar(-this.moveSpeed * deltaTime));
            this.node.position = this.vec3;
        } else if (this.keyMap[KeyCode.KEY_S]) {
            Vec3.add(this.vec3,this.node.position,this.node.forward.clone().multiplyScalar(this.moveSpeed * deltaTime));
            this.node.position = this.vec3;
        }else {
        }
        if (this.keyMap[KeyCode.KEY_A]) {
            this.node.setRotationFromEuler(0,this.node.eulerAngles.y + deltaTime * this.rotSpeed,0);
        }else if (this.keyMap[KeyCode.KEY_D]) {
            this.node.setRotationFromEuler(0,this.node.eulerAngles.y + deltaTime * -this.rotSpeed,0);
        }
    }
}
FirstPersonGunCamreSc.ts:
import { _decorator, Component, Node, CCObject, Vec3, Quat, tween, Camera } from 'cc';
const { ccclass, property } = _decorator;

@ccclass('FirstPersonGunCamreSc')
export class FirstPersonGunCamreSc extends Component {
    private original_position:Vec3;
    @property(Camera)
    aniCamera:Camera = null;
    start() {
        this.original_position = this.node.position.clone();
    }
    aim(){
        tween(this.node).to(0.3,{position:this.aniCamera.node.position}).start();
        tween(this.getComponent(Camera)).to(0.3,{fov:this.aniCamera.fov}).start();
    }
    unAim(){
        tween(this.node).to(0.3,{position:this.original_position}).start();
        tween(this.getComponent(Camera)).to(0.3,{fov:45}).start();
    }
    update(deltaTime: number) {

    }
}
GunSc.ts:
import { _decorator, Component, Node, SkeletalAnimation, input, Input, EventKeyboard, misc, KeyCode } from 'cc';
import { FirstPersonGunCamreSc } from './FirstPersonGunCamreSc';
import { PlayerController } from './PlayerController';
const { ccclass, property } = _decorator;

@ccclass('GunSc')
export class GunSc extends Component {

    @property(SkeletalAnimation)
    gunSA:SkeletalAnimation = null;
    @property(FirstPersonGunCamreSc)
    FirstPersonGunCam:FirstPersonGunCamreSc = null;

    start() {
        this.playIndex(5);
        input.on(Input.EventType.KEY_DOWN,this.onKeyDown,this);
    }
    private _isaim = false;
    private onKeyDown(e:EventKeyboard){
        if(e.keyCode == KeyCode.SPACE){
            this._isaim = !this._isaim;
            if(this._isaim){
                this.aim();
            }else{
                this.unAim();
            }
        }
    }

    update(deltaTime: number) {

    }
    private playIndex(index) {
        const animatname = this.gunSA.clips[index].name;
        this.gunSA.play(animatname);
        this.gunSA.crossFade(animatname);

    }
    aim(){
        this.FirstPersonGunCam.aim();
        this.playIndex(1);
        this.getComponent(PlayerController)?.setRotSpeed(30);
    }
    unAim(){
        this.playIndex(5);
        this.FirstPersonGunCam.unAim();
        this.getComponent(PlayerController)?.setRotSpeed(90);
    }
}
现在给摄像机上添加渲染纹理,为监视器添加对应的材质。如此一来,我们在电视上看到了街头监视器画面,而屏幕左边则投射了无人机画面。由于有控制脚本,我们可以控制它到处飞行一下,看看效果:
资源链接
源码下载丨Cocos Store:
https://store.cocos.com/app/detail/3803
视频教程(UP 主:Nowpaper)
https://www.bilibili.com/video/BV1S34y1j7Ha
论坛讨论帖:
https://forum.cocos.org/t/topic/136021
今天的文章就到这里,我是 Nowpaper,一个混迹游戏行业的老爸,如果您喜欢我的分享,不妨多多点赞留言,也欢迎关注我的 B 站,您的支持是我更新的动力,下次再见!
Nowpaper 往期分享
Cocos Store 正在举办618大促活动,超低优惠
还有Cocos周边实物礼品赠送!


 1245
1245

 被折叠的 条评论
为什么被折叠?
被折叠的 条评论
为什么被折叠?
 到【灌水乐园】发言


