


1.基础
纠正一个思想,即要具有模块化的思维,面对整体中模块是不要考虑其他,就仅考虑如何将一个类抽象出来,思考实现怎样的功能。前面的总结学习我认为是错误的学习方法,并不系统。我的目的:借鉴学习别人的编程思想,总结规律,归纳步骤,以解决新的问题。当然,前提是理论知识要熟悉。
(1)Camera类
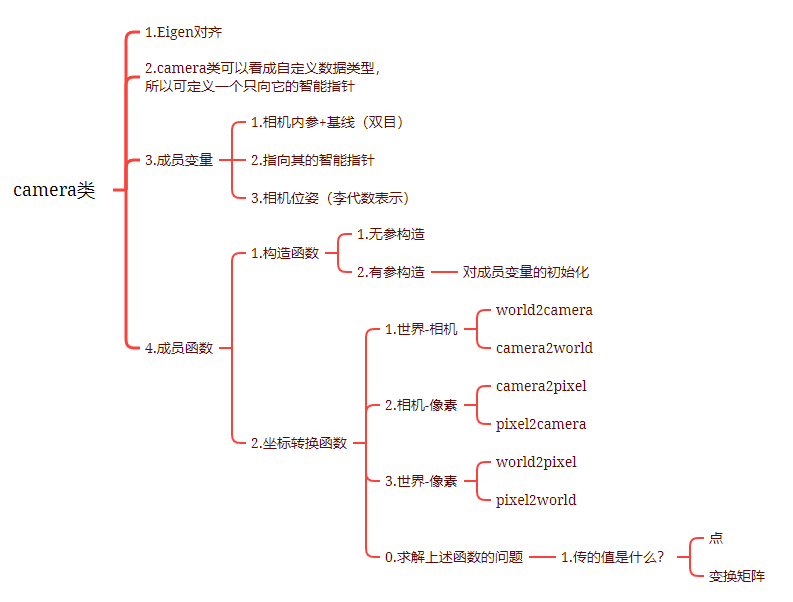
上述思维导图将思路列了出来,下面是关注细节。
主要是坐标转换
1 世界坐标系下的点转换到相机坐标系下:
P
c
=
T
c
w
P
w
P_c = T_{cw}P_w
Pc=TcwPw
代码中有pose原因:初始位置相机坐标系与世界坐标系并不重合。
2 相机坐标系到像素坐标系:
P
u
v
=
K
Z
P
c
P_{uv}=\frac{K}{Z}P_c
Puv=ZKPc
3.由上述公式很容易写出世界到像素的代码
Vec3 Camera::world2camera(const Vec3 &p_w, const SE3 &T_c_w) {
    return pose_ * T_c_w * p_w;
}

Vec3 Camera::camera2world(const Vec3 &p_c, const SE3 &T_c_w) {
    return T_c_w.inverse() * pose_inv_ * p_c;
}

Vec2 Camera::camera2pixel(const Vec3 &p_c) {
    return Vec2(
            fx_ * p_c(0, 0) / p_c(2, 0) + cx_,
            fy_ * p_c(1, 0) / p_c(2, 0) + cy_
    );
}

Vec3 Camera::pixel2camera(const Vec2 &p_p, double depth) {
    return Vec3(
            (p_p(0, 0) - cx_) * depth / fx_,
            (p_p(1, 0) - cy_) * depth / fy_,
            depth
    );
}

Vec2 Camera::world2pixel(const Vec3 &p_w, const SE3 &T_c_w) {
    return camera2pixel(world2camera(p_w, T_c_w));
}

Vec3 Camera::pixel2world(const Vec2 &p_p, const SE3 &T_c_w, double depth) {
    return camera2world(pixel2camera(p_p, depth), T_c_w);
}
(2)Frame类
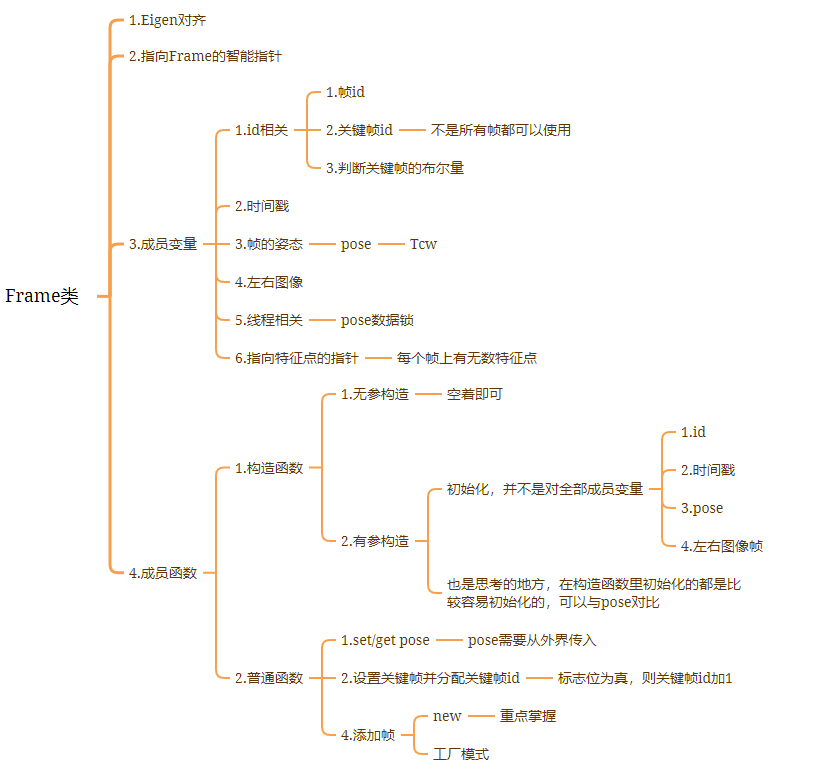
1 对pose的操作(记得在初学C++时也有类似的操作)
SE3 Pose() {
	std::unique_lock<std::mutex> lck(pose_mutex_);
	return pose_;
}

void SetPose(const SE3 &pose) {
	std::unique_lock<std::mutex> lck(pose_mutex_);
	pose_ = pose;
}
2 创建帧–>设置关键帧
创建帧:返回一个指向帧的指针
Frame::Ptr Frame::CreateFrame() {
    static long factory_id = 0;
    Frame::Ptr new_frame(new Frame);
    new_frame->id_ = factory_id++;
    return new_frame;
}

void Frame::SetKeyFrame() {
    static long keyframe_factory_id = 0;
    is_keyframe_ = true;
    keyframe_id_ = keyframe_factory_id++;
}
(3)Feature类
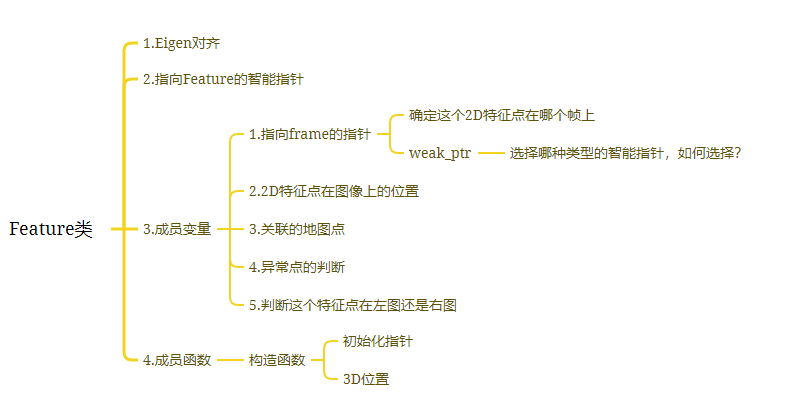
看上去这个类很简单,就几个成员变量,关键是如何想到?
感觉特征点起到一个桥梁作用:
1 特征点在图像上,那么2D位置在哪?
2 图像对应的3D路标点的位置
3 这个特征点在那一帧?
(4)MapPoint类
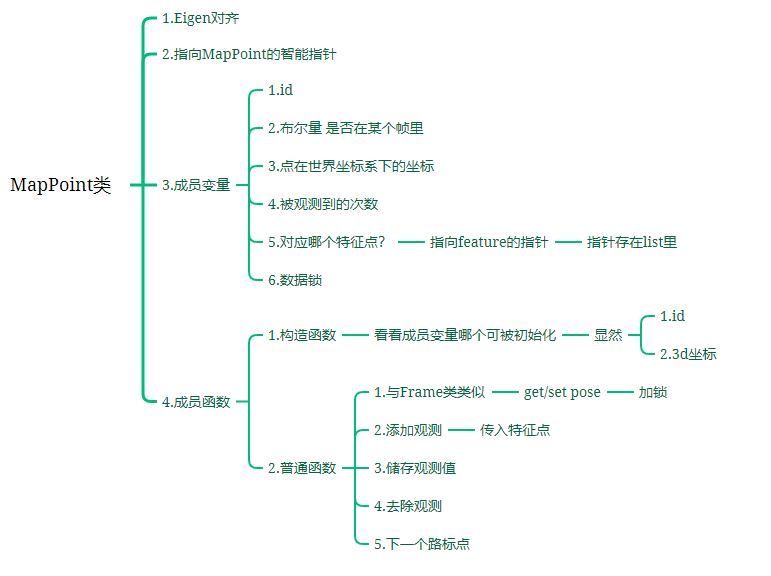
1 3D点的位置
Vec3 Pos() {
	std::unique_lock<std::mutex> lck(data_mutex_);
	return pos_;
}

void SetPos(const Vec3 &pos) {
	std::unique_lock<std::mutex> lck(data_mutex_);
	pos_ = pos;
}
2 2D观测值
void AddObservation(std::shared_ptr<Feature> feature) {
	std::unique_lock<std::mutex> lck(data_mutex_);
	observations_.push_back(feature);
	observed_times_++;
}
std::list<std::weak_ptr<Feature>> GetObs() {
	std::unique_lock<std::mutex> lck(data_mutex_);
	return observations_;
}
上述有共通之处。
3 创建新路标点(与创建帧类似)
MapPoint::Ptr MapPoint::CreateNewMappoint() {
    static long factory_id = 0;
    MapPoint::Ptr new_mappoint(new MapPoint);
    new_mappoint->id_ = factory_id++;
    return new_mappoint;
}
4 移除观测
void MapPoint::RemoveObservation(std::shared_ptr<Feature> feat) {
    std::unique_lock<std::mutex> lck(data_mutex_);
    for (auto iter = observations_.begin(); iter != observations_.end(); iter++)
	{
        if (iter->lock() == feat) {
            observations_.erase(iter);      //erase() 删除
            feat->map_point_.reset();
            observed_times_--;
            break;
        }
    }
}
这个代码看的有点头疼,复习了一下C++,写一下个人的理解,也更加深了对智能指针的理解:
第一,明确一个不太注意到的点(反正我没注意,或者说没在意,只想着当成指针来用了),智能指针是一个类,本质上是一个抽象的数据类型。第二,list的begin方法返回迭代器,想来想去不就是指针嘛。第三,如果从observations_里面存的指向feature的指针来说,迭代器不久成了二级指针嘛,为什么能调用weak_ptr的lock方法?这也是我最初的疑惑。第四,现在的理解:把weak_ptr看成一个类(当然,本来就是), 那么迭代器指向weak_ptr这个类,简单理解struct weak_ptr * iter,自然可以调用lock方法。
看懂了之后发现自己就是个傻X,这么简单还看老半天。。。C++不熟悉
删除观测点:遍历迭代器,找到要删除的位置,删除元素,释放内存,观测次数减一
(4.5)思考
根据上述所写的代码,每个类都要声明一个指向自己的指针:
typedef std::shared_ptr<Camera> Ptr;
typedef std::shared_ptr<Frame> Ptr;
typedef std::shared_ptr<Feature> Ptr;
typedef std::shared_ptr<MapPoint> Ptr;
在feature类里面,选择的是weak_ptr
std::weak_ptr<Frame> frame_;         // 持有该feature的frame
cv::KeyPoint position_;              // 2D提取位置
std::weak_ptr<MapPoint> map_point_;  // 关联地图点
现在在脑子里还不是很清晰,与引用计数的关系以及为什么这样选择,暂时留一个问题吧。
(5)Map类
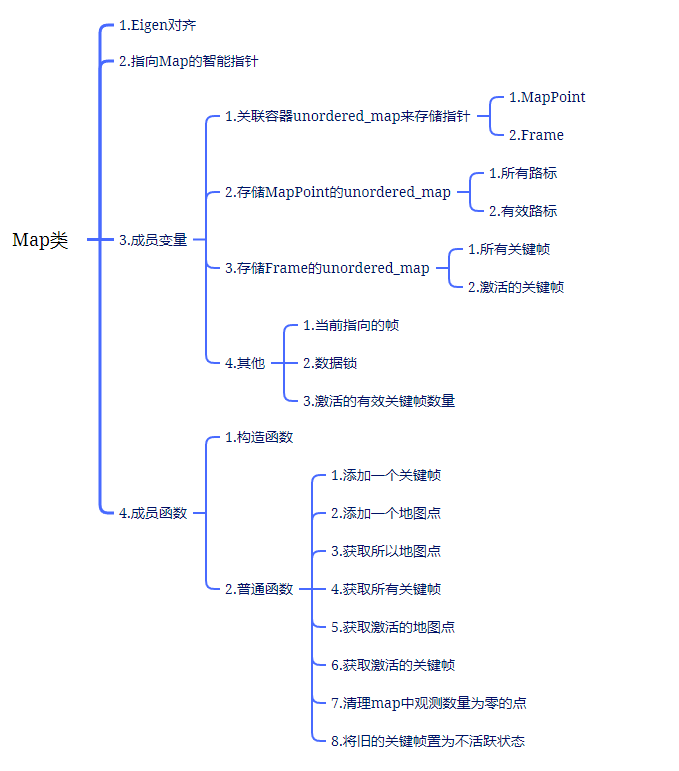
围绕帧和地图点来展开
1 添加一个关键帧/添加一个地图点
/*
	添加关键帧逻辑:
		1 传进一个指向某个帧的指针,设置为当前帧
		2 判断是否在图里,根据id判断
			若不在 添加进图
			若在 	 新的替换老的		意义?
		3 将活跃的设置在一定的范围内
*/
void Map::InsertKeyFrame(Frame::Ptr frame) {
    current_frame_ = frame;

    if (keyframes_.find(frame->keyframe_id_) == keyframes_.end())   //没找到
    {
        keyframes_.insert(make_pair(frame->keyframe_id_, frame));
        active_keyframes_.insert(make_pair(frame->keyframe_id_, frame));
    } else {
        keyframes_[frame->keyframe_id_] = frame;
        active_keyframes_[frame->keyframe_id_] = frame;
    }

    if (active_keyframes_.size() > num_active_keyframes_) {
        RemoveOldKeyframe();
    }
}

/*
	添加地图点逻辑:
		与上述 2 类似
*/
void Map::InsertMapPoint(MapPoint::Ptr map_point) {
    if (landmarks_.find(map_point->id_) == landmarks_.end()) {
        landmarks_.insert(make_pair(map_point->id_, map_point));
        active_landmarks_.insert(make_pair(map_point->id_, map_point));
    } else {
        landmarks_[map_point->id_] = map_point;
        active_landmarks_[map_point->id_] = map_point;
    }
}
2 添加关键帧时,有一个去除关键帧的函数
/*
	1 寻找与当前帧最近与最远的两个关键帧
		遍历激活的关键帧
		设置一个评价指标
		找到最近与最远的id
	2 判断删除哪一个
	3 把要删除的帧从激活关键帧的map里删除
	4 删除观测
		遍历这一帧上的所有特征点
		将特征点对应的3D路标点删除
*/
void Map::RemoveOldKeyframe() {
    if (current_frame_ == nullptr) return;
    // 寻找与当前帧最近与最远的两个关键帧
    double max_dis = 0, min_dis = 9999;
    double max_kf_id = 0, min_kf_id = 0;
    auto Twc = current_frame_->Pose().inverse();
    for (auto& kf : active_keyframes_) {
        if (kf.second == current_frame_)
            continue;      //当前帧

        auto dis = (kf.second->Pose() * Twc).log().norm();  //完全匹配为1?

        if (dis > max_dis) {
            max_dis = dis;
            max_kf_id = kf.first;
        }
        if (dis < min_dis) {
            min_dis = dis;
            min_kf_id = kf.first;
        }
    }

    const double min_dis_th = 0.2;  // 最近阈值
    Frame::Ptr frame_to_remove = nullptr;
    if (min_dis < min_dis_th) {
        // 如果存在很近的帧,优先删掉最近的
        frame_to_remove = keyframes_.at(min_kf_id);
    } else {
        // 删掉最远的
        frame_to_remove = keyframes_.at(max_kf_id);
    }

    LOG(INFO) << "remove keyframe " << frame_to_remove->keyframe_id_;
    // remove keyframe and landmark observation
    active_keyframes_.erase(frame_to_remove->keyframe_id_);
    for (auto feat : frame_to_remove->features_left_) {
        auto mp = feat->map_point_.lock();
        if (mp) {
            mp->RemoveObservation(feat);
        }
    }
    for (auto feat : frame_to_remove->features_right_) {
        if (feat == nullptr) continue;
        auto mp = feat->map_point_.lock();
        if (mp) {
            mp->RemoveObservation(feat);
        }
    }
	//清理map中观测数量为零的点
    CleanMap();
}
3 清理map中观测数量为零的点 CleanMap函数
/*
	1 遍历活跃的路标点
	2 判断被观测的次数是否为0
		为0 将其删除
		不为0 再看其他的路标点
*/
void Map::CleanMap() {
    int cnt_landmark_removed = 0;
    for (auto iter = active_landmarks_.begin(); iter != active_landmarks_.end();)
    {
        if (iter->second->observed_times_ == 0) {
            iter = active_landmarks_.erase(iter);
            cnt_landmark_removed++;
        } else {
            ++iter;
        }
    }
    LOG(INFO) << "Removed " << cnt_landmark_removed << " active landmarks";
}
4 返回整体
    /// 获取所有地图点
    LandmarksType GetAllMapPoints() {
        std::unique_lock<std::mutex> lck(data_mutex_);
        return landmarks_;
    }
    /// 获取所有关键帧
    KeyframesType GetAllKeyFrames() {
        std::unique_lock<std::mutex> lck(data_mutex_);
        return keyframes_;
    }

    /// 获取激活地图点
    LandmarksType GetActiveMapPoints() {
        std::unique_lock<std::mutex> lck(data_mutex_);
        return active_landmarks_;
    }

    /// 获取激活关键帧
    KeyframesType GetActiveKeyFrames() {
        std::unique_lock<std::mutex> lck(data_mutex_);
        return active_keyframes_;
    }
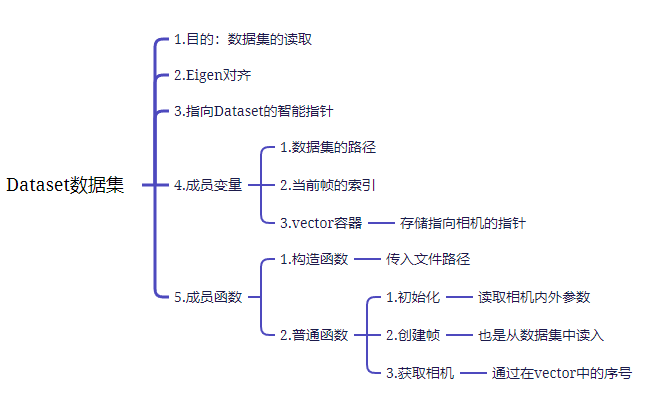
(6)Dataset数据集
1 传感器安装位置
Kitti传感器主要包含相机(Cam0-4)、GPS/IMU、激光雷达(Velodyne Laserscanner)。本课题中只用到了相机,所以只讨论相机。
在calib.txt文件中P0到P4分别对应四个相机数据,其中,P0的原点为车辆坐标系原点,P0, P1, P2, P3 分别代表对应的相机内参矩阵, 大小为 3x4:
P
r
e
c
t
i
=
[
f
u
i
0
c
u
i
−
f
u
i
b
x
i
0
f
v
i
c
v
i
0
0
0
1
0
]
(3)
P^{i}_{rect}= \left[ \begin{matrix} f^i_u & 0 & c^i_u & -f^i_ub^i_x \\ 0 & f^i_v & c^i_v & 0 \\ 0 & 0 & 1 & 0 \end{matrix} \right] \tag{3}
Precti=⎣⎡fui000fvi0cuicvi1−fuibxi00⎦⎤(3)
第四列数据
−
f
u
i
b
x
i
-f^i_ub^i_x
−fuibxi 中的
b
x
i
b^i_x
bxi 表示此相机相对与车辆坐标系原点的距离,只有平移没有旋转。
通过 b ,将四个相机的相对关系描述出来。同时,b还是相机基线的距离
2 初始化
实例化相机
注:有一个编程细节问题,也算是可以学习的经验:代码中将内参矩阵缩小为原来的1/2,这样可以将图像缩小,运行起来看上去舒服。
/*
	1 读入相机数据
		相机名:P0-P3
		相机内参数
	2 实例化相机类,并初始化
	3 存相机数据
*/
bool Dataset::Init() {
    // read camera intrinsics and extrinsics
    ifstream fin(dataset_path_ + "/calib.txt");
    if (!fin) {
        LOG(ERROR) << "cannot find " << dataset_path_ << "/calib.txt!";
        return false;
    }

    for (int i = 0; i < 4; ++i) {
        char camera_name[3];
        for (int k = 0; k < 3; ++k) {
            fin >> camera_name[k];
        }
        double projection_data[12];
        for (int k = 0; k < 12; ++k) {
            fin >> projection_data[k];
        }
        Mat33 K;
        K << projection_data[0], projection_data[1], projection_data[2],
            projection_data[4], projection_data[5], projection_data[6],
            projection_data[8], projection_data[9], projection_data[10];
        Vec3 t;
        t << projection_data[3], projection_data[7], projection_data[11];
        t = K.inverse() * t;
        K = K * 0.5;
        Camera::Ptr new_camera(new Camera(K(0, 0), K(1, 1), K(0, 2), K(1, 2),
                                          t.norm(), SE3(SO3(), t)));
        cameras_.push_back(new_camera);
        LOG(INFO) << "Camera " << i << " extrinsics: " << t.transpose();
    }
    fin.close();
    current_image_index_ = 0;
    return true;
}

/// get camera by id
Camera::Ptr GetCamera(int camera_id) const {
	return cameras_.at(camera_id);
}
3 读入图像
boost::format 的用法
    boost::format fmt("%s/image%d ");
    //fmt % "输出内容" % 1;
    std::string s=(fmt % "输出内容" % 1).str();
    std::cout<< s << std::endl;
/*
	1 boost::format 将地址转成字符串
	2 读入图片
	3 修改图片大小 -> 与缩小相机内参矩阵对应
	3 创建帧
*/
Frame::Ptr Dataset::NextFrame() {
    boost::format fmt("%s/image_%d/%06d.png");
    cv::Mat image_left, image_right;
    // read images
    image_left =
        cv::imread((fmt % dataset_path_ % 0 % current_image_index_).str(),
                   cv::IMREAD_GRAYSCALE);
    image_right =
        cv::imread((fmt % dataset_path_ % 1 % current_image_index_).str(),
                   cv::IMREAD_GRAYSCALE);

    if (image_left.data == nullptr || image_right.data == nullptr) {
        LOG(WARNING) << "cannot find images at index " << current_image_index_;
        return nullptr;
    }

    cv::Mat image_left_resized, image_right_resized;
    cv::resize(image_left, image_left_resized, cv::Size(), 0.5, 0.5,
               cv::INTER_NEAREST);
    cv::resize(image_right, image_right_resized, cv::Size(), 0.5, 0.5,
               cv::INTER_NEAREST);

    auto new_frame = Frame::CreateFrame();
    new_frame->left_img_ = image_left_resized;
    new_frame->right_img_ = image_right_resized;
    current_image_index_++;
    return new_frame;
}
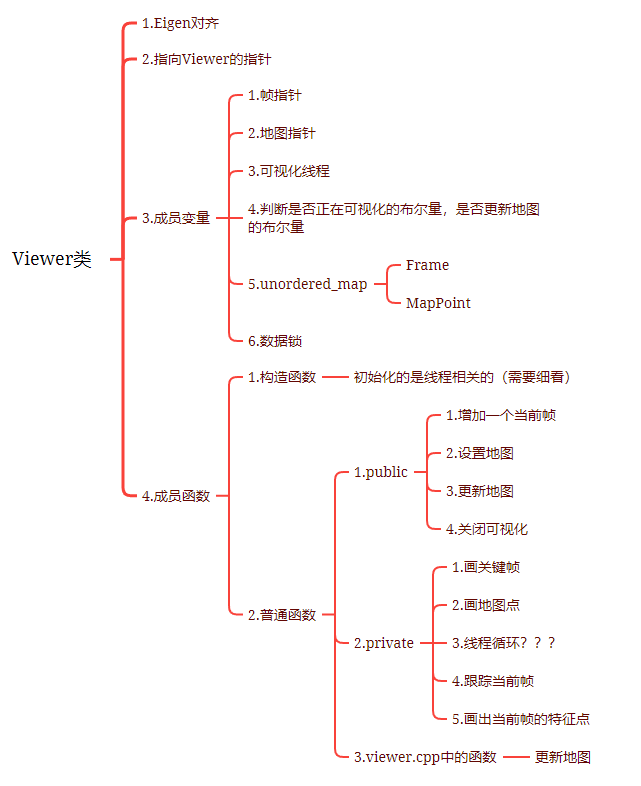
(7)Viewer类
RGB值表示颜色(常用的)
| RGB值 | 颜色 |
|---|---|
| [1 0 0] | 红色 |
| [0 1 0] | 绿色 |
| [0 0 1] | 蓝色 |
| [0 0 0] | 黑色 |
| [1 1 1] | 白色 |
| [1 1 0] | 黄色 |
1 使用Pangolin 绘制运行过程
/*
	1 Pangolin 的使用步骤
	2 循环里面
		1 帧
		2 路标点
		3 图片	--另一个窗口
*/
void Viewer::ThreadLoop() {
    // 1 创建 GUI 窗口
    pangolin::CreateWindowAndBind("MySLAM", 1024, 768);
    glEnable(GL_DEPTH_TEST);
    glEnable(GL_BLEND);
    glBlendFunc(GL_SRC_ALPHA, GL_ONE_MINUS_SRC_ALPHA);

    // 2 创建观察者视图
    pangolin::OpenGlRenderState vis_camera(
        pangolin::ProjectionMatrix(1024, 768, 400, 400, 512, 384, 0.1, 1000),
        pangolin::ModelViewLookAt(0, -5, -10, 0, 0, 0, 0.0, -1.0, 0.0));

    // Add named OpenGL viewport to window and provide 3D Handler
    // 3 创建即
    pangolin::View& vis_display =
        pangolin::CreateDisplay()
            .SetBounds(0.0, 1.0, 0.0, 1.0, -1024.0f / 768.0f)
            .SetHandler(new pangolin::Handler3D(vis_camera));

    const float blue[3] = {0, 0, 1};
    const float green[3] = {0, 1, 0};

    while (!pangolin::ShouldQuit() && viewer_running_) {
        glClear(GL_COLOR_BUFFER_BIT | GL_DEPTH_BUFFER_BIT);
        glClearColor(1.0f, 1.0f, 1.0f, 1.0f);
        vis_display.Activate(vis_camera);

        std::unique_lock<std::mutex> lock(viewer_data_mutex_);
        if (current_frame_) {
            DrawFrame(current_frame_, green);
            FollowCurrentFrame(vis_camera);

            cv::Mat img = PlotFrameImage();
            cv::imshow("image", img);
            cv::waitKey(1);
        }

        if (map_) {
            DrawMapPoints();
        }

        pangolin::FinishFrame();
        usleep(5000);
    }

    LOG(INFO) << "Stop viewer";
}
2 画出帧(类似相机的实物模型)
/*
	当前帧绿色,其他为红色
	疑问:为什么这样画模型?
*/
void Viewer::DrawFrame(Frame::Ptr frame, const float* color) {
    SE3 Twc = frame->Pose().inverse();
    const float sz = 1.0;
    const int line_width = 2.0;
    const float fx = 400;
    const float fy = 400;
    const float cx = 512;
    const float cy = 384;
    const float width = 1080;
    const float height = 768;

    glPushMatrix();

    Sophus::Matrix4f m = Twc.matrix().template cast<float>();
    glMultMatrixf((GLfloat*)m.data());

    if (color == nullptr) {
        glColor3f(1, 0, 0);
    } else
        glColor3f(color[0], color[1], color[2]);

    glLineWidth(line_width);
    glBegin(GL_LINES);
    glVertex3f(0, 0, 0);
    glVertex3f(sz * (0 - cx) / fx, sz * (0 - cy) / fy, sz);
    glVertex3f(0, 0, 0);
    glVertex3f(sz * (0 - cx) / fx, sz * (height - 1 - cy) / fy, sz);
    glVertex3f(0, 0, 0);
    glVertex3f(sz * (width - 1 - cx) / fx, sz * (height - 1 - cy) / fy, sz);
    glVertex3f(0, 0, 0);
    glVertex3f(sz * (width - 1 - cx) / fx, sz * (0 - cy) / fy, sz);

    glVertex3f(sz * (width - 1 - cx) / fx, sz * (0 - cy) / fy, sz);
    glVertex3f(sz * (width - 1 - cx) / fx, sz * (height - 1 - cy) / fy, sz);

    glVertex3f(sz * (width - 1 - cx) / fx, sz * (height - 1 - cy) / fy, sz);
    glVertex3f(sz * (0 - cx) / fx, sz * (height - 1 - cy) / fy, sz);

    glVertex3f(sz * (0 - cx) / fx, sz * (height - 1 - cy) / fy, sz);
    glVertex3f(sz * (0 - cx) / fx, sz * (0 - cy) / fy, sz);

    glVertex3f(sz * (0 - cx) / fx, sz * (0 - cy) / fy, sz);
    glVertex3f(sz * (width - 1 - cx) / fx, sz * (0 - cy) / fy, sz);

    glEnd();
    glPopMatrix();
}
/*
	猜测:让镜头随着帧的运动而运动
	Pangolin的深入功能及用法还不是很了解
*/
void Viewer::FollowCurrentFrame(pangolin::OpenGlRenderState& vis_camera) {
    SE3 Twc = current_frame_->Pose().inverse();
    pangolin::OpenGlMatrix m(Twc.matrix());
    vis_camera.Follow(m, true);
}
3 图像
/*
	把看到的路标点对应的特征点可视化
*/
cv::Mat Viewer::PlotFrameImage() {
    cv::Mat img_out;
    cv::cvtColor(current_frame_->left_img_, img_out, CV_GRAY2BGR);
    for (size_t i = 0; i < current_frame_->features_left_.size(); ++i) {
        if (current_frame_->features_left_[i]->map_point_.lock()) {
            auto feat = current_frame_->features_left_[i];
            cv::circle(img_out, feat->position_.pt, 2, cv::Scalar(0, 250, 0), 2);
        }
    }
    return img_out;
}
4 3D路标点
void Viewer::DrawMapPoints() {
    const float red[3] = {1.0, 0, 0};
    for (auto& kf : active_keyframes_) {
        DrawFrame(kf.second, red);
    }
    glPointSize(2);
    glBegin(GL_POINTS);
    for (auto& landmark : active_landmarks_) {
        auto pos = landmark.second->Pos();
        glColor3f(red[0], red[1], red[2]);
        glVertex3d(pos[0], pos[1], pos[2]);
    }
    glEnd();
}
以上与可视化相关,感觉有点困难
5 读入参数
void Viewer::AddCurrentFrame(Frame::Ptr current_frame) {
    std::unique_lock<std::mutex> lck(viewer_data_mutex_);
    current_frame_ = current_frame;
}

void SetMap(Map::Ptr map) { map_ = map; }
6 更新地图
void Viewer::UpdateMap() {
    std::unique_lock<std::mutex> lck(viewer_data_mutex_);
    assert(map_ != nullptr);
    active_keyframes_ = map_->GetActiveKeyFrames();
    // 这样可以显示所有地图点,同时也能够看出没有回环检测,累计误差很大
    // active_landmarks_ = map_->GetActiveMapPoints();
    active_landmarks_ = map_->GetAllMapPoints();   // 改为all mappoints,显示整体地图
    map_updated_ = true;
}
7 关闭线程
void Viewer::Close() {
    viewer_running_ = false;
    viewer_thread_.join();
}
(8)config 配置类
使用SetParameterFile确定配置文件
bool Config::SetParameterFile(const std::string &filename) {
    if (config_ == nullptr)
        config_ = std::shared_ptr<Config>(new Config);
    config_->file_ = cv::FileStorage(filename.c_str(), cv::FileStorage::READ);
    if (config_->file_.isOpened() == false) {
        LOG(ERROR) << "parameter file " << filename << " does not exist.";
        config_->file_.release();
        return false;
    }
    return true;
}


 238
238

 被折叠的 条评论
为什么被折叠?
被折叠的 条评论
为什么被折叠?
 到【灌水乐园】发言


