


在PFN阶段只是对非空Pillar进行了特征提取,按照PointPIllars的默认设置,每个非空Pillar经过PFN后表示为一个通道数为64的特征向量。最后PFN阶段的输出feature-map尺寸为(C,P),C表示通道数,P为PIllar的数量。但是,因为不同点云帧P的数量是不固定的,再送入下以阶段之前还要做一个PillarScatter的操作。
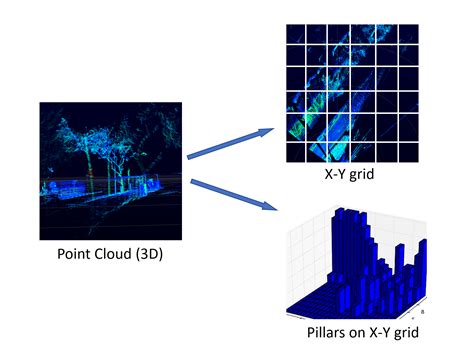
图:点云的Pillar化过程
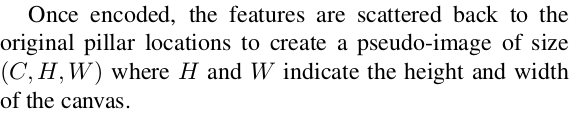
这里引用论文中的一段原话,也就是将点云特征投射回Pillar在原始网格中的位置。根据设定,PointPillars在点云空间X-Y平面上划分了固定大小的网格。 假如点云的空间范围(point_cloud_range)为:[0, -39.68, -3, 69.12, 39.68, 1],单个Pillar的尺寸(pillar_size)为:[0.16,0.16,4],可以通过point_cloud_range/pillar_size计算的网格的尺寸为[432,496,1],这里依次是X,Y,Z三个方向。不考虑Z方向,则X-Y网格尺寸为[432,496]。
class PointPillarsScatter(nn.Module):
    def __init__(self,
                 output_shape,
                 num_input_features=64,
                 batch_size=2):
        """
        Point Pillar's Scatter.
        Converts learned features from dense tensor to sparse pseudo image. This replaces SECOND's
        second.pytorch.voxelnet.SparseMiddleExtractor.
        :param output_shape: ([int]: 4). Required output shape of features.
        :param num_input_features: <int>. Number of input features.
        """
        super().__init__()
        self.name = 'PointPillarsScatter'
        #[1,496,432]是grid_size(z,y,x)?
        self.output_shape = output_shape #shape[1, 1, 496, 432, 64]
        self.ny = output_shape[2]
        self.nx = output_shape[3]
        self.nchannels = num_input_features #64
        self.batch_size = batch_size

    # def forward(self, voxel_features, coords, batch_size):
    def forward(self, voxel_features, coords):
        """
        voxel_features,shape[6815,64]
        coords,[6815,4]
        """
        #import pdb
        #pdb.set_trace()
        # batch_canvas will be the final output.
        batch_canvas = []

        if self.batch_size == 1:
            #shape[64,214272]
            canvas = torch.zeros(self.nchannels, self.nx * self.ny,
                dtype=voxel_features.dtype,device=voxel_features.device)
            #计算索引,y*N_X + x
            indices = coords[:, 2] * self.nx + coords[:, 3] #shape[6815]
            indices = indices.type(torch.float64)
            transposed_voxel_features = voxel_features.t() #shape[64,6815]

            # Now scatter the blob back to the canvas.
            indices_2d = indices.view(1, -1) #shape[1,6815]
            ones = torch.ones([self.nchannels, 1], dtype=torch.float64, device=voxel_features.device)

            indices_num_channel = torch.mm(ones, indices_2d)
            indices_num_channel = indices_num_channel.type(torch.int64)
            #shape[64,214272]
            scattered_canvas = canvas.scatter_(1, indices_num_channel, transposed_voxel_features)

            # Append to a list for later stacking.
            batch_canvas.append(scattered_canvas)

            # Stack to 3-dim tensor (batch-size, nchannels, nrows*ncols)
            """
            stack注意与cat的区别,stack是沿着一个新的维度进行拼接,
            输入张量必需为相同的维度
            (Pdb) batch_canvas.shape
            torch.Size([1, 64, 214272])
            """
            batch_canvas = torch.stack(batch_canvas, 0)

            # Undo the column stacking to final 4-dim tensor
            #torch.Size([1, 64, 496, 432])
            batch_canvas = batch_canvas.view(1, self.nchannels, self.ny, self.nx)
            return batch_canvas
        else:
            raise Exception("NotImplemented")
最重要的一句就是:scattered_canvas = canvas.scatter_(1, indices_num_channel, transposed_voxel_features)。
Tensor.scatter_(dim, index, src, reduce=None) → Tensor
Writes all values from the tensor src into self at the indices specified in the index tensor. For each value in src, its output index is specified by its index in src for dimension != dim and by the corresponding value in index for dimension = dim.
pytorch的scatter api简单说就是通过一个张量来修改另外一个张量,具体修改那些元素呢?通过index,dim配合来给出。官方给出了3-D tensor的计算方式:
self[index[i][j][k]][j][k] = src[i][j][k] # if dim == 0
self[i][index[i][j][k]][k] = src[i][j][k] # if dim == 1
self[i][j][index[i][j][k]] = src[i][j][k] # if dim == 2
我们这里只考虑2-D的情形:
self[index[i][j]][j] = src[i][j] #if dim == 0

self[i][index[i][j]] = src[i][j] #if dim == 1

scatter操作后对得到的scatter_canvas进一步reshape到(1,self.channels,self.ny,self.nx),这里self.channels,self.ny,self.nx对于每一帧点云都是固定值。这样,我们就得到了点云的伪图像。后面的操作就跟普通图像的操作一样了。
【参考文献】
https://blog.csdn.net/weixin_43496455/article/details/103870889


 1155
1155


 被折叠的 条评论
为什么被折叠?
被折叠的 条评论
为什么被折叠?
 到【灌水乐园】发言


