


ROS笔记
第二章 ROS基础
安装开发软件
Roboware安装找不到我安装时参考的博客了,算了,反正多试试就好了。
Jeston是ARM架构的,Roboware不支持ARM,据说它也暂停更新了,可能有生之年在Jeston上用不到它了。
用VScode开发的话Vscode配置Ros这篇博客就差不多了。
安装就那么略过了。
节点
发布端
learning_communication_pub.cpp
#include "ros/ros.h"
//引入核心库,放在第一行
#include "std_msgs/String.h"
//引入std_msgs::String消息类型
#include <sstream>

/**
 * This tutorial demonstrates simple sending of messages over the ROS system.
 */
int main(int argc, char *argv[])
{
	//initialize and name node  初始化 publisher是节点名称
	ros::init(argc, argv, "publisher");
    //create nodehandle  创建句柄,命名为nh
	ros::NodeHandle nh;
	//create publisher  string_topic是话题名称,<std_msgs::String>是话题发布的消息类型
	ros::Publisher simplepub = nh.advertise<std_msgs::String>("string_topic", 100);
	//publish frequency  设置发布的频率
	ros::Rate rate(10);
	//message for publish  创建了一个std_msgs::String类型的对象
	std_msgs::String pubinfo;
    //std_msgs::String类里面只有一个定义,string data
	pubinfo.data="Hello,I'm Publisher!";
    //ros::ok()是当这个节点在执行的时候,while一直执行
	while(ros::ok())
	{
        //发布定义好的消息类型
		simplepub.publish(pubinfo);
		rate.sleep();
	}


	return 0;
}
可以使用
rosmsg show std_msgs/String
显示std_msgs::String里面定义的字段,响应如下:
string data
即std_msgs::String里面只定义了一个string类型的data。
下面的代码是CMakeLists.txt里面的,使用Roboware编写ROS时,这些配置文件里的代码会自动生成,不必自己编写。
#add_executable的第一个参数是为生成的可执行文件选定名字,自动生成的与代码文件名一致
#第二个参数是对包目录而言在哪里找到源代码
add_executable(learning_communication_pub
  src/learning_communication_pub.cpp
)
#用于告知编译器把新的可执行文件和声明过的库链接起来
add_dependencies(learning_communication_pub ${${PROJECT_NAME}_EXPORTED_TARGETS} ${catkin_EXPORTED_TARGETS})
target_link_libraries(learning_communication_pub
  ${catkin_LIBRARIES}
)
rostopic命令行
rostopic
返回
rostopic is a command-line tool for printing information about ROS Topics.

Commands:
	rostopic bw	display bandwidth used by topic
	rostopic delay	display delay of topic from timestamp in header
	rostopic echo	print messages to screen
	rostopic find	find topics by type
	rostopic hz	display publishing rate of topic
	rostopic info	print information about active topic
	rostopic list	list active topics
	rostopic pub	publish data to topic
	rostopic type	print topic or field type

Type rostopic <command> -h for more detailed usage, e.g. 'rostopic echo -h'
从上面可以看到rostopic有九个命令选项
rostopic list
列出有多少正在活动的话题,返回
/rosout
/rosout_agg
/string_topic
其中/rosout和/rosout_agg是ROS自己创建的,string_topic是我创建的。
rostopic hz /string_topic
返回
subscribed to [/string_topic]
average rate: 10.000
	min: 0.099s max: 0.101s std dev: 0.00031s window: 10
average rate: 9.999
	min: 0.099s max: 0.101s std dev: 0.00037s window: 20
这个显示的是话题发布的频率,由于我上面在代码总设置的是ros::Rate rate(10);所以这里的也大概是10HZ的频率进行发布。
rostopic bw /string_topic
返回
subscribed to [/string_topic]
average: 252.84B/s
	mean: 24.00B min: 24.00B max: 24.00B window: 10
average: 245.98B/s
	mean: 24.00B min: 24.00B max: 24.00B window: 20
这显示了最小发布器消耗了多少可用通信带宽。
rostopic info /string_topic
返回
Type: std_msgs/String

Publishers:
 * /publisher (http://ubuntu:40271/)

Subscribers: None
这里显示的是包含的消息类型std_msgs/String,publisher是在ros::init(argc, argv, “publisher”); 里面定义的节点名称。
rostopic echo /string_topic
返回
data: "Hello,I'm Publisher!"
---
data: "Hello,I'm Publisher!"
---
data: "Hello,I'm Publisher!"
---
data: "Hello,I'm Publisher!"
---
这里是rostopic尝试输出string_topic上发布的一切。
rosnode
rosnode list
返回
/publisher
/rosout
返回的是节点名称,rosout是一个通用的进程,用于节点在终端上显示文本,由roscore默认启动。
订阅器
learning_communication_sub.cpp
#include "ros/ros.h"
#include "std_msgs/String.h"
using namespace std;

//传入的参数要和希望接收到的参数的类型兼容
void subCallback(const std_msgs::String::ConstPtr& submsg)
{
    //这里是输出了接收到的消息
	ROS_INFO("The message subscribed is: %s", submsg->data.c_str());
}

int main(int argc, char *argv[])
{
	//initial and name node
	ros::init(argc, argv, "subscriber");
	//create nodehandle
	ros::NodeHandle nh;
	//create subscriber	每当有对这个string_topic话题发出消息的时候,就会调用subCallback函数
    //1000是
	ros::Subscriber sub = nh.subscribe("string_topic", 1000, &subCallback);

	ros::spin();

	return 0;
}
ROS_INFO("The message subscribed is: %s", submsg->data.c_str());
ROS_INFO这个函数还可以改为c++的写法,即cout语法
ROS_INFO_STREAM("The message subscribed is:"<<submsg->data.c_str()<<std::endl);
subCallback每次被调用完,这个节点就进入休眠状态,不占用CPU运行资源,等待下一次string_topic接收到信息后,再开启。
CMakeLists.txt里面代码:
add_executable(learning_communication_sub
  src/learning_communication_sub.cpp
)
add_dependencies(learning_communication_sub ${${PROJECT_NAME}_EXPORTED_TARGETS} ${catkin_EXPORTED_TARGETS})
target_link_libraries(learning_communication_sub
  ${catkin_LIBRARIES}
)
Launch
robot_mapping.launch
<launch>
    <node name="publisher" pkg="learning_communication" type="learning_communication_pub"/>
    <node name="subscriber" pkg="learning_communication" type="learning_communication_sub"/>
</launch>
name的值是节点名称,pkg是程序包名称,type是可执行文件名称。
书上写launch文件名通常要和功能包的名字一样,尽管这不是必须的,我的功能包里面已经有一个现成的launch文件robot_mapping.launch,我就没再重新创建。launch文件可以一次启动多个节点,也可以启动多个功能包里面的不同节点,还可以嵌套别的launch文件进行启动。运行roslaunch的时候,会首先检查是否有roscore正在运行,如果没有,则先启动一个roscore,然后再运行launch文件里面的节点。
roslaunch learning_communication robot_mapping.launch
返回
... logging to /home/ubuntu/.ros/log/ddc3586c-df18-11eb-b2b1-000c29f89d7a/roslaunch-ubuntu-31860.log
Checking log directory for disk usage. This may take awhile.
Press Ctrl-C to interrupt
Done checking log file disk usage. Usage is <1GB.

started roslaunch server http://ubuntu:34729/

SUMMARY
========

PARAMETERS
 * /rosdistro: kinetic
 * /rosversion: 1.12.14

NODES
  /
    publisher (learning_communication/learning_communication_pub)
    subscriber (learning_communication/learning_communication_sub)

auto-starting new master
process[master]: started with pid [31870]
ROS_MASTER_URI=http://localhost:11311

setting /run_id to ddc3586c-df18-11eb-b2b1-000c29f89d7a
process[rosout-1]: started with pid [31884]
started core service [/rosout]
process[publisher-2]: started with pid [31889]
process[subscriber-3]: started with pid [31899]
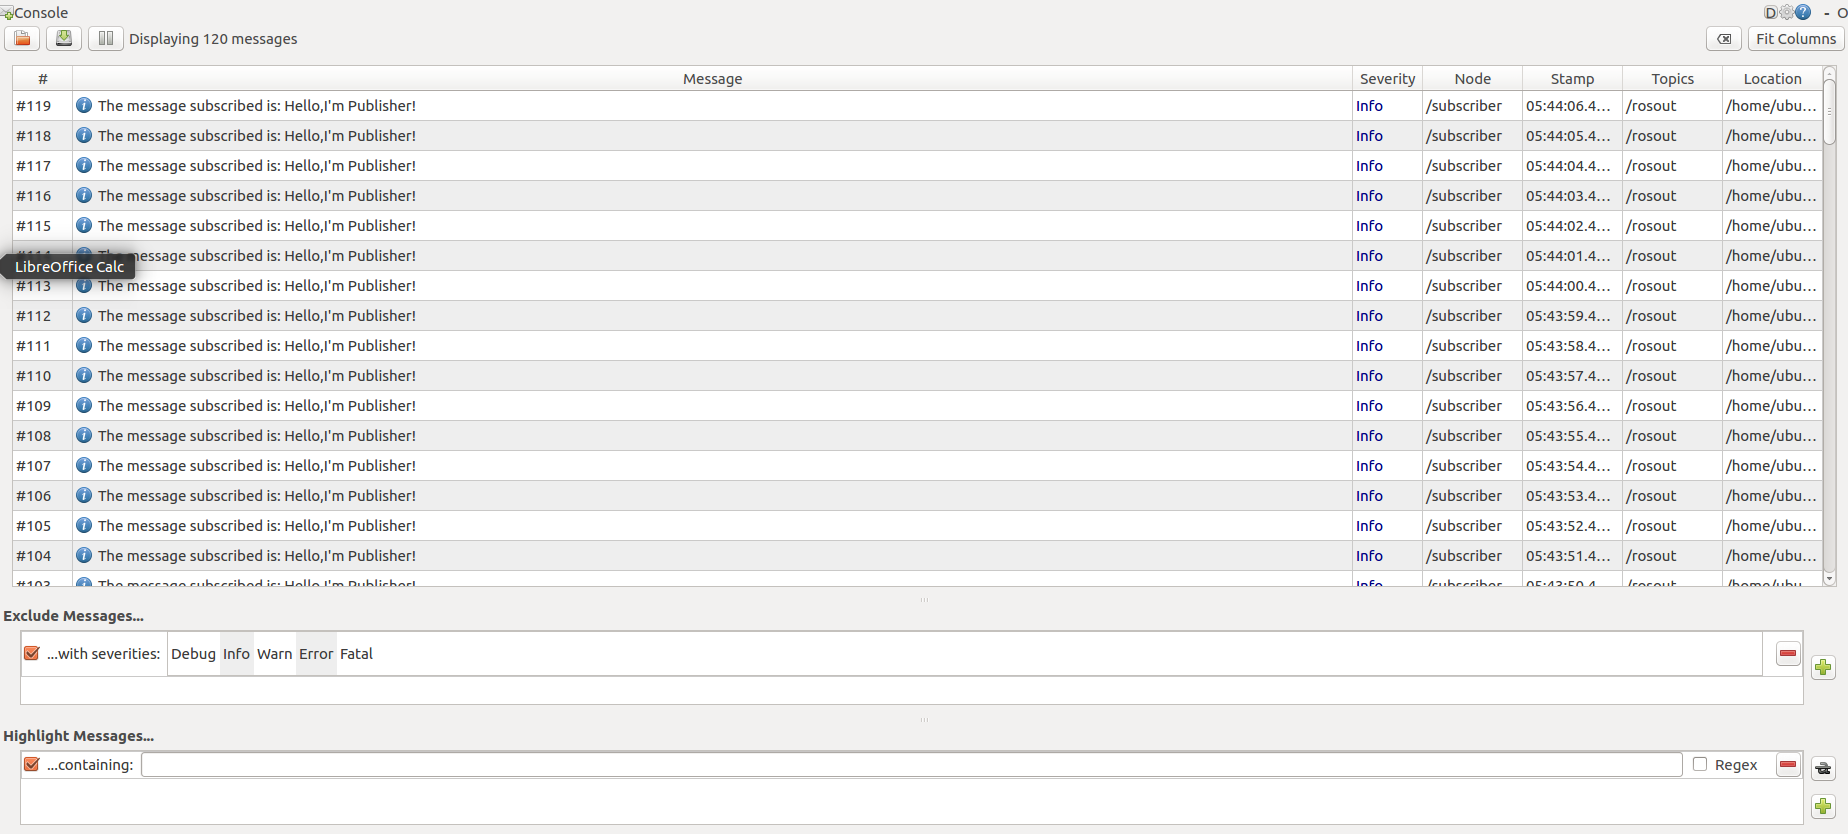
rqt_console
可以通过rqt_console查看消息。
rosbag
教程上让在功能包里面新建了一个子目录bagefiles,把rosbag记录的文件放在里面。
打开bagefiles文件夹,使用rosbag记录并回放数据。
rosbag record /string_topic
返回一个warning,没啥问题,忽略就行。关闭之前的节点,如果之前是直接运行的roslaunch,没有打开roscore,那么关闭节点后再开启一下roscore。
回放数据:
rosbag play 20207-08-01-34-36.bag
返回
[ INFO] [1625733670.132816148]: Opening 2021-07-08-01-34-36.bag

Waiting 0.2 seconds after advertising topics... done.

Hit space to toggle paused, or 's' to step.
 [DELAYED]  Bag Time: 1625733276.407486   Duration: 0.000000 / 70.999726   Delay
 [RUNNING]  Bag Time: 1625733276.407486   Duration: 0.000000 / 70.999726
 [RUNNING]  Bag Time: 1625733276.407486   Duration: 0.000000 / 70.999726
 [RUNNING]  Bag Time: 1625733276.407570   Duration: 0.000084 / 70.999726
此时开启订阅器
rosrun learning_communication learning_communication_sub
返回
[ INFO] [1625735080.481445540]: The message subscribed is: Hello,I'm Publisher!
[ INFO] [1625735081.481944206]: The message subscribed is: Hello,I'm Publisher!
[ INFO] [1625735082.482298689]: The message subscribed is: Hello,I'm Publisher!
[ INFO] [1625735083.481266454]: The message subscribed is: Hello,I'm Publisher!
[ INFO] [1625735084.481959088]: The message subscribed is: Hello,I'm Publisher!
[ INFO] [1625735085.481650213]: The message subscribed is: Hello,I'm Publisher!
[ INFO] [1625735086.481681083]: The message subscribed is: Hello,I'm Publisher!
[ INFO] [1625735087.481668623]: The message subscribed is: Hello,I'm Publisher!
[ INFO] [1625735088.482174147]: The message subscribed is: Hello,I'm Publisher!
[ INFO] [1625735089.481088268]: The message subscribed is: Hello,I'm Publisher!
[ INFO] [1625735090.482117154]: The message subscribed is: Hello,I'm Publisher!
这些都是在那个bag包里面记录的数据的回放。
最小仿真器
minimal_simulator.cpp
#include<ros/ros.h>
#include<std_msgs/Float64.h>
std_msgs::Float64 g_velocity;
std_msgs::Float64 g_force;

void myCallback(const std_msgs::Float64& message_holder)
{
    //check for messages on topic "force_cmd"  接收到信息,将信息发布出去,然后再赋值给g_force给main函数调用
    ROS_INFO("received force value is: %f",message_holder);
    g_force.data = message_holder.data;
}

int main(int argc, char *argv[])
{
    ros::init(argc, argv, "minimal_simulator");
    ros::NodeHandle nh;
    //create a Subscriber object and have it subscribe to the topic "force_cmd"
    ros::Subscriber my_subscriber_object = nh.subscribe("force_cmd",1,myCallback);
    //simulate accelerations and publish the resulting velocity  模拟加速度,发布速度的结果
    ros::Publisher my_publisher_object = nh.advertise<std_msgs::Float64>("velocity",1);
    double mass = 1.0;
    double dt = 0.01; //10ms integration time step
    double sample_rate = 1.0/dt;//compute the corresponding update by callback
    ros::Rate naptime(sample_rate);
    g_force.data = 0.0;
    g_velocity.data = 0.0;
    while(ros::ok())
    {
        g_velocity.data = g_velocity.data + (g_force.data/mass)*dt;//Euler integration of acceleration
        my_publisher_object.publish(g_velocity);
        ROS_INFO("velocity = %f",g_velocity);
        ros::spinOnce();//allow data update from callback
        //wait for remainder of specified period;this loop rate is faster than the update rate of
        //the 10HZ controller that specifies force_cmd however,simulator must advance each 10ms regardless
        naptime.sleep();
    }

    return 0;
}
整个while循环是根据naptime.sleep();制定的频率进行运行的,即在初始化的时候设定的ros::Rate naptime(sample_rate);这里sample_rate的值是由1.0/dt得出的,而dt的意思是时间间隔,设定的时间间隔是0.01,单位是s,所以是10ms的时间间隔,也就是我们想让这个发布器每隔10ms发布一次速度。而ros::Rate naptime(sample_rate);初始化需要的是频率HZ,所以就有了double sample_rate = 1.0/dt;这一步的转换。也就是说,naptime.sleep();是以100hz的频率控制while循环的。
ros::spinOnce();
这个代码的含义是,虽然while是以10ms的周期进行循环,但是它允许以更快的速率进行callback的读取,就是可以更快的频率读取发送来的力的消息。虽然可能事实上这个力的消息要比10ms更慢,本例程中力的周期是100ms,这个是手动发布的,后面再写。
总的来说,就是速度的发布周期要比力的发布周期要短,而读取力的周期函数要比速度的发布周期还要短一些,这样就能保证每个力的指令都可以进行,而且是及时的进行。
下面用几个发布指令来观察这一现象:
rostopic pub -r 10 force_cmd std_msgs/Float64 0.1
这里选择的是手动发布数据,即手动发布力的大小,来让已经写好的仿真器运行。以10hz发布,即100ms发布一次。
同时我们运行:
rosrun cs_ws minimal_simulator
得到的返回结果是:
[ INFO] [1625807619.872923527]: velocity = 0.399000
[ INFO] [1625807619.883449704]: velocity = 0.400000
[ INFO] [1625807619.883532220]: received force value is: 0.100000
[ INFO] [1625807619.892430602]: velocity = 0.401000
[ INFO] [1625807619.902282671]: velocity = 0.402000
[ INFO] [1625807619.912478316]: velocity = 0.403000
[ INFO] [1625807619.923923319]: velocity = 0.404000
[ INFO] [1625807619.932684560]: velocity = 0.405000
[ INFO] [1625807619.942146243]: velocity = 0.406000
[ INFO] [1625807619.952545407]: velocity = 0.407000
[ INFO] [1625807619.963155529]: velocity = 0.408000
[ INFO] [1625807619.972077788]: velocity = 0.409000
[ INFO] [1625807619.983075314]: velocity = 0.410000
[ INFO] [1625807619.983135947]: received force value is: 0.100000
[ INFO] [1625807619.993135512]: velocity = 0.411000
[ INFO] [1625807620.002318043]: velocity = 0.412000
[ INFO] [1625807620.013041668]: velocity = 0.413000
[ INFO] [1625807620.022235617]: velocity = 0.414000
我们可以看到每当有十次velocity发布,就会有一次force的value进行显示。这也正是手动发布的数据是力的值,100ms一次,要比速度的发布周期,10ms一次要慢。当然这个力的发布频率是可以改变的,这是可人为调节的。比如我把频率改为20hz,即50ms发布一次:
rostopic pub -r 20 force_cmd std_msgs/Float64 0.1
返回
[ INFO] [1625807943.253137906]: velocity = 0.887000
[ INFO] [1625807943.262155341]: velocity = 0.888000
[ INFO] [1625807943.262386054]: received force value is: 0.100000
[ INFO] [1625807943.272711568]: velocity = 0.889000
[ INFO] [1625807943.282494829]: velocity = 0.890000
[ INFO] [1625807943.292400204]: velocity = 0.891000
[ INFO] [1625807943.302861920]: velocity = 0.892000
[ INFO] [1625807943.312977550]: velocity = 0.893000
[ INFO] [1625807943.313702988]: received force value is: 0.100000
[ INFO] [1625807943.322479546]: velocity = 0.894000
[ INFO] [1625807943.332306080]: velocity = 0.895000
就是每当有5次velocity发布,就会有一次force的value显示。
同时,我们还可以使用rostopic的另一个指令进行观察命令的发布
rostopic echo force_cmd
返回
data: 0.1
---
data: 0.1
---
data: 0.1
---
data: 0.1
---
data: 0.1
---
data: 0.1
---
也就是force_cmd上的数据大小的显示,可以看到data的每次的值。
我们还可以使用rqt_plot组件来直观的看到数据的变化。
rqt_plot vlocity/data
然后就会呈现一条一直变化的线,随着x轴的时间变化,y轴的值一直在增加,也就是反应了velocity的值的变化情况。
最小控制器
minimal_controller.cpp
#include<ros/ros.h>
#include<std_msgs/Float64.h>
//global variables for callback functions to populate for use in main program
std_msgs::Float64 g_velocity;
std_msgs::Float64 g_vel_cmd;
std_msgs::Float64 g_force;//this one does not need to be global
void myCallbackVelocity(const std_msgs::Float64& message_holder)
{
    //check for data on topic "velocity" 这个是实际的速度,订阅的是仿真器发布的velocity话题
    ROS_INFO("received velocity value is: %f",message_holder.data);
    g_velocity.data = message_holder.data;
}

void myCallbackVelcmd(const std_msgs::Float64& message_holder)
{
    //g_vel_cmd是指我们希望达到的速度值,这个是用另一个rostopic发布指令发布给vel_cmd接收到的
    ROS_INFO("received velocity command value is: %f",message_holder.data);
    g_vel_cmd.data = message_holder.data;
}

int main(int argc, char *argv[])
{
    ros::init(argc, argv, "minimal_controller");
    ros::NodeHandle nh;
    //这里定义了两个接收订阅器,一个是速度真实值话题velocity,另一个是速度期望值话题vel_cmd
    ros::Subscriber my_subscriber_object1 = nh.subscribe("velocity",1,myCallbackVelocity);
    ros::Subscriber my_subscriber_object2 = nh.subscribe("vel_cmd", 1,myCallbackVelcmd);
    //这里发布的是force_cmd话题,发布力的控制值,由最小仿真器接收
    ros::Publisher my_publisher_object = nh.advertise<std_msgs::Float64>("force_cmd",1);
   	//速度反馈增益,也就是pid算法里面的积,就当是个参数,可以调节速度达到期望值的快慢,Kv越大,速度变化的越快,达到期望值越快
    double Kv = 1.0;//velocity feedback gain
    //控制时间的发布周期,0.1,单位s,即100ms一次
    double dt_controller = 0.1;//specify 10Hz controller sample rate (pretty slow,but illustrative)
    //计算对应的频率,10Hz
    double sample_rate = 1.0/dt_controller;//compute the corresponding update frequency
    //初始化周期控制函数(不晓得具体名字,就那么叫吧)
    ros::Rate naptime(sample_rate);
    //把需要用到的未知数在程序开始前置零
    g_velocity.data = 0.0;
    g_vel_cmd.data = 0.0;
    g_force.data = 0.0;
    double vel_err = 0.0;
    //enter the main loop: get velocity state and velocity commands
    //compute command force to get system velocity to match velocity command
    //publish this force for use by the complementary simulator
    while(ros::ok)
    {
        //计算期望值与真实值的偏差
        vel_err = g_vel_cmd.data - g_velocity.data; //compute error btwn desired and actual
        //velocities  给g_force赋值,Kv是1.0,则以期望值与真实值的偏差为力的大小进行速度的修正
        g_force.data = Kv*vel_err; //proportional-only velocity-error feedback defines commanded
        //force  发布g_force
        my_publisher_object.publish(g_force); //publish the control effort computed by this
        //controller  顺便把发布的g_force打印出来
        ROS_INFO("force command = %f",g_force.data);
        //这个函数还是为了两个接收话题的正常运行,跟上面仿真器的效果一样
        ros::spinOnce();//allow data update from callback
        //进行周期长度控制
        naptime.sleep();
    }
    return 0;
}
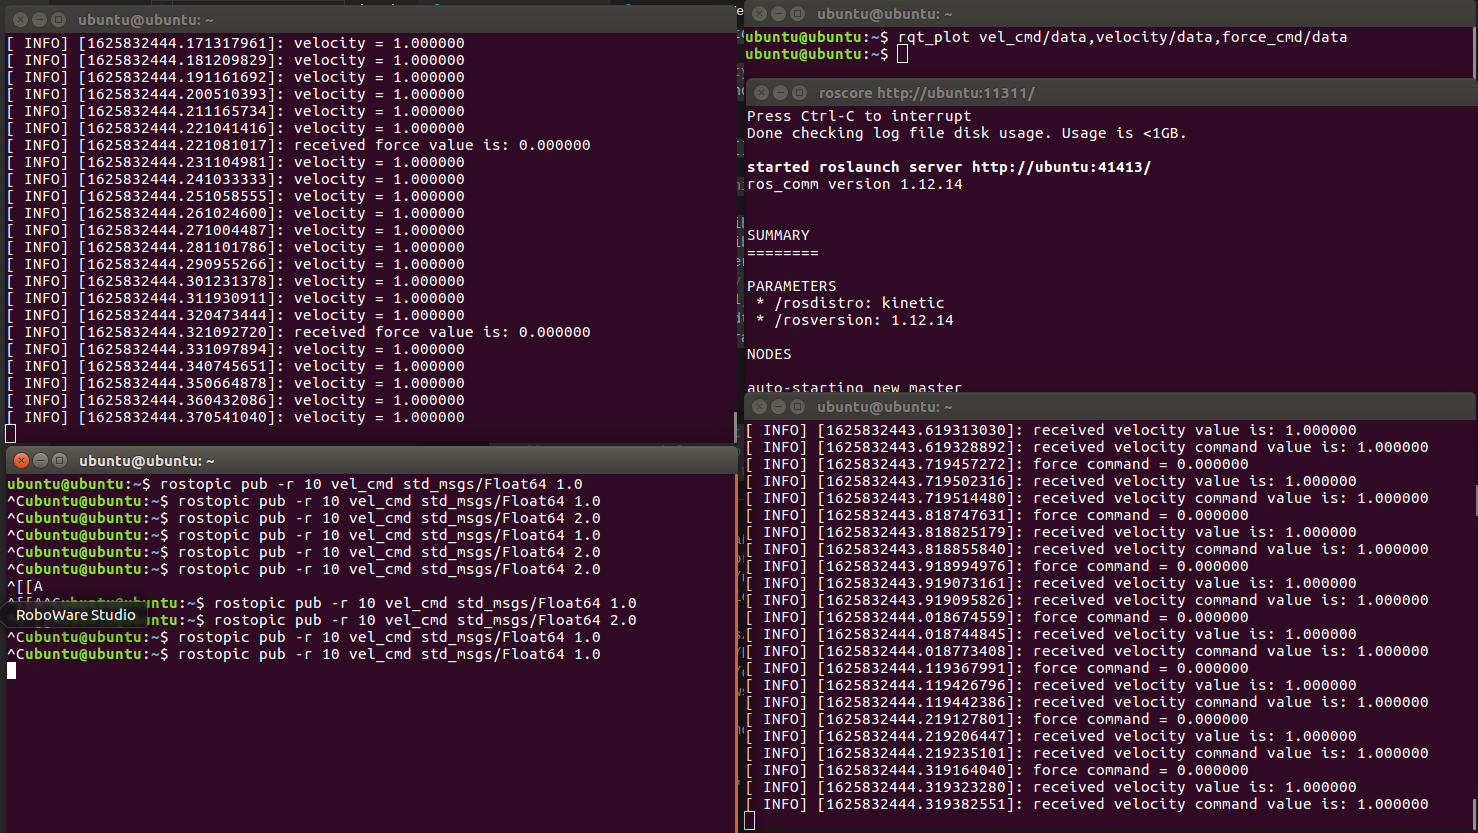
下面运行观察效果:
运行
rosrun cs_ws minimal_simulator
rosrun cs_ws minimal_controller
rostopic pub -r 10 vel_cmd std_msgs/Float64 1.0
运行一段时间后,如下图所示,现在力的大小为0,速度的期望值和真实值都是1.0,发布的vel_cmd也是1.0。这也正是程序想要达到的效果。
下面改变一下,让话题发布vel_cmd变成2.0
rostopic pub -r 10 vel_cmd std_msgs/Float64 2.0
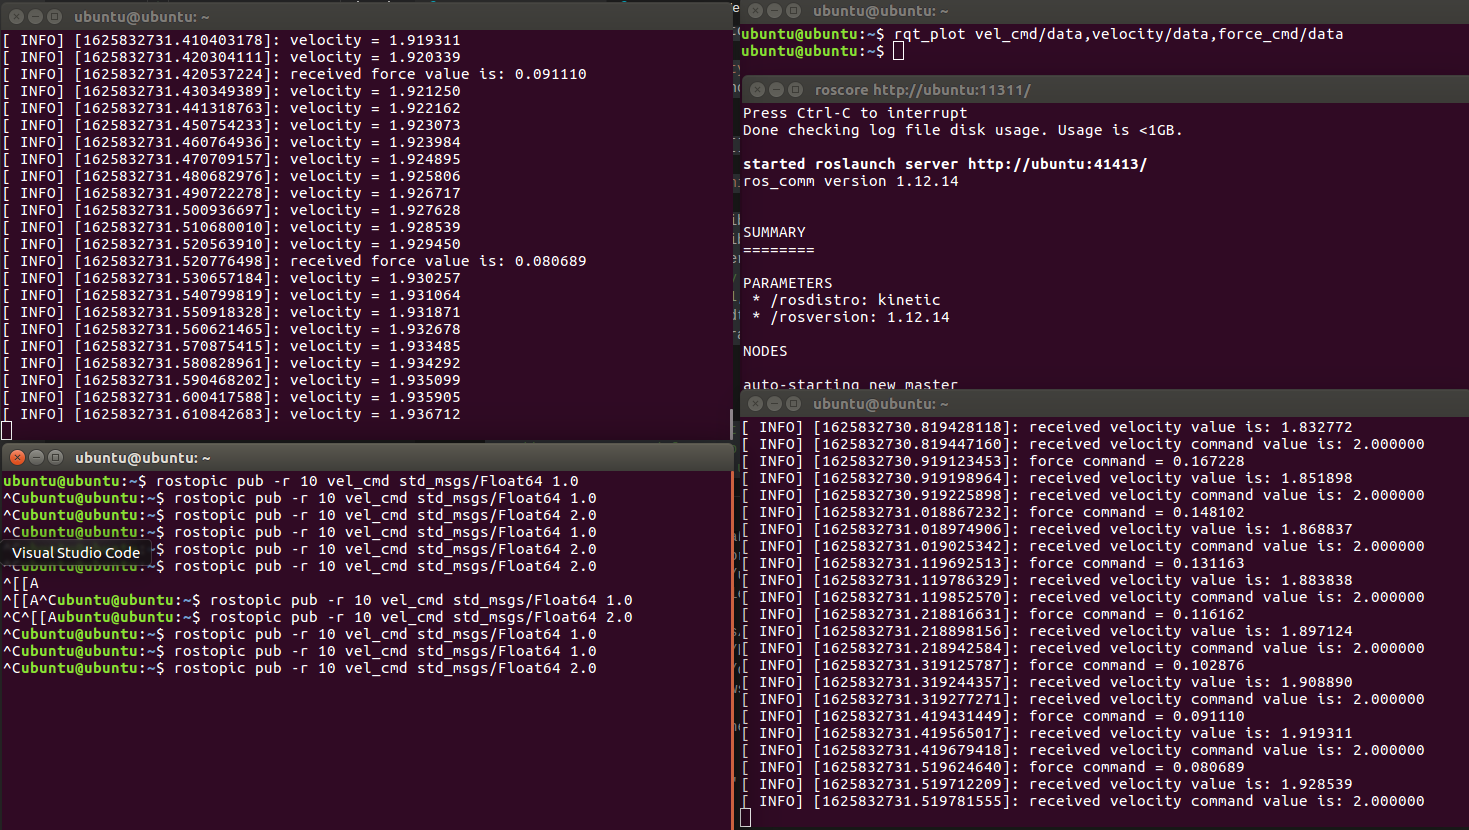
从图中我们可以看出,velocity的真实值正在趋向于2.0,而且左上的终端发布的速度velocity的值要比右下终端的速度velocity值要大,更接近2.0。这是因为左上的是仿真器minimal_simulator节点,它发布的话题velocity被右下角终端在运行的minimal_controller节点接收后,再发布出来,就要慢了一些。
同时我们还可以看到,右下边发布的有velocity command value,即期望值2.0与vel_cmd的话题发布值相同。
还有右下终端里面的force command是一直在减小的,这是因为期望值与真实值的差距正在减小,也正是g_force.data = Kv*vel_err;和vel_err = g_vel_cmd.data - g_velocity.data;的含义。
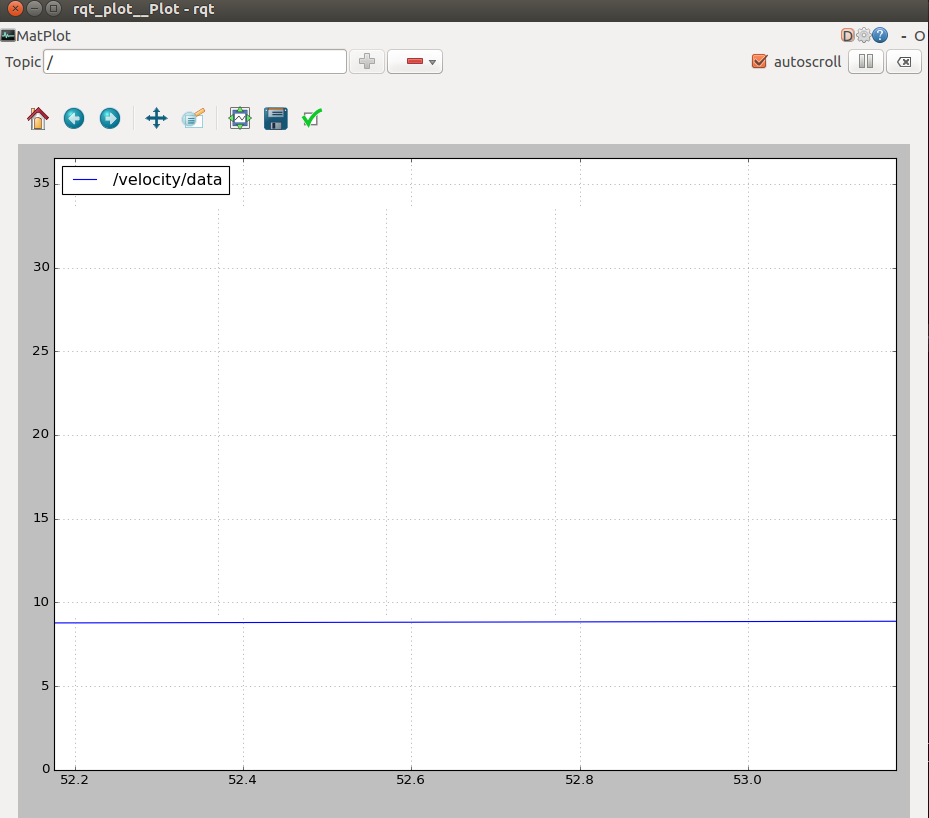
教程中还让我用rqt_plot查看几个数据的变化曲线,我也不知道是哪里的问题,三个一直都是y=0.0这一条直线。
rqt_plot vel_cmd/data,velocity/data,force_cmd/data
指令放这了,可以试试看。
至此,节点结束,《ROS机器人编程原理与应用》的第二章结束,《ROS机器人编程与SLAM算法解析指南》的话题发布与接收,节点部分结束,写完2.2。


 971
971


 被折叠的 条评论
为什么被折叠?
被折叠的 条评论
为什么被折叠?
 到【灌水乐园】发言


