官网已经更新了教程说明,在此特别说明:
https://github.com/ros-industrial/ros_qtc_plugin/wiki
This wiki explains the procedure for installing the ROS Qt Creator Plug-in.
Table of Contents
1.1 Installation Procedure for Ubuntu 14.04
1.2 Installation Procedure for Ubuntu 16.04
1.3 Installation Issues and Conflicts
1.4 Testing Plugin
1.5 Proceed to Next Step
1.1 Installation Procedure for Ubuntu 14.04
sudo add-apt-repository ppa:beineri/opt-qt57-trusty
sudo add-apt-repository ppa:levi-armstrong/ppa
sudo apt-get update && sudo apt-get install qt57creator-plugin-ros
1.2 Installation Procedure for Ubuntu 16.04
sudo add-apt-repository ppa:beineri/opt-qt57-xenial
sudo add-apt-repository ppa:levi-armstrong/ppa
sudo apt-get update && sudo apt-get install qt57creator-plugin-ros
1.3 Installation Issues and Conflicts
- No known issues
1.4 Testing Plugin.
Start Qt Creator
- Option 1: Launch using the desktop icon.
- Option 2: Launch from terminal. Before you can launch from the terminal perform one of the action below.
- Add "source /opt/qt57/bin/qt57-env.sh" to the users .bashrc file.
- Create a symbolic link file in you /usr/local/bin called qtcreator which points to /opt/qt57/bin/qtcreator-wrapper
To verify that the plugin exist, goto File>New File or Project>Projects>Import Project>Import ROS Workspace. If the Import ROS Workspace is present then everything built correctly and is ready for development and testing.
Table of Contents
1.1 Setup
1.1.1 Download development packages
1.1.1.1 Installation Procedure for Ubuntu 14.04
1.1.1.2 Installation Procedure for Ubuntu 16.04
1.1.2 Configure system
1.1.3 Run ROS Qt Creator setup script.
1.1.4 Testing Plugin
1.1.5 Debug issues with Plugin
1.1 Setup
This section explains how to setup your system for development
1.1.1 Download development packages
1.1.1.1 Installation Procedure for Ubuntu 14.04
sudo add-apt-repository ppa:beineri/opt-qt57-trusty
sudo add-apt-repository ppa:levi-armstrong/ppa
sudo apt-get update && sudo apt-get install qt57creator-plugin-ros libqtermwidget57-0-dev
1.1.1.2 Installation Procedure for Ubuntu 16.04
sudo add-apt-repository ppa:beineri/opt-qt57-xenial
sudo add-apt-repository ppa:levi-armstrong/ppa
sudo apt-get update && sudo apt-get install qt57creator-plugin-ros libqtermwidget57-0-dev
1.1.2 Configure system to use the new version of Qt
After installation you need to tell qtchooser where to find this install. Replace the two lines in the file below with the location to the local version shown below. Make sure to change username and versionin the file path to match your system.
File:
sudo gedit /usr/lib/x86_64-linux-gnu/qt-default/qtchooser/default.conf
File content:
/opt/qt57/bin
/opt/qt57/lib
1.1.3 - Run ROS Qt Creator setup script.
- Clone your fork of the repository.
$ git clone -b master https://github.com/<username>/ros_qtc_plugins.git Next in a terminal, navigate into the repository directory and execute the command below.
$ bash setup.sh -dNote: Instruction 2 can can be repeated to get the latest updates for Qt Creator source. The developer must manually update there fork to get the latest version of ros_qtc_plugins.
1.1.4 Testing Plugin.
- Execute the command below or launch using the desktop launcher.
$ qtcreator - To verify that the plugin exist, goto File>New File or Project>Projects>Import Project>Import ROS Workspace. If the Import ROS Workspace is present then everything built correctly and is ready for development and testing.
1.1.5 - Debug issues with Plugin
- Next in a terminal, navigate to the repository ros_qtc_plugin and execute the command below.
$ bash setup.sh -di Now launch qtcreator using gdb as shown below and after the plugin segfaults post the trace back in the active/new issue.
$ gdb <local>/qt-creator-build/bin/qtcreator

(gdb) run
After error:
(gdb) bt
参考链接:1. http://blog.csdn.net/u013453604/article/details/52186375
2. http://blog.csdn.net/zhangrelay/article/details/52068865
之前,帖子写得太过简略,这里学习和参考了张京林的博客。
如果使用的是ubuntu 14.04和ROS(indigo),参考他的博客,教程非常详细。
这里测试的是ubuntu 16.04和ROS(kinetic)。但是过程和细节几乎一致。
开启终端,输入:
- ~$ qtcreator
使用 Ctrl+N ,可以看到如下界面:


分为项目与文件和类。
新建catkin工作空间,并在其中创建功能包,实现Hi ROS!!!!
1 新建工作空间
单击下图Choose...

Name:catkin_HiROS
Path:/home/xxx/catkin_HiROS
弹出对话框,点击Yes,初始化工作空间如下:

之后,点击Generate Project File,完成后点击下一步(N):

在这个选项卡中,可以配置版本控制系统等,如不需要,点击完成(F):

这样就建好了一个空的工作空间,下面新建功能包,添加节点等。

2 创建功能包
在src上单击右键,添加新文件...

点击Choose...
然后填入一些功能包的细节信息,如下:

点击下一步(N),然后点击完成(F):

到此,功能包创建完成。
3 添加一个节点
在HiROS下的src上单击右键,添加新文件...


4 调试编译
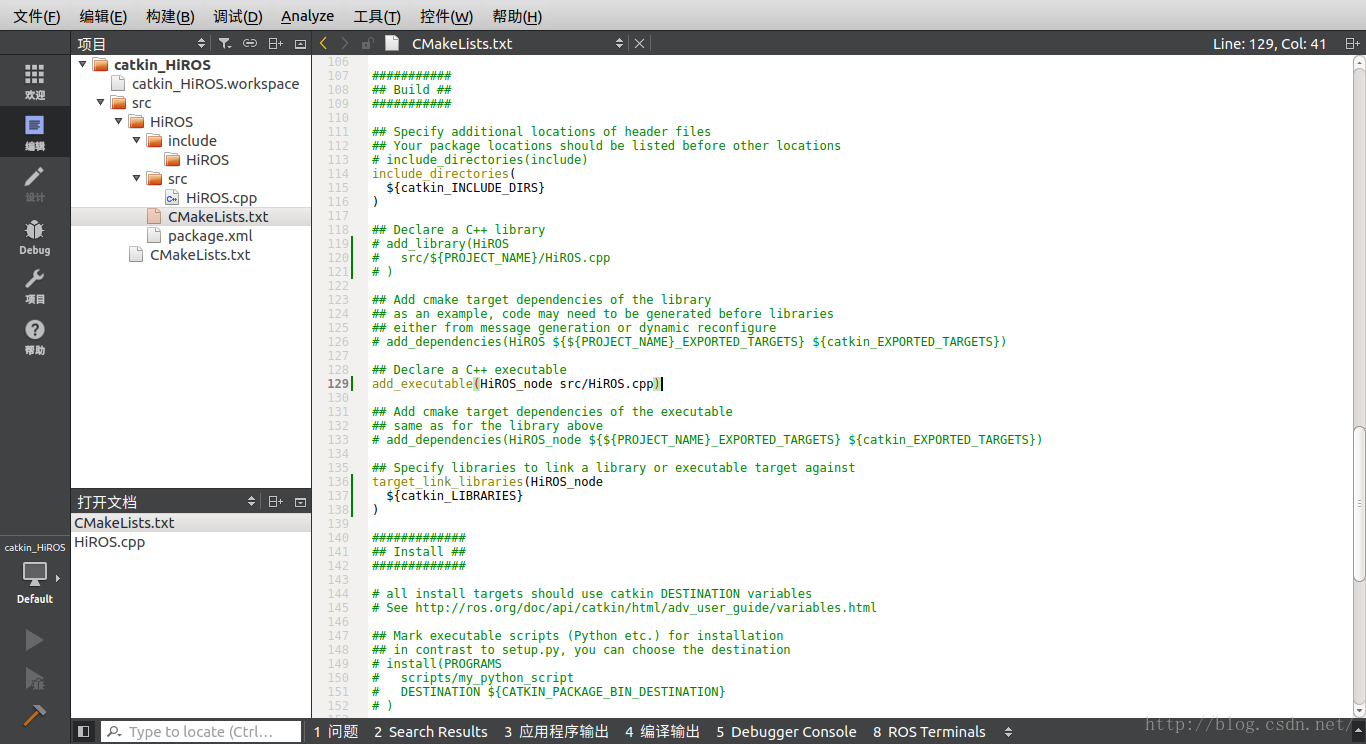
需要修改CMakeList.txt,在Build中,进行如下修改:
- ###########
- ## Build ##
- ###########
- ## Specify additional locations of header files
- ## Your package locations should be listed before other locations
- # include_directories(include)
- include_directories(
- ${catkin_INCLUDE_DIRS}
- )
- ## Declare a C++ library
- # add_library(HiROS
- # src/${PROJECT_NAME}/HiROS.cpp
- # )
- ## Add cmake target dependencies of the library
- ## as an example, code may need to be generated before libraries
- ## either from message generation or dynamic reconfigure
- # add_dependencies(HiROS ${${PROJECT_NAME}_EXPORTED_TARGETS} ${catkin_EXPORTED_TARGETS})
- ## Declare a C++ executable
- add_executable(HiROS_node src/HiROS.cpp)
- ## Add cmake target dependencies of the executable
- ## same as for the library above
- # add_dependencies(HiROS_node ${${PROJECT_NAME}_EXPORTED_TARGETS} ${catkin_EXPORTED_TARGETS})
- ## Specify libraries to link a library or executable target against
- target_link_libraries(HiROS_node
- ${catkin_LIBRARIES}
- )
注意:
- add_executable(HiROS_node src/HiROS.cpp)
- target_link_libraries(HiROS_node
- ${catkin_LIBRARIES}
- )

点击构建,进行编译。这里出现警告。功能包命名不规范,应当使用小写字母。

5 运行节点
点击右侧项目,配置桌面->运行:

点击运行,可以在底栏8 ROS Terminals,查看输入结果:

-End-


 被折叠的 条评论
为什么被折叠?


