


0 前言
在时空行为数据集中,最常出现的就是长尾数据集,即某些类别的动作标签过少,导致训练效果不好,在mmation2当中,提供了一个方法,就是可以自定义要训练的类别。
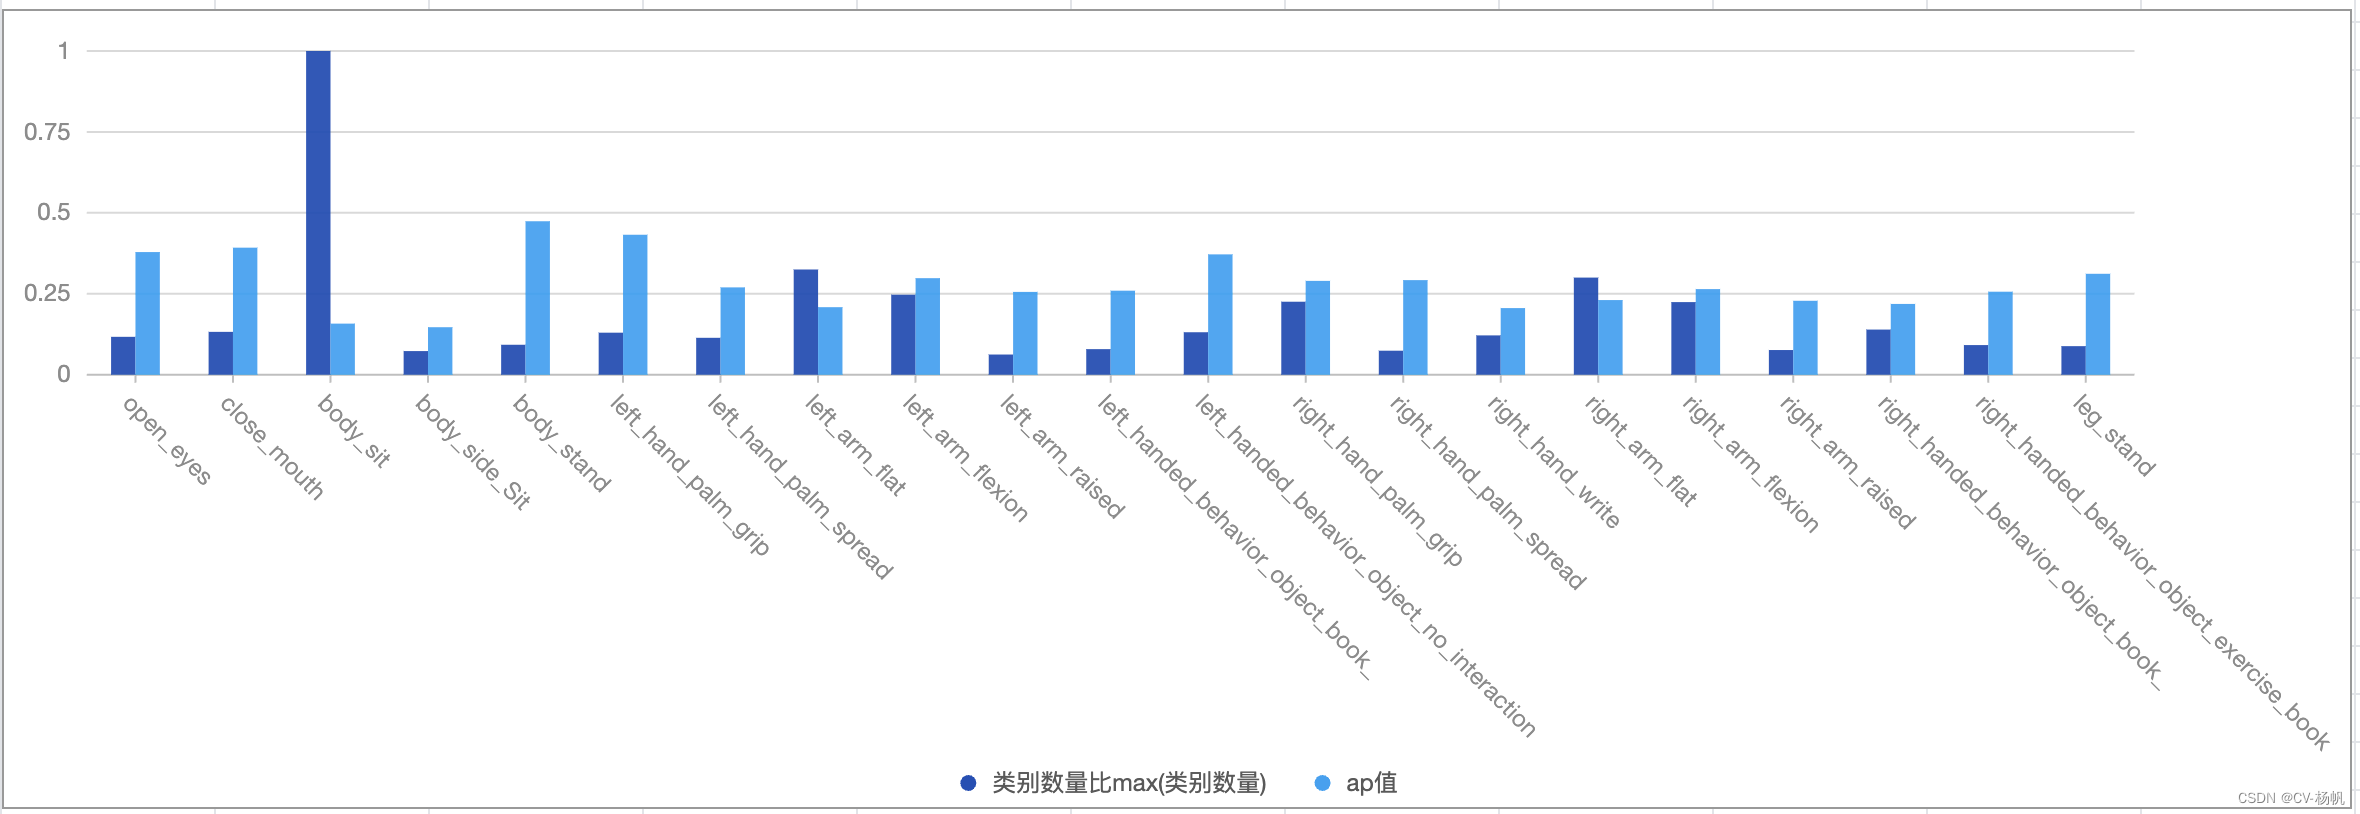
那么先看看我之前训练的分析结果
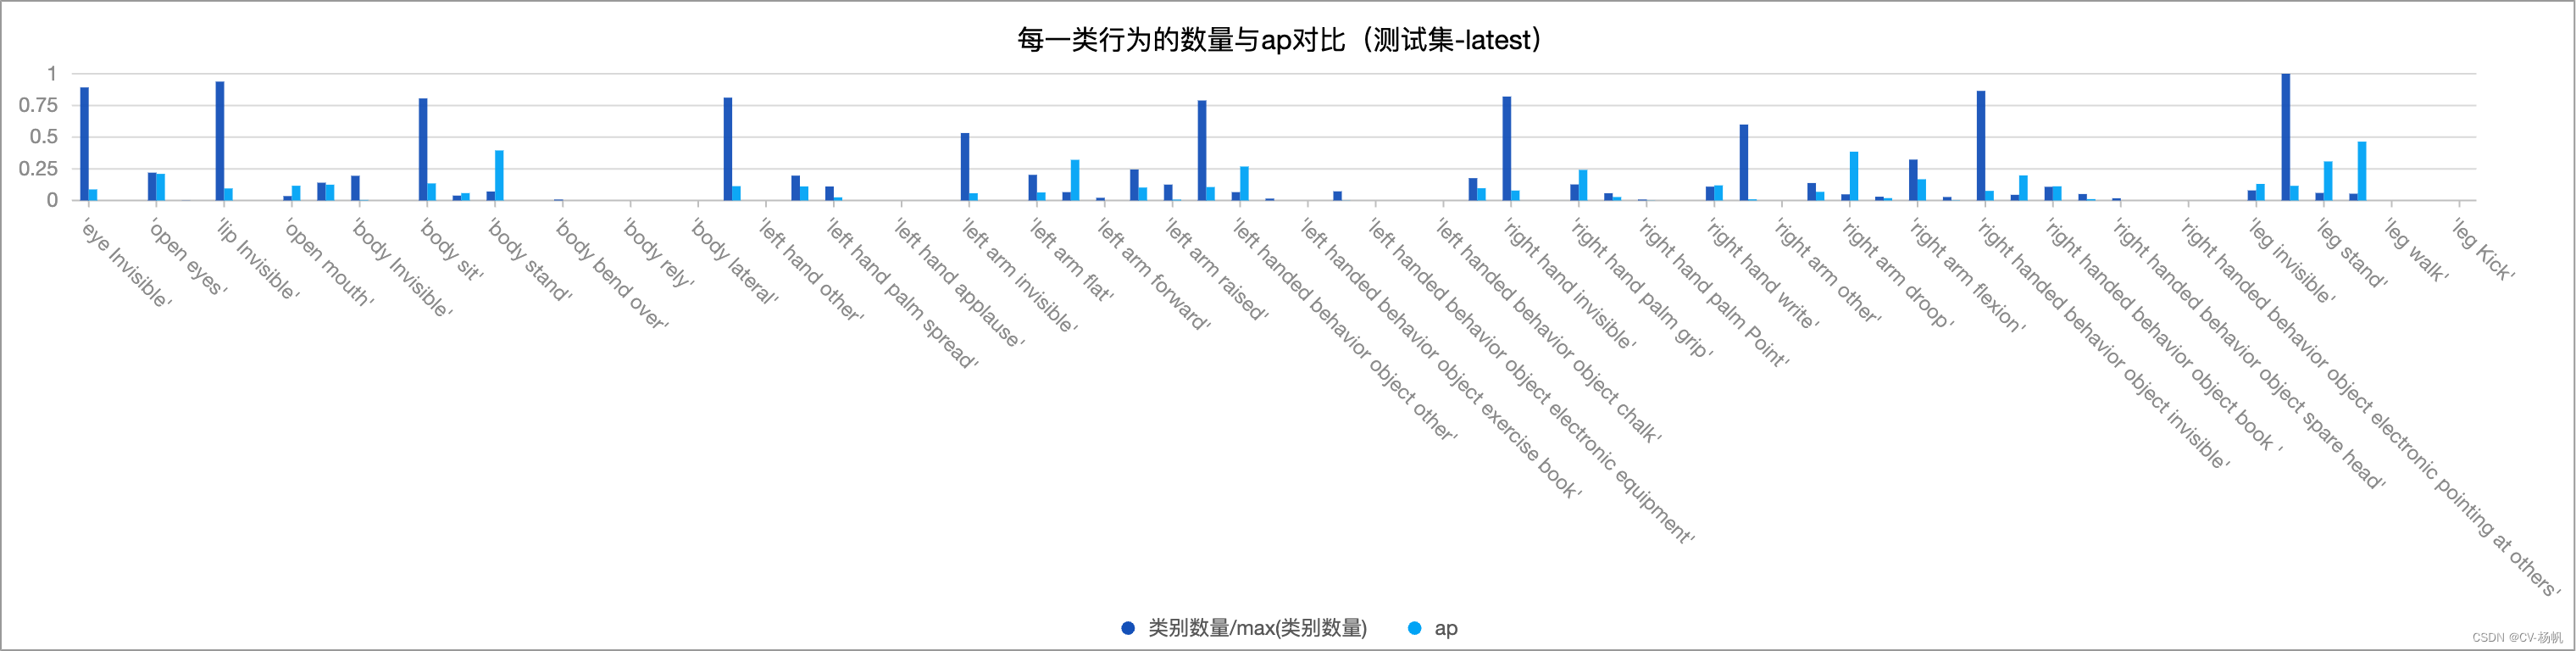
上图中,深蓝色的样本数量,浅蓝色的ap值,可以看出,样本极少的类别,ap值几乎为0,那么我们在训练的时候,可以忽略这些行为。
那如何来做呢,在mmaction2文档中已经说明了:https://mmaction2.readthedocs.io/zh_CN/latest/detection_models.html#id11
GPU平台:https://cloud.videojj.com/auth/register?inviter=18452&activityChannel=student_invite
b站:https://www.bilibili.com/video/BV1RV4y1s7mK/
1(官网)训练 AVA 数据集中的自定义类别
用户可以训练 AVA 数据集中的自定义类别。AVA 中不同类别的样本量很不平衡:其中有超过 100000 样本的类别: stand/listen to (a person)/talk to (e.g., self, a person, a group)/watch (a person),也有样本较少的类别(半数类别不足 500 样本)。大多数情况下,仅使用样本较少的类别进行训练将在这些类别上得到更好精度。
训练 AVA 数据集中的自定义类别包含 3 个步骤:
- 从原先的类别中选择希望训练的类别,将其填写至配置文件的
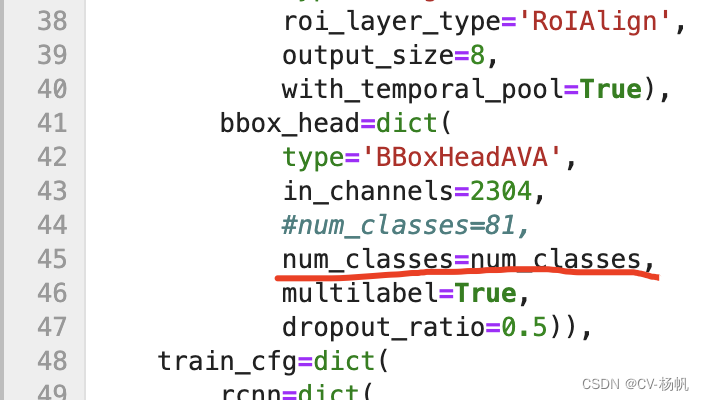
custom_classes域中。其中 0 不表示具体的动作类别,不应被选择。 - 将
num_classes设置为num_classes = len(custom_classes) + 1。- 在新的类别到编号的对应中,编号 0 仍对应原类别 0,编号 i (i > 0) 对应原类别
custom_classes[i-1]。 - 配置文件中 3 处涉及
num_classes需要修改:model -> roi_head -> bbox_head -> num_classes, data -> train -> num_classes, data -> val -> num_classes. - 若
num_classes <= 5, 配置文件BBoxHeadAVA中的topk参数应被修改。topk的默认值为(3, 5),topk中的所有元素应小于num_classes。
- 在新的类别到编号的对应中,编号 0 仍对应原类别 0,编号 i (i > 0) 对应原类别
- 确认所有自定义类别在
label_file中。
2 训练数据集中的自定义类别
那么就开始咯,通过统计分析,原本71个动作类,选取了其中21个动作类。
2.1 配置文件
直接上配置文件:
# model setting
custom_classes = [3, 8, 11, 12, 13, 22, 23, 29, 32, 33, 36, 42, 45, 46, 49, 52, 55, 56, 59, 60, 67]
#custom_classes = [2, 7, 10, 11, 12, 21, 22, 28, 31, 32, 35, 41, 44, 45, 48, 51, 54, 55, 58, 59, 66]
num_classes = len(custom_classes) + 1
model = dict(
type='FastRCNN',
backbone=dict(
type='ResNet3dSlowFast',
pretrained=None,
resample_rate=8,
speed_ratio=8,
channel_ratio=8,
slow_pathway=dict(
type='resnet3d',
depth=50,
pretrained=None,
lateral=True,
conv1_kernel=(1, 7, 7),
dilations=(1, 1, 1, 1),
conv1_stride_t=1,
pool1_stride_t=1,
inflate=(0, 0, 1, 1),
spatial_strides=(1, 2, 2, 1)),
fast_pathway=dict(
type='resnet3d',
depth=50,
pretrained=None,
lateral=False,
base_channels=8,
conv1_kernel=(5, 7, 7),
conv1_stride_t=1,
pool1_stride_t=1,
spatial_strides=(1, 2, 2, 1))),
roi_head=dict(
type='AVARoIHead',
bbox_roi_extractor=dict(
type='SingleRoIExtractor3D',
roi_layer_type='RoIAlign',
output_size=8,
with_temporal_pool=True),
bbox_head=dict(
type='BBoxHeadAVA',
in_channels=2304,
#num_classes=81,
num_classes=num_classes,
multilabel=True,
dropout_ratio=0.5)),
train_cfg=dict(
rcnn=dict(
assigner=dict(
type='MaxIoUAssignerAVA',
pos_iou_thr=0.9,
neg_iou_thr=0.9,
min_pos_iou=0.9),
sampler=dict(
type='RandomSampler',
num=32,
pos_fraction=1,
neg_pos_ub=-1,
add_gt_as_proposals=True),
pos_weight=1.0,
debug=False)),
test_cfg=dict(rcnn=dict(action_thr=0.002)))
dataset_type = 'AVADataset'
data_root = '/home/MPCLST/Dataset/rawframes'
anno_root = '/home/MPCLST/Dataset/annotations'
#ann_file_train = f'{anno_root}/ava_train_v2.1.csv'
ann_file_train = f'{anno_root}/train.csv'
#ann_file_val = f'{anno_root}/ava_val_v2.1.csv'
ann_file_val = f'{anno_root}/val.csv'
#exclude_file_train = f'{anno_root}/ava_train_excluded_timestamps_v2.1.csv'
#exclude_file_val = f'{anno_root}/ava_val_excluded_timestamps_v2.1.csv'
exclude_file_train = f'{anno_root}/train_excluded_timestamps.csv'
exclude_file_val = f'{anno_root}/val_excluded_timestamps.csv'
#label_file = f'{anno_root}/ava_action_list_v2.1_for_activitynet_2018.pbtxt'
label_file = f'{anno_root}/action_list.pbtxt'
proposal_file_train = (f'{anno_root}/dense_proposals_train.pkl')
proposal_file_val = f'{anno_root}/dense_proposals_val.pkl'
img_norm_cfg = dict(
mean=[123.675, 116.28, 103.53], std=[58.395, 57.12, 57.375], to_bgr=False)
train_pipeline = [
dict(type='SampleAVAFrames', clip_len=32, frame_interval=2),
dict(type='RawFrameDecode'),
dict(type='RandomRescale', scale_range=(256, 320)),
dict(type='RandomCrop', size=256),
dict(type='Flip', flip_ratio=0.5),
dict(type='Normalize', **img_norm_cfg),
dict(type='FormatShape', input_format='NCTHW', collapse=True),
# Rename is needed to use mmdet detectors
dict(type='Rename', mapping=dict(imgs='img')),
dict(type='ToTensor', keys=['img', 'proposals', 'gt_bboxes', 'gt_labels']),
dict(
type='ToDataContainer',
fields=[
dict(key=['proposals', 'gt_bboxes', 'gt_labels'], stack=False)
]),
dict(
type='Collect',
keys=['img', 'proposals', 'gt_bboxes', 'gt_labels'],
meta_keys=['scores', 'entity_ids'])
]
# The testing is w/o. any cropping / flipping
val_pipeline = [
dict(type='SampleAVAFrames', clip_len=32, frame_interval=2),
dict(type='RawFrameDecode'),
dict(type='Resize', scale=(-1, 256)),
dict(type='Normalize', **img_norm_cfg),
dict(type='FormatShape', input_format='NCTHW', collapse=True),
# Rename is needed to use mmdet detectors
dict(type='Rename', mapping=dict(imgs='img')),
dict(type='ToTensor', keys=['img', 'proposals']),
dict(type='ToDataContainer', fields=[dict(key='proposals', stack=False)]),
dict(
type='Collect',
keys=['img', 'proposals'],
meta_keys=['scores', 'img_shape'],
nested=True)
]
data = dict(
#videos_per_gpu=9,
#workers_per_gpu=2,
videos_per_gpu=5,
workers_per_gpu=2,
val_dataloader=dict(videos_per_gpu=1),
test_dataloader=dict(videos_per_gpu=1),
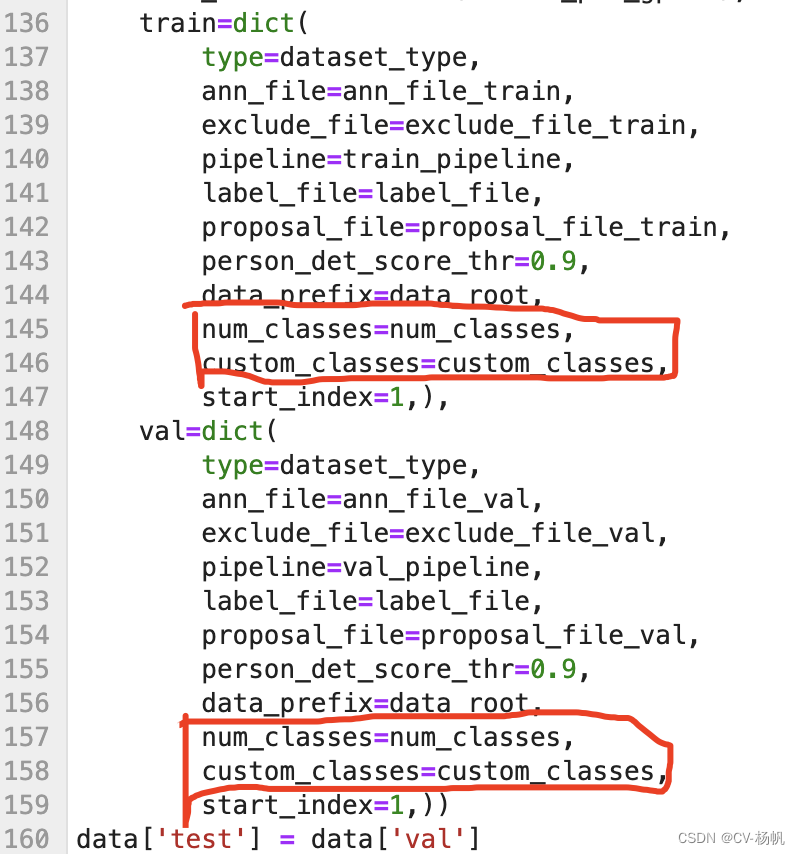
train=dict(
type=dataset_type,
ann_file=ann_file_train,
exclude_file=exclude_file_train,
pipeline=train_pipeline,
label_file=label_file,
proposal_file=proposal_file_train,
person_det_score_thr=0.9,
data_prefix=data_root,
num_classes=num_classes,
custom_classes=custom_classes,
start_index=1,),
val=dict(
type=dataset_type,
ann_file=ann_file_val,
exclude_file=exclude_file_val,
pipeline=val_pipeline,
label_file=label_file,
proposal_file=proposal_file_val,
person_det_score_thr=0.9,
data_prefix=data_root,
num_classes=num_classes,
custom_classes=custom_classes,
start_index=1,))
data['test'] = data['val']
#optimizer = dict(type='SGD', lr=0.1125, momentum=0.9, weight_decay=0.00001)
optimizer = dict(type='SGD', lr=0.0125, momentum=0.9, weight_decay=0.00001)
# this lr is used for 8 gpus
optimizer_config = dict(grad_clip=dict(max_norm=40, norm_type=2))
# learning policy
lr_config = dict(
policy='step',
step=[10, 15],
warmup='linear',
warmup_by_epoch=True,
warmup_iters=5,
warmup_ratio=0.1)
#total_epochs = 20
total_epochs = 35
checkpoint_config = dict(interval=1)
workflow = [('train', 1)]
evaluation = dict(interval=1, save_best='mAP@0.5IOU')
log_config = dict(
interval=20, hooks=[
dict(type='TextLoggerHook'),
])
dist_params = dict(backend='nccl')
log_level = 'INFO'
work_dir = ('./work_dirs/22-8-15-custom-ava/'
'slowfast_kinetics_pretrained_r50_4x16x1_20e_ava_rgb')
load_from = ('https://download.openmmlab.com/mmaction/recognition/slowfast/'
'slowfast_r50_4x16x1_256e_kinetics400_rgb/'
'slowfast_r50_4x16x1_256e_kinetics400_rgb_20200704-bcde7ed7.pth')
resume_from = None
find_unused_parameters = False

2.2 执行训练
#训练
cd /home/MPCLST/mmaction2_YF
python tools/train.py configs/detection/ava/my_custom_slowfast_kinetics_pretrained_r50_4x16x1_20e_ava.py --validate
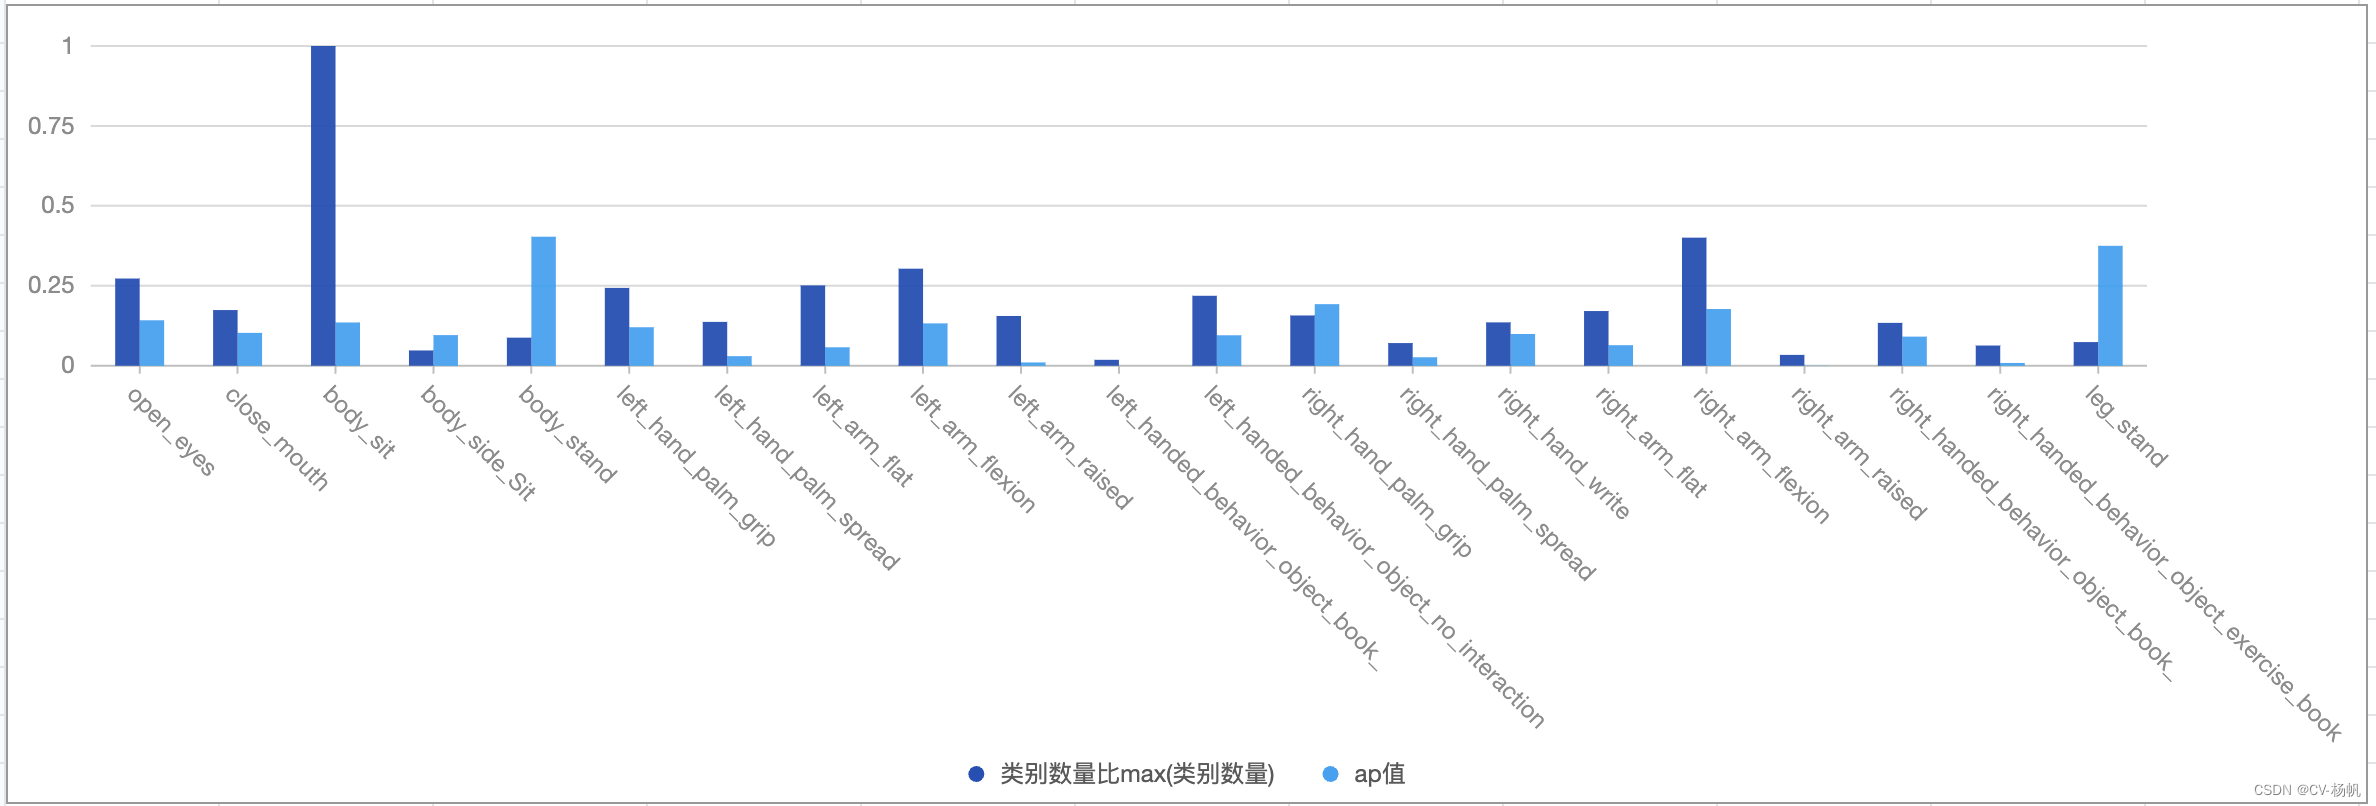
2.3 可视化测试
在上一篇博客写过:【mmaction2 入门教程 03】评价指标可视化 mAP、每类行为的ap值、每类行为的数量
# 测试集的分析-latest
cd /home/MPCLST/mmaction2_YF/
python tools/test.py configs/detection/ava/my_custom_slowfast_kinetics_pretrained_r50_4x16x1_20e_ava.py ./work_dirs/22-8-15-custom-ava/slowfast_kinetics_pretrained_r50_4x16x1_20e_ava_rgb/latest.pth --eval mAP
# 训练集的分析-latest
cd /home/MPCLST/mmaction2_YF/
python tools/test.py configs/detection/ava/my_custom_slowfast_kinetics_pretrained_r50_4x16x1_20e_ava2.py ./work_dirs/22-8-15-custom-ava/slowfast_kinetics_pretrained_r50_4x16x1_20e_ava_rgb/latest.pth --eval mAP


 1153
1153


 被折叠的 条评论
为什么被折叠?
被折叠的 条评论
为什么被折叠?
 到【灌水乐园】发言


