


今天的分享是跟AI开发相关的。
一直以来Java离大模型、AI都比较远,原因是缺少工业级的开发框架和平台。尤其是LangChain出现后,因为低廉的学习成本和较好的效果,深受大家喜爱,因此Python在大模型、AI领域显示出了无与伦比的先发优势。
今天我们介绍的是Java语言体系中的AI框架:Spring AI。
Spring AI 是从著名的 Python 项目LangChain和LlamaIndex中汲取灵感,它不是这些项目的直接移植,它的成立信念是,下一波生成式人工智能应用程序将不仅适用于Python开发人员,而且将在许多编程语言中无处不在。
Spring AI项目的推出,不仅标志着Spring生态的进一步扩展,也在Java语言体系中开启了一个全新的编程领域。
Spring AI的核心功能
我们可以从Spring AI的官网描述中,总结出Spring AI的几个核心的关键词:
-
模型管理:支持本地和远程模型的加载与卸载。
-
模型推理:提供统一的接口调用 AI 模型进行推理。
-
模型扩展:允许开发者自定义模型和扩展功能。
-
与Spring生态整合:无缝集成 Spring Boot、Spring Cloud等组件。
Spring AI安装配置和开发
Spring这个框架因为优秀的架构设计,在工业界做到了前无古人。Spring AI 极大简化了我们构建大型复杂的AI应用的过程。
引入依赖
<dependencies>
    <!-- Spring AI 核心依赖 -->
    <dependency>
        <groupId>org.springframework.ai</groupId>
        <artifactId>spring-ai-core</artifactId>
        <version>1.0.0</version>
    </dependency>
</dependencies>
添加模型
这个模型可以是本地训练好的,当然也可以是远程例如千问、DeepSeek等。
例如你是DeepSeek:
// api-key:在deepseek平台申请的key
spring.ai.openai.api-key=sk-xxxxxx
spring.ai.openai.base-url=https://api.deepseek.com
spring.ai.openai.chat.options.model=deepseek-chat
本地ollama模型:
spring.ai.ollama.chat.model:deepseek-r1
spring.ai.ollama.base-url:http://localhost:11434
开发应用
Spring AI提供的功能如下:
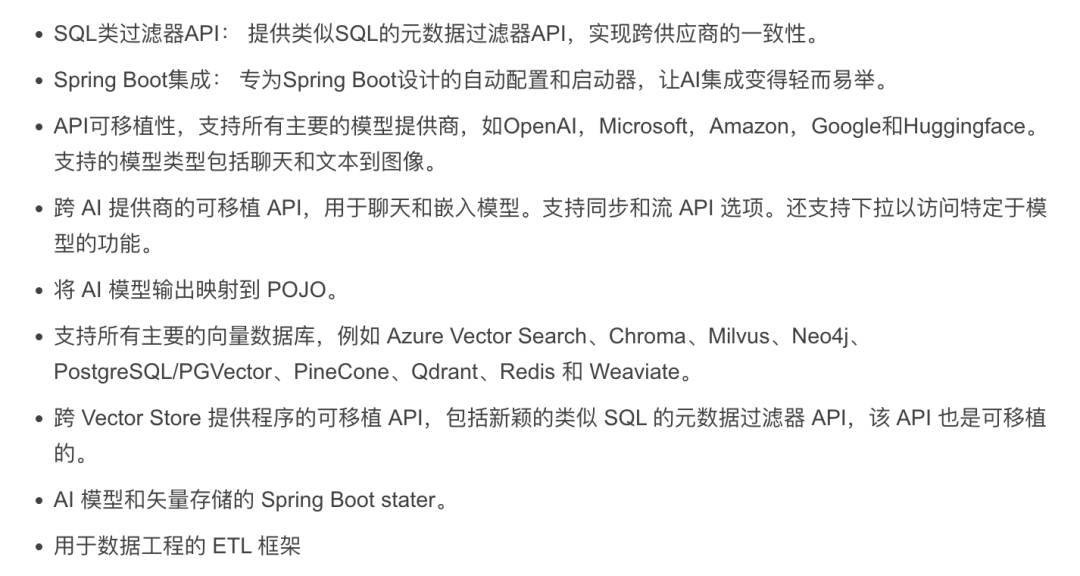
例如一个极简版本的聊天模型代码如下:
创建Config配置类:
@Configuration
public class CommonConfig {
    @Bean
    public ChatClient chatClient(OllamaChatModel model) {
        return ChatClient
                .builder(model)
                .build();
    }
}
创建Controller控制响应类:
@RestController
@RequestMapping("/ai")
public class ChatController {

    @Resource
    private ChatClient chatClient;

    //流式方式调用模型,编码格式
    @GetMapping(value = "/chat", produces = "text/html; charset=utf-8")
    public Flux<String> chat(String msg) {
        return chatClient.prompt()
                .user(msg)
                .stream()
                .content();
    }
}
然后我们就可以通过制定的url地址进行访问对话了。
你可以参考官方网站,有大量的实战案例。
Spring AI实现MCP服务
Spring AI MCP,它是模型上下文协议(Model Context Protocol,MCP)的 Java SDK 实现。Spring AI 生态系统的这一新成员为 Java 平台带来了标准化的 AI 模型集成能力。
使用 SpringAI 开发 MCP 服务非常简单:
引入下面依赖:
<dependency>
    <groupId>org.springframework.ai</groupId>
    <artifactId>spring-ai-starter-mcp-server-webmvc</artifactId>
</dependency>
开发 MCP Tool,并注册暴露 MCP Server:
// 开发 MCP Tool
@Service
public class WeatherService {
    @Tool(description = "根据城市名称获取天气预报")
    public String getWeatherByCity(@ToolParam(description = "城市名称") String city) {
        if (Objects.isNull(city)) {
            return"抱歉:城市名称不能为空!";
        }
        // 模拟天气数据
        Map<String, String> mockData = Map.of(
                "西安", "晴天",
                "北京", "小雨",
                "上海", "大雨"
        );
        return mockData.getOrDefault(city, "抱歉:未查询到对应城市!");
    }
}
// 注册暴露 MCP Server
@Bean
public ToolCallbackProvider weatherTools(WeatherService weatherService) {
    return MethodToolCallbackProvider.builder().toolObjects(weatherService).build();
}
启动 MCP 服务:
public static void main(String[] args) {
    SpringApplication.run(ServerApplication.class, args);
}
通过HTTP方式访问:
// 初始化 HTTP Client
var client = McpClient.sync(new HttpClientSseClientTransport("http://localhost:8080")).build(
// 发起请求
CallToolResult getWeatherByCity = client.callTool(new CallToolRequest("getWeatherByCity", Map.of("city", "上海")));
System.out.println("上海天气是:" + getWeatherByCity);
文章内容来自公众号:大数据技术与架构


 3146
3146

 被折叠的 条评论
为什么被折叠?
被折叠的 条评论
为什么被折叠?
 到【灌水乐园】发言


