


简介:介绍PyTorch 环境 在 EHub_tx1_tx2_E100载板,TX1核心模块环境(Ubuntu18.04)下如何实现部署和测试,准备安装的环境是(PyTorch v1.8.0 + torchvision v0.9.0)。
关于测试硬件EHub_tx1_tx2_E100载板请查看:EdgeBox_EHub_tx1_tx2_E100 开发板评测_机器人虎哥的博客-CSDN博客
目录
3.1 PyTorch for Jetson v1.8.0下载安装
错误1:import torchvision 时报 SyntaxError: future feature annotations is not defined
四、Containers NVIDIA L4T PyTorch
一、PyTorch 介绍
 Pytorch是torch的python版本,是由Facebook开源的神经网络框架,专门针对 GPU 加速的深度神经网络(DNN)编程。Torch 是一个经典的对多维矩阵数据进行操作的张量(tensor )库,在机器学习和其他数学密集型应用有广泛应用。与Tensorflow的静态计算图不同,pytorch的计算图是动态的,可以根据计算需要实时改变计算图。但由于Torch语言采用 Lua,导致在国内一直很小众,并逐渐被支持 Python 的 Tensorflow 抢走用户。作为经典机器学习库 Torch 的端口,PyTorch 为 Python 语言使用者提供了舒适的写代码选择。著名的avatarify(替身)的python版本是用pytorch实现的,项目见:https://github.com/alievk/avata
其官网入口为:PyTorch
中文教程入口:https://pytorch.apachecn.org/#/docs/1.4/README
PyTorch既可以看做加入了GPU支持的numpy,同时也可以看成一个拥有自动求导功能的强大的深度神经网络,除了Facebook之外,它还已经被Twitter、CMU和Salesforce等机构采用。
TensorFlow和Caffe都是命令式的编程语言,而且是静态的,首先必须构建一个神经网络,然后一次又一次使用相同的结构,如果想要改 变网络的结构,就必须从头开始。但是对于PyTorch,通过反向求导技术,可以让你零延迟地任意改变神经网络的行为,而且其实现速度 快。正是这一灵活性是PyTorch对比TensorFlow的最大优势。
另外,PyTorch的代码对比TensorFlow而言,更加简洁直观,底层代码也更容易看懂,这对于使用它的人来说理解底层肯定是一件令人激 动的事。所以,总结一下PyTorch的优点:
-
支持GPU
-
灵活,支持动态神经网络
-
底层代码易于理解
-
命令式体验
-
自定义扩展
当然,现今任何一个深度学习框架都有其缺点,PyTorch也不例外,对比TensorFlow,其全面性处于劣势,目前PyTorch还不支持快速傅里 叶、沿维翻转张量和检查无穷与非数值张量;针对移动端、嵌入式部署以及高性能服务器端的部署其性能表现有待提升;其次因为这个框 架较新,使得他的社区没有那么强大,在文档方面其C库大多数没有文档。
PyTorch的特性
PyTorch的祖先是Chainer,HIPS autograd,twitter-autograd.
这些库有以下两个鲜明的特征:
动态的,运行时定义:一个动态框架仅仅通过运行期望的操作来对函数求导,这与实现一个预先符号求导的静态的图结构再多次运行的方式恰恰相反。这样一来就允许用户使用任何想要的宿主语言特性(如各种控制流结构),以每次迭代都要求执行的求导为代价。动态执行将PyTorch和TensorFlow,Caffe这样的静态架构区分开来了。
A dynamic framework defines the function to be differentinated simply by running the desired computation,as opposed to specifying a static graph structure which is differentiated symbolically ahead of time and then run many times.This permits users to use any host-language features they want(e.g.,arbirary control flow constructs),at the cost of requiring differentiation to be carried out every iteration.Dynamic execution distinguishes PyTorch from static frameworks like TensorFlow,Caffe,etc.
简言之,动态计算图不容易优化,当不同输入的网路结构不一致时,难以并行计算,但是灵活性比较高。
立即的,迫切的执行:一个迫切的框架在遇到张量运算时才会运行;它甚至避免去实现一个“前向的图”,仅仅记录下对于求导运算必要的内容。这就站在DyNet的对立面上了,DyNet采用懒评估的方式,在每一次训练迭代中都会真实地重建前向和反向图。立即执行允许CPU和GPU运算被管道化,但是放弃了整个网络进行优化和批处理。
An eager framework runs tensor computations as it encounters them;it avoids ever materializing a "forward graph", recording only what is necessary to differentiate the computation.This stands in contrast to DyNet,which employs lazy evaluation,literally rebuilding the forwards and backwards graph every training iteration.Immediate execution allows CPU and GPU computation to be pipelined,but gives up the opportunity for whole-network optimization and batching.
但是让PyTorch从所有动态迫切执行地自动求导库中成了实现最快的一个,还要依赖于它地以下设计和实现选择:
原地运算:原地运算会给自动求导带来危害,因为原地运算会使得在微分阶段将要用到的数据失效。此外,它们要求执行特殊的tape转换操作。针对这些问题,PyTorch实现了简单但有效的机制。
In-place operations pose a hazard for automatic differentiation,because an in-place operation can invalidate data that would be needed in the differentiation phase.Additionally,they require nontrivial tape transformations to be performed.PyTorch implements simple but effective mechanisms that address both of these problems.
没有tape:传统反转模式求导记录一个tape(也叫Wengert列表),其作用是描述最初的执行操作的顺序,这个优化允许避免一个拓扑分类的实现。PyTorch(以及Chainer)避免了这个tape,取而代之的是,每一个中间结果只记录和它们计算有关子集。这也就意味着PyTorch的用户可以随心所欲地混合与匹配独立的图,以任何想要的方式(没有直接的同步)。以这种方式结构化图的另一个好处是,当图的一部分死去,就会被自动释放,这对于我们想要尽快释放大的内存块来说是一个重要的考虑。
Traditional reverse-mode differentiation records a tape(also known as a Wengert list) describing the order in which operations were originally executed;this optimization allows implementations to avoid a topological sort.PyTorch (and Chainer) eschew this tape;instead,every intermediate result records only the subset of the computation graph that was relevant to their computaion.This means PyTorch users can mix and match indepedent graphs however they like,in whatever threads they like(without explicit synchronization).An added benefit of structuring graphs this way is that when a portion of the graph becomes dead,it is automatically freed;an important consideration when we want to free large memory chunks as quickly as possible.
用C++写核心逻辑:PyTorch起源于Python的库;但是,高昂的转换器消耗对于核心AD逻辑来说很快凸显出来。今天,大多数的核心逻辑都是用C++写的,并且将核心操作定义转化成C++仍在进行中。小心调优的C++代码是PyTorch能够实现相比其他框架低得多的开销的首要愿意。
PyTorch started its life as a Python library;however,it quickly became clear that interpreter overhead is too high for core AD logic.Today,most of it is written in C++,and we are in the process of moving core operator definitions to C++.Carefully tuned C++ code is one of the primary reasons PyTorch can achieve much lower overhead compared to other frameworks.
二、安装环境确认说明
Jetpack默认已安装opencv、cuda、cudnn,故只需再安装pytorch即可,留意jetson是arm架构,需要下载对应的安装文件加以安装
1.1 确认系统版本
sudo lsb_release -a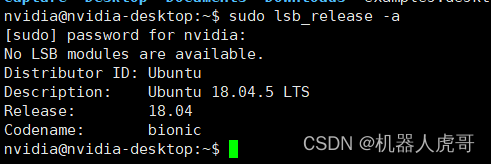
1.2 确认L4T版本版本
head -n 1 /etc/nv_tegra_release
说明使用的是jetpack4.6。
1.3 确认Jetson版本
jetson_release -v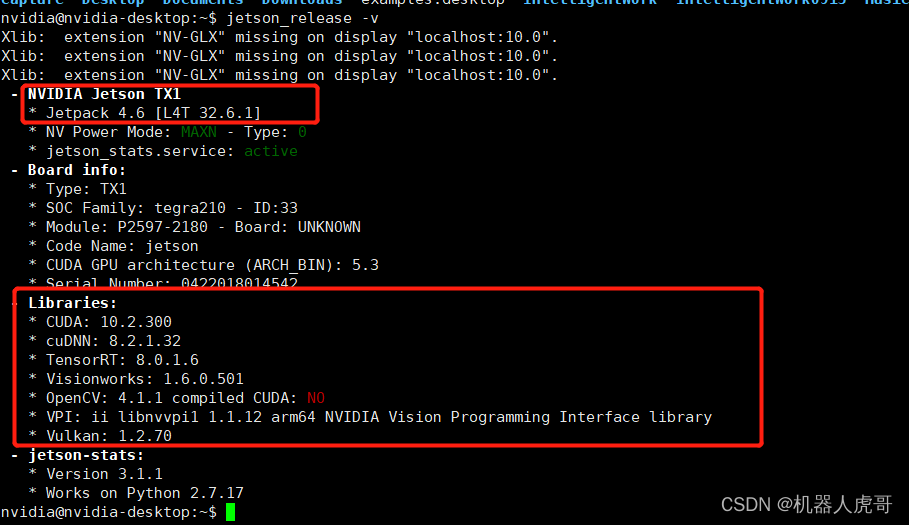
EHub_tx1_tx2_E100 系统 TX1核心,我们已经安装了CUDA、cuDNN、等,具体的安装方法,使用官方对应的工具刷机安装,具体可以参考之前的文章。
jeston TX1&TX2使用sdkmanager 安装cuda等环境_机器人虎哥的博客-CSDN博客
EHub_tx1_tx2_E100 测试VisionWorks跑自带的demo_机器人虎哥的博客-CSDN博客_visionworks
1.4 PYthon 版本:
nvidia@nvidia-desktop:~$ python --version
Python 2.7.17
nvidia@nvidia-desktop:~$ python3 --version
Python 3.6.9
三、安装环境步骤
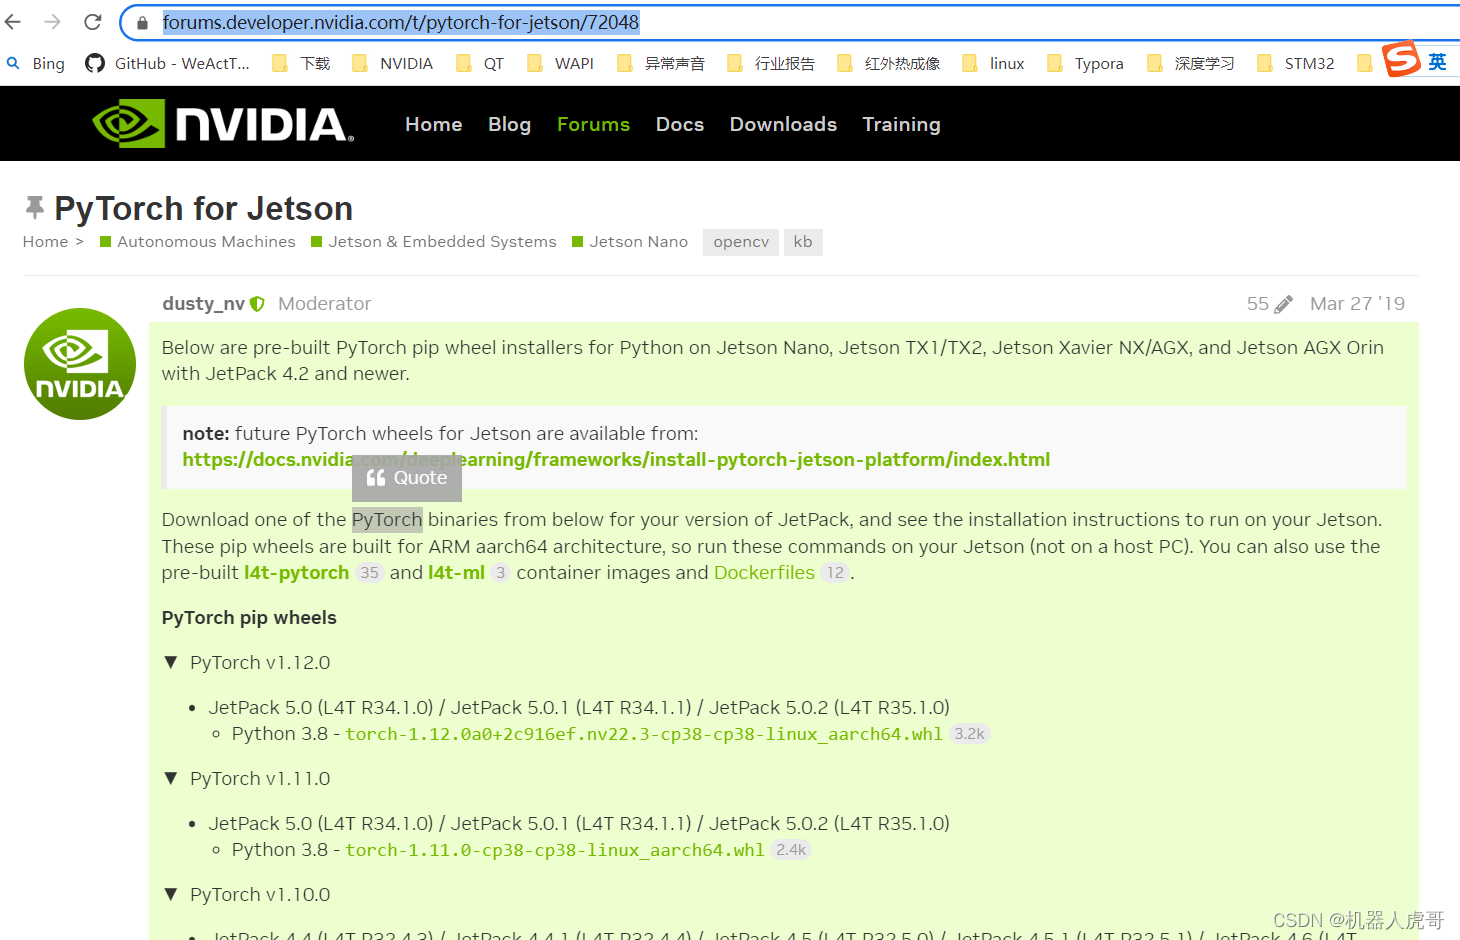
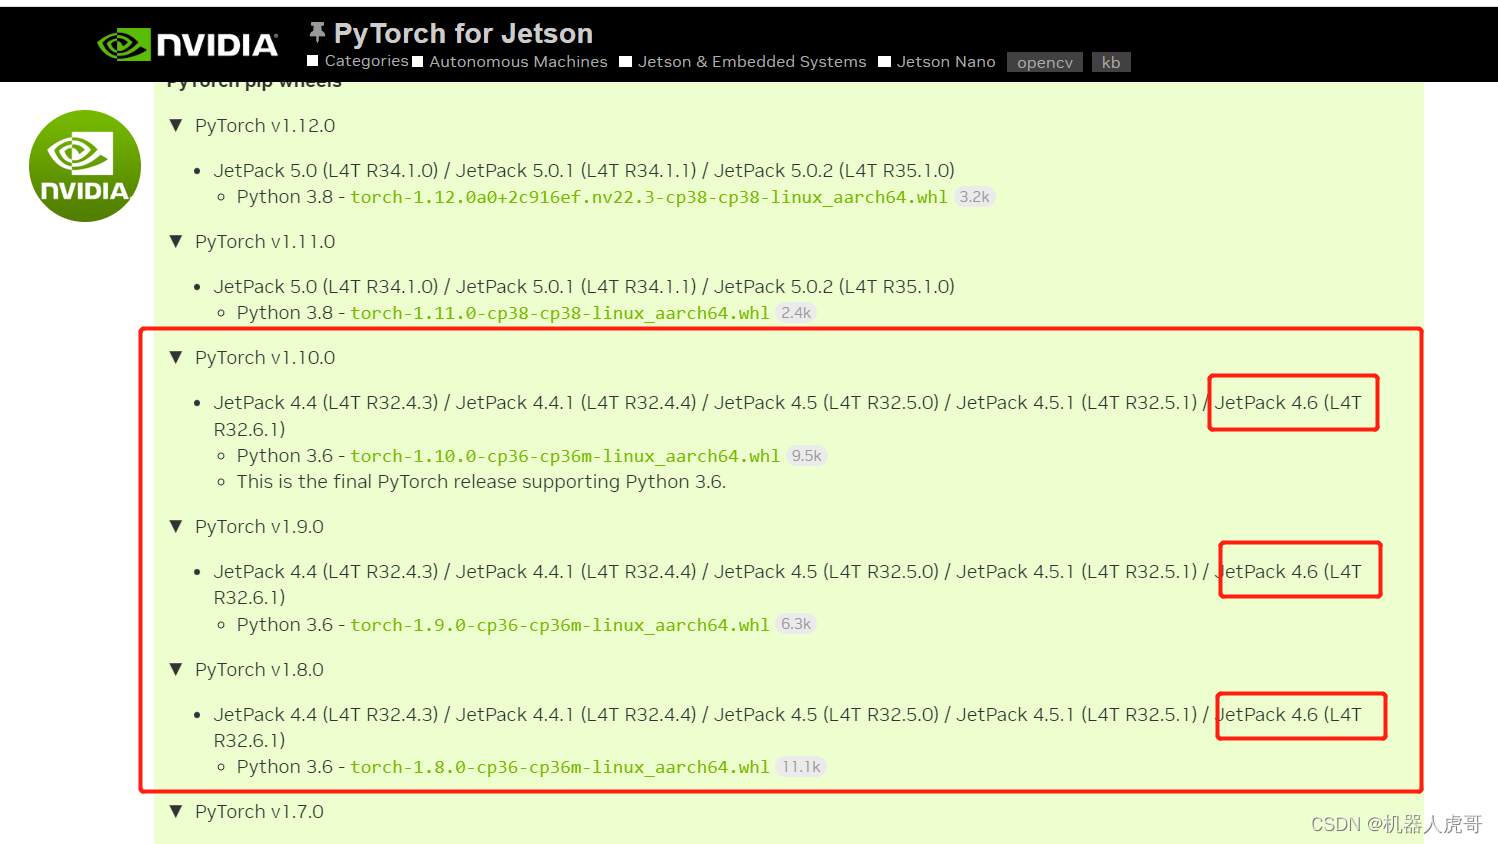
TX1专用下载地址,一定和jetpack的版本对应好,但是这个里面有些其实照着装也不能成功,主要是中间有些细节和出现错误后没有说明怎么解决。不过是很重要的参考。
https://forums.developer.nvidia.com/t/pytorch-for-jetson/72048
但是上面的对应关系我自己安装总是在 torchvision出错。所以我决定找找官方容器是怎么安装的搭配的。功夫不负有心人,终于找到了。
网址入口:NVIDIA L4T PyTorch | NVIDIA NGC
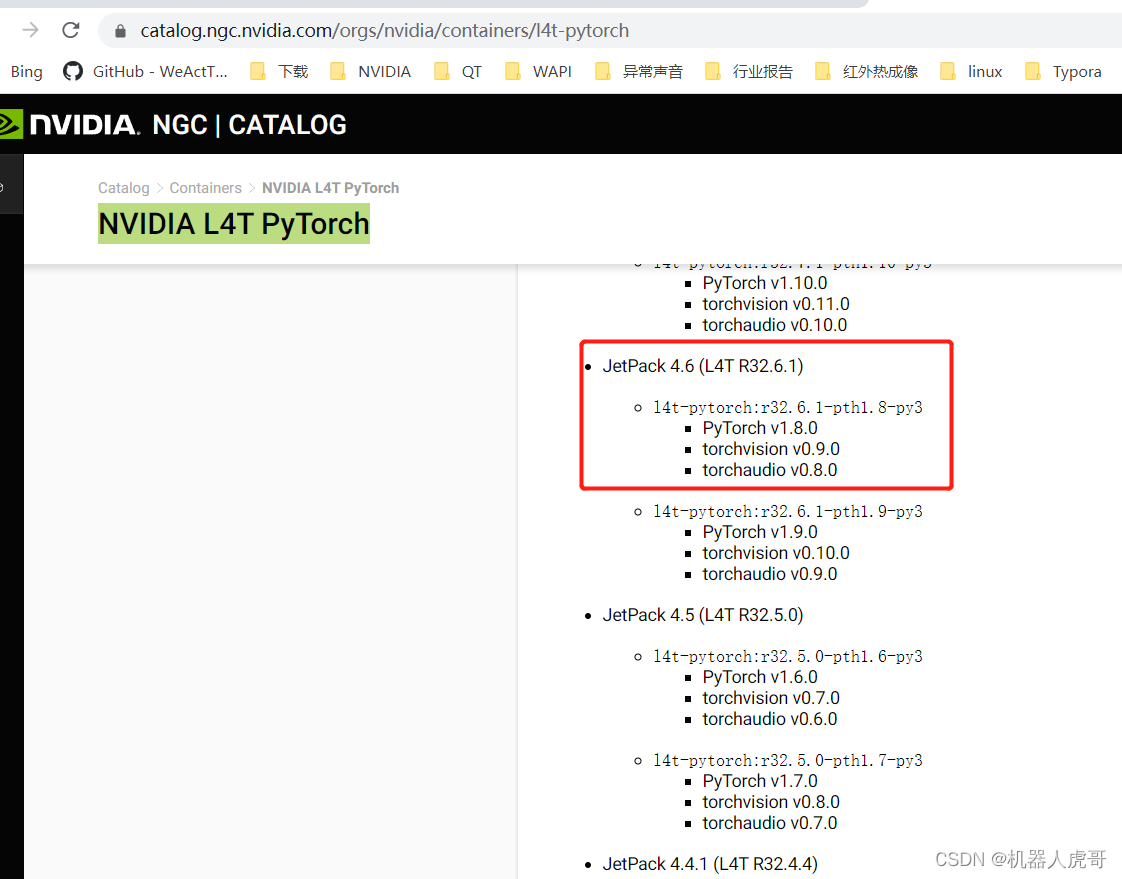
我们自己安装也使用这个搭配来安装:PyTorch v1.8.0 torchvision v0.9.0 按照这个组合试试。
3.1 PyTorch for Jetson v1.8.0下载安装
我们的环境是
Jetpack 4.6 [L4T 32.6.1]
网址入口:https://forums.developer.nvidia.com/t/pytorch-for-jetson/72048
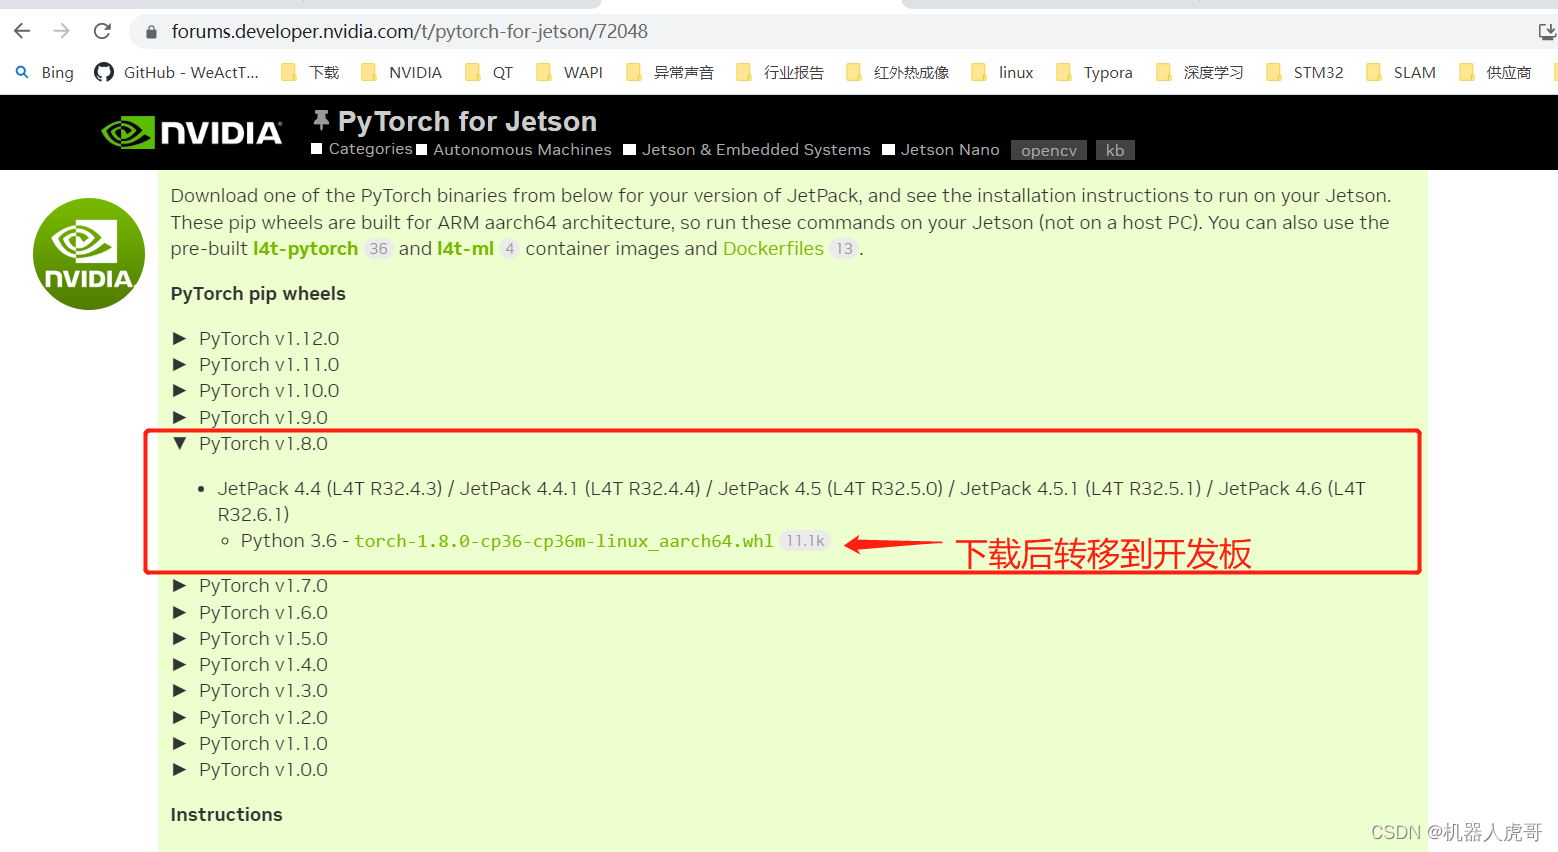

安装:
pip3 install numpy torch-1.8.0-cp36-cp36m-linux_aarch64.whl3.2 安装 torchvision v0.9.0
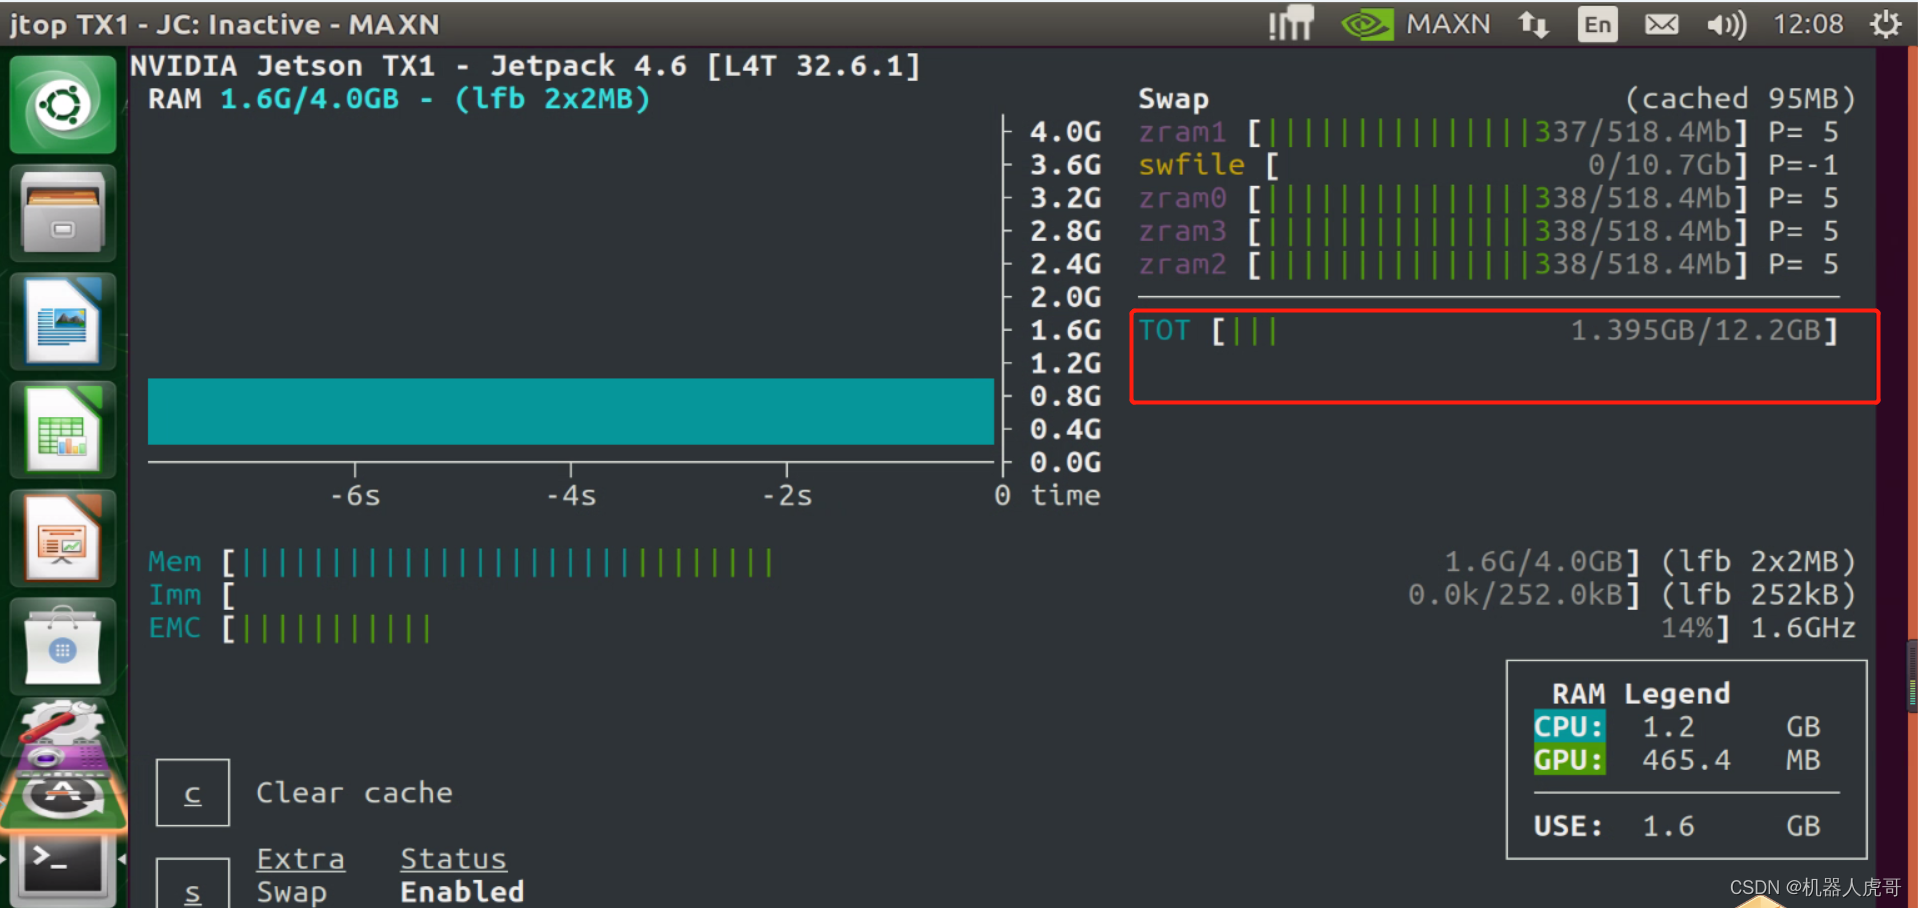
1、调高虚拟内存,建议总内存至少大于10G
jtop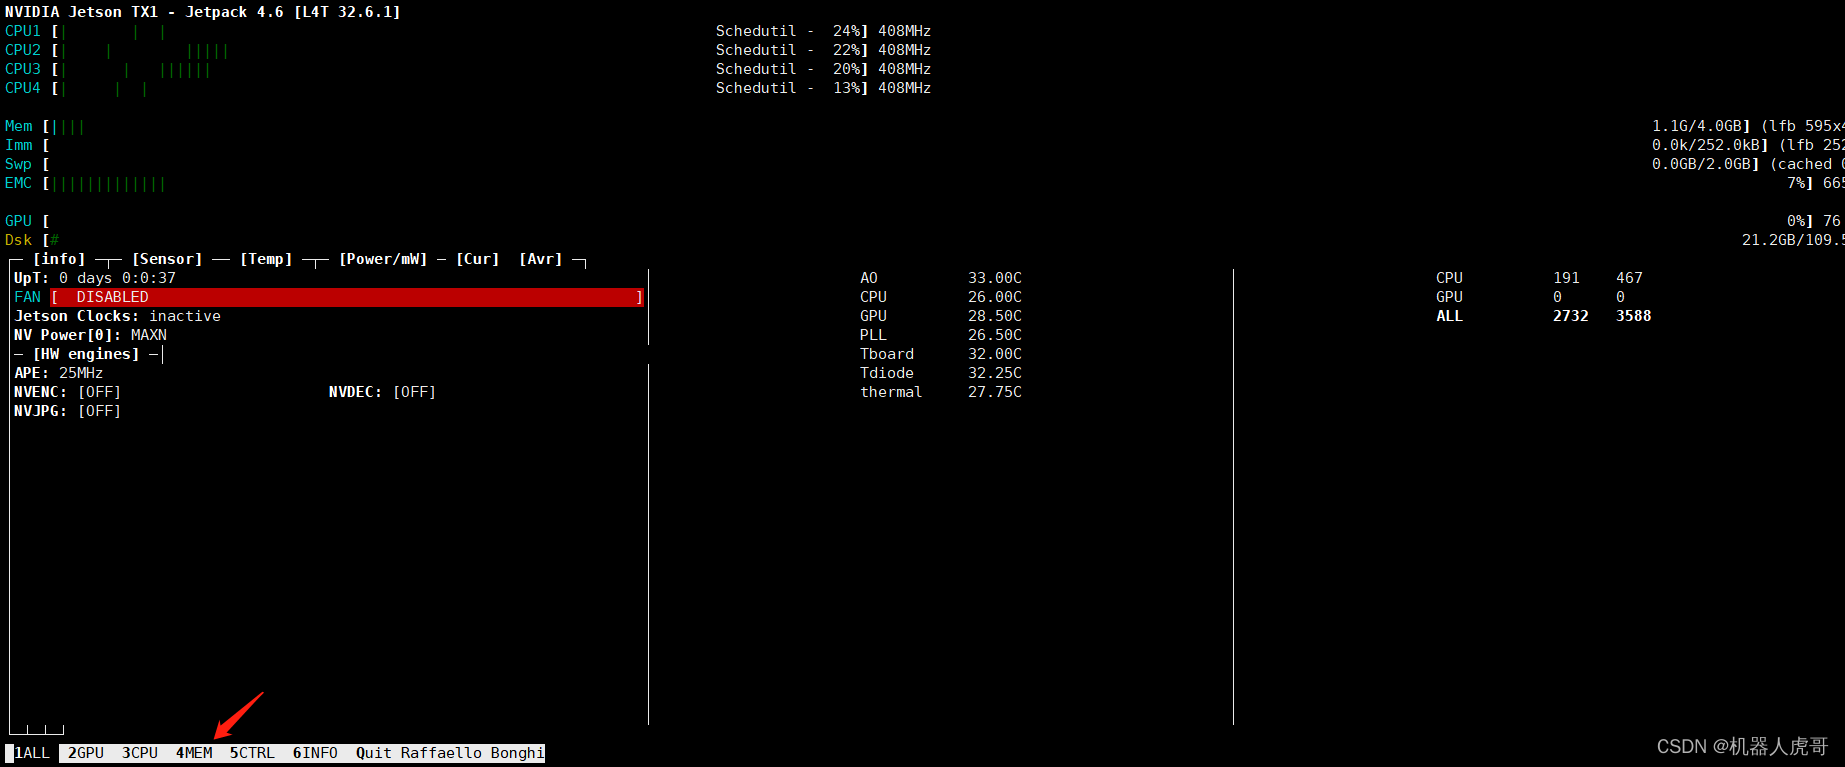
先加8G的,总计12G的内存
2、调大一些环境参数
nvidia@nvidia-desktop:~$ ulimit -a
core file size          (blocks, -c) 0
data seg size           (kbytes, -d) unlimited
scheduling priority             (-e) 0
file size               (blocks, -f) unlimited
pending signals                 (-i) 13930
max locked memory       (kbytes, -l) 65536
max memory size         (kbytes, -m) unlimited
open files                      (-n) 65535
pipe size            (512 bytes, -p) 8
POSIX message queues     (bytes, -q) 819200
real-time priority              (-r) 0
stack size              (kbytes, -s) 2024
cpu time               (seconds, -t) unlimited
max user processes              (-u) 13930
virtual memory          (kbytes, -v) unlimited
file locks                      (-x) unlimited
sudo gedit /etc/security/limits.conf 修改后重启sudo reboot,重启后查看环境量:
nvidia@nvidia-desktop:~$ ulimit -a
core file size          (blocks, -c) 0
data seg size           (kbytes, -d) unlimited
scheduling priority             (-e) 0
file size               (blocks, -f) unlimited
pending signals                 (-i) 13930
max locked memory       (kbytes, -l) 65536
max memory size         (kbytes, -m) unlimited
open files                      (-n) 65535
pipe size            (512 bytes, -p) 8
POSIX message queues     (bytes, -q) 819200
real-time priority              (-r) 0
stack size              (kbytes, -s) 6024
cpu time               (seconds, -t) unlimited
max user processes              (-u) 13930
virtual memory          (kbytes, -v) unlimited
file locks                      (-x) unlimited
3、源码编译安装
#前提环境
sudo apt-get install libjpeg-dev zlib1g-dev libpython3-dev libavcodec-dev libavformat-dev libswscale-dev
#这个官方教程没写
pip3 install setuptools
#克隆源代码
git clone --branch v0.9.0 https://github.com/pytorch/vision torchvision
cd torchvision/
git checkout -b v0.9.0
#查看当前分支
git branch -a 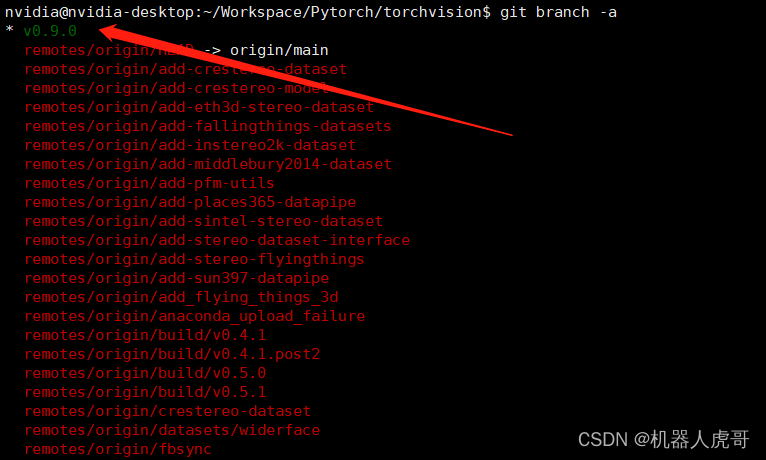
#进入克隆后的目录
cd /home/nvidia/Workspace/Pytorch/torchvision
#设置环境变量后,编译安装,之前记得增加虚拟内存,总内存需要至少大于10G才保险
export BUILD_VERSION=0.9.0
sudo python3 setup.py install --user
#这一步我最后也没有确认是否需要必须执行
cd ../
pip install 'pillow<7'3.3 错误解决
错误1:import torchvision 时报 SyntaxError: future feature annotations is not defined
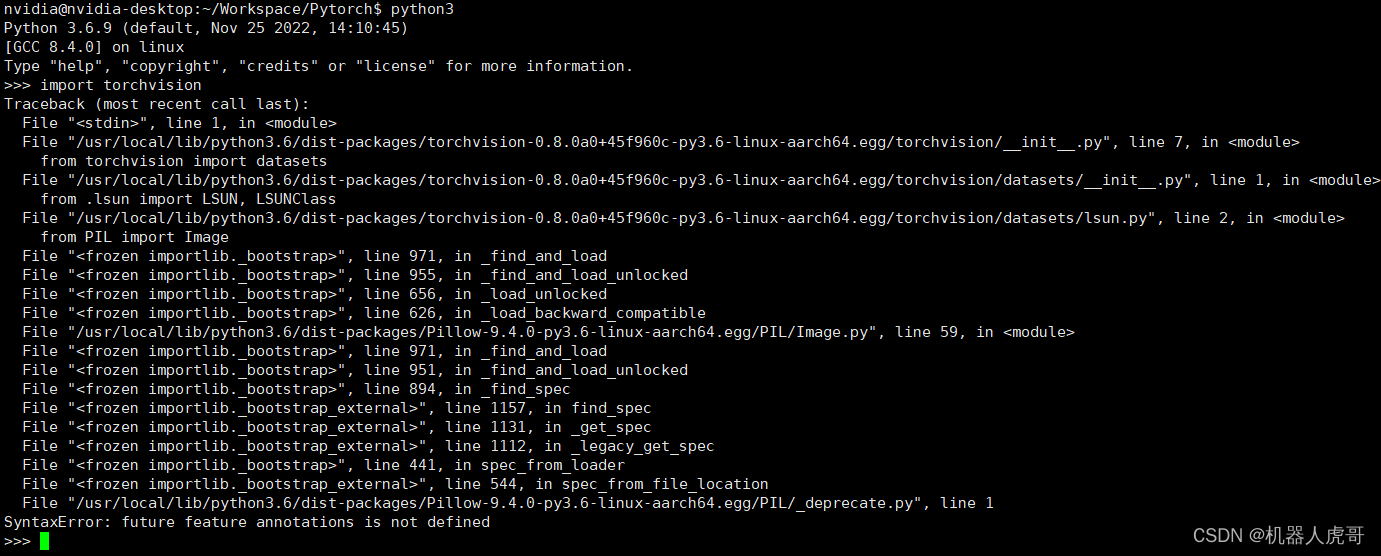 网上似乎有人的意见是这个版本有些高了,需要卸载后,安装更低版本的。还是不对,后来偶尔发现,可能是pillow版本太高导致的,我自己实验,降低了pillow版本后,即可以正常验证过去。
#卸载后重新安装pillow 我自己原来是Pillow-9.4.0 卸载后系统自动匹配的是Successfully installed dataclasses-0.8 torchvision-0.9.0a0+01dfa8e typing-extensions-4.1.1
sudo pip3 uninstall pillow
sudo pip3 install -U pillow
#把之前安装的torchvision先卸载掉
pip3 uninstall torchvision
#重新编译安装0.9.0版本
cd /home/nvidia/Workspace/Pytorch/torchvision
export BUILD_VERSION=0.9.0
sudo python3 setup.py install --user
#这一步我最后也没有确认是否需要必须执行
cd ../
pip install 'pillow<7'卸载和安装打印
nvidia@nvidia-desktop:~/Workspace/Pytorch$ sudo pip3 uninstall pillow
The directory '/home/nvidia/.cache/pip/http' or its parent directory is not owned by the current user and the cache has been disabled. Please check the permissions and owner of that directory. If executing pip with sudo, you may want sudo's -H flag.
Uninstalling Pillow-9.4.0:
/usr/local/lib/python3.6/dist-packages/Pillow-9.4.0-py3.6-linux-aarch64.egg
Proceed (y/n)? y
Successfully uninstalled Pillow-9.4.0
nvidia@nvidia-desktop:~/Workspace/Pytorch$ sudo pip3 install -U pillow
Collecting pillow
Downloading https://files.pythonhosted.org/packages/7d/2a/2fc11b54e2742db06297f7fa7f420a0e3069fdcf0e4b57dfec33f0b08622/Pillow-8.4.0.tar.gz (49.4MB)
Successfully installed dataclasses-0.8 torchvision-0.9.0a0+01dfa8e typing-extensions-4.1.1再验证通过
nvidia@nvidia-desktop:~/Workspace/Pytorch$ python3
Python 3.6.9 (default, Nov 25 2022, 14:10:45)
[GCC 8.4.0] on linux
Type "help", "copyright", "credits" or "license" for more information.
>>> import torchvision
>>> print(torchvision.__version__)
0.9.0a0+01dfa8e
>>>
3.4 验证安装
To verify that PyTorch has been installed correctly on your system, launch an interactive Python interpreter from terminal (python command for Python 2.7 or python3 for Python 3.6) and run the following commands:
python3
>>> import torch
>>> print(torch.__version__)
>>> print('CUDA available: ' + str(torch.cuda.is_available()))
>>> print('cuDNN version: ' + str(torch.backends.cudnn.version()))
>>> a = torch.cuda.FloatTensor(2).zero_()
>>> print('Tensor a = ' + str(a))
>>> b = torch.randn(2).cuda()
>>> print('Tensor b = ' + str(b))
>>> c = a + b
>>> print('Tensor c = ' + str(c))
nvidia@nvidia-desktop:~/Workspace/Pytorch$ python3
Python 3.6.9 (default, Nov 25 2022, 14:10:45)
[GCC 8.4.0] on linux
Type "help", "copyright", "credits" or "license" for more information.
>>> import torch
>>> print(torch.__version__)
1.7.0
>>> print('CUDA available: ' + str(torch.cuda.is_available()))
CUDA available: True
>>> print('cuDNN version: ' + str(torch.backends.cudnn.version()))
cuDNN version: 8201
>>> a = torch.cuda.FloatTensor(2).zero_()
>>> print('Tensor a = ' + str(a))
Tensor a = tensor([0., 0.], device='cuda:0')
>>> b = torch.randn(2).cuda()
>>> print('Tensor b = ' + str(b))
Tensor b = tensor([-0.3136, -0.3914], device='cuda:0')
>>> c = a + b
>>> print('Tensor c = ' + str(c))
Tensor c = tensor([-0.3136, -0.3914], device='cuda:0')验证版本
python3
>>> import torchvision
>>> print(torchvision.__version__)
四、Containers NVIDIA L4T PyTorch
如果你想省事,可以直接使用官方已经搭配配置好的容器
网址入口:NVIDIA L4T PyTorch | NVIDIA NGC

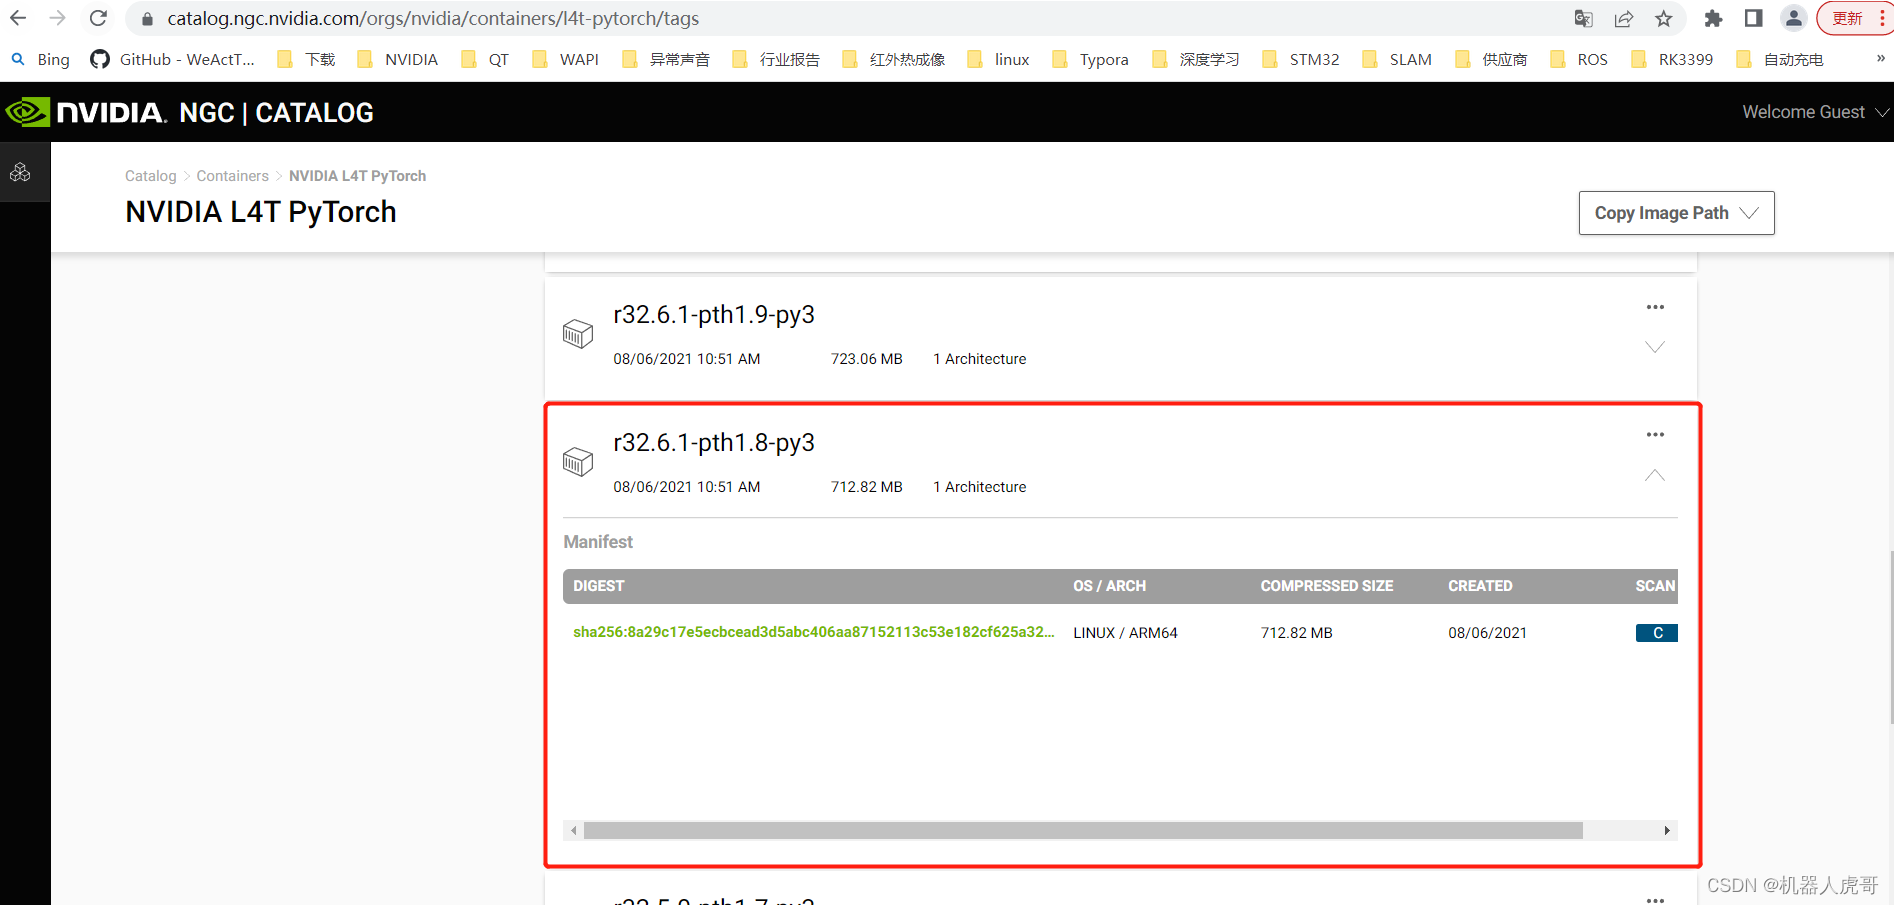
nvcr.io/nvidia/l4t-pytorch:r32.6.1-pth1.8-py3五、通过下载安装torchvision
之前我们安装是通过git 上下载源码安装,具体可以参考3.2,如果你的网络可以链接谷歌的下载地址,是可以直接向下载PyTouch一样,下载包完成安装的。
官方教程网址入口:Install PyTorch on Jetson Nano - Q-engineering
下拉找到torchvision 的界面:
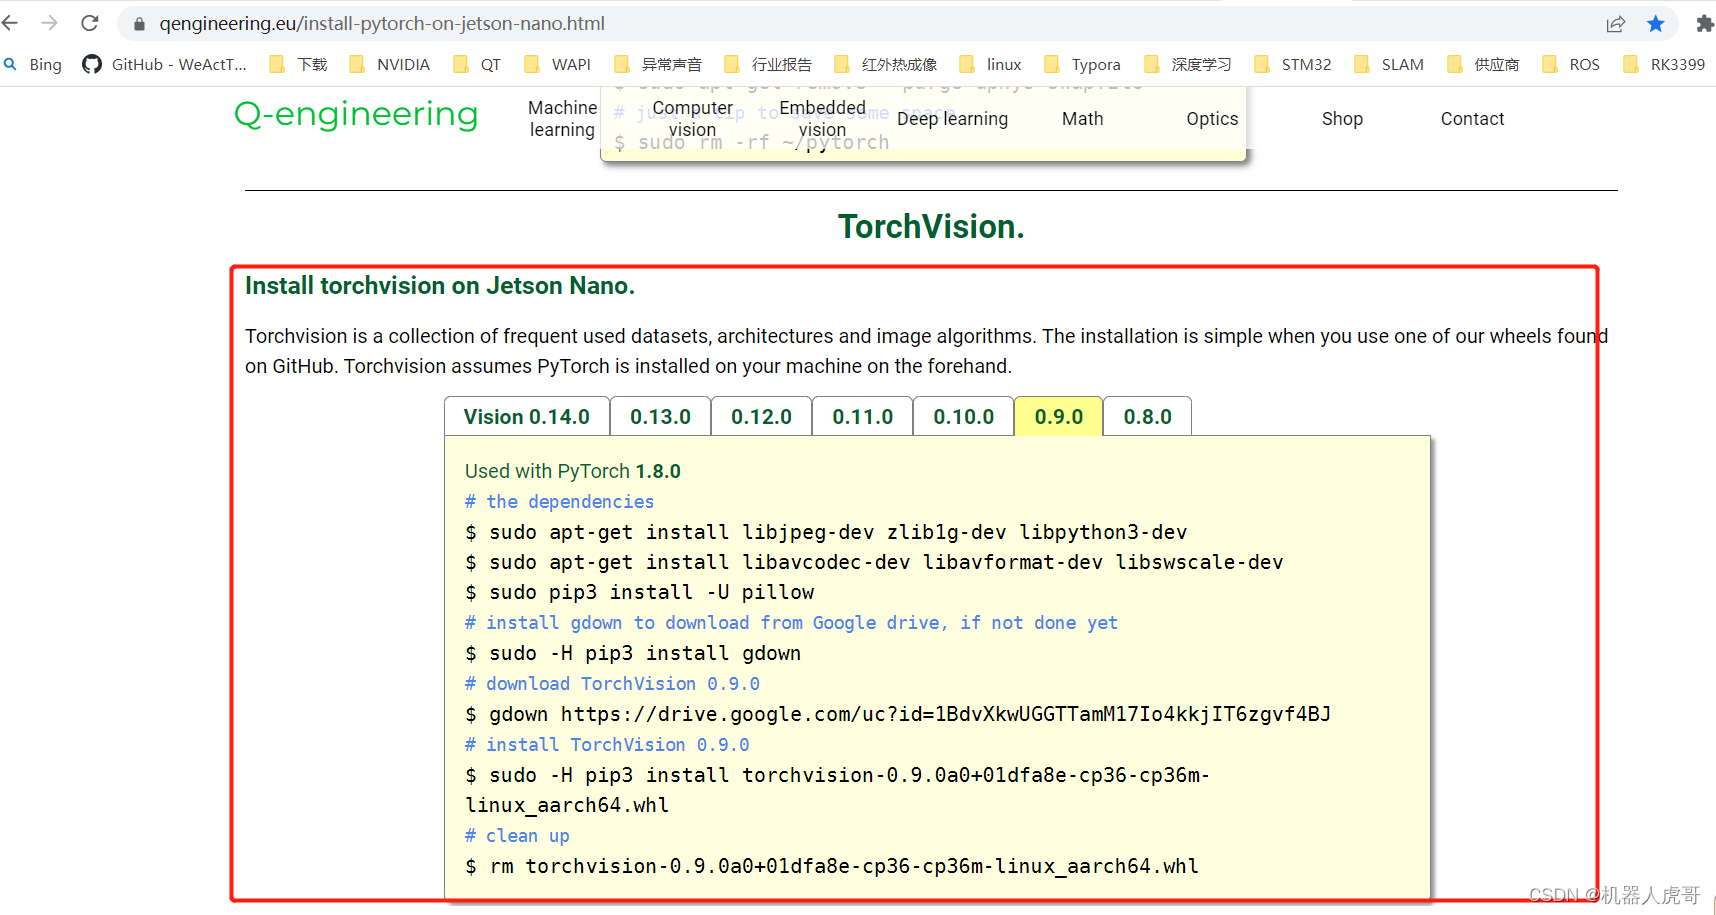
根据的版本需求,步骤都写的很详细,我自己需要0.9.0的版本,所以按照这个步骤执行:
# Used with PyTorch 1.8.0
# the dependencies
$ sudo apt-get install libjpeg-dev zlib1g-dev libpython3-dev
$ sudo apt-get install libavcodec-dev libavformat-dev libswscale-dev
$ sudo pip3 install -U pillow
# install gdown to download from Google drive, if not done yet
$ sudo -H pip3 install gdown
# download TorchVision 0.9.0
$ gdown https://drive.google.com/uc?id=1BdvXkwUGGTTamM17Io4kkjIT6zgvf4BJ
# install TorchVision 0.9.0
$ sudo -H pip3 install torchvision-0.9.0a0+01dfa8e-cp36-cp36m-linux_aarch64.whl
# clean up 这个可以不执行
$ rm torchvision-0.9.0a0+01dfa8e-cp36-cp36m-linux_aarch64.whl


 1800
1800


 被折叠的 条评论
为什么被折叠?
被折叠的 条评论
为什么被折叠?
 到【灌水乐园】发言


