


http://blog.csdn.net/qqmcy/article/details/9391283
本文代码例子: http://vdisk.weibo.com/s/KLdrg
首先,直接将角色控制器包中的模型资源拖拽如层次视图当中。
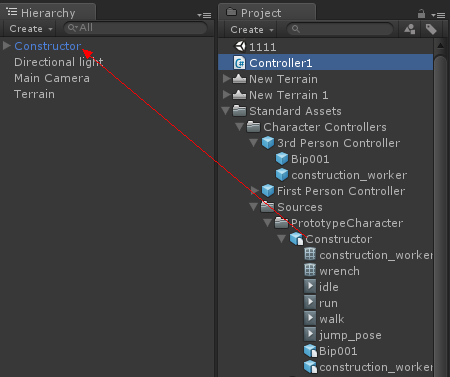
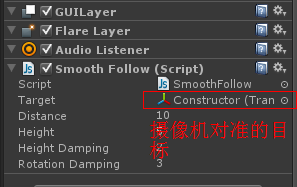
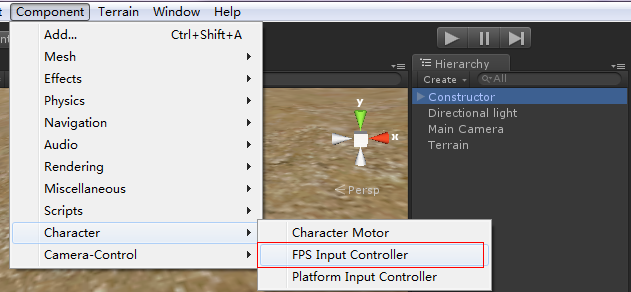
在Project视图中鼠标右键选择Import Package ->Script引入官方提供的脚本,这些脚本主要是应用于摄像机朝向的部分。首先在Hierarchy视图中选择摄像机组件,接着在导航栏菜单中选择Compont -> Camera-Control ->SmoothFollow脚本。实际意义是将跟随脚本绑定在摄像机之上,目的是主角移动后摄像机也能跟随主角一并移动。如下图所示,脚本绑定完毕后可在右侧监测面板视图中看到Smooth Follow脚本。Target 就是射向摄像机朝向的参照物,这里把主角对象挂了上去意思是摄像机永远跟随主角移动。
由于官方提供的脚本并不是特别的好,摄像机永远照射在主角的后面,以至于控制主角向后回头时也无法看到主角的面部。可以做如下修改。
- /*
- This camera smoothes out rotation around the y-axis and height.
- Horizontal Distance to the target is always fixed.
- There are many different ways to smooth the rotation but doing it this way gives you a lot of control over how the camera behaves.
- For every of those smoothed values we calculate the wanted value and the current value.
- Then we smooth it using the Lerp function.
- Then we apply the smoothed values to the transform's position.
- */
- // The target we are following
- var target : Transform;
- // The distance in the x-z plane to the target
- var distance = 10.0;
- // the height we want the camera to be above the target
- var height = 5.0;
- // How much we
- var heightDamping = 2.0;
- var rotationDamping = 3.0;
- // Place the script in the Camera-Control group in the component menu
- @script AddComponentMenu("Camera-Control/Smooth Follow")
- function LateUpdate () {
- // Early out if we don't have a target
- if (!target)
- return;
- // Calculate the current rotation angles
- var wantedRotationAngle = target.eulerAngles.y;
- var wantedHeight = target.position.y + height;
- var currentRotationAngle = transform.eulerAngles.y;
- var currentHeight = transform.position.y;
- // Damp the rotation around the y-axis
- currentRotationAngle = Mathf.LerpAngle (currentRotationAngle, wantedRotationAngle, rotationDamping * Time.deltaTime);
- // Damp the height
- currentHeight = Mathf.Lerp (currentHeight, wantedHeight, heightDamping * Time.deltaTime);
- // Convert the angle into a rotation
- //下面这行为官方的代码,我们将其注释掉
- // var currentRotation = Quaternion.Euler (0, currentRotationAngle, 0);
- //只需要需改这样就好。
- var currentRotation = 1;
- // Set the position of the camera on the x-z plane to:
- // distance meters behind the target
- transform.position = target.position;
- transform.position -= currentRotation * Vector3.forward * distance;
- // Set the height of the camera
- transform.position.y = currentHeight;
- // Always look at the target
- transform.LookAt (target);
- }

下面是我们自己写的脚本,写完与Constructor(主人公)相关联就OK了。
- using UnityEngine;
- using System.Collections;
- public class Controller1 : MonoBehaviour
- {
- //状态:站立
- private const int HERO_IDLE = 0;
- //行走
- private const int HERO_WALK = 1;
- //跑
- private const int HERO_RUN = 2;
- //人物当前的状态
- private int gameState = 0;
- //记录触摸点的3D坐标
- private Vector3 point;
- private float time;
- void Start()
- {
- //初始设置人物状态:站立
- SetGameState(HERO_IDLE);
- }
- void Update()
- {
- //按下鼠标左键
- if(Input.GetMouseButtonDown(0))
- {
- //从摄像机的原点向鼠标点击的对象身上发射一条射线
- Ray ray = Camera.main.ScreenPointToRay(Input.mousePosition);
- RaycastHit hit;
- //当射线碰到对象时
- if(Physics.Raycast(ray,out hit))
- {
- //目前场景中只有地形
- //其实应当判断一下当前射线碰撞到的对象是否为地形。
- //得到在3D世界中点击的坐标
- point = hit.point;
- //设置主角面朝这个点击的坐标
- //这里设定的方向是鼠标选择的目标点在游戏世界点中的3D坐标。为了避免主人公的x
- //轴与Zzhou发生旋转(特殊情况)所以我们设定朝向的Y轴永远是主人公的y轴。
- transform.LookAt(new Vector3(point.x,transform.position.y,point.z));
- //用户是否连续点击按钮
- if(Time.realtimeSinceStartup - time <= 0.2f)
- {
- //连续点击 进入奔跑状态
- SetGameState(HERO_RUN);
- }
- else
- {
- //点击一次只进入走路状态
- SetGameState(HERO_WALK);
- }
- //记录点击鼠标的时间
- time = Time.realtimeSinceStartup;
- }
- }
- }
- void FixedUpdate()
- {
- switch(gameState)
- {
- case HERO_IDLE:
- break;
- case HERO_WALK:
- //移动主角一次移动的长度为0.05
- Move(0.05f);
- break;
- case HERO_RUN:
- //跑步是移动长度为0.1f
- Move(0.1f);
- break;
- }
- }
- void SetGameState(int state)
- {
- //动画效果
- switch(state)
- {
- case HERO_IDLE:
- point = transform.position;
- animation.Play("idle");
- break;
- case HERO_WALK:
- animation.Play("walk");
- break;
- case HERO_RUN:
- animation.Play("run");
- break;
- }
- gameState = state;
- }
- void Move(float speed)
- {
- //主角没到达目标点时,一直向该点移动
- //在这里判断主人公当前位置是否到达目标位置,然后取得两点坐标差的绝对值。未到达目的
- if(Mathf.Abs(Vector3.Distance(point,transform.position)) >= 1.3f)
- {
- //得到角色控制器
- CharacterController controller = GetComponent<CharacterController>();
- //设置移动
- //第一个参数:两个坐标点的差,参数2:需要移动的距离
- Vector3 v = Vector3.ClampMagnitude(point - transform.position,speed);
- //控制移动
- controller.Move(v);
- }
- else
- {
- //到达目的地,继续站立状态
- SetGameState(HERO_IDLE);
- }
- }
- }


 1306
1306


 被折叠的 条评论
为什么被折叠?
被折叠的 条评论
为什么被折叠?
 到【灌水乐园】发言


