


直接上代码吧,逻辑差不多,不过优化了一些公式。
local M = {}
--图片大小
local rectW,rectH = 55,95
--最大间距和最小间距
local maxSpaceY,minSpaceY = 40,30
--最大最小宽
local maxW,minW = rectW,45
--最小高度,最大高度被最大宽按比例控制,不需要设置
local minH = 30
M.tRect = {}
--抛物线
local function parabolaFunction( sum,x,min,max )
local p = sum/2
local a = (min-max)/math.pow(-p,2)
local y = a*math.pow(x-p,2)+max
return y
end
--根据数组长度分段类等腰三角形一次函数/\
local function linearFunction( sum,x,min,max )
local center = sum/2
local y
if x>sum/2 then --下部
y = (max-min)/(center-sum)*x+max-(max-min)/(center-sum)*center
else
y = ((max-min)/center)*x+min
end
return y
end
--间距
local function computerSpaceY( sum,x )
local spaceY = linearFunction(sum,x,minSpaceY,maxSpaceY)
-- spaceY = 20
return spaceY
end
-- 位移
local offset,speed = 0,0
--设置矩形y坐标
local function setRectY( ... )
if #M.tRect<=0 then
return
end
-- 设置y
local height = 0
for k,imgRect in pairs(M.tRect) do
--矩形之间间隙
local spaceY = computerSpaceY(M.distanceXY,height)
local imgH = imgRect.img.height
height = height+imgH+spaceY
imgRect.y = (height + offset)%(M.distanceXY)
imgRect:setShape()
imgRect.alpha = 1
if imgRect.y<=M.distanceXY and imgRect.y>=M.distanceXY-rectH then
-- imgRect.alpha = (M.distanceXY-imgRect.y)/rectH
end
if imgRect.y>=0 and imgRect.y<=rectH then
-- imgRect.alpha = imgRect.y/rectH
end
end
offset = offset - speed
end
--移除所有矩形
local function removeAllRect( ... )
for i,imgRect in pairs(M.tRect) do
display.remove(imgRect)
imgRect = nil
end
M.tRect = {}
end
--计算矩形高度
local function computerRectHeight( sum,x )
--图片高度
local height = linearFunction(sum,x,minH,rectH/rectW*maxW)
return height
end
--计算M.distanceXY应该创建多少个矩形
local function getAllCount( ... )
if M.distanceXY<=rectH then
return 0
end
--架设矩形个数在1-20之间反复检测,满足条件就返回
--i为创建个数
for i=1,20 do
local height = 0
for j=1,i do
--矩形之间间隙
local spaceY = computerSpaceY(M.distanceXY,height)
local imgH = computerRectHeight(M.distanceXY,height)
height = height+imgH+spaceY
if height>=M.distanceXY then
return i-1
end
end
end
return 20
end
local function newRect( index )
local gRect = display.newGroup()
M.gRects:insert(gRect)
gRect.index = index
gRect.anchorY = 1
gRect.anchorChildren = true
local top = display.newImage( gRect, "arrow/edge.png")
top.anchorY = 1
local bottom = display.newImage( gRect, "arrow/edge.png")
bottom.anchorY = 0
local img = display.newImage( gRect, "arrow/rect.png")
gRect.img =img
local txt = display.newText( gRect, index, 0, 0, nil ,26 )
function gRect:setHeight()
img.height = computerRectHeight(M.distanceXY,gRect.y)
--前两个需要控制高度,因为y和height相互影响,会产生跳跃
if #M.tRect<=2 then
img.height = rectH/2
end
top.y = img.y-img.height/2
bottom.y = img.y+img.height/2
local max,min = 15,2
top.height = math.max(min,2*(max-min)/M.distanceXY*gRect.y+max-2*(max-min))
bottom.height = math.max(2*(min-max)/M.distanceXY*gRect.y+max,min)
end
function gRect:setWidth()
local topWidth = parabolaFunction(M.distanceXY,gRect.y-img.height,minW,maxW)
local bottomWidth = parabolaFunction(M.distanceXY,gRect.y,minW,maxW)
top.width = topWidth
bottom.width = bottomWidth
if gRect.y>M.distanceXY/2 then --下部
img.path.x2 = (rectW-bottomWidth)/2
img.path.x3 = -(rectW-bottomWidth)/2
img.path.x1 = (rectW-topWidth)/2
img.path.x4 = -(rectW-topWidth)/2
else --上部
img.path.x2 = (rectW-bottomWidth)/2
img.path.x3 = -(rectW-bottomWidth)/2
img.path.x1 = (rectW-topWidth)/2
img.path.x4 = -(rectW-topWidth)/2
end
end
-- 设置形状
function gRect:setShape( ... )
gRect:setHeight()
gRect:setWidth()
end
return gRect
end
--创建矩形组
local function createRect( ... )
local count = getAllCount()-#M.tRect
offset=0
speed=0
if count>0 then
for i=1,count do
local imgRect = newRect(#M.tRect+1)
table.insert(M.tRect,imgRect)
end
elseif count<0 then
for i=1,-count do
local imgRect = table.remove(M.tRect)
display.remove(imgRect)
imgRect = nil
end
end
end
--设置角度,高度,图形的变形
local function setCoordinate( startX,startY,endX,endY,distanceX,distanceY )
M.imgCenter.x,M.imgCenter.y = endX,endY
M.imgArrow.x,M.imgArrow.y = endX,endY
M.imgArrow.rotation = math.atan2(distanceY,distanceX)*180/math.pi+90
M.gRects.x,M.gRects.y = startX,startY
M.gRects.rotation = math.atan2(distanceY,distanceX)*180/math.pi+90
end
--touch事件监听
local function touchListener( event )
local phase = event.phase
local self = event.target
local endX,endY = event.x-M.gTouch.x,event.y-M.gTouch.y
local startX,startY = event.xStart-M.gTouch.x,event.yStart-M.gTouch.y
local distanceX,distanceY = endX-startX,endY-startY
M.distanceXY = math.sqrt(math.pow((distanceY),2)+math.pow((distanceX),2))
if phase == "began" then
display.getCurrentStage():setFocus( self )
self.isFocus = true
M.imgCenter.isVisible = true
M.imgArrow.isVisible = true
M.gRects.isVisible = M.distanceXY>=rectH
setCoordinate(startX,startY,endX,endY,distanceX,distanceY)
elseif ( self.isFocus ) then
if phase == "moved" then
M.gRects.isVisible = M.distanceXY>=rectH
createRect()
if M.timer then
timer.cancel( M.timer )
M.timer = nil
end
M.timer = timer.performWithDelay( 10, function( ... )
speed = 0
end)
setCoordinate(startX,startY,endX,endY,distanceX,distanceY)
elseif phase == "ended" or phase == "cancelled" then
display.getCurrentStage():setFocus( nil )
self.isFocus = nil
M.distanceXY = 0
M.imgCenter.isVisible = false
M.imgArrow.isVisible = false
M.gRects.isVisible = false
removeAllRect()
offset = 0
if M.timer then
timer.cancel( M.timer )
M.timer = nil
end
end
end
return true
end
function M.addListener( sceneGroup )
M.gTouch = display.newGroup()
M.gTouch.x,M.gTouch.y = display.contentWidth/2,display.contentHeight/2
-- 底图
local imgBg = display.newRect( M.gTouch, 0,0, display.contentWidth,display.contentHeight )
--背景
local imgBg = display.newImage( M.gTouch, "bg.png")
--靶心
M.imgCenter = display.newImage( M.gTouch, "arrow/center.png")
M.imgCenter.isVisible = false
--矩形条组
M.gRects = display.newGroup()
M.gTouch:insert(M.gRects)
M.gRects.anchorY = 1
M.gRects.anchorChildren = true
M.gRects.isVisible = false
--箭头
M.imgArrow = display.newImage( M.gTouch, "arrow/arrow.png")
M.imgArrow.anchorY = -3
M.imgArrow.isVisible = false
M.gTouch:addEventListener( "touch", touchListener )
Runtime:addEventListener( "enterFrame", setRectY )
return M.gTouch
end
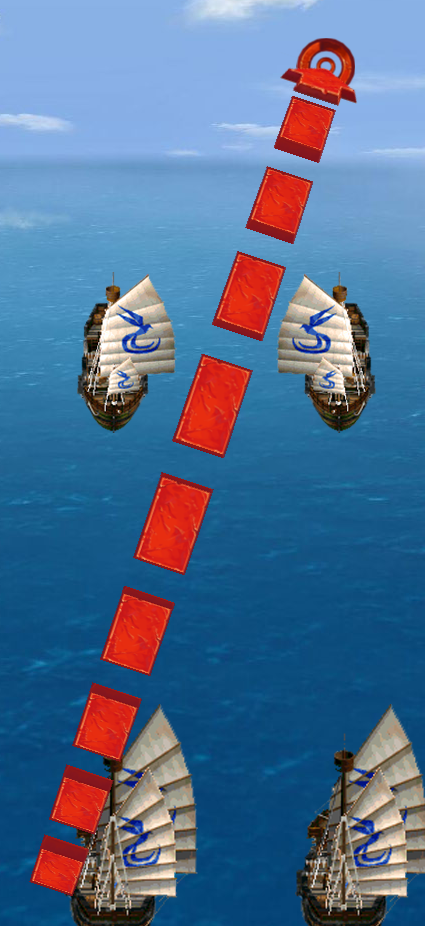
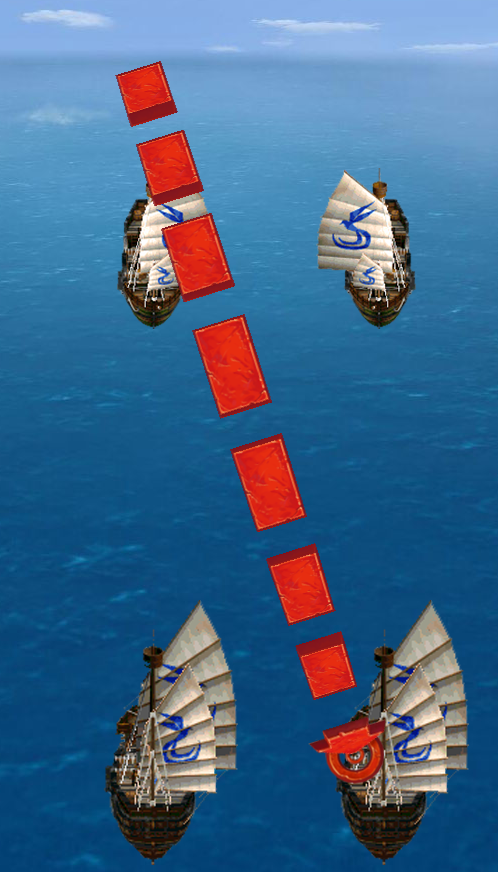
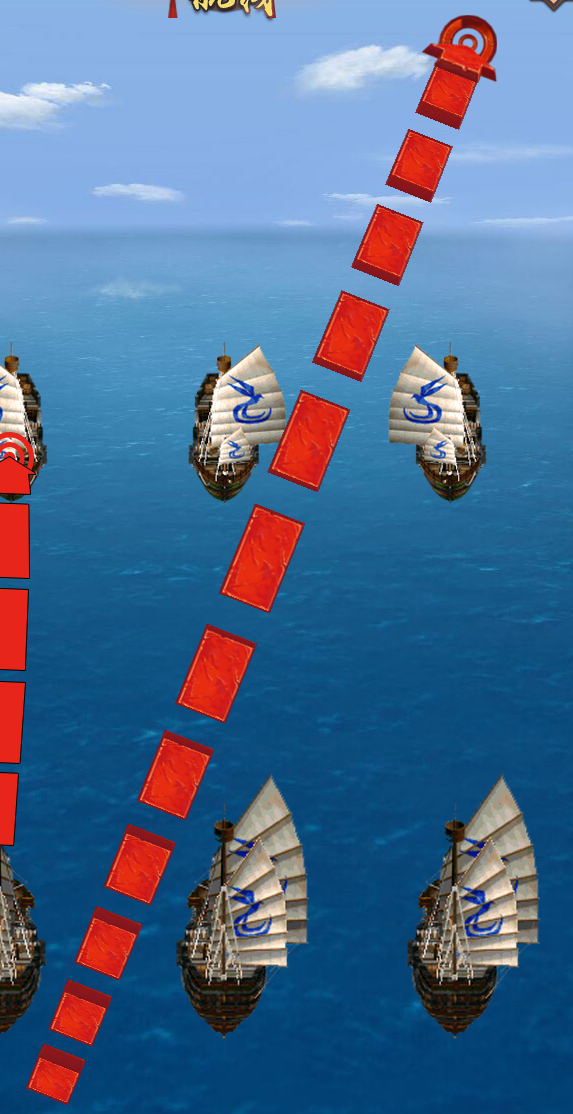
return M效果如图:

资源:
![]()

![]()


 5509
5509

 被折叠的 条评论
为什么被折叠?
被折叠的 条评论
为什么被折叠?
 到【灌水乐园】发言


