


本文来源公众号“计算机视觉之家”,仅用于学术分享,侵权删,干货满满。
原文链接:如何使用 YOLOv12 实现目标检测
介 绍
在研究了YOLOv8、YOLOv9、YOLOv10甚至YOLOv11之后,我们很高兴地推出 YOLO 系列的最新版本:YOLOv12!这个新版本采用了以注意力为中心的架构,改变了实时对象检测的方式。它还为准确性和效率树立了新标准。
释放 YOLOv12 的力量:
与之前的版本一样,YOLOv12 在检测、分类和定位图像和视频中的对象方面表现出色。但是,它包含重大增强功能,可提高多种用例的性能和适应性。下一节将介绍 YOLOv12 作为该系列的一个显著迭代而具有的关键增强功能。
推动 YOLOv12 性能提升的关键创新:
-
-
增强注意力特征提取
-
YOLOv12 集成了新颖的区域注意力机制和先进的残差高效层聚合网络 (R-ELAN)。这种集成能够在不影响速度的情况下捕获更丰富的上下文信息并提高检测准确性。
-
-
优化的效率和速度:
-
所考虑的模型已被证明通过使用精炼的架构设计和智能优化(例如 FlashAttention)实现了令人印象深刻的实时性能。该模型的设计旨在确保在各种应用程序中(无论是在边缘设备还是高端 GPU 上)快速准确地进行推理。
-
-
无与伦比的跨任务多功能性:
-
YOLOv12 的功能超出了传统物体检测的范围,涵盖了广泛的计算机视觉任务。这些任务包括实例分割、图像分类、姿势估计和定向边界框检测。这些广泛的功能使 YOLOv12 成为解决各个领域无数挑战的强大解决方案。
如何使用 YOLOv12 处理图像
第 1 步:安装必要的库
pip install opencv-python ultralytics第 2 步:导入库
import cv2from ultralytics import YOLOimport random
第 3 步:选择模型
model = YOLO("yolo12x.pt")在下面网址中,你可以比较不同的模型,并权衡它们各自的优缺点。在本例中,我们选择了 yolov12x.pt。
https://docs.ultralytics.com/de/models/yolo12/#key-improvements第 4 步:编写一个函数来预测和检测图像中的目标
def predict(chosen_model, img, classes=[], conf=0.5):if classes:results = chosen_model.predict(img, classes=classes, conf=conf)else:results = chosen_model.predict(img, conf=conf)return resultsdef predict_and_detect(chosen_model, img, classes=[], conf=0.5, rectangle_thickness=5, text_thickness=2):results = predict(chosen_model, img, classes, conf=conf)yolo_classes = list(model.names.values())classes_ids = [yolo_classes.index(clas) for clas in yolo_classes]colors = [random.choices(range(256), k=3) for _ in classes_ids]for result in results:for box in result.boxes:color_number = classes_ids.index(int(box.cls[0]))cv2.rectangle(img, (int(box.xyxy[0][0]), int(box.xyxy[0][1])),(int(box.xyxy[0][2]), int(box.xyxy[0][3])), colors[color_number], rectangle_thickness)cv2.putText(img, f"{result.names[int(box.cls[0])]}",(int(box.xyxy[0][0]), int(box.xyxy[0][1]) - 10),cv2.FONT_HERSHEY_PLAIN, 1, colors[color_number], text_thickness)return img, results
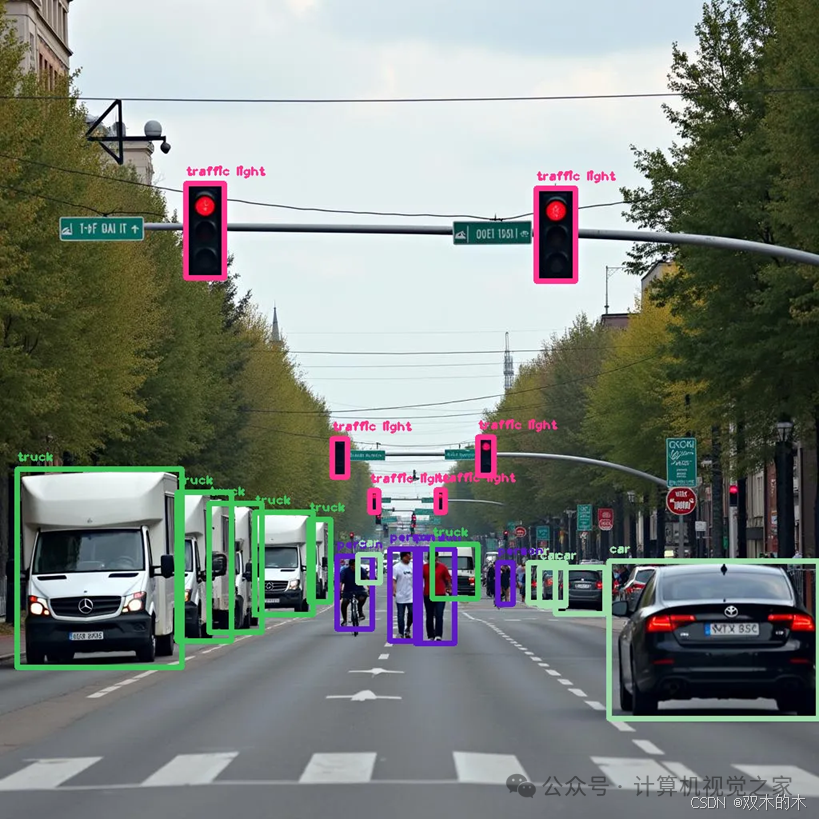
第 5 步:使用 YOLOv12 检测图像中的物体
# read the imageimage = cv2.imread("YourImagePath")result_img, _ = predict_and_detect(model, image, classes=[], conf=0.5)
如果您想要检测特定的类别(您可以在这里找到),只需在类别列表中写入对象的 ID 号即可。
https://github.com/ultralytics/ultralytics/blob/main/ultralytics/cfg/datasets/coco.yaml第 6 步:保存并绘制结果图像
cv2.imshow("Image", result_img)cv2.imwrite("YourSavePath", result_img)cv2.waitKey(0)
完整代码:
from ultralytics import YOLOimport cv2import randomdef predict(chosen_model, img, classes=[], conf=0.5):if classes:results = chosen_model.predict(img, classes=classes, conf=conf)else:results = chosen_model.predict(img, conf=conf)return resultsdef predict_and_detect(chosen_model, img, classes=[], conf=0.5, rectangle_thickness=5, text_thickness=2):results = predict(chosen_model, img, classes, conf=conf)yolo_classes = list(model.names.values())classes_ids = [yolo_classes.index(clas) for clas in yolo_classes]colors = [random.choices(range(256), k=3) for _ in classes_ids]for result in results:for box in result.boxes:color_number = classes_ids.index(int(box.cls[0]))cv2.rectangle(img, (int(box.xyxy[0][0]), int(box.xyxy[0][1])),(int(box.xyxy[0][2]), int(box.xyxy[0][3])), colors[color_number], rectangle_thickness)cv2.putText(img, f"{result.names[int(box.cls[0])]}",(int(box.xyxy[0][0]), int(box.xyxy[0][1]) - 10),cv2.FONT_HERSHEY_PLAIN, 1, colors[color_number], text_thickness)return img, resultsmodel = YOLO("yolo12x.pt")# read the imageimage = cv2.imread(r"YourImagePath")result_img, _ = predict_and_detect(model, image, classes=[], conf=0.5)cv2.imshow("Image", result_img)cv2.imwrite("YourSavePath.png", result_img)cv2.waitKey(0)
如何使用 YOLOv12 处理视频
前面步骤相同,所以这里直接给出完整代码供大家参考:
import cv2from ultralytics import YOLOimport randomdef predict(chosen_model, img, classes=[], conf=0.5):if classes:results = chosen_model.predict(img, classes=classes, conf=conf)else:results = chosen_model.predict(img, conf=conf)return resultsdef predict_and_detect(chosen_model, img, classes=[], conf=0.5, rectangle_thickness=5, text_thickness=2):results = predict(chosen_model, img, classes, conf=conf)yolo_classes = list(model.names.values())classes_ids = [yolo_classes.index(clas) for clas in yolo_classes]colors = [random.choices(range(256), k=3) for _ in classes_ids]for result in results:for box in result.boxes:color_number = classes_ids.index(int(box.cls[0]))cv2.rectangle(img, (int(box.xyxy[0][0]), int(box.xyxy[0][1])),(int(box.xyxy[0][2]), int(box.xyxy[0][3])), colors[color_number], rectangle_thickness)cv2.putText(img, f"{result.names[int(box.cls[0])]}",(int(box.xyxy[0][0]), int(box.xyxy[0][1]) - 10),cv2.FONT_HERSHEY_PLAIN, 1, colors[color_number], text_thickness)return img, results# defining function for creating a writer (for mp4 videos)def create_video_writer(video_cap, output_filename):# grab the width, height, and fps of the frames in the video stream.frame_width = int(video_cap.get(cv2.CAP_PROP_FRAME_WIDTH))frame_height = int(video_cap.get(cv2.CAP_PROP_FRAME_HEIGHT))fps = int(video_cap.get(cv2.CAP_PROP_FPS))# initialize the FourCC and a video writer objectfourcc = cv2.VideoWriter_fourcc(*'MP4V')writer = cv2.VideoWriter(output_filename, fourcc, fps,(frame_width, frame_height))return writermodel = YOLO("yolo12x.pt")output_filename = "YourFilename.mp4"video_path = r"YourVideoPath.mp4"cap = cv2.VideoCapture(video_path)writer = create_video_writer(cap, output_filename)while True:success, img = cap.read()if not success:breakresult_img, _ = predict_and_detect(model, img, classes=[], conf=0.5)writer.write(result_img)cv2.imshow("Image", result_img)cv2.waitKey(1)writer.release()
参考链接
论文: https://www.arxiv.org/abs/2502.12524
仓库: https://github.com/sunsmarterjie/yolov12
THE END !
文章结束,感谢阅读。您的点赞,收藏,评论是我继续更新的动力。大家有推荐的公众号可以评论区留言,共同学习,一起进步。


 1399
1399

 被折叠的 条评论
为什么被折叠?
被折叠的 条评论
为什么被折叠?
 到【灌水乐园】发言


