


凸包检测
凸包定义
凸包(Convex Hull)是一个计算几何(图形学)中常见的概念。简单来说,给定二维平面上的点集,凸包就是将最外层的点连接起来构成的凸多边形,它是能包含点集中所有点的。理解物体形状或轮廓的一种比较有用的方法便是计算一个物体的凸包,然后计算其凸缺陷(convexity defects)。
判断:如果在集合A内连接任意两个点的直线段都在A的内部,则称集合A是凸形的。
直观的理解,就是一个多边型,没有凹的地方。
举例:
一些点集的凸包如下:

上图参考自:https://www.cnblogs.com/mikewolf2002/p/3422197.html
名词解释

如上图所示,黑色的轮廓线为convexity hull(凸包), 而convexity hull与手掌之间的部分为convexity defects(凸包缺陷). 每个convexity defect区域有四个特征量:起始点(startPoint),结束点(endPoint),距离convexity hull最远点(farPoint),最远点到convexity hull的距离(depth)。
原理
Graham扫描法
思路:Graham扫描的思想和Jarris步进法类似,也是先找到凸包上的一个点,然后从那个点开始按逆时针方向逐个找凸包上的点。
操作步骤大概可分为两步
第一步:排序
第二步:扫描
步骤:
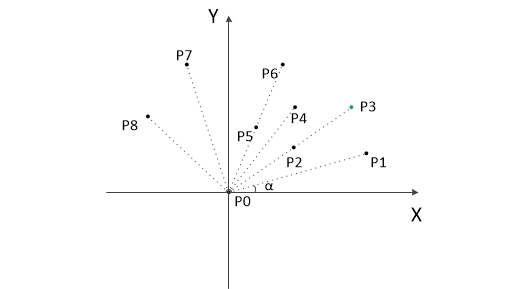
- 把所有点放在二维自然直角坐标系中(注意与图片像素坐标系区分),则纵坐标最小的点一定是凸包上的点,如图中的P0。
- 那么以P0作为坐标参考点,如上图所示
- 计算各个点相对于 P0 的幅角 α ,按从小到大的顺序对各个点排序(大概就是把坐标系看坐极坐标,从逆时针方向找第一个最近的点)。当 α 相同时,距离 P0 比较近的排在前面。例如上图得到的结果为 P1,P2,P3,P4,P5,P6,P7,P8。我们由定义可以知道,结果中第一个点 P1 和最后一个点 P8 一定是凸包上的点。
(以上是排序步骤,以下开始求凸包)
以上,我们已经知道了凸包上的第一个点 P0 和第二个点 P1,我们把它们放在栈里面。现在从步骤3求得的那个结果里,把 P1 后面的那个点拿出来做当前点,即 P2 。接下来开始找第三个点:- 根据栈顶的最前两个点作出有向直线(X-1指向X),记PX-1->PX 。看当前点是在有向直线 L 的右边还是左边(怎么看:就是把有向直线作为Y轴,箭头朝上即可)。如果在直线的右边就执行步骤5;如果在直线上,或者在直线的左边就执行步骤6。
- 栈顶的那个元素不是凸包上的点,把栈顶元素出栈。把按下一个点作为新的当前点,执行步骤4。
- 当前点是凸包上的点,把它压入栈,执行步骤7。
- 检查当前的点 P2 是不是步骤3那个结果的最后一个元素。是最后一个元素的话就结束。如果不是的话就把按下一个点作为新的当前点,返回步骤4。
- 【总结】:右出栈,非右入栈
最后,栈中的元素就是凸包上的点了。
下给出动图,方便琢磨:
/*原理描述部分参考:https://www.cnblogs.com/LGJC1314/p/6843641.html ,并作出了一些修改,更好理解*/
/*程序实现参考:https://blog.csdn.net/u012328159/article/details/50808360
https://blog.csdn.net/fivedoumi/article/details/7653128 */
核心函数
凸包检测:
void cv::convexHull (   InputArray  points,
                        OutputArray     hull,
                        bool    clockwise = false,
                        bool    returnPoints = true
)
- points:输入的二维点集,Mat类型数据即可
- hull:输出参数,用于输出函数调用后找到的凸包
- clockwise:操作方向,当标识符为真时,输出凸包为顺时针方向,否则为逆时针方向。
- returnPoints:操作标识符,默认值为true,此时返回各凸包的各个点,否则返回凸包各点的指数,当输出数组时std::vector时,此标识被忽略。
凸包缺陷:
void convexityDefects(  InputArray contour,
                        InputArray convexhull,
OutputArray convexityDefects );- contour:一般就是轮廓检测函数findContours的输出
- convexhull:convexHull函数的输出,里面存储的是凸包信息,在这里只能是int类型(即vector<vector<int>>类型),而不能是vector<vector<Point>>类型!
- convexityDefects :类型为vector<vector<Vec4i>>类型,每一个凸包缺陷由N个Vec4i来描述,直观上来看每一个Vec4i实际上就是一系列点:Vec4i存储了起始点,结束点,距离及最远点到凸包的距离。这些点很难用语言来解释,看下面两幅图吧!
上面的黄色数字标的①②③④四个部分实际上就描述了某个凸包缺陷。所以这个凸包缺陷有四个Vec4i,我们以黄色数字标号为①的来说明,两个深紫色的圈就表示了这个凸包缺陷的第①部分在检测到的凸包边上的起始点,分别存储在Vec4i的第0号和第1号位上;红色的圈的坐标存储在第2位,表示轮廓最凹处,很明显这个点在轮廓上;Vec4i的第3位表示第2位的坐标距离凸包边的距离。

调用代码:
(1)只绘制出轮廓和凸包
#include<opencv2/highgui/highgui.hpp>
#include<opencv2/imgproc/imgproc.hpp>
#include<iostream>
#include<stdio.h>
#include<stdlib.h>
using namespace std;
using namespace cv;
//设置全局参数
Mat srcImage, srcGray;
int thresh = 100;
int max_thresh = 255;
RNG rng(12345);
void thresh_callback(int, void*)
{
	Mat srcTemp = srcImage.clone();
	Mat threMat;
	//轮廓检测参数
	vector<vector<Point>> contours;
	vector<Vec4i>hierarchy;
	//二值化
	threshold(srcGray, threMat, thresh, 255, CV_THRESH_BINARY_INV);
	imshow("threMat", threMat);
	//轮廓检测
	findContours(threMat, contours, hierarchy,
		CV_RETR_TREE, CV_CHAIN_APPROX_SIMPLE, Point(0, 0));
	imshow("threMat_after_findContours", threMat);
	//凸包和凸包检测缺陷参数定义
	vector<vector<Point>> pointHull(contours.size());
	vector<vector<int>> intHull(contours.size());
	vector<vector<Vec4i>> hullDefect(contours.size());
	for (size_t i = 0; i < contours.size(); i++){
			//Point 类型凸包检测
			convexHull(Mat(contours[i]), pointHull[i], false);
			//int 类型凸包检测
			//convexHull(Mat(contours[i]), intHull[i], false);
			凸包缺陷检测
			//convexityDefects(Mat(contours[i]), intHull[i],
			//	hullDefect[i]);
	}
	//绘制凸包
	Mat drawing = Mat::zeros(threMat.size(), CV_8UC3);
	for (size_t i = 0; i < contours.size(); i++){
		Scalar color = Scalar(rng.uniform(0, 255),
			rng.uniform(0, 255), rng.uniform(0, 255));
		drawContours(drawing, contours, i, color, 1, 8,
			vector<Vec4i>(), 0, Point());
		drawContours(drawing, pointHull, i, color, 1, 8,
			vector<Vec4i>(), 0, Point());
	}
	imshow("result", drawing);
}

void main()
{
	srcImage = imread("F:\\opencv_re_learn\\hand.jpg");
	if (!srcImage.data){
		cout << "failed to read" << endl;
		system("pause");
		return;
	}
	cvtColor(srcImage, srcGray, CV_BGR2GRAY);
	blur(srcGray, srcGray, Size(3, 3));
	string src_windows = "SRC";
	namedWindow(src_windows, CV_WINDOW_AUTOSIZE);
	imshow(src_windows, srcImage);
	//鼠标回调
	createTrackbar("Threshold", src_windows, &thresh,
		max_thresh, thresh_callback);
	thresh_callback(0, 0);
	waitKey(0);
}
(2)轮廓、凸包、凸包缺陷绘制
#include<opencv2/highgui/highgui.hpp>
#include<opencv2/imgproc/imgproc.hpp>
#include<iostream>
#include<stdio.h>
#include<stdlib.h>
using namespace std;
using namespace cv;
//设置全局参数
Mat srcImage, srcGray;
int thresh = 100;
int max_thresh = 255;
RNG rng(12345);
void thresh_callback(int, void*)
{
	Mat srcTemp = srcImage.clone();
	Mat threMat;
	//轮廓检测参数
	vector<vector<Point>> contours;
	vector<Vec4i>hierarchy;
	//二值化
	threshold(srcGray, threMat, thresh, 255, CV_THRESH_BINARY_INV);
	imshow("threMat", threMat);
	//轮廓检测
	findContours(threMat, contours, hierarchy,
		CV_RETR_TREE, CV_CHAIN_APPROX_SIMPLE, Point(0, 0));
	imshow("threMat_after_findContours", threMat);
	//凸包和凸包检测缺陷参数定义
	vector<vector<Point>> pointHull(contours.size());
	vector<vector<int>> intHull(contours.size());
	vector<vector<Vec4i>> hullDefect(contours.size());
	for (size_t i = 0; i < contours.size(); i++){
		if (contours[i].size() >= 4){ //凸包缺陷检测要求轮廓包含4个或以上的点
			//Point 类型凸包检测
			convexHull(Mat(contours[i]), pointHull[i], false);
			//int 类型凸包检测
			convexHull(Mat(contours[i]), intHull[i], false);
			//凸包缺陷检测
			convexityDefects(Mat(contours[i]), intHull[i],
				hullDefect[i]);
		}
	}
	//绘制凸包及凸包缺陷
	Mat drawing = Mat::zeros(threMat.size(), CV_8UC3);
	for (size_t i = 0; i < contours.size(); i++){
		Scalar color = Scalar(rng.uniform(0, 255),
			rng.uniform(0, 255), rng.uniform(0, 255));
		drawContours(drawing, contours, i, color, 1, 8,  //轮廓绘制
			vector<Vec4i>(), 0, Point());
		drawContours(drawing, pointHull, i, color, 1, 8, //凸包绘制
			vector<Vec4i>(), 0, Point());
		//绘制缺陷
		size_t count = contours[i].size(); //判断轮廓包含像素点数
		if (count < 300)                   //小于则不绘制
			continue;
		//设置凸包缺陷迭代器
		vector<Vec4i>::iterator iterDefects = hullDefect[i].begin();  //相当于指针,指向凸包检测输出的第一个
		//遍历得到4个特征量
		while (iterDefects != hullDefect[i].end())
		{
			Vec4i& v = (*iterDefects); //iterDefects 相当于数组的首地址a[0]
			//起始位置
			int startidx = v[0];
			Point ptStart(contours[i][startidx]);
			//终止位置
			int endidx = v[1];
			Point ptEnd(contours[i][endidx]);
			//轮廓中最凹的点,即距离凸包最远的点
			int faridx = v[2];
			Point ptFar(contours[i][faridx]);
			//轮廓中最凹的点到凸包的距离    【具体请看下面解释的图】
			int depth = v[3] / 256;
			//绘制指定范围内的凸包缺陷
			if (depth > 0 && depth < 800)
			{
				line(drawing, ptStart, ptFar, CV_RGB(0, 255, 0), 2);
				line(drawing, ptEnd, ptFar, CV_RGB(0, 255, 0), 2);
				circle(drawing, ptStart, 4, Scalar(255, 0, 100), 2);
				circle(drawing, ptEnd, 4, Scalar(255, 0, 100), 2);
				circle(drawing, ptFar, 4, Scalar(100, 0, 255), 2);
			}
			iterDefects++;
		}
	}
	imshow("result", drawing);
}

void main()
{
	srcImage = imread("F:\\opencv_re_learn\\hand.jpg");
	if (!srcImage.data){
		cout << "failed to read" << endl;
		system("pause");
		return;
	}
	cvtColor(srcImage, srcGray, CV_BGR2GRAY);
	blur(srcGray, srcGray, Size(3, 3));
	string src_windows = "SRC";
	namedWindow(src_windows, CV_WINDOW_AUTOSIZE);
	imshow(src_windows, srcImage);
	//鼠标回调
	createTrackbar("Threshold", src_windows, &thresh,
		max_thresh, thresh_callback);
	thresh_callback(0, 0);
	waitKey(0);
}

上述代码中,在绘制凸包缺陷之前,先判断了这个最凹点到凸包的距离,这个距离就是上图中标记出来的红线到手的最远距离。【即黑色那一段】
另外,凸包缺陷检测要求检测的轮廓内包含像素点个数不小于4,否则会报错,这是很多网上的其他博客中没有注意到的,其中他们的代码也是千篇一律,这里会使其代码报莫名其妙的错。
实现效果:

另外,可以发现,某二值化后的Mat,作为参数传值到findcontours()函数中,执行后,再次imshow这个Mat,可以看见这个Mat发生了变化,如上图中的下方两张图
参考博客:
https://blog.csdn.net/keith_bb/article/details/70194073
https://blog.csdn.net/lichengyu/article/details/38392473
http://lib.csdn.net/article/opencv/33260
https://www.cnblogs.com/mikewolf2002/p/3422197.html
https://blog.csdn.net/spw_1201/article/details/78176594
https://blog.csdn.net/zhangjunp3/article/details/79798301
https://blog.csdn.net/opencv_source/article/details/78779799


 487
487

 被折叠的 条评论
为什么被折叠?
被折叠的 条评论
为什么被折叠?
 到【灌水乐园】发言


