


阿里开源了一系列很好的大模型,其中QWEN 2.5系列的大模型性能很好,DeepSeek也因为QWEN的优良性能,而选择了该系列模型进行知识蒸馏。
我对Qwen模型的源码也进行了研究,以进一步了解大模型发展的最新技术。从架构上,Qwen2.5也是采用了基于Transformer的Decoder Only的架构,引入了GQA分组查询,SwiGLU激活,RoPE旋转位置编码,QKV偏置以及RMSNorm正则化等技术。
以Qwen 2.5 0.5B参数的模型为例,以下代码可以打印该模型的架构:
from transformers import AutoModel, AutoConfig


model_path = '../models/Qwen2.5-0.5B'
# 从本地加载(需确保存在 config.json 和 model.safetensors)
config = AutoConfig.from_pretrained(model_path)
model = AutoModel.from_pretrained(
    model_path,
    config=config,
    use_safetensors=True  # 强制使用 safetensors 格式
)

print(model)
模型结构如下:
Qwen2Model(
  (embed_tokens): Embedding(151936, 896)
  (layers): ModuleList(
    (0-23): 24 x Qwen2DecoderLayer(
      (self_attn): Qwen2SdpaAttention(
        (q_proj): Linear(in_features=896, out_features=896, bias=True)
        (k_proj): Linear(in_features=896, out_features=128, bias=True)
        (v_proj): Linear(in_features=896, out_features=128, bias=True)
        (o_proj): Linear(in_features=896, out_features=896, bias=False)
        (rotary_emb): Qwen2RotaryEmbedding()
      )
      (mlp): Qwen2MLP(
        (gate_proj): Linear(in_features=896, out_features=4864, bias=False)
        (up_proj): Linear(in_features=896, out_features=4864, bias=False)
        (down_proj): Linear(in_features=4864, out_features=896, bias=False)
        (act_fn): SiLU()
      )
      (input_layernorm): Qwen2RMSNorm((896,), eps=1e-06)
      (post_attention_layernorm): Qwen2RMSNorm((896,), eps=1e-06)
    )
  )
  (norm): Qwen2RMSNorm((896,), eps=1e-06)
  (rotary_emb): Qwen2RotaryEmbedding()
)
模型具体的配置参数如下:
Qwen2Config {
  "_name_or_path": "../models/Qwen2.5-0.5B",
  "architectures": [
    "Qwen2ForCausalLM"
  ],
  "attention_dropout": 0.0,
  "bos_token_id": 151643,
  "eos_token_id": 151643,
  "hidden_act": "silu",
  "hidden_size": 896,
  "initializer_range": 0.02,
  "intermediate_size": 4864,
  "max_position_embeddings": 32768,
  "max_window_layers": 24,
  "model_type": "qwen2",
  "num_attention_heads": 14,
  "num_hidden_layers": 24,
  "num_key_value_heads": 2,
  "rms_norm_eps": 1e-06,
  "rope_scaling": null,
  "rope_theta": 1000000.0,
  "sliding_window": null,
  "tie_word_embeddings": true,
  "torch_dtype": "bfloat16",
  "transformers_version": "4.45.2",
  "use_cache": true,
  "use_mrope": false,
  "use_sliding_window": false,
  "vocab_size": 151936
}
在我们本地安装的Transformers库当中可以找到对应的源代码。
首先模型输入是一个Embedding层,Token词汇表的长度是151936,把每个Token转化为896维度的向量,这个直接采用pytorch nn.embedding来进行向量转换。
然后是由24层Qwen2DecoderLayer组成,第一层的输入是Embedding层的输出,后面每层的输入是上一层的输出。每个Layer都是由Qwen2SdpaAttention层,Qwen2MLP层以及Qwen2RMSNorm正则化层组成。
在Qwen2DecoderLayer的代码中,对输入的hidden_states进行Qwen2RMSNorm正则化处理,然后通过Qwen2SdpaAttention进行注意力计算。
Qwen2SdpaAttention这个层是继承了Qwen2Attention,只是改写了forward函数。其主要作用就是对输入的hidden_states进行QKV的线性变换,如以下代码:
self.q_proj = nn.Linear(self.hidden_size, self.num_heads * self.head_dim, bias=True)
self.k_proj = nn.Linear(self.hidden_size, self.num_key_value_heads * self.head_dim, bias=True)
self.v_proj = nn.Linear(self.hidden_size, self.num_key_value_heads * self.head_dim, bias=True)
self.o_proj = nn.Linear(self.num_heads * self.head_dim, self.hidden_size, bias=False)
然后给QK这两个向量增加旋转编码,使得QK向量具备位置信息,之后就是标准的注意力计算的流程。这里面的旋转编码RoPE给QK向量添加位置信息,可以理解为对不同位置的向量旋转不同的角度。以下是RoPE论文中的一个示意图,形象的展示了这个旋转编码的思路:
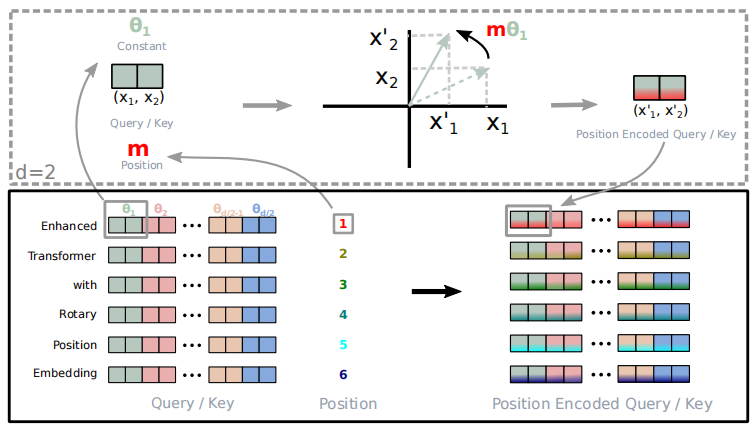
从上图中可以看到对于输入的嵌入向量,其维度为d,位置为m,例如假设对于输入的语句"Enhanced Transformer with Rotary Position Embedding”,我们计算得到了其Q、K向量,其中QK向量的维度是64,那么对于Enhanced的Q向量来说,其m为1,对其64维的数字两两分组,每一组可以看做二维平面的一个向量,对其旋转角度,得到一个新的向量。这样处理之后的Q向量就带有了位置信息。
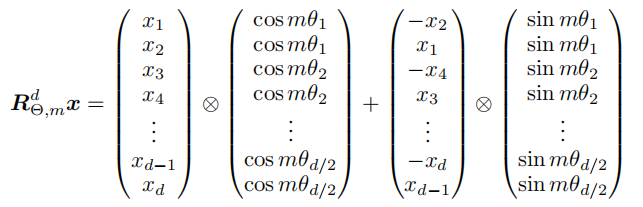
具体对于每个分组的的计算方式如下:

之后我们就可以对每个分组来进行旋转,具体的计算方式如下图:
现在我们看看这个RoPE在Qwen里面是如何计算的。在Config里面可以看到输入的tokenid被编码为896维的向量,num_attention_heads为14,因此这个向量在经过Q值变换后,每个head的输出变量为896/14=64维。在以下代码中计算
inv_freq = 1.0 / (base ** (torch.arange(0, dim, 2, dtype=torch.int64).float().to(device) / dim))这里base是config的rope_theta=1000000, dim=64,因此是1.0,
是0.6493816315762113,...
计算inv_freq和m之间的乘积,并得到这些乘积的cos和sin的值
inv_freq_expanded = self.inv_freq[None, :, None].float().expand(position_ids.shape[0], -1, 1)
position_ids_expanded = position_ids[:, None, :].float()
freqs = (inv_freq_expanded.float() @ position_ids_expanded.float()).transpose(1, 2)
emb = torch.cat((freqs, freqs), dim=-1)
cos = emb.cos()
sin = emb.sin()
这里的计算和论文中的方式稍有不同。例如对于一个64维的向量,分为32组,在论文中是这样来分组,代码中是
这样来分组,这样分组不影响效果,代码实现上会更简洁一些。
现在可以计算QK向量旋转后的数值了
query_states, key_states = apply_rotary_pos_emb(query_states, key_states, cos, sin)

def rotate_half(x):
    """Rotates half the hidden dims of the input."""
    x1 = x[..., : x.shape[-1] // 2]
    x2 = x[..., x.shape[-1] // 2 :]
    return torch.cat((-x2, x1), dim=-1)

def apply_rotary_pos_emb(q, k, cos, sin, position_ids=None, unsqueeze_dim=1):
    """Applies Rotary Position Embedding to the query and key tensors.

    Args:
        q (`torch.Tensor`): The query tensor.
        k (`torch.Tensor`): The key tensor.
        cos (`torch.Tensor`): The cosine part of the rotary embedding.
        sin (`torch.Tensor`): The sine part of the rotary embedding.
        position_ids (`torch.Tensor`, *optional*):
            Deprecated and unused.
        unsqueeze_dim (`int`, *optional*, defaults to 1):
            The 'unsqueeze_dim' argument specifies the dimension along which to unsqueeze cos[position_ids] and
            sin[position_ids] so that they can be properly broadcasted to the dimensions of q and k. For example, note
            that cos[position_ids] and sin[position_ids] have the shape [batch_size, seq_len, head_dim]. Then, if q and
            k have the shape [batch_size, heads, seq_len, head_dim], then setting unsqueeze_dim=1 makes
            cos[position_ids] and sin[position_ids] broadcastable to the shapes of q and k. Similarly, if q and k have
            the shape [batch_size, seq_len, heads, head_dim], then set unsqueeze_dim=2.
    Returns:
        `tuple(torch.Tensor)` comprising of the query and key tensors rotated using the Rotary Position Embedding.
    """
    cos = cos.unsqueeze(unsqueeze_dim)
    sin = sin.unsqueeze(unsqueeze_dim)
    q_embed = (q * cos) + (rotate_half(q) * sin)
    k_embed = (k * cos) + (rotate_half(k) * sin)
    return q_embed, k_embed
模型的其余部分的代码都比较好理解,就不再详细写了。以上就是对Qwen 2.5模型代码研究的一些总结。


 143
143

 被折叠的 条评论
为什么被折叠?
被折叠的 条评论
为什么被折叠?
 到【灌水乐园】发言


