


由于某些个人原因,我在2019.5月,开始图形学相关的内容,从2019.9~到2020.2月中旬,这段时间内又浪费了时间。(手动哭笑!!!啊啊啊啊!!!!)
所以往后的时间,又得更加努力的恶补图形相关的内容。
我的计划是先将目前积累得到的知识点,都将能做的效果,都做一篇,做备忘用的。
等所有的效果备忘一份后,又开始学习新的内容,为练习项目做得准备啊!(啊啊啊!!!好多内容!!!慢慢啃)
(另外说明一下,因为时间关系,我后面实现的内容,讲解都可能比较少了,主要都注释在代码说明)
基于前一篇的基础上做优化:Unity Shader - GrabPass 实现武器热扭曲拖尾效果
而GrabPass在单次DC没有Finish时,就去GPU取其他BUFF的信息,会比较慢,具体不知道GPU的工作原理(日后慢慢不上GPU结构与工作原理方式),可以查看一篇相关的文章:Unity ImageEffect 效率分析。
实现思路是:
- 先使用
_Camera.SetTargetBuffers(colorRT.colorBuffer, depthRT.depthBuffer);或CommandBuffer.SetRenderTarget(RenderTargetIdentifier[] colors, RenderTargetIdentifier depth);将渲染目标的ColorBuffer设置为我们自己需要的纹理中。 - 再将存有
ColorBuffer信息的纹理在每帧的OnPreRender传入到Shader的全局变量。 GrabPass就可以删除了,改用传进来的ColorBuffer的纹理来替代。
CSharp
using UnityEngine;
using UnityEngine.Rendering;
/// <summary>
/// jave.lin 2020.03.19
/// </summary>
public class TrailNoGrabPassRetargetColAndDepthBuf : MonoBehaviour
{
    public enum ProjType
    {
        Perspective,
        Orthographic
    }

    private static int _AfterSkyboxColTex_hash = Shader.PropertyToID("_AfterSkyboxColTex");
    private static int _AfterForwardOpaqueDepthTex_hash = Shader.PropertyToID("_AfterForwardOpaqueDepthTex");

    public bool enableCustomColDepth = false;
    private bool lastEnableCustomColDepth = false;

    public ProjType projType;

    private Camera cam;
    private CommandBuffer blitColorBufCMD;
    private CommandBuffer blitDepthBufCMD;
    private CommandBuffer blitBackBufCMD;

    private RenderTexture colorBuf;
    private RenderTexture depthBuf;

    private RenderTexture colorTex;
    private RenderTexture depthTex;

    private void Start()
    {
        cam = GetComponent<Camera>();

        StepCmd();
    }

    private void StepCmd()
    {
        if (lastEnableCustomColDepth != enableCustomColDepth)
        {
            lastEnableCustomColDepth = enableCustomColDepth;
            if (enableCustomColDepth)
            {
                colorBuf = new RenderTexture(Screen.width, Screen.height, 0, RenderTextureFormat.RGB111110Float);
                depthBuf = new RenderTexture(Screen.width, Screen.height, 24, RenderTextureFormat.Depth);

                colorTex = new RenderTexture(Screen.width, Screen.height, 0, RenderTextureFormat.RGB111110Float);
                depthTex = new RenderTexture(Screen.width, Screen.height, 0, RenderTextureFormat.R16); // RHalf,注意这里别使用RHalf,否则精度没有原来的RenderTextureFormat.Depth的那么高,在正交相机模式下很明显,透视没什么问题

                colorBuf.name = "Custom - ColorBuffer";
                depthBuf.name = "Custom - DepthBuffer";
                colorTex.name = "Custom - ColorTexture";
                depthTex.name = "Custom - DepthTexture";

                blitColorBufCMD = new CommandBuffer();
                blitColorBufCMD.name = "AfterSkyBox - BlitColor";
                blitColorBufCMD.CopyTexture(colorBuf.colorBuffer, colorTex.colorBuffer);
                cam.AddCommandBuffer(CameraEvent.AfterSkybox, blitColorBufCMD);

                blitDepthBufCMD = new CommandBuffer();
                blitDepthBufCMD.name = "AfterForwardOpaque - BlitDepth";
                blitDepthBufCMD.Blit(depthBuf.depthBuffer, depthTex.colorBuffer);
                cam.AddCommandBuffer(CameraEvent.AfterForwardOpaque, blitDepthBufCMD);

                blitBackBufCMD = new CommandBuffer();
                blitBackBufCMD.name = "AfterEverything - BlitBackBuf";
                blitBackBufCMD.Blit(colorBuf.colorBuffer, (RenderTexture)null);
                cam.AddCommandBuffer(CameraEvent.AfterEverything, blitBackBufCMD);
            }
            else
            {
                DestroyCmd();
            }
        }
    }

    private void OnPreRender()
    {
        StepCmd();

        if (enableCustomColDepth)
        {
            colorBuf.DiscardContents();
            depthBuf.DiscardContents();
            colorTex.DiscardContents();
            depthTex.DiscardContents();

            Shader.SetGlobalTexture(_AfterSkyboxColTex_hash, colorTex);
            Shader.SetGlobalTexture(_AfterForwardOpaqueDepthTex_hash, depthTex);

            // Camera.targetTexture和SetTargetBuffers的区别
            // https://blog.csdn.net/wodownload2/article/details/104424005
            // when targetTexture is null, camera renders to screen.
            // when rendering into a texture, the camera always renders into the whole texture;
            // it is also possible to make camera render into separate RenderBuffers, or into multiple textures at once, using SetTargetBuffers function.
            cam.SetTargetBuffers(colorBuf.colorBuffer, depthBuf.depthBuffer);
        }
        else
        {
            cam.targetTexture = null;
        }
    }

    private void DestroyCmd()
    {
        Destroy(colorBuf);
        Destroy(depthBuf);
        Destroy(colorTex);
        Destroy(depthTex);

        if (blitColorBufCMD != null)
        {
            cam.RemoveCommandBuffer(CameraEvent.AfterSkybox, blitColorBufCMD);
            blitColorBufCMD.Dispose();
            blitColorBufCMD = null;
        }
        if (blitDepthBufCMD != null)
        {
            cam.RemoveCommandBuffer(CameraEvent.AfterForwardOpaque, blitDepthBufCMD);
            blitDepthBufCMD.Dispose();
            blitDepthBufCMD = null;
        }
        if (blitBackBufCMD != null)
        {
            cam.RemoveCommandBuffer(CameraEvent.AfterEverything, blitBackBufCMD);
            blitBackBufCMD.Dispose();
            blitBackBufCMD = null;
        }
    }

    private void OnDestroy()
    {
        DestroyCmd();
    }
}
乍一看,好想没做啥东西,如果看不懂,CommandBuffer 的相关代码,可以看看我之前翻译的一篇:Unity Graphics Command Buffers 图形指令缓存。
Shader
// jave.lin 2020.03.19 武器热扭曲 改用CommandBuffer在AfterSkybox后的ColorBuffer传经来的纹理,作为替代GrabPass的方式
Shader "Custom/WeaponDistortionTrailNoGrabPass" {
    Properties {
        [MaterialToggle(DISTORTION)]  DISTORTION("Distortion", Float) = 1       // 是否开始深度的,浅水透视效果
        _NoiseTex ("NoiseTex", 2D) = "white" {}                                 // 噪点图
        _Brightness ("Brightness", Range(0, 4)) = 2                             // 拖尾亮度
        _DistortionIntensity ("DistortionIntensity", Range(0, 10)) = .5         // 扭曲强度
        _DistortionFrequency ("DistortionFrequency", Range(0, 100)) = 1         // 扭曲变化频率
    }
    SubShader {
        Tags { "RenderType"="Opaque" "Queue"="Transparent" } LOD 100
        // GrabPass { "_wpTrailTexture" }           // 不用GrabPass
        Pass {
            ZWrite Off Cull Off Lighting Off Fog { Mode Off }
            //Blend SrcAlpha OneMinusSrcAlpha
            CGPROGRAM
            #pragma vertex vert
            #pragma fragment frag
            #pragma multi_compile _ DISTORTION
            #include "UnityCG.cginc"
            struct appdata {
                float4 vertex : POSITION;
                float2 uv : TEXCOORD0;
                fixed4 color : COLOR;
            };
            struct v2f {
                float4 vertex : SV_POSITION;
                float2 uv : TEXCOORD0;
                float4 grabPos : TEXCOORD1;
                fixed4 color : COLOR0;
            };
            // sampler2D _wpTrailTexture;           // 不用GrabPass的纹理
            sampler2D _AfterSkyboxColTex;           // 改用CommandBuffer在AfterSkybox后的ColorBuffer传经来的纹理,作为替代GrabPass的方式
            sampler2D _NoiseTex;
            float4 _NoiseTex_ST;
            fixed _Brightness;
            fixed _DistortionIntensity;
            fixed _DistortionFrequency;
            v2f vert (appdata v) {
                v2f o;
                o.vertex = UnityObjectToClipPos(v.vertex);
                o.uv = TRANSFORM_TEX(v.uv, _NoiseTex);
                o.grabPos = ComputeGrabScreenPos(o.vertex);
                o.color = v.color;
                return o;
            }
            fixed4 frag (v2f i) : SV_Target {
                i.grabPos.xy /= i.grabPos.w;

                #if DISTORTION
                float intensity = tex2D(_NoiseTex, i.grabPos.xy).r * sin(_Time.yw * _DistortionFrequency);
                i.grabPos.x += intensity * i.color.a * _DistortionIntensity;
                #endif

                fixed4 col = tex2D(_AfterSkyboxColTex, i.grabPos.xy);

                col.rgb = lerp(col.rgb, col.rgb * i.color.rgb + col.rgb * _Brightness, i.color.a);
                col.a = i.color.a;
                return col;
            }
            ENDCG
        }
    }
}
可以看到我们没用到GrabPass来实现了。也不需要Camera.Render()多一次场景的方式,因为我们用的是ColorBuffer的纹理。
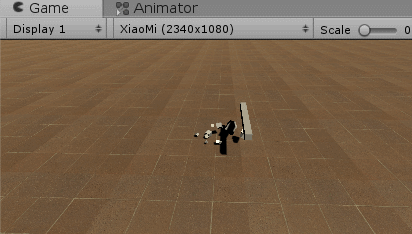
运行效果
但是Scene视图得拖尾有问题
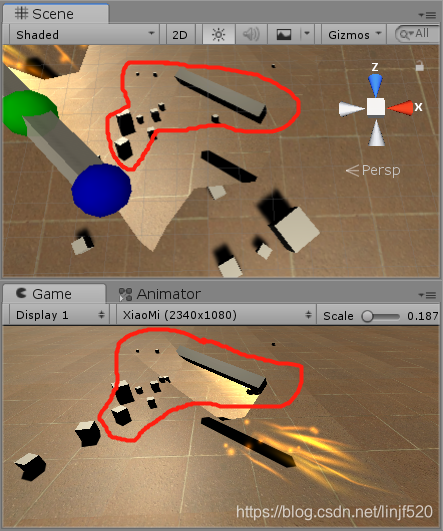
但在Scene视图就无所谓了。
Project
backup : UnityShader_CmdBuf_WeaponDistortionTrail_NoGrabPass_2018.3.0f2
scene : WeaponDistortionTrailNoGrabPassScene.unity


 3万+
3万+

 被折叠的 条评论
为什么被折叠?
被折叠的 条评论
为什么被折叠?
 到【灌水乐园】发言


