


 本文深入探讨了屏幕空间全局光照(SSGI)技术,这是一种用于实时全局光照的优化方法。SSGI通过基于屏幕空间的计算,减少了对全局光照的复杂计算,从而降低了对内存和CPU/GPU资源的需求。文章详细阐述了SSGI的实现步骤,包括深度图采样、光线步进、TAA抗锯齿、模糊处理以及最终的场景颜色与间接光照的组合。尽管SSGI存在一定的局限性,但作为实时全局光照解决方案,它为封闭空间内的光照效果提供了良好的模拟。
我们知道全局光照是图形学中一项比较难实现的技术,因为真正要得到全局光照是需要一个点跟所有点的关系计算的,而这个计算如果用在计算机那是不太可能实现的。而现代技术利用了一些比如有向距离场,体素,辐照度等方式实现全局光照,还有就是越来越火的光纤追踪技术实现全局光照。但是这些技术的消耗都很大,包括内存,cpu,gpu的运算量。那么自然会有一种ss系列的方式来实现全局光照,这种方式会比前面几种都容易实现并且运算量相对小。
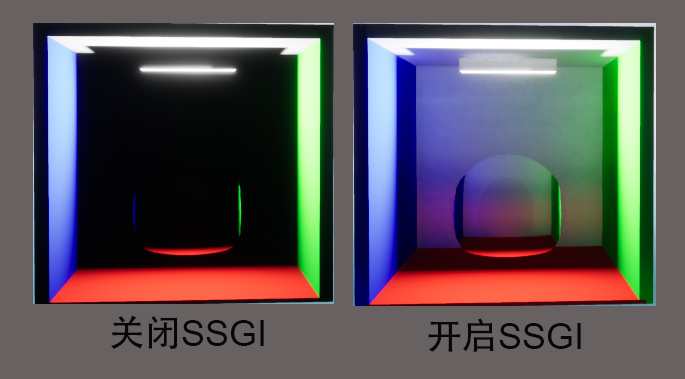
屏幕空间的全局光照也叫SSGI,是一个相对来说比较快速得到间接光的一种全局光照技术,是基于屏幕空间大小来实现的,也就是说不会得到屏幕外的颜色或者光照。他也不是基于光源的,而是基于当前的颜色来做扰动采样整合得到的光照信息,最后需要做一些抗锯齿的操作来让他噪点比较合理。这种方式更合理的使用在密闭空间内,这样的效果会比较理想。
SSGI一般会有几个步骤:
1.采样不同lod的深度图信息并得到其中最大的深度值。(要执行多少次寻找就看你设置多少次pass)
2.用光线步进的方式,并用噪音图采样以圆的周长来找周围的像素点的颜色,这个颜色是根据当前场景颜色做的(所以ssgi一般放到最后处理)。采样的点存储到rt上
3.这时的rt是带有比较明显的锯齿的rt,需要用taa方式过滤一次
4.最后在横向和纵向做两次模糊处理。
5.这样就得到了ssgi的漫反射方向的间接光照了,最后只需要把场景图和这个间接光rtcombina一下就好了。
大体实现:
1.获取深度图信息的核心代码是
float2 uv = i.uv.xy;

    half4 minDepth = half4(
        _SSGi_HierarchicalDepth_RT.SampleLevel( sampler_SSGi_HierarchicalDepth_RT, uv, _SSGi_HiZ_PrevDepthLevel, int2(-1.0,-1.0) ).r,
        _SSGi_HierarchicalDepth_RT.SampleLevel( sampler_SSGi_HierarchicalDepth_RT, uv, _SSGi_HiZ_PrevDepthLevel, int2(-1.0, 1.0) ).r,
        _SSGi_HierarchicalDepth_RT.SampleLevel( sampler_SSGi_HierarchicalDepth_RT, uv, _SSGi_HiZ_PrevDepthLevel, int2(1.0, -1.0) ).r,
        _SSGi_HierarchicalDepth_RT.SampleLevel( sampler_SSGi_HierarchicalDepth_RT, uv, _SSGi_HiZ_PrevDepthLevel, int2(1.0, 1.0) ).r
    );

	return max( max(minDepth.r, minDepth.g), max(minDepth.b, minDepth.a) );
采样上下左右四个方向的深度获取最深的。
2.光线步进采样周围像素点的核心代码(有注释):
float2 UV = i.uv.xy;

	//当前像素深度
	float SceneDepth = tex2Dlod(_CameraDepthTexture, float4(UV, 0, 0)).r;
	//转成摄像机方向的线性深度
	float EyeDepth = LinearEyeDepth(SceneDepth);
	//float LinearDepth = Linear01Depth(SceneDepth);

	half Roughness = clamp(1 - tex2D(_CameraGBufferTexture1, UV).a, 0.02, 1);
	float3 WorldNormal = tex2D(_CameraGBufferTexture2, UV) * 2 - 1;
	float3 ViewNormal = mul((float3x3)(_SSGi_WorldToCameraMatrix), WorldNormal);

	//摄像机位置,z轴表示深度
	float3 ScreenPos = GetScreenSpacePos(UV, SceneDepth);
	//通过摄像机的逆矩阵转换到世界坐标
	float3 WorldPos = GetWorldSpacePos(ScreenPos, _SSGi_InverseViewProjectionMatrix);
	//通过投影矩阵的逆矩阵转换到摄像机空间
	float3 ViewPos = GetViewSpacePos(ScreenPos, _SSGi_InverseProjectionMatrix);
	//摄像机空间方向
	float3 ViewDir = GetViewDir(WorldPos, ViewPos);

	//基于世界法线建立切线空间
	float3x3 TangentBasis = GetTangentBasis( WorldNormal );
	//uint3 p1 = Rand3DPCG16( uint3( (float)0xffba * abs(WorldPos) ) );
	//uint2 p = (uint2(UV * 3) ^ 0xa3c75a5cu) ^ (p1.xy);

	half Out_Mask = 0;
	half3 Out_Color = 0;

	[loop]
	for (uint i = 0; i < (uint)_SSGi_NumRays; i++)
	{
		//uint3 Random = Rand3DPCG16( int3( p, ReverseBits32(i) ) );
		//half2 Hash = float2(Random.xy ^ Random.z) / 0xffffu;
		//根据扰动图片采样来获取周边的像素和深度
		half2 Hash = tex2Dlod(_SSGi_Noise, half4((UV + sin( i + _SSGi_Jitter.zw )) * _SSGi_RayCastSize.xy / _SSGi_NoiseSize.xy, 0, 0)).xy;

		float3 L;
		//基于圆偏移的点
		L.xy = UniformSampleDiskConcentric( Hash );
		L.z = sqrt( 1 - dot( L.xy, L.xy ) );
		//世界空间
		float3 World_L = mul( L, TangentBasis );
		//转摄像机空间
		float3 View_L = mul((float3x3)(_SSGi_WorldToCameraMatrix),  World_L);

		float3 rayStart = float3(UV, ScreenPos.z);
		//对方向最一些偏移,也是基于圆做偏移
		float4 rayProj = mul ( _SSGi_ProjectionMatrix, float4(ViewPos + View_L, 1.0) );
		float3 rayDir = normalize( (rayProj.xyz / rayProj.w) - ScreenPos);
		rayDir.xy *= 0.5;
		//找偏移附近的uv
		float4 RayHitData = Hierarchical_Z_Trace(_SSGi_HiZ_MaxLevel, _SSGi_HiZ_StartLevel, _SSGi_HiZ_StopLevel, _SSGi_NumSteps_HiZ, _SSGi_Thickness, 1 / _SSGi_RayCastSize.xy, rayStart, rayDir, _SSGi_HierarchicalDepth_RT, sampler_SSGi_HierarchicalDepth_RT);

		//根据偏移采样场景颜色
		float3 SampleColor = tex2Dlod(_SSGi_SceneColor_RT, half4(RayHitData.xy, 0, 0));
		float4 SampleNormal = tex2Dlod(_CameraGBufferTexture2, half4(RayHitData.xy, 0, 0)) * 2 - 1;
		float Occlusion = 1 - saturate( dot(World_L, SampleNormal) );

		SampleColor *= Occlusion;
		SampleColor *= rcp( 1 + Luminance(SampleColor) );

		Out_Color += SampleColor;
		//对场景大小的遮罩决定显示范围
		Out_Mask += Square( RayHitData.a * GetScreenFadeBord(RayHitData.xy, _SSGi_ScreenFade) );
	}
	Out_Color /= _SSGi_NumRays;
	Out_Color *= rcp( 1 - Luminance(Out_Color) );
	Out_Mask /= _SSGi_NumRays;

	//颜色用附近采样的颜色,透明度用深度决定
	[branch]
	if(_SSGi_MaskRay == 1) {
		return half4( Out_Color * saturate(Out_Mask * 2), EyeDepth );
	} else {
		return half4( Out_Color, EyeDepth );
	}
3.做一次TAA,主要是获取aabb的裁剪盒子,然后得到最小颜色,最大颜色,然后clamp进行过渡,再融合上一帧的颜色和当前帧的颜色。
half2 UV = i.uv.xy;
	half3 WorldNormal = tex2D(_CameraGBufferTexture2, UV).rgb * 2 - 1;
	half2 Velocity = tex2D(_CameraMotionVectorsTexture, UV);

	/////Get AABB ClipBox
	half SS_Indirect_Variance = 0;
	half4 SS_Indirect_CurrColor = 0;
	half4 SS_Indirect_MinColor, SS_Indirect_MaxColor;
	ResolverAABB(_SSGi_RayCastRT, 0, 10, _SSGi_TemporalScale, UV, _SSGi_ScreenSize.xy, SS_Indirect_Variance, SS_Indirect_MinColor, SS_Indirect_MaxColor, SS_Indirect_CurrColor);

	/////Clamp TemporalColor
	half4 SS_Indirect_PrevColor = tex2D(_SSGi_TemporalPrev_RT, UV - Velocity);
	SS_Indirect_PrevColor = clamp(SS_Indirect_PrevColor, SS_Indirect_MinColor, SS_Indirect_MaxColor);

	/////Combine TemporalColor
	half Temporal_BlendWeight = saturate(_SSGi_TemporalWeight * (1 - length(Velocity) * 2));
	half4 SS_IndirectColor = lerp(SS_Indirect_CurrColor, SS_Indirect_PrevColor, Temporal_BlendWeight);

	return SS_IndirectColor;
4.做横向和纵向两次模糊(blur里面会对颜色和深度都做模糊处理,颜色直接用相加然后除于相加的数量得到,深度需要用2的n次幂来得到一条曲线,下面的CrossBilateralWeight就是深度的过滤方式):
float4 Bilateralfilter_X(PixelInput i) : SV_Target
{
	half2 UV = i.uv.xy;
	const float Radius = 12.0;
	return BilateralBlur( Radius, UV, half2(1.0 / _SSGi_ScreenSize.x, 0), _SSGi_TemporalPrev_RT );
}

float4 Bilateralfilter_Y(PixelInput i) : SV_Target
{
	half2 UV = i.uv.xy;
	const float Radius = 12.0;
	return BilateralBlur( Radius, UV, half2(0, 1.0 / _SSGi_ScreenSize.y), _SSGi_TemporalPrev_RT );
}

float CrossBilateralWeight(float BLUR_RADIUS, float r, float Depth, float originDepth)
{
	const float BlurSigma = BLUR_RADIUS * 0.5;
	const float BlurFalloff = 1.0 / (2.0 * BlurSigma * BlurSigma);

    float dz = (originDepth - Depth) * _ProjectionParams.z * 0.25;
	return exp2(-r * r * BlurFalloff - dz * dz);
}
5.合并就简单了,就是用当前场景颜色和上面算出来的间接光照相加。
half2 UV = i.uv.xy;

	half3 BaseColor = tex2D(_CameraGBufferTexture0, UV);
	half3 SceneColor = tex2D(_SSGi_SceneColor_RT, UV);
	half3 IndirectIrradiance = tex2D(_SSGi_Bilateral_RT, UV) * _SSGi_GiIntensity;

	return (IndirectIrradiance * BaseColor) + SceneColor ;
总结:ssgi的diffuse方式实现简单,得到的结果也不错,但是他并不是正确的,是一个模拟周围颜色的过程,当你要得到更好的结果时需要扩大获取深度和颜色扰动的范围,同样gpu的压力也会增大。但他确是一种实时的全局光照方式。当然如果我们只需要一些静态或可控的动态区域做全局光照,那么用烘焙和球谐光照就可以了。


 855
855

 被折叠的 条评论
为什么被折叠?
被折叠的 条评论
为什么被折叠?
 到【灌水乐园】发言


