


语义分割是计算机视觉中一项核心任务,其目标是为图像中的每个像素分配一个类别标签。在各种语义分割模型中,SegNet 以其结构清晰、计算高效的特点,广泛应用于医疗图像、自动驾驶、遥感等领域。
本文将带你全面了解 SegNet 的原理、架构,并通过 PyTorch 实现一个小案例,助你快速上手语义分割!
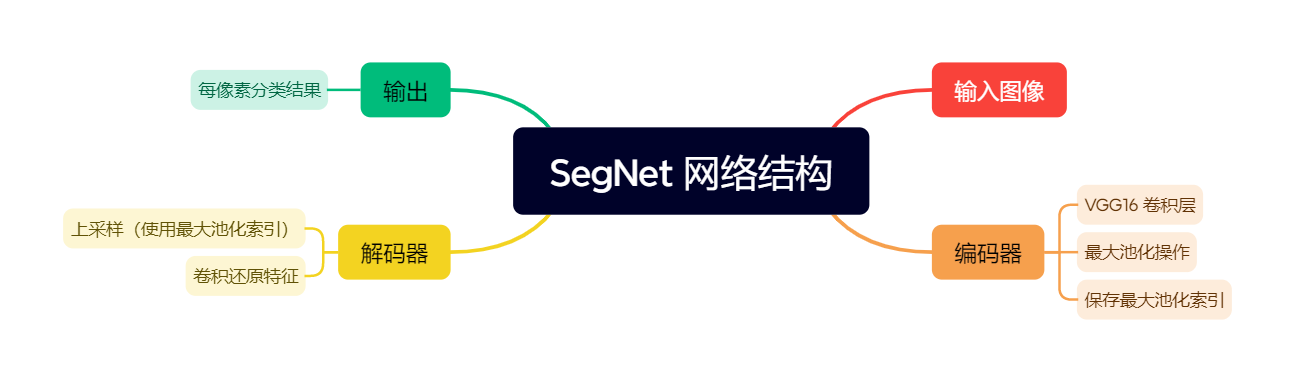
🧠 1. 什么是 SegNet?
SegNet 是由剑桥大学的研究人员提出的一种基于编码器-解码器结构的语义分割神经网络。其主要特点是:
-
编码器部分借鉴了 VGG16 的卷积结构;
-
解码器部分通过最大池化索引(max-pooling indices)进行非线性上采样;
-
无需全连接层,因此参数较少,易于训练。
📌 结构图
你可以用如下架构图展示:
🧪 2. 案例实战:使用 PyTorch 实现 SegNet
我们以 Pascal VOC 或 CamVid 数据集为例,构建一个简单的 SegNet 网络。
🔧 2.1 环境准备
pip install torch torchvision matplotlib
🏗️ 2.2 网络结构代码
import torch
import torch.nn as nn

class SegNet(nn.Module):
    def __init__(self, in_channels=3, num_classes=21):
        super(SegNet, self).__init__()

        # 编码器(以 VGG16 为模板)
        self.encoder = nn.Sequential(
            # block 1
            nn.Conv2d(in_channels, 64, 3, padding=1), nn.ReLU(inplace=True),
            nn.Conv2d(64, 64, 3, padding=1), nn.ReLU(inplace=True),
            nn.MaxPool2d(2, 2, return_indices=True),
            # block 2
            nn.Conv2d(64, 128, 3, padding=1), nn.ReLU(inplace=True),
            nn.Conv2d(128, 128, 3, padding=1), nn.ReLU(inplace=True),
            nn.MaxPool2d(2, 2, return_indices=True),
        )

        # 解码器
        self.decoder = nn.Sequential(
            nn.MaxUnpool2d(2, 2),
            nn.Conv2d(128, 128, 3, padding=1), nn.ReLU(inplace=True),
            nn.Conv2d(128, 64, 3, padding=1), nn.ReLU(inplace=True),

            nn.MaxUnpool2d(2, 2),
            nn.Conv2d(64, 64, 3, padding=1), nn.ReLU(inplace=True),
            nn.Conv2d(64, num_classes, 3, padding=1)
        )

    def forward(self, x):
        indices_list = []
        sizes = []

        for layer in self.encoder:
            if isinstance(layer, nn.MaxPool2d):
                sizes.append(x.size())
                x, indices = layer(x)
                indices_list.append(indices)
            else:
                x = layer(x)

        for layer in self.decoder:
            if isinstance(layer, nn.MaxUnpool2d):
                indices = indices_list.pop()
                size = sizes.pop()
                x = layer(x, indices, output_size=size)
            else:
                x = layer(x)

        return x
📊 2.3 模型训练与预测(简化版)
model = SegNet(num_classes=21).cuda()
criterion = nn.CrossEntropyLoss()
optimizer = torch.optim.Adam(model.parameters(), lr=1e-4)

# 假设有 dataloader
for images, labels in train_loader:
    images, labels = images.cuda(), labels.cuda()
    outputs = model(images)
    loss = criterion(outputs, labels)
    optimizer.zero_grad()
    loss.backward()
    optimizer.step()
🖼️ 2.4 预测结果可视化
import matplotlib.pyplot as plt

def decode_segmap(output):
    output = torch.argmax(output.squeeze(), dim=0).cpu().numpy()
    return output  # 可添加调色板上色

# 可视化
with torch.no_grad():
    output = model(image.cuda().unsqueeze(0))
    seg_result = decode_segmap(output)
    plt.imshow(seg_result)
    plt.title("SegNet Prediction")
    plt.axis("off")
    plt.show()
📌 3. SegNet 的优缺点
| 优点 | 缺点 |
|---|---|
| 无需全连接层,参数少 | 解码器结构相对简单,可能影响分割边缘精度 |
| 利用池化索引还原特征图位置,节省计算 | 不如 UNet 或 DeepLab 系列精度高 |
| 模型轻量,适合嵌入式部署 | 不支持多尺度上下文捕捉(如 ASPP) |
📚 4. 总结
SegNet 是一种经典而高效的语义分割模型,非常适合入门与部署场景。本文从原理到代码实现,再到结果可视化,带你全方位掌握 SegNet。如果你正在研究图像分割任务,不妨试试用它作为起点!


 3618
3618

 被折叠的 条评论
为什么被折叠?
被折叠的 条评论
为什么被折叠?
 到【灌水乐园】发言


