


本文将从源码深度分析Ragflow,理解原理,未来对复杂场景可以多一些思考。
RAGflow框架热门,主要是因为:
- 文档解析
- 解析后可追溯
但他的工作流做得不够出色,现在一般的方案是用RagFlow 只构建知识库。用dify或手搓代码做更智能体搭建。因此本文将侧重于RagFlow的ocr文档处理部分,其他架构是类似的。
核心技术:Deep Doc引擎
下图为RagFlow的架构图,最右侧是deepdoc部分。
我们单独抽取文档部分分析:
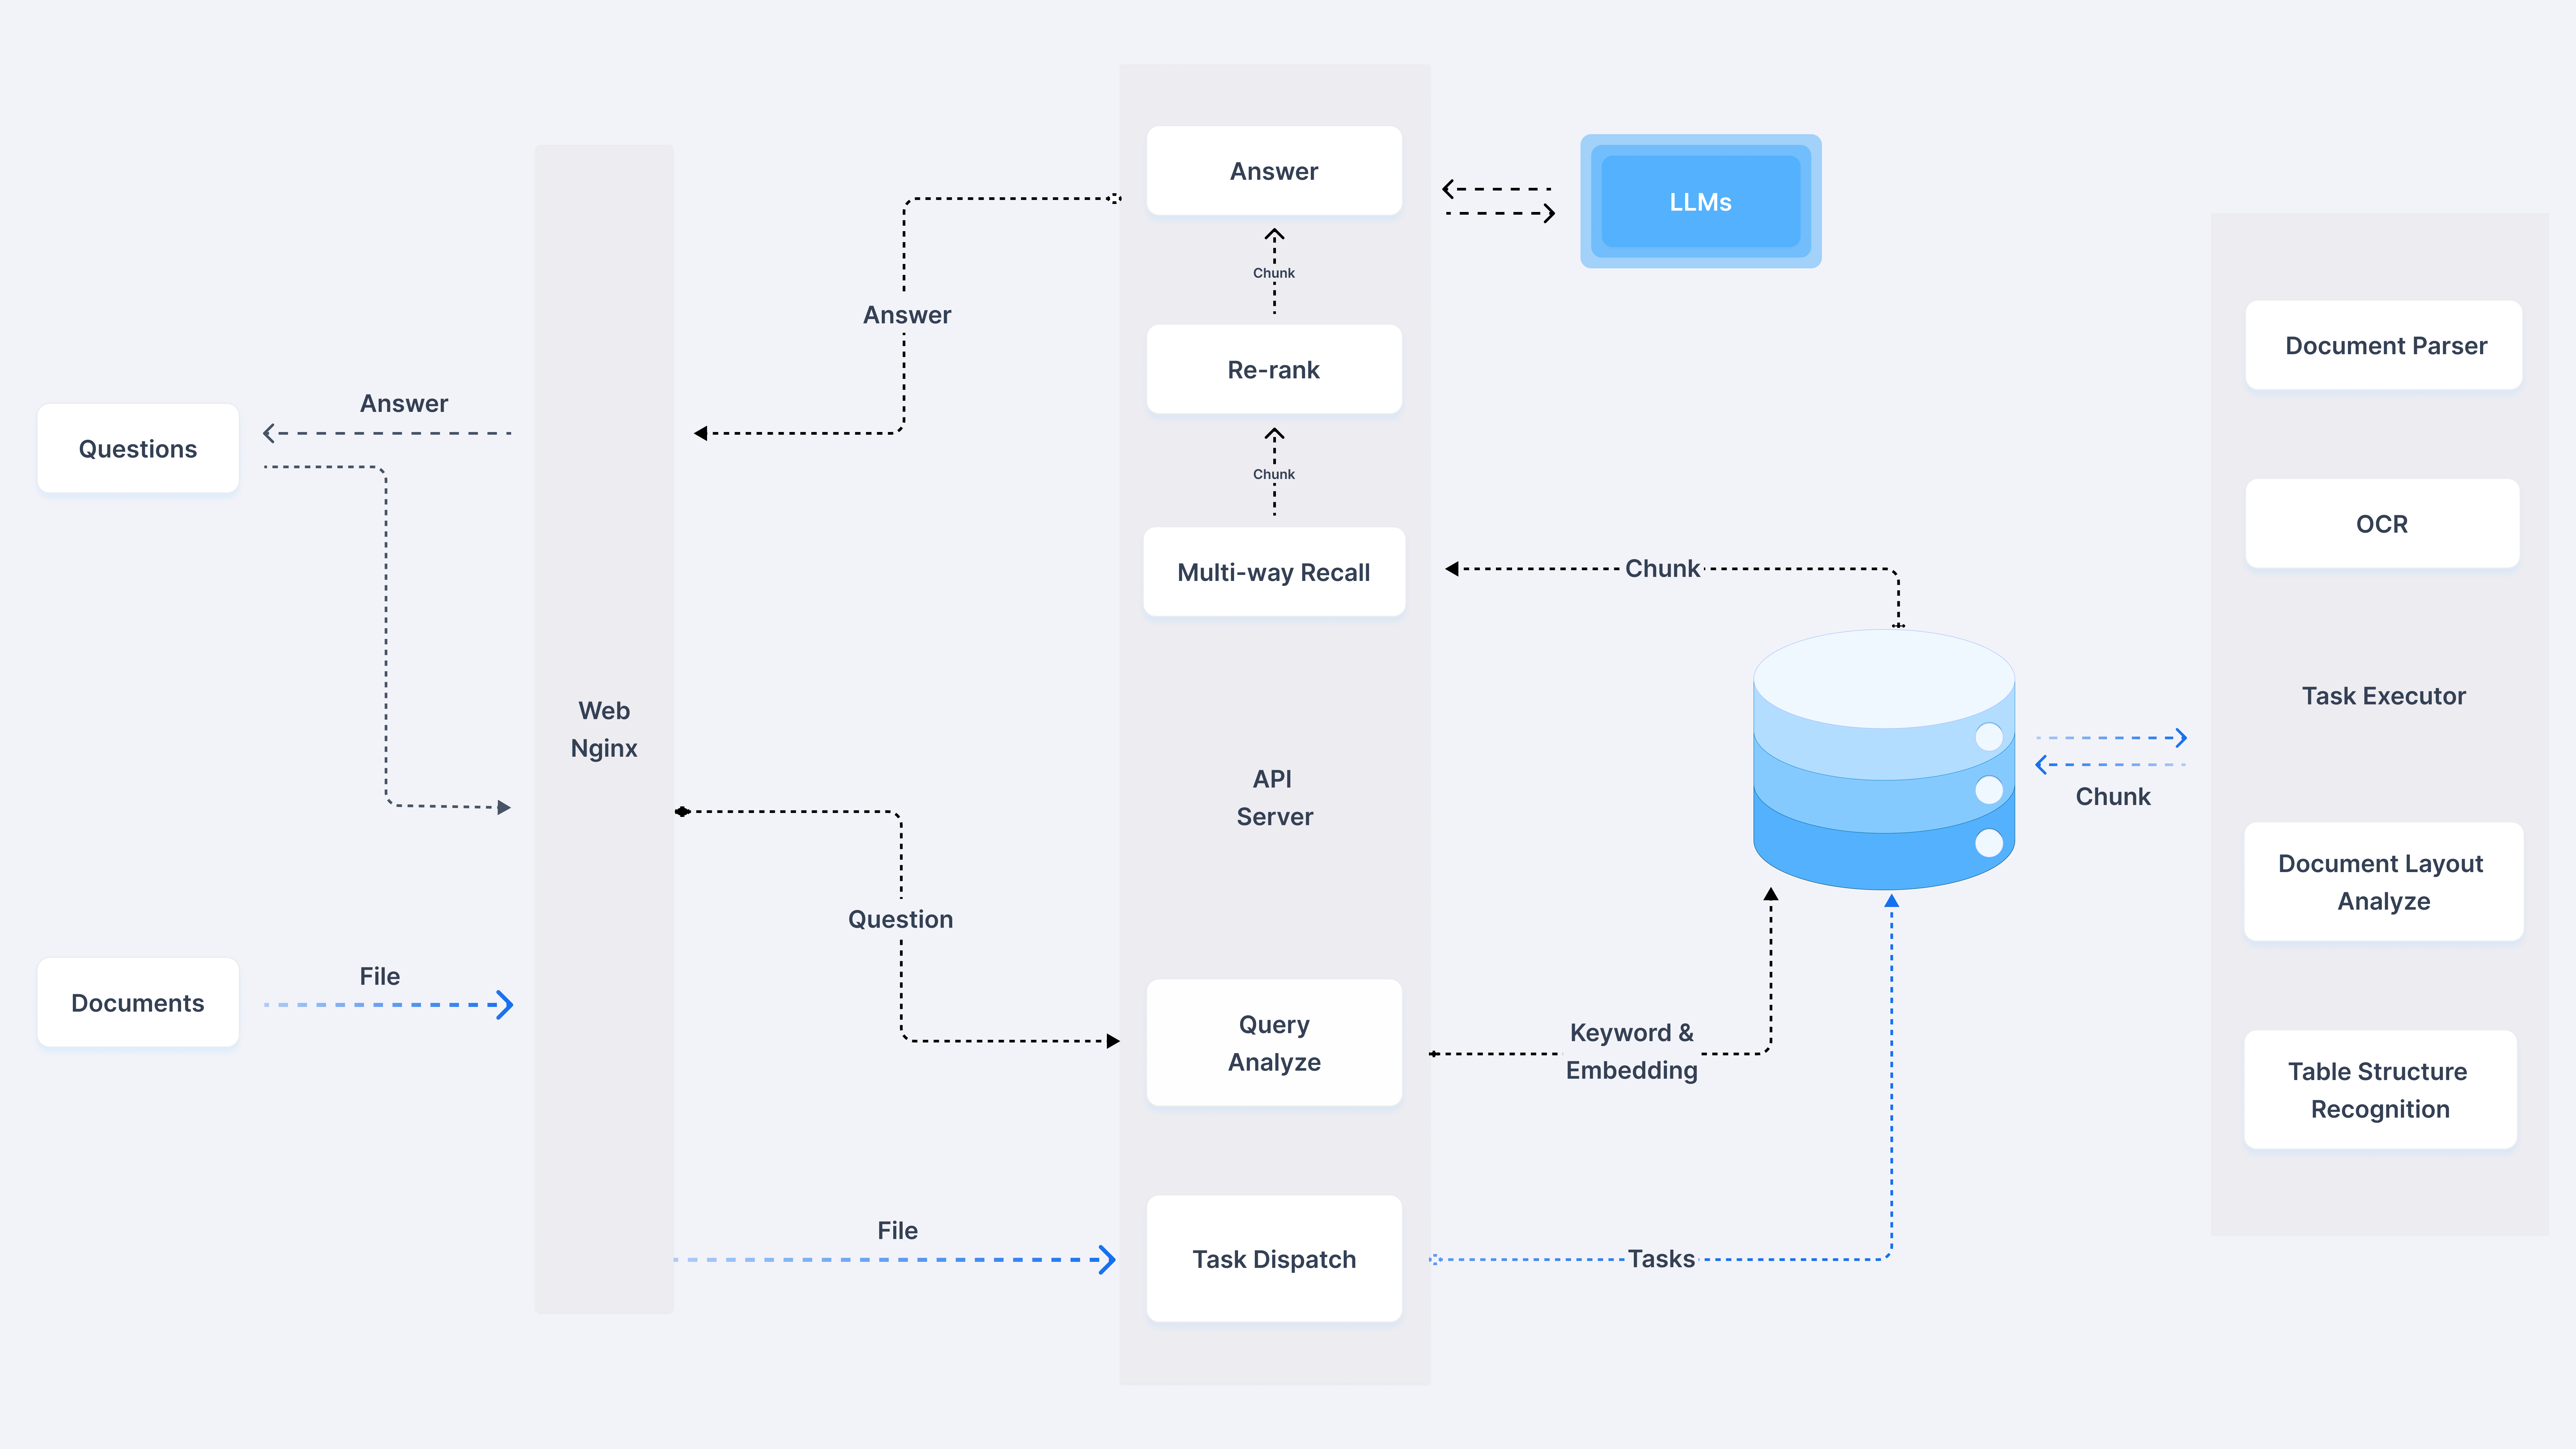
DeepDoc 由两个组成部分:视觉处理和解析器
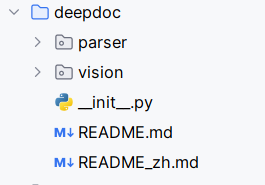
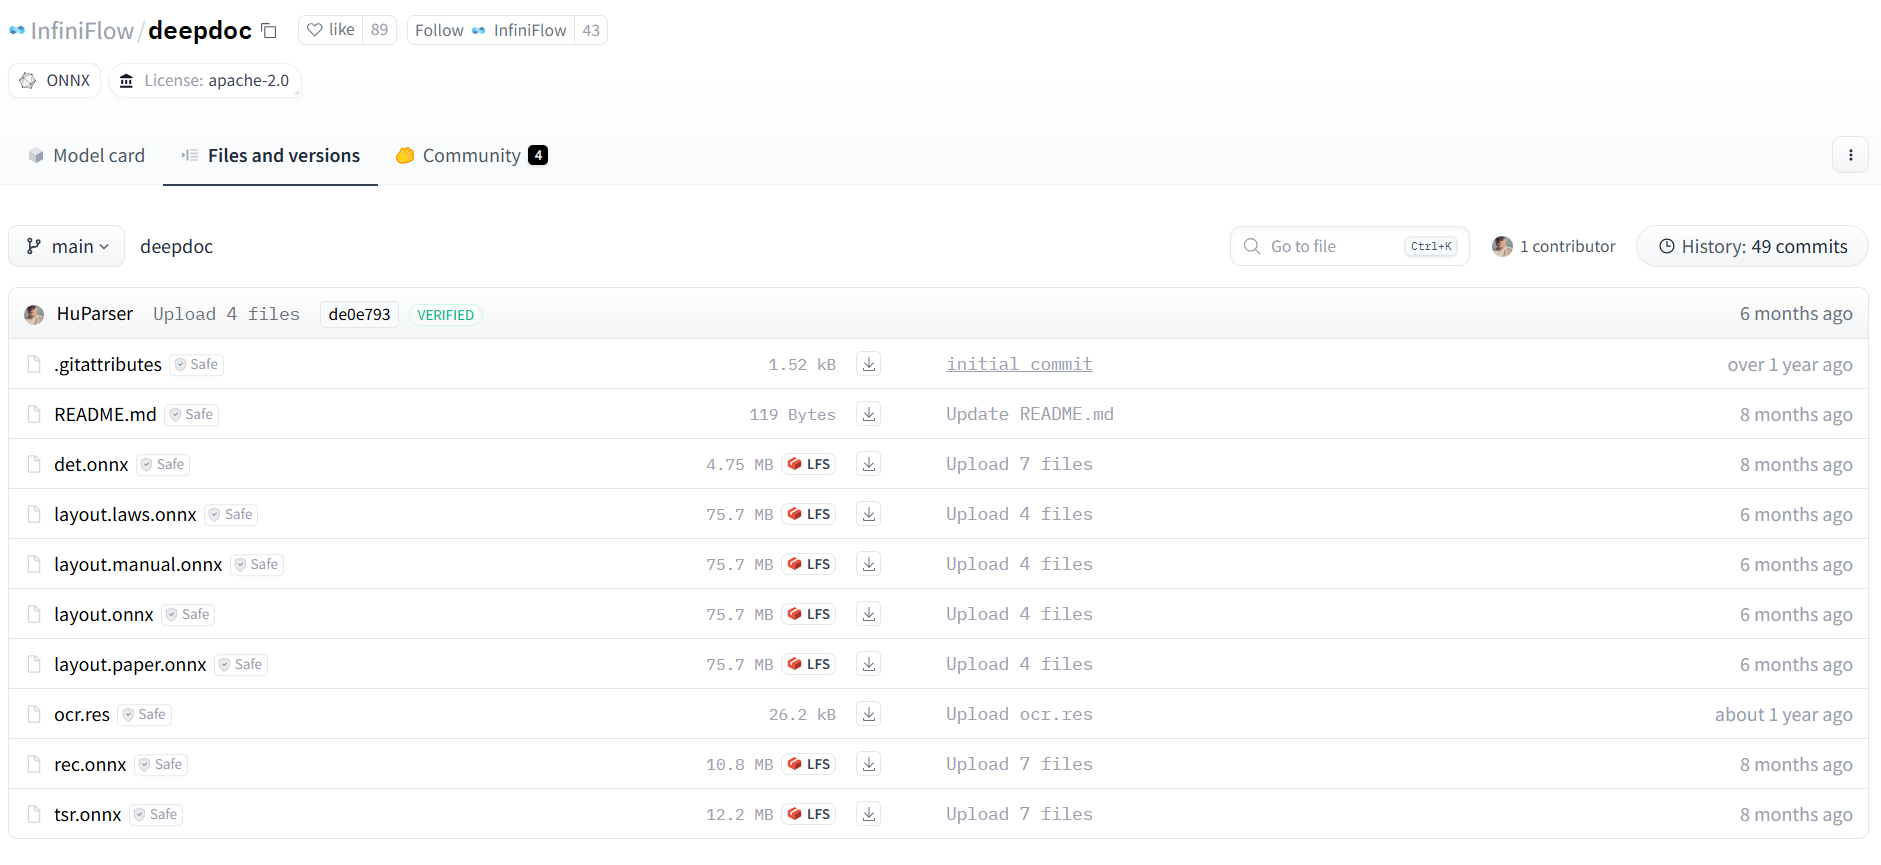
拉下来了官方的代码,他们设计模式分离做得很好。Deep Doc每个组件都是独立的,可以单独使用,也可以组合使用。比如你只需要OCR功能,就只用OCR模块;如果要分析文档布局,再加上LayoutRecognizer。但是该源码不涉及到核心算法实现,主要是调用他们团队开发的HuggingFace 上的模型文件:
- det.onnx - 文本检测模型
- rec.onnx - 文本识别模型
- layout.onnx - 布局识别模型
- tsr.onnx- 表格结构识别模型
- ocr.res - OCR字符字典文件
一、视觉处理
OCR
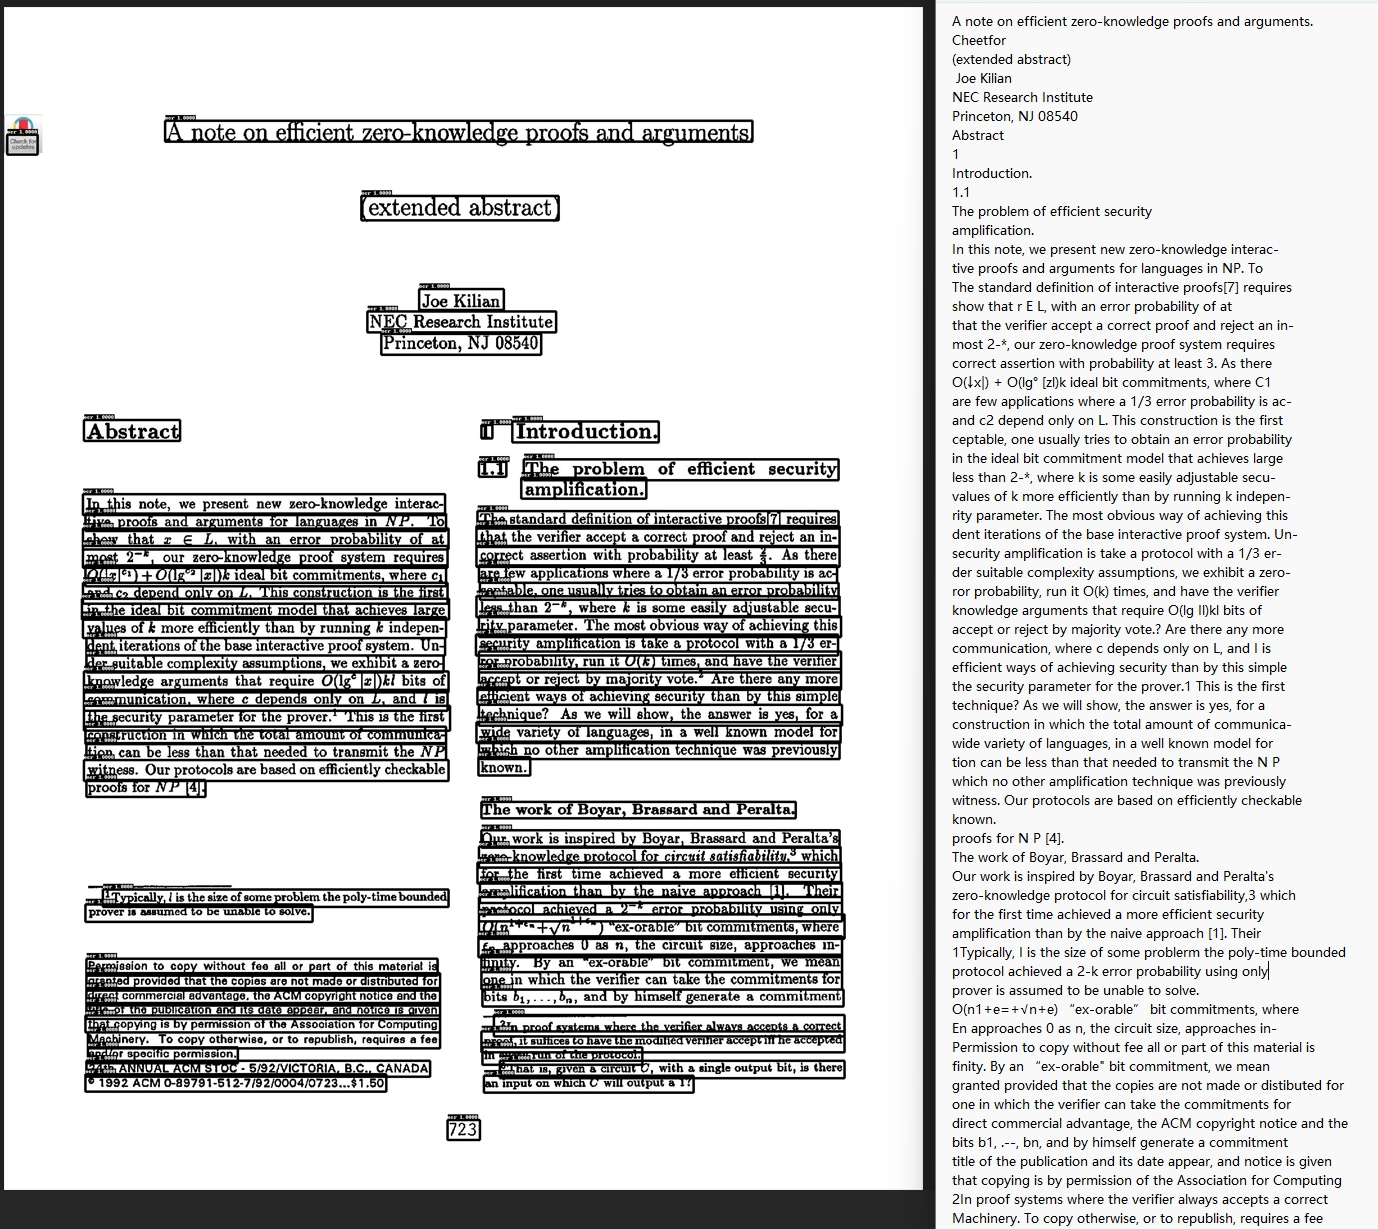
使用OCR。引入该技术目的是为了应对扫描pdf,同时该算法也为后续TSR识别奠定基础。整个效果如下图:
其实我们自己如果去处理pdf扫描文档,最可能的就是粗暴做法,套用个OCR API做解析。
对吗?🤭
但作者为了突出它的产品第二个大优势:解析后可追溯。将pdf先检测出文本框,再对这些文本框进行OCR。这样当用户点击某段文本就可以关联到它具体的pdf部分了。OCR这部分流程如下:
PDF (3页) → [page0, page1, page2]
    ↓ [并行OCR处理]
Page 0:
    image0 → OCR处理 → results0 → "document_0.jpg" + "document_0.jpg.txt"
Page 1:
    image1 → OCR处理 → results1 → "document_1.jpg" + "document_1.jpg.txt"
Page 2:
    image2 → OCR处理 → results2 → "document_2.jpg" + "document_2.jpg.txt"
    ↓ [最终输出]
输出目录结构:
    ./ocr_outputs/
    ├── document_0.jpg     # 第0页标注图像
    ├── document_0.jpg.txt # 第0页文本内容
    ├── document_1.jpg     # 第1页标注图像
    ├── document_1.jpg.txt # 第1页文本内容
    ├── document_2.jpg     # 第2页标注图像
    └── document_2.jpg.txt # 第2页文本内容
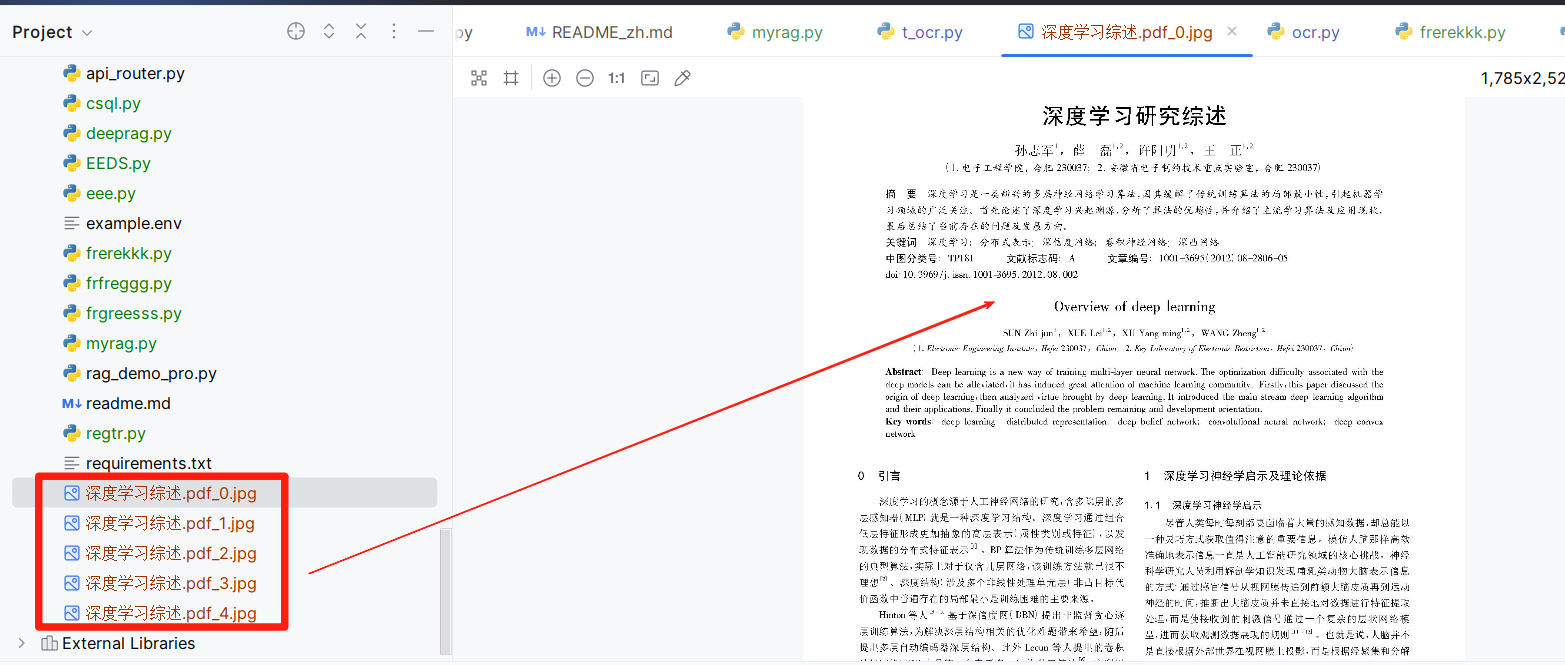
第一阶段:PDF预处理
输入pdf →处理对象转换成每一页pdf转换为图像
输入PDF文件 (document.pdf)
    ↓ [PDF解析 - pdfplumber]
PDF页面对象列表:
    page0, page1, page2, ..., pageN
    ↓ [页面渲染 - 3倍缩放]
图像转换 (zoomin=3, resolution=216 DPI):
    page0 → image0 (2592x3456像素)  # A4页面典型尺寸
    page1 → image1 (2592x3456像素)
    page2 → image2 (2592x3456像素)
    ↓ [格式标准化]
RGB图像列表:
    images = [image0.convert('RGB'), image1.convert('RGB'), ...]
    outputs = ["document_0.jpg", "document_1.jpg", ...]
核心代码是,代码太长了,看下面我的解释即可:
def init_in_out(args):
    from PIL import Image
    import os
    import traceback
    from api.utils.file_utils import traversal_files
    images = []
    outputs = []

    if not os.path.exists(args.output_dir):
        os.mkdir(args.output_dir)

    def pdf_pages(fnm, zoomin=3):
        nonlocal outputs, images
        with sys.modules[LOCK_KEY_pdfplumber]:
            pdf = pdfplumber.open(fnm)
            images = [p.to_image(resolution=72 * zoomin).annotated for i, p in
                                enumerate(pdf.pages)]

        for i, page in enumerate(images):
            outputs.append(os.path.split(fnm)[-1] + f"_{i}.jpg")
        pdf.close()
这部分没有保存图片,生成的图片是在内存中。
我单独测试了这段代码,将图片显示的保存下来:
第二阶段:文本框识别
针对每个单页图像做文本检测 → 文本区域裁剪
单页图像处理 (以page0为例)
原始图像 image0 (2592x3456)
    ↓ [文本检测预处理]
检测预处理:
    1. DetResizeForTest: 2592x3456 → 960x1280 (保持比例,限制最大边960)
    2. NormalizeImage: RGB归一化 mean=[0.485,0.456,0.406], std=[0.229,0.224,0.225]
    3. ToCHWImage: HWC→CHW格式转换 (1280,960,3) → (3,1280,960)
    4. KeepKeys: 保留image和shape信息
    ↓ [DB文本检测模型推理]
检测模型输出:
    feature_map (1, 1, 1280, 960) # 概率图
    ↓ [DB后处理]
检测框提取:
    thresh=0.3, box_thresh=0.5, unclip_ratio=1.5
    max_candidates=1000
    ↓ [几何校正与过滤]
检测到5个文本框,四个点,每个点有一个X,Y值:
    box1: [(150,300), (450,300), (450,360), (150,360)]     # "Company Report 2024"
    box2: [(150,400), (350,395), (355,445), (155,450)]     # "第一季度总结" (轻微倾斜)
    box3: [(500,420), (520,650), (580,645), (560,415)]     # "Sales: $1.2M" (较大倾斜)
    box4: [(150,500), (550,500), (550,530), (150,530)]     # "Net Profit: 15.8%"
    box5: [(200,600), (400,605), (395,635), (195,630)]     # "Growth Rate: +8.5%"
    ↓ [智能排序 - 阅读顺序]
排序后的检测框:
    [box1, box2, box4, box5, box3]  # 从上到下,从左到右
代码是,其实作者就是在做了基本图像处理后调用了它们实现的huggingface上文本检测模型:
class TextRecognizer:
    def __init__(self, model_dir, device_id: int | None = None):
        self.rec_image_shape = [int(v) for v in "3, 48, 320".split(",")]
        self.rec_batch_num = 16
        postprocess_params = {
            'name': 'CTCLabelDecode',
            "character_dict_path": os.path.join(model_dir, "ocr.res"),
            "use_space_char": True
        }
        self.postprocess_op = build_post_process(postprocess_params)
        self.predictor, self.run_options = load_model(model_dir, 'rec', device_id)
        self.input_tensor = self.predictor.get_inputs()[0]

    def resize_norm_img(self, img, max_wh_ratio):
        imgC, imgH, imgW = self.rec_image_shape

        assert imgC == img.shape[2]
        imgW = int((imgH * max_wh_ratio))
        w = self.input_tensor.shape[3:][0]
        if isinstance(w, str):
            pass
        elif w is not None and w > 0:
            imgW = w
        h, w = img.shape[:2]
        ratio = w / float(h)
        if math.ceil(imgH * ratio) > imgW:
            resized_w = imgW
        else:
            resized_w = int(math.ceil(imgH * ratio))

        resized_image = cv2.resize(img, (resized_w, imgH))
        resized_image = resized_image.astype('float32')
        resized_image = resized_image.transpose((2, 0, 1)) / 255
        resized_image -= 0.5
        resized_image /= 0.5
        padding_im = np.zeros((imgC, imgH, imgW), dtype=np.float32)
        padding_im[:, :, 0:resized_w] = resized_image
        return padding_im

    def resize_norm_img_vl(self, img, image_shape):

        imgC, imgH, imgW = image_shape
        img = img[:, :, ::-1]  # bgr2rgb
        resized_image = cv2.resize(
            img, (imgW, imgH), interpolation=cv2.INTER_LINEAR)
        resized_image = resized_image.astype('float32')
        resized_image = resized_image.transpose((2, 0, 1)) / 255
        return resized_image

    def resize_norm_img_srn(self, img, image_shape):
        imgC, imgH, imgW = image_shape

        img_black = np.zeros((imgH, imgW))
        im_hei = img.shape[0]
        im_wid = img.shape[1]

        if im_wid <= im_hei * 1:
            img_new = cv2.resize(img, (imgH * 1, imgH))
        elif im_wid <= im_hei * 2:
            img_new = cv2.resize(img, (imgH * 2, imgH))
        elif im_wid <= im_hei * 3:
            img_new = cv2.resize(img, (imgH * 3, imgH))
        else:
            img_new = cv2.resize(img, (imgW, imgH))

        img_np = np.asarray(img_new)
        img_np = cv2.cvtColor(img_np, cv2.COLOR_BGR2GRAY)
        img_black[:, 0:img_np.shape[1]] = img_np
        img_black = img_black[:, :, np.newaxis]

        row, col, c = img_black.shape
        c = 1

        return np.reshape(img_black, (c, row, col)).astype(np.float32)

    def srn_other_inputs(self, image_shape, num_heads, max_text_length):

        imgC, imgH, imgW = image_shape
        feature_dim = int((imgH / 8) * (imgW / 8))

        encoder_word_pos = np.array(range(0, feature_dim)).reshape(
            (feature_dim, 1)).astype('int64')
        gsrm_word_pos = np.array(range(0, max_text_length)).reshape(
            (max_text_length, 1)).astype('int64')

        gsrm_attn_bias_data = np.ones((1, max_text_length, max_text_length))
        gsrm_slf_attn_bias1 = np.triu(gsrm_attn_bias_data, 1).reshape(
            [-1, 1, max_text_length, max_text_length])
        gsrm_slf_attn_bias1 = np.tile(
            gsrm_slf_attn_bias1,
            [1, num_heads, 1, 1]).astype('float32') * [-1e9]

        gsrm_slf_attn_bias2 = np.tril(gsrm_attn_bias_data, -1).reshape(
            [-1, 1, max_text_length, max_text_length])
        gsrm_slf_attn_bias2 = np.tile(
            gsrm_slf_attn_bias2,
            [1, num_heads, 1, 1]).astype('float32') * [-1e9]

        encoder_word_pos = encoder_word_pos[np.newaxis, :]
        gsrm_word_pos = gsrm_word_pos[np.newaxis, :]

        return [
            encoder_word_pos, gsrm_word_pos, gsrm_slf_attn_bias1,
            gsrm_slf_attn_bias2
        ]

    def process_image_srn(self, img, image_shape, num_heads, max_text_length):
        norm_img = self.resize_norm_img_srn(img, image_shape)
        norm_img = norm_img[np.newaxis, :]

        [encoder_word_pos, gsrm_word_pos, gsrm_slf_attn_bias1, gsrm_slf_attn_bias2] = \
            self.srn_other_inputs(image_shape, num_heads, max_text_length)

        gsrm_slf_attn_bias1 = gsrm_slf_attn_bias1.astype(np.float32)
        gsrm_slf_attn_bias2 = gsrm_slf_attn_bias2.astype(np.float32)
        encoder_word_pos = encoder_word_pos.astype(np.int64)
        gsrm_word_pos = gsrm_word_pos.astype(np.int64)

        return (norm_img, encoder_word_pos, gsrm_word_pos, gsrm_slf_attn_bias1,
                gsrm_slf_attn_bias2)

    def resize_norm_img_sar(self, img, image_shape,
                            width_downsample_ratio=0.25):
        imgC, imgH, imgW_min, imgW_max = image_shape
        h = img.shape[0]
        w = img.shape[1]
        valid_ratio = 1.0
        # make sure new_width is an integral multiple of width_divisor.
        width_divisor = int(1 / width_downsample_ratio)
        # resize
        ratio = w / float(h)
        resize_w = math.ceil(imgH * ratio)
        if resize_w % width_divisor != 0:
            resize_w = round(resize_w / width_divisor) * width_divisor
        if imgW_min is not None:
            resize_w = max(imgW_min, resize_w)
        if imgW_max is not None:
            valid_ratio = min(1.0, 1.0 * resize_w / imgW_max)
            resize_w = min(imgW_max, resize_w)
        resized_image = cv2.resize(img, (resize_w, imgH))
        resized_image = resized_image.astype('float32')
        # norm
        if image_shape[0] == 1:
            resized_image = resized_image / 255
            resized_image = resized_image[np.newaxis, :]
        else:
            resized_image = resized_image.transpose((2, 0, 1)) / 255
        resized_image -= 0.5
        resized_image /= 0.5
        resize_shape = resized_image.shape
        padding_im = -1.0 * np.ones((imgC, imgH, imgW_max), dtype=np.float32)
        padding_im[:, :, 0:resize_w] = resized_image
        pad_shape = padding_im.shape

        return padding_im, resize_shape, pad_shape, valid_ratio

    def resize_norm_img_spin(self, img):
        img = cv2.cvtColor(img, cv2.COLOR_BGR2GRAY)
        # return padding_im
        img = cv2.resize(img, tuple([100, 32]), cv2.INTER_CUBIC)
        img = np.array(img, np.float32)
        img = np.expand_dims(img, -1)
        img = img.transpose((2, 0, 1))
        mean = [127.5]
        std = [127.5]
        mean = np.array(mean, dtype=np.float32)
        std = np.array(std, dtype=np.float32)
        mean = np.float32(mean.reshape(1, -1))
        stdinv = 1 / np.float32(std.reshape(1, -1))
        img -= mean
        img *= stdinv
        return img

    def resize_norm_img_svtr(self, img, image_shape):

        imgC, imgH, imgW = image_shape
        resized_image = cv2.resize(
            img, (imgW, imgH), interpolation=cv2.INTER_LINEAR)
        resized_image = resized_image.astype('float32')
        resized_image = resized_image.transpose((2, 0, 1)) / 255
        resized_image -= 0.5
        resized_image /= 0.5
        return resized_image

    def resize_norm_img_abinet(self, img, image_shape):

        imgC, imgH, imgW = image_shape

        resized_image = cv2.resize(
            img, (imgW, imgH), interpolation=cv2.INTER_LINEAR)
        resized_image = resized_image.astype('float32')
        resized_image = resized_image / 255.

        mean = np.array([0.485, 0.456, 0.406])
        std = np.array([0.229, 0.224, 0.225])
        resized_image = (
            resized_image - mean[None, None, ...]) / std[None, None, ...]
        resized_image = resized_image.transpose((2, 0, 1))
        resized_image = resized_image.astype('float32')

        return resized_image

    def norm_img_can(self, img, image_shape):

        img = cv2.cvtColor(
            img, cv2.COLOR_BGR2GRAY)  # CAN only predict gray scale image

        if self.rec_image_shape[0] == 1:
            h, w = img.shape
            _, imgH, imgW = self.rec_image_shape
            if h < imgH or w < imgW:
                padding_h = max(imgH - h, 0)
                padding_w = max(imgW - w, 0)
                img_padded = np.pad(img, ((0, padding_h), (0, padding_w)),
                                    'constant',
                                    constant_values=(255))
                img = img_padded

        img = np.expand_dims(img, 0) / 255.0  # h,w,c -> c,h,w
        img = img.astype('float32')

        return img

    def __call__(self, img_list):
        img_num = len(img_list)
        # Calculate the aspect ratio of all text bars
        width_list = []
        for img in img_list:
            width_list.append(img.shape[1] / float(img.shape[0]))
        # Sorting can speed up the recognition process
        indices = np.argsort(np.array(width_list))
        rec_res = [['', 0.0]] * img_num
        batch_num = self.rec_batch_num
        st = time.time()

        for beg_img_no in range(0, img_num, batch_num):
            end_img_no = min(img_num, beg_img_no + batch_num)
            norm_img_batch = []
            imgC, imgH, imgW = self.rec_image_shape[:3]
            max_wh_ratio = imgW / imgH
            # max_wh_ratio = 0
            for ino in range(beg_img_no, end_img_no):
                h, w = img_list[indices[ino]].shape[0:2]
                wh_ratio = w * 1.0 / h
                max_wh_ratio = max(max_wh_ratio, wh_ratio)
            for ino in range(beg_img_no, end_img_no):
                norm_img = self.resize_norm_img(img_list[indices[ino]],
                                                max_wh_ratio)
                norm_img = norm_img[np.newaxis, :]
                norm_img_batch.append(norm_img)
            norm_img_batch = np.concatenate(norm_img_batch)
            norm_img_batch = norm_img_batch.copy()

            input_dict = {}
            input_dict[self.input_tensor.name] = norm_img_batch
            for i in range(100000):
                try:
                    outputs = self.predictor.run(None, input_dict, self.run_options)
                    break
                except Exception as e:
                    if i >= 3:
                        raise e
                    time.sleep(5)
            preds = outputs[0]
            rec_result = self.postprocess_op(preds)
            for rno in range(len(rec_result)):
                rec_res[indices[beg_img_no + rno]] = rec_result[rno]

        return rec_res, time.time() - st
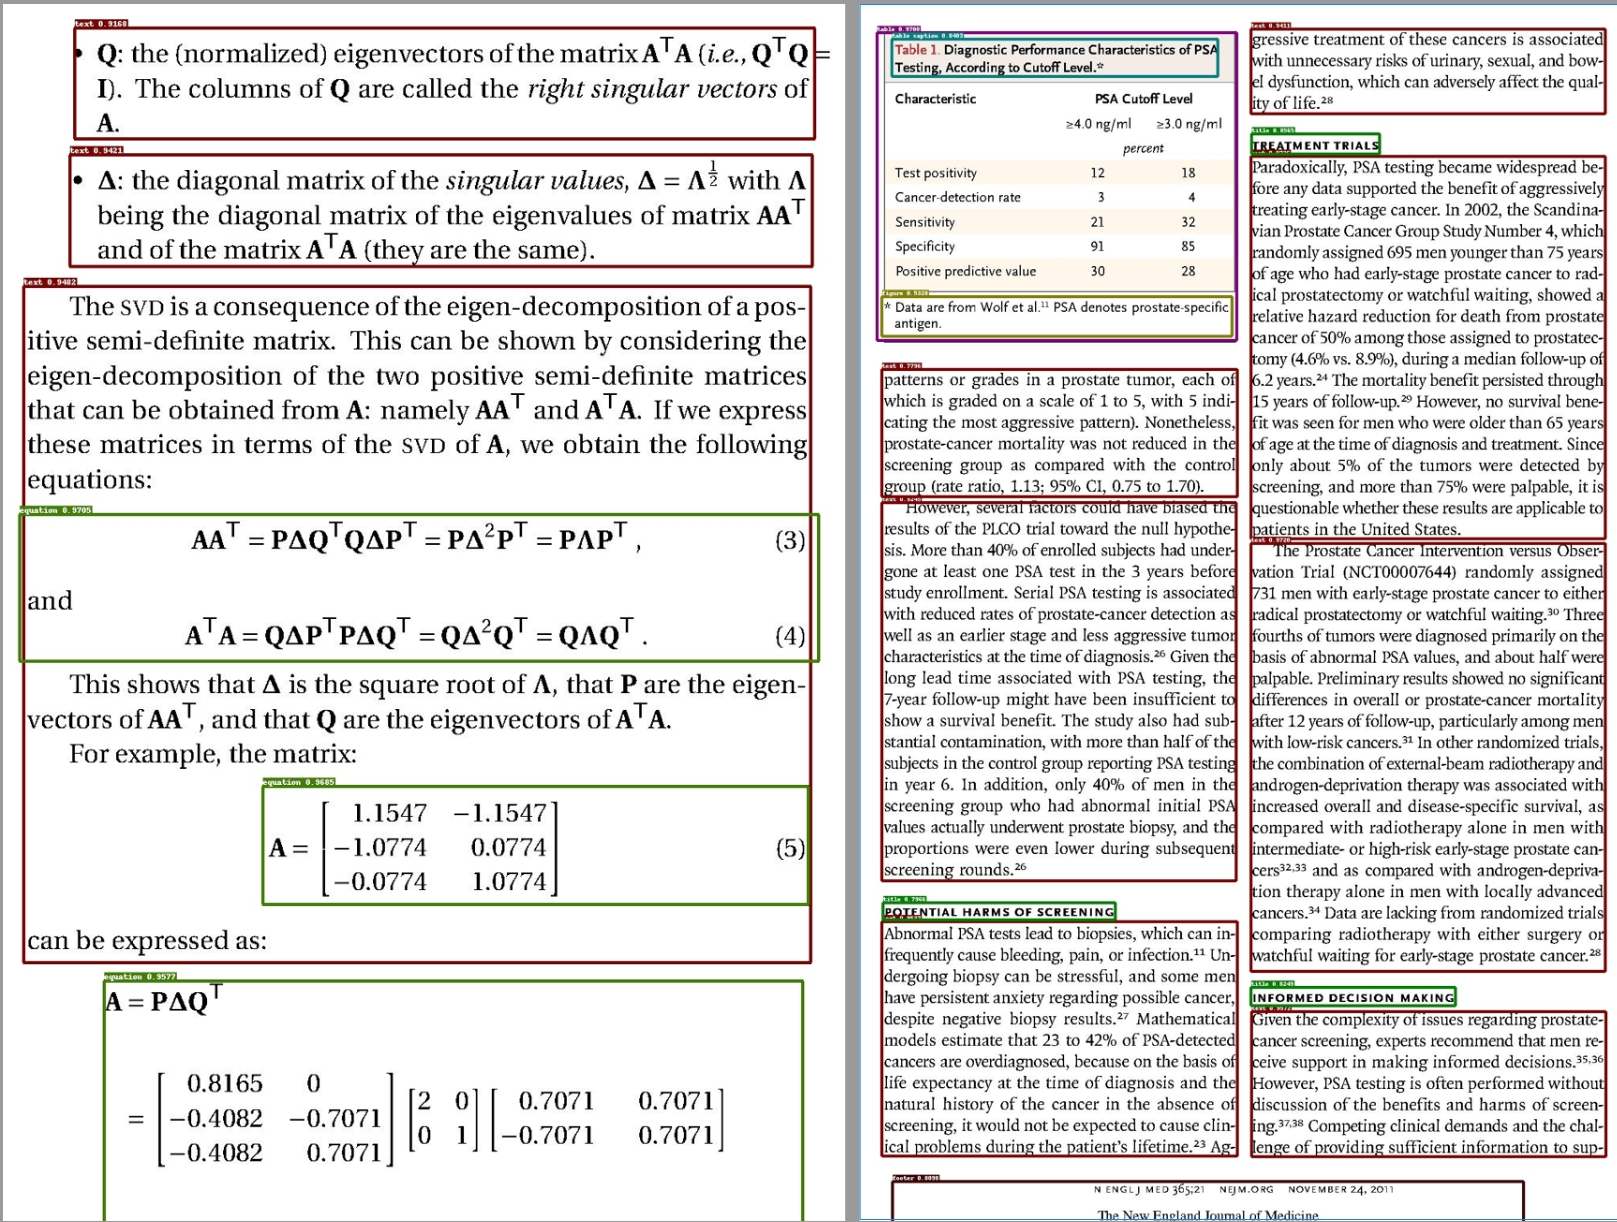
调用方式就是输入单张图片
dt_boxes, elapse = self.text_detector[device_id](img)
单张图片会输出多个检测框坐标。如下图:

第三阶段:将文本框转为小图片
透视变换裁剪 (针对每个检测框)
    ↓ [box1: 水平文本]
box1 [(150,300), (450,300), (450,360), (150,360)]
    → 透视变换矩阵计算
    → crop1: 300x60像素的水平文本图像 # "Company Report 2024"

    ↓ [box2: 轻微倾斜文本]
box2 [(150,400), (350,395), (355,445), (155,450)]
    → 角度矫正 (约-2度倾斜)
    → crop2: 200x45像素的矫正文本图像 # "第一季度总结"

    ↓ [box3: 大角度倾斜文本]
box3 [(500,420), (520,650), (580,645), (560,415)]
    → 角度矫正 (约-75度倾斜)
    → 自动旋转90度 (高宽比>1.5)
    → crop3: 230x40像素的矫正文本图像 # "Sales: $1.2M"

    ↓ [box4: 水平长文本]
box4 [(150,500), (550,500), (550,530), (150,530)]
    → crop4: 400x30像素的水平文本图像 # "Net Profit: 15.8%"

    ↓ [box5: 轻微倾斜文本]
box5 [(200,600), (400,605), (395,635), (195,630)]
    → crop5: 200x35像素的矫正文本图像 # "Growth Rate: +8.5%"

裁剪图像列表:
    img_crop_list = [crop1, crop2, crop4, crop5, crop3]
这部分代码:
    def get_rotate_crop_image(self, img, points):
        '''
        img_height, img_width = img.shape[0:2]
        left = int(np.min(points[:, 0]))
        right = int(np.max(points[:, 0]))
        top = int(np.min(points[:, 1]))
        bottom = int(np.max(points[:, 1]))
        img_crop = img[top:bottom, left:right, :].copy()
        points[:, 0] = points[:, 0] - left
        points[:, 1] = points[:, 1] - top
        '''
        assert len(points) == 4, "shape of points must be 4*2"
        img_crop_width = int(
            max(
                np.linalg.norm(points[0] - points[1]),
                np.linalg.norm(points[2] - points[3])))
        img_crop_height = int(
            max(
                np.linalg.norm(points[0] - points[3]),
                np.linalg.norm(points[1] - points[2])))
        pts_std = np.float32([[0, 0], [img_crop_width, 0],
                              [img_crop_width, img_crop_height],
                              [0, img_crop_height]])
        M = cv2.getPerspectiveTransform(points, pts_std)
        dst_img = cv2.warpPerspective(
            img,
            M, (img_crop_width, img_crop_height),
            borderMode=cv2.BORDER_REPLICATE,
            flags=cv2.INTER_CUBIC)
        dst_img_height, dst_img_width = dst_img.shape[0:2]
        if dst_img_height * 1.0 / dst_img_width >= 1.5:
            dst_img = np.rot90(dst_img)
        return dst_img
第四阶段:对小图片进行文本识别
对第三阶段的小图片做真正的OCR处理
文本识别预处理
    ↓ [长宽比计算与排序]
长宽比分析:
    crop1: 300/60 = 5.0   # 很长的文本
    crop2: 200/45 = 4.4   # 较长的文本
    crop4: 400/30 = 13.3  # 极长的文本
    crop5: 200/35 = 5.7   # 长文本
    crop3: 230/40 = 5.8   # 长文本
    ↓ [性能优化排序]
排序索引:[1, 0, 4, 2, 3]  # 按长宽比排序
处理顺序:[crop2, crop1, crop5, crop3, crop4]
    ↓ [批量预处理]
批次1 (batch_size=16): [crop2, crop1, crop5, crop3, crop4]
    最大长宽比: 13.3 (来自crop4)
    统一调整尺寸: 高度48像素,宽度 48*13.3≈640像素

    crop2_norm: (3, 48, 211) → padding到 (3, 48, 640)
    crop1_norm: (3, 48, 240) → padding到 (3, 48, 640)
    crop5_norm: (3, 48, 274) → padding到 (3, 48, 640)
    crop3_norm: (3, 48, 278) → padding到 (3, 48, 640)
    crop4_norm: (3, 48, 640) → 无需padding
    ↓ [CTC识别模型推理]
模型输入: batch_tensor (5, 3, 48, 640)
模型输出: prediction_tensor (5, 160, 6625)  # 160个时间步,6625个字符类别
    ↓ [CTC解码]
CTC解码结果:
    pred1: "Company Report 2024"
    pred2: "第一季度总结"
    pred3: "Sales: $1.2M"
    pred4: "Net Profit: 15.8%"
    pred5: "Growth Rate: +8.5%"
    ↓ [置信度计算]
识别结果 (按原始顺序恢复):
    crop1: ("Company Report 2024", 0.96)
    crop2: ("第一季度总结", 0.89)
    crop3: ("Sales: $1.2M", 0.92)
    crop4: ("Net Profit: 15.8%", 0.94)
    crop5: ("Growth Rate: +8.5%", 0.91)
核心代码在:
class TextDetector:
    def __init__(self, model_dir, device_id: int | None = None):
        pre_process_list = [{
            'DetResizeForTest': {
                'limit_side_len': 960,
                'limit_type': "max",
            }
        }, {
            'NormalizeImage': {
                'std': [0.229, 0.224, 0.225],
                'mean': [0.485, 0.456, 0.406],
                'scale': '1./255.',
                'order': 'hwc'
            }
        }, {
            'ToCHWImage': None
        }, {
            'KeepKeys': {
                'keep_keys': ['image', 'shape']
            }
        }]
        postprocess_params = {"name": "DBPostProcess", "thresh": 0.3, "box_thresh": 0.5, "max_candidates": 1000,
                              "unclip_ratio": 1.5, "use_dilation": False, "score_mode": "fast", "box_type": "quad"}

        self.postprocess_op = build_post_process(postprocess_params)
        self.predictor, self.run_options = load_model(model_dir, 'det', device_id)
        self.input_tensor = self.predictor.get_inputs()[0]

        img_h, img_w = self.input_tensor.shape[2:]
        if isinstance(img_h, str) or isinstance(img_w, str):
            pass
        elif img_h is not None and img_w is not None and img_h > 0 and img_w > 0:
            pre_process_list[0] = {
                'DetResizeForTest': {
                    'image_shape': [img_h, img_w]
                }
            }
        self.preprocess_op = create_operators(pre_process_list)

    def order_points_clockwise(self, pts):
        rect = np.zeros((4, 2), dtype="float32")
        s = pts.sum(axis=1)
        rect[0] = pts[np.argmin(s)]
        rect[2] = pts[np.argmax(s)]
        tmp = np.delete(pts, (np.argmin(s), np.argmax(s)), axis=0)
        diff = np.diff(np.array(tmp), axis=1)
        rect[1] = tmp[np.argmin(diff)]
        rect[3] = tmp[np.argmax(diff)]
        return rect

    def clip_det_res(self, points, img_height, img_width):
        for pno in range(points.shape[0]):
            points[pno, 0] = int(min(max(points[pno, 0], 0), img_width - 1))
            points[pno, 1] = int(min(max(points[pno, 1], 0), img_height - 1))
        return points

    def filter_tag_det_res(self, dt_boxes, image_shape):
        img_height, img_width = image_shape[0:2]
        dt_boxes_new = []
        for box in dt_boxes:
            if isinstance(box, list):
                box = np.array(box)
            box = self.order_points_clockwise(box)
            box = self.clip_det_res(box, img_height, img_width)
            rect_width = int(np.linalg.norm(box[0] - box[1]))
            rect_height = int(np.linalg.norm(box[0] - box[3]))
            if rect_width <= 3 or rect_height <= 3:
                continue
            dt_boxes_new.append(box)
        dt_boxes = np.array(dt_boxes_new)
        return dt_boxes

    def filter_tag_det_res_only_clip(self, dt_boxes, image_shape):
        img_height, img_width = image_shape[0:2]
        dt_boxes_new = []
        for box in dt_boxes:
            if isinstance(box, list):
                box = np.array(box)
            box = self.clip_det_res(box, img_height, img_width)
            dt_boxes_new.append(box)
        dt_boxes = np.array(dt_boxes_new)
        return dt_boxes

    def __call__(self, img):
        ori_im = img.copy()
        data = {'image': img}

        st = time.time()
        data = transform(data, self.preprocess_op)
        img, shape_list = data
        if img is None:
            return None, 0
        img = np.expand_dims(img, axis=0)
        shape_list = np.expand_dims(shape_list, axis=0)
        img = img.copy()
        input_dict = {}
        input_dict[self.input_tensor.name] = img
        for i in range(100000):
            try:
                outputs = self.predictor.run(None, input_dict, self.run_options)
                break
            except Exception as e:
                if i >= 3:
                    raise e
                time.sleep(5)

        post_result = self.postprocess_op({"maps": outputs[0]}, shape_list)
        dt_boxes = post_result[0]['points']
        dt_boxes = self.filter_tag_det_res(dt_boxes, ori_im.shape)

        return dt_boxes, time.time() - st
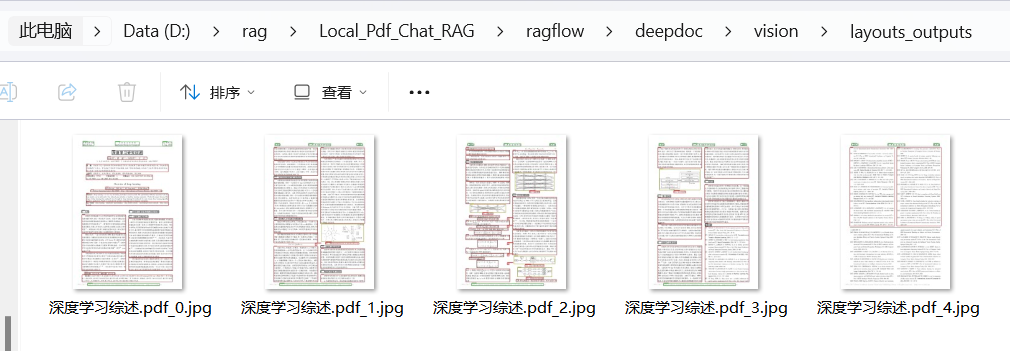
布局识别
引入该技术目的是为了更好切割文本。想象下没有布局识别,我们切分文档就是固定一段段切分的,但是有了布局识别我们可以把插入的图片/表格单独分出来。而没有布局识别的的我们只会将其纯文本顺序识别,效果很差。
布局识别有10个基本布局组件,涵盖了大多数情况:
布局元素分类体系:
├── 文本类元素
│   ├── Text(正文文本)
│   ├── Title(标题)
│   ├── Header(页眉)
│   └── Footer(页脚)
├── 图形类元素
│   ├── Figure(图片/图表)
│   ├── Figure Caption(图片说明)
│   ├── Table(表格)
│   └── Table Caption(表格说明)
└── 学术类元素
    ├── Reference(参考文献)
    └── Equation(公式)
布局识别在深度学习里面,可以视为一种图像的目标检测,而这里分的10类就是10个目标。这个领域最出名的算法就是yolo系列。这里就是用的YOLOv10算法。
布局识别整体流程与OCR类似,这部分比较传统与OCR类似,分析没有太大必要,我就简写了:
输入处理:
    输入目录: "/data/research_papers/"
    发现文档:
    - paper_1.pdf (15页) → 15个图像对象
    - paper_2.pdf (23页) → 23个图像对象
    - report.docx (8页) → 8个图像对象
    - slide.pptx (12页) → 12个图像对象
    总计: 58个页面图像
    ↓ [颜色编码设计]
布局元素颜色映射:
    title: 红色 #FF0000          # 重要性最高
    header/footer: 橙色 #FFA500   # 页面结构元素
    text: 绿色 #00FF00           # 主要内容
    figure: 蓝色 #0000FF         # 图形元素
    table: 紫色 #800080          # 数据表格
    caption: 青色 #00FFFF        # 说明文字
    reference: 棕色 #A52A2A      # 参考文献
    equation: 粉色 #FFC0CB       # 数学公式
    ↓ [标注框绘制]
输出管理:
    ./layouts_outputs/
    ├── paper_1_0.jpg    # 论文1第0页
    ├── paper_1_1.jpg    # 论文1第1页
    ├── ...
    ├── paper_1_14.jpg   # 论文1第14页
    ├── paper_2_0.jpg    # 论文2第0页
    ├── ...
    ├── slide_11.jpg     # 幻灯片第11页
    └── 总计58个标注图像文件
TSR
TSR引入该技术目的是为了识别:表格。
传统做法可能是直接对整个表格图像进行OCR识别,但这样会丢失重要的结构信息。因此TSR算法采用"先识别结构,再提取内容"的策略。
TSR处理流程如下:
表格图像 → [结构检测] → [内容分类] → [结构优化] → [格式输出]
    ↓
输入:table_image.jpg
    ↓ [AI模型检测]
检测结果:
    ├── table_region (表格区域)
    ├── rows (行边界)
    ├── columns (列边界)
    ├── headers (标题区域)
    └── spanning_cells (合并单元格)
    ↓ [结构重建]
输出结果:
    ├── table.html (HTML格式)
    └── table_desc.txt (描述格式)
二、 解析器
即识别PDF、DOCX、EXCEL和PPT四种文档格式都有相应的解析器。


 9万+
9万+

 被折叠的 条评论
为什么被折叠?
被折叠的 条评论
为什么被折叠?
 到【灌水乐园】发言


