


mxnet依赖项如下:
(1)nvidia 驱动,cuda8.0,cudnn5.1
(2)OpenBlas-0.2.20
(3)Opencv2.4.12
(4)Python-2.7.8 or higher
(5)mxnet安装
(1)nvidia 驱动,cuda8.0,cudnn5.1
去官网,http://www.nvidia.cn/Download/index.aspx?lang=cn下载驱动,
去官网,https://developer.nvidia.com/cuda-downloads下载cuda-8.0
去官网,https://developer.nvidia.com/rdp/form/cudnn-download-survey下载cudnn-5.1
yum -y install gcc kernel-devel kernel-headers #编译驱动需要
./NVIDIA-Linux-x86_64-384.59.run
./cuda_8.0.61_375.26_linux.run
./cuda_8.0.61.2_linux.run #更新包
tar -xvf cudnn-8.0-linux-x64-v5.1.tgz
cp cuda/include/* /usr/local/cuda-8.0/include/
cp cuda/lib/* /usr/local/ cuda-8.0/lib
#添加环境变量
vim ~/.bashrc
export CUDA_HOME=/usr/local/cuda-8.0
export PATH=/usr/local/cuda-8.0/bin:$PATH
export LD_LIBRARY_PATH=/usr/local/cuda-8.0/lib64:$LD_LIBRARY_PATH
export LD_LIBRARY_PATH="/usr/local/cuda-8.0/lib:${LD_LIBRARY_PATH}"
source ~/.bashrc
(2)OpenBlas-0.2.20
这里也可以选择使用MKL(收费,学生可以免费申请),atlas,实际加速效果,MKL>OpenBlas>atlas
下载链接:https://sourceforge.net/projects/openblas/
tar OpenBLAS-0.2.20.tar.gz
make -j8
make prefix=/usr/local/openblas install
vim ~/.bashrc
加入下面的路径,
export LD_LIBRARY_PATH="/usr/local/openblas/lib:${LD_LIBRARY_PATH}"
source ~/.bashrc
cp /usr/local/openblas/lib/* /usr/local/lib/
cp /usr/local/openblas/include/* /usr/local/include/
cp /usr/local/openblas/bin/* /usr/bin/
(3)Opencv2.4.12
官网下载,http://opencv.org/
unzip opencv-2.4.12.zip
cd opencv-2.4.12
mkdir build
cd build
cmake..
make -j8
make install
vim ~/.bashrc
添加export PKG_CONFIG_PATH=/usr/local/lib/pkgconfig
Source ~/.bashrc
(4)Python-2.7.8 or higher
默认centos7自带python2.7.5,如果想安装别的版本或者3.2以上的版本,可以参考下面的操作,个人不建议换,里面牵扯的东西太多。
官网下载https://www.python.org/ftp/python/
tar -xvf Python-2.7.8.tgz
./configure--prefix=/usr/local/python-2.7.8
make -j8
make install
mv /usr/bin/python python2.7.5
ln -s /usr/local/python-2.7.8/bin/python /usr/bin/python
vim /usr/bin/yum
将第一行#!/usr/bin/python改为 #!/usr/bin/python2.7.5,从而保证yum可以使用
vim /usr/libexec/urlgrabber-ext-down
将第一行#!/usr/bin/python改为 #!/usr/bin/python2.7.5,从而保证yum可以使用
保证ibus可以使用
vim /usr/bin/ibus-setup
将最后一行exec /usr/bin/python改为exec /usr/bin/python2.7.5
安装numpy
wget http://jaist.dl.sourceforge.NET/project/numpy/NumPy/1.9.0/numpy-1.9.0.zip
unzip numpy-1.9.0.zip
cd numpy-1.9.0
Python setup.py install
reboot
(5)mxnet安装
git clone --recursive https://github.com/apache/incubator-mxnet.git --branch0.11.0.rc3
cd incubator-mxnet
cp make/config.mk ./
做如下的修改,
#-------------------------------------------------------------------------------
# Template configuration for compiling mxnet
#
# If you want to change the configuration,please use the following
# steps. Assume you are on the root directoryof mxnet. First copy the this
# file so that any local changes will beignored by git
#
# $ cp make/config.mk .
#
# Next modify the according entries, and thencompile by
#
# $ make
#
# or build in parallel with 8 threads
#
# $ make -j8
#-------------------------------------------------------------------------------
#---------------------
#choice of compiler
#--------------------
exportCC = gcc
exportCXX = g++
exportNVCC = nvcc
#whether compile with options for MXNet developer
DEV= 0
#whether compile with debug
DEBUG= 0
#whether compiler with profiler
USE_PROFILER=
#the additional link flags you want to add
ADD_LDFLAGS=
#the additional compile flags you want to add
ADD_CFLAGS=
#---------------------------------------------
#matrix computation libraries for CPU/GPU
#---------------------------------------------
#whether use CUDA during compile
USE_CUDA = 1
#add the path to CUDA library to link and compile flag
#if you have already add them to environment variable, leave it as NONE
USE_CUDA_PATH = /usr/local/cuda
#USE_CUDA_PATH= NONE
#whether use CuDNN R3 library
USE_CUDNN = 1
#whether use cuda runtime compiling for writing kernels in native language (i.e.Python)
USE_NVRTC= 0
#whether use opencv during compilation
#you can disable it, however, you will not able to use
#imbin iterator
USE_OPENCV= 1
#use openmp for parallelization
USE_OPENMP= 1
#MKL ML Library for Intel CPU/Xeon Phi
#Please refer to MKL_README.md for details
#MKL ML Library folder, need to be root for /usr/local
#Change to User Home directory for standard user
#For USE_BLAS!=mkl only
MKLML_ROOT=/usr/local
#whether use MKL2017 library
USE_MKL2017= 0
#whether use MKL2017 experimental feature for high performance
#Prerequisite USE_MKL2017=1
USE_MKL2017_EXPERIMENTAL= 0
#whether use NNPACK library
USE_NNPACK= 0
#choose the version of blas you want to use
#can be: mkl, blas, atlas, openblas
#in default use atlas for linux while apple for osx
UNAME_S:= $(shell uname -s)
ifeq($(UNAME_S), Darwin)
USE_BLAS= apple
else
USE_BLAS = openblas
endif
#whether use lapack during compilation
#only effective when compiled with blas versions openblas/apple/atlas/mkl
USE_LAPACK= 1
#path to lapack library in case of a non-standard installation
USE_LAPACK_PATH=
#add path to intel library, you may need it for MKL, if you did not add the path
#to environment variable
USE_INTEL_PATH= NONE
#If use MKL only for BLAS, choose static link automatically to allow pythonwrapper
ifeq($(USE_MKL2017), 0)
ifeq($(USE_BLAS), mkl)
USE_STATIC_MKL= 1
endif
else
USE_STATIC_MKL= NONE
endif
#----------------------------
#Settings for power and arm arch
#----------------------------
ARCH:= $(shell uname -a)
ifneq(,$(filter $(ARCH), armv6l armv7l powerpc64le ppc64le aarch64))
USE_SSE=0
else
USE_SSE=1
endif
#----------------------------
#distributed computing
#----------------------------
#whether or not to enable multi-machine supporting
USE_DIST_KVSTORE= 0
#whether or not allow to read and write HDFS directly. If yes, then hadoop is
#required
USE_HDFS= 0
#path to libjvm.so. required if USE_HDFS=1
LIBJVM=$(JAVA_HOME)/jre/lib/amd64/server
#whether or not allow to read and write AWS S3 directly. If yes, then
#libcurl4-openssl-dev is required, it can be installed on Ubuntu by
#sudo apt-get install -y libcurl4-openssl-dev
USE_S3= 0
#----------------------------
#additional operators
#----------------------------
#path to folders containing projects specific operators that you don't want toput in src/operators
EXTRA_OPERATORS=
#----------------------------
#other features
#----------------------------
#Create C++ interface package
USE_CPP_PACKAGE= 0
#----------------------------
#plugins
#----------------------------
#whether to use caffe integration. This requires installing caffe.
#You also need to add CAFFE_PATH/build/lib to your LD_LIBRARY_PATH
#CAFFE_PATH = $(HOME)/caffe
#MXNET_PLUGINS += plugin/caffe/caffe.mk
#whether to use torch integration. This requires installing torch.
#You also need to add TORCH_PATH/install/lib to your LD_LIBRARY_PATH
#TORCH_PATH = $(HOME)/torch
#MXNET_PLUGINS += plugin/torch/torch.mk
#WARPCTC_PATH = $(HOME)/warp-ctc
#MXNET_PLUGINS += plugin/warpctc/warpctc.mk
#whether to use sframe integration. This requires build sframe
#git@github.com:dato-code/SFrame.git
#SFRAME_PATH = $(HOME)/SFrame
#MXNET_PLUGINS += plugin/sframe/plugin.mk
然后执行,
Make -j8
yum install graphviz
pip install graphviz
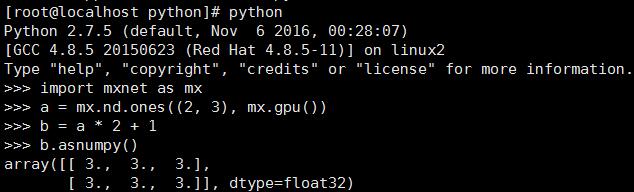
完毕后,mxnet就安装完毕,使用官网的一个矩阵运算进行测试,
$ python
>>> import mxnet as mx
>>> a = mx.nd.ones((2, 3), mx.gpu())
>>> b = a * 2 + 1
>>> b.asnumpy()
array([[ 3., 3., 3.],
[ 3., 3., 3.]], dtype=float32)
References:
https://mxnet.incubator.apache.org/get_started/install.html
https://github.com/apache/incubator-mxnet


 380
380


 被折叠的 条评论
为什么被折叠?
被折叠的 条评论
为什么被折叠?
 到【灌水乐园】发言


