


 本文详细介绍了YoloV5与YoloV7的目标检测算法,包括预处理步骤、数据增强方法、骨干网络结构、检测头的设计、损失函数及后处理流程等内容。
一、preprocessing step
1.1 YoloV5
YoloV5训练的数据格式是yolo格式,如果标注数据是coco格式(x,y,w,h),所在图片的宽高是im_w, im_h,需要做如下处理:
x
=
(
x
+
x
+
w
)
/
2
/
i
m
_
w
x=(x+x+w)/2/im\_w
x=(x+x+w)/2/im_w
y
=
(
y
+
y
+
h
)
/
2
/
i
m
_
h
y=(y+y+h)/2/im\_h
y=(y+y+h)/2/im_h
w
=
w
/
2
/
i
m
_
w
w=w/2/im\_w
w=w/2/im_w
h
=
h
/
2
/
i
m
_
h
h=h/2/im\_h
h=h/2/im_h
标注数据的类别需要转成数字,如0、1等,转成后的yolo格式如下,每1行代表一个物体,依次表示为:类别、x、y、w、h
0 0.560206893217963 0.5092064076597311 0.7469425242906174 0.9815871846805376
1 0.15586895117261101 0.6268121813297857 0.3016702509919036 0.17568520662657175
参考代码如下:
import json
import os
import cv2
import numpy as np
from tqdm import tqdm

files_path = r"C:\Users\9ling\Desktop\knife_datasets\has_knife"  # todo modify
s_files_path = os.listdir(files_path)
for item in tqdm(s_files_path):
    json_path = os.path.join(files_path, item, item + ".json")
    jdata = json.load(open(json_path))["labels"]
    for item01 in tqdm(jdata):
        img_path = os.path.join(files_path, item, item01["filename"])
        im = cv2.imdecode(np.fromfile(img_path), 1)
        if im is None:
            im = cv2.imread(img_path)
        height, width = im.shape[0:2]
        pedes_annos = []
        knife_annos = []
        for item02 in item01["annotations"]:
            if item02["class"] == "pedestrain":
                # voc格式
                pedes_annos.extend(
                    [item02["x"], item02["y"], item02["x"] + item02["width"], item02["y"] + item02["height"], 0])
            elif item02["class"] == "knife":
                # voc格式
                knife_annos.extend(
                    [item02["x"], item02["y"], item02["x"] + item02["width"], item02["y"] + item02["height"], 1])
        try:
            left_xcoord = max(0, pedes_annos[0] - 0.25 * (pedes_annos[2] - pedes_annos[0]))
            right_xcoord = min(width, pedes_annos[2] + 0.25 * (pedes_annos[2] - pedes_annos[0]))
            left_ycoord = max(0,
                              pedes_annos[1] - 0.15 * (pedes_annos[3] - pedes_annos[1]))
        except IndexError as e:
            print(item01["filename"])
        im = im[int(left_ycoord):int(pedes_annos[3]), int(left_xcoord):int(right_xcoord)]
        im_path = os.path.join(os.path.abspath(r"datasets/images/val"), item01["filename"])  # todo modify
        # cv2.imwrite(im_path, im)

        pedes_annos[0] = pedes_annos[0] - left_xcoord
        pedes_annos[1] = pedes_annos[1] - left_ycoord
        pedes_annos[2] = pedes_annos[2] - left_xcoord
        pedes_annos[3] = pedes_annos[3] - left_ycoord
        if len(knife_annos) > 0:
            knife_annos[0] = max(0, knife_annos[0] - left_xcoord)
            knife_annos[1] = max(0, knife_annos[1] - left_ycoord)
            knife_annos[2] = min(right_xcoord - left_xcoord, knife_annos[2] - left_xcoord)
            knife_annos[3] = max(0, knife_annos[3] - left_ycoord)

        # todo modify
        with open(os.path.join(os.path.abspath(r"datasets/labels/val"), item01["filename"].split(".")[0] + ".txt"),
                  'w') as f:
            im_w = right_xcoord - left_xcoord
            im_h = pedes_annos[3] - left_ycoord

            # 获取一个pedestrian的信息
            label_idx_p = str(pedes_annos[4])
            x_center_p = str((pedes_annos[0] + pedes_annos[2]) / 2 / im_w)
            y_center_p = str((pedes_annos[1] + pedes_annos[3]) / 2 / im_h)
            width_p = str((pedes_annos[2] - pedes_annos[0]) / im_w)
            height_p = str((pedes_annos[3] - pedes_annos[1]) / im_h)

            # 将信息写入txt
            data = label_idx_p + ' ' + x_center_p + ' ' + y_center_p + ' ' + width_p + ' ' + height_p + '\n'
            f.write(data)

            # 获取一个knife的信息
            if len(knife_annos) > 0:
                label_idx_k = str(knife_annos[4])
                x_center_k = str((knife_annos[0] + knife_annos[2]) / 2 / im_w)
                y_center_k = str((knife_annos[1] + knife_annos[3]) / 2 / im_h)
                width_k = str((knife_annos[2] - knife_annos[0]) / im_w)
                height_k = str((knife_annos[3] - knife_annos[1]) / im_h)

                # 将信息写入txt
                data = label_idx_k + ' ' + x_center_k + ' ' + y_center_k + ' ' + width_k + ' ' + height_k + '\n'
                f.write(data)
1.3 YoloV7
YoloV7的preprocessing step 同YoloV5
二、data augmentation
2.1 YoloV5
YoloV5使用随机mosaic数据增强与随机mixup,需要注意只有在训练时才进行数据增强,测试时不需要,数据增强步骤如下,
1、从训练数据随机选取3张图片与当前的图片进行拼接,
2、当前经过mosaic的图片再与随机选取的图片进行mixup,
其中mosaic数据增强具体步骤如下:
1、每次读取4张图片,
2、分别对四张图片进行翻转、缩放、色域变化等,并且按照四个方向位置摆好,
3、进行图片的组合和框的组合,
mosaic实现代码如下:
import cv2
import numpy as np
from PIL import Image, ImageDraw


def rand(a=0, b=1):
    return np.random.rand()*(b-a) + a

def merge_bboxes(bboxes, cutx, cuty):
    merge_bbox = []
    for i in range(len(bboxes)):
        for box in bboxes[i]:
            tmp_box = []
            x1, y1, x2, y2 = box[0], box[1], box[2], box[3]

            if i == 0:
                if y1 > cuty or x1 > cutx:
                    continue
                if y2 >= cuty and y1 <= cuty:
                    y2 = cuty
                if x2 >= cutx and x1 <= cutx:
                    x2 = cutx

            if i == 1:
                if y2 < cuty or x1 > cutx:
                    continue
                if y2 >= cuty and y1 <= cuty:
                    y1 = cuty
                if x2 >= cutx and x1 <= cutx:
                    x2 = cutx

            if i == 2:
                if y2 < cuty or x2 < cutx:
                    continue
                if y2 >= cuty and y1 <= cuty:
                    y1 = cuty
                if x2 >= cutx and x1 <= cutx:
                    x1 = cutx

            if i == 3:
                if y1 > cuty or x2 < cutx:
                    continue
                if y2 >= cuty and y1 <= cuty:
                    y2 = cuty
                if x2 >= cutx and x1 <= cutx:
                    x1 = cutx
            tmp_box.append(x1)
            tmp_box.append(y1)
            tmp_box.append(x2)
            tmp_box.append(y2)
            tmp_box.append(box[-1])
            merge_bbox.append(tmp_box)
    return merge_bbox

def get_random_data_with_Mosaic(annotation_line, input_shape, jitter=0.3, hue=.1, sat=0.7, val=0.4):
    h, w = input_shape
    min_offset_x = rand(0.3, 0.7)
    min_offset_y = rand(0.3, 0.7)

    image_datas = []
    box_datas   = []
    index       = 0
    for line in annotation_line:
        #---------------------------------#
        #   每一行进行分割
        #---------------------------------#
        line_content = line.split()
        #---------------------------------#
        #   打开图片
        #---------------------------------#
        image = Image.open(line_content[0])
        image = image.convert('RGB')

        #---------------------------------#
        #   图片的大小
        #---------------------------------#
        iw, ih = image.size
        #---------------------------------#
        #   保存框的位置
        #---------------------------------#
        box = np.array([np.array(list(map(int,box.split(',')))) for box in line_content[1:]])

        #---------------------------------#
        #   是否翻转图片
        #---------------------------------#
        flip = rand()<.5
        if flip and len(box)>0:
            image = image.transpose(Image.FLIP_LEFT_RIGHT)
            box[:, [0,2]] = iw - box[:, [2,0]]

        #------------------------------------------#
        #   对图像进行缩放并且进行长和宽的扭曲
        #------------------------------------------#
        new_ar = iw/ih * rand(1-jitter,1+jitter) / rand(1-jitter,1+jitter)
        scale = rand(.4, 1)
        if new_ar < 1:
            nh = int(scale*h)
            nw = int(nh*new_ar)
        else:
            nw = int(scale*w)
            nh = int(nw/new_ar)
        image = image.resize((nw, nh), Image.BICUBIC)

        #-----------------------------------------------#
        #   将图片进行放置,分别对应四张分割图片的位置
        #-----------------------------------------------#
        if index == 0:
            dx = int(w*min_offset_x) - nw
            dy = int(h*min_offset_y) - nh
        elif index == 1:
            dx = int(w*min_offset_x) - nw
            dy = int(h*min_offset_y)
        elif index == 2:
            dx = int(w*min_offset_x)
            dy = int(h*min_offset_y)
        elif index == 3:
            dx = int(w*min_offset_x)
            dy = int(h*min_offset_y) - nh

        new_image = Image.new('RGB', (w,h), (128,128,128))
        new_image.paste(image, (dx, dy))
        image_data = np.array(new_image)

        index = index + 1
        box_data = []
        #---------------------------------#
        #   对box进行重新处理
        #---------------------------------#
        if len(box)>0:
            np.random.shuffle(box)
            box[:, [0,2]] = box[:, [0,2]]*nw/iw + dx
            box[:, [1,3]] = box[:, [1,3]]*nh/ih + dy
            box[:, 0:2][box[:, 0:2]<0] = 0
            box[:, 2][box[:, 2]>w] = w
            box[:, 3][box[:, 3]>h] = h
            box_w = box[:, 2] - box[:, 0]
            box_h = box[:, 3] - box[:, 1]
            box = box[np.logical_and(box_w>1, box_h>1)]
            box_data = np.zeros((len(box),5))
            box_data[:len(box)] = box

        image_datas.append(image_data)
        box_datas.append(box_data)

    #---------------------------------#
    #   将图片分割,放在一起
    #---------------------------------#
    cutx = int(w * min_offset_x)
    cuty = int(h * min_offset_y)

    new_image = np.zeros([h, w, 3])
    new_image[:cuty, :cutx, :] = image_datas[0][:cuty, :cutx, :]
    new_image[cuty:, :cutx, :] = image_datas[1][cuty:, :cutx, :]
    new_image[cuty:, cutx:, :] = image_datas[2][cuty:, cutx:, :]
    new_image[:cuty, cutx:, :] = image_datas[3][:cuty, cutx:, :]

    new_image       = np.array(new_image, np.uint8)
    #---------------------------------#
    #   对图像进行色域变换
    #   计算色域变换的参数
    #---------------------------------#
    r               = np.random.uniform(-1, 1, 3) * [hue, sat, val] + 1
    #---------------------------------#
    #   将图像转到HSV上
    #---------------------------------#
    hue, sat, val   = cv2.split(cv2.cvtColor(new_image, cv2.COLOR_RGB2HSV))
    dtype           = new_image.dtype
    #---------------------------------#
    #   应用变换
    #---------------------------------#
    x       = np.arange(0, 256, dtype=r.dtype)
    lut_hue = ((x * r[0]) % 180).astype(dtype)
    lut_sat = np.clip(x * r[1], 0, 255).astype(dtype)
    lut_val = np.clip(x * r[2], 0, 255).astype(dtype)

    new_image = cv2.merge((cv2.LUT(hue, lut_hue), cv2.LUT(sat, lut_sat), cv2.LUT(val, lut_val)))
    new_image = cv2.cvtColor(new_image, cv2.COLOR_HSV2RGB)

    #---------------------------------#
    #   对框进行进一步的处理
    #---------------------------------#
    new_boxes = merge_bboxes(box_datas, cutx, cuty)

    return new_image, new_boxes
mixup实现代码如下:
def get_random_data_with_MixUp(self, image_1, box_1, image_2, box_2):
     new_image = np.array(image_1, np.float32) * 0.5 + np.array(image_2, np.float32) * 0.5
     if len(box_1) == 0:
         new_boxes = box_2
     elif len(box_2) == 0:
         new_boxes = box_1
     else:
         new_boxes = np.concatenate([box_1, box_2], axis=0)
     return new_image, new_boxes
2.2 YoloV7
YoloV7的data augmentation同YoloV5
三、backbone network architecture
3.1 YoloV5
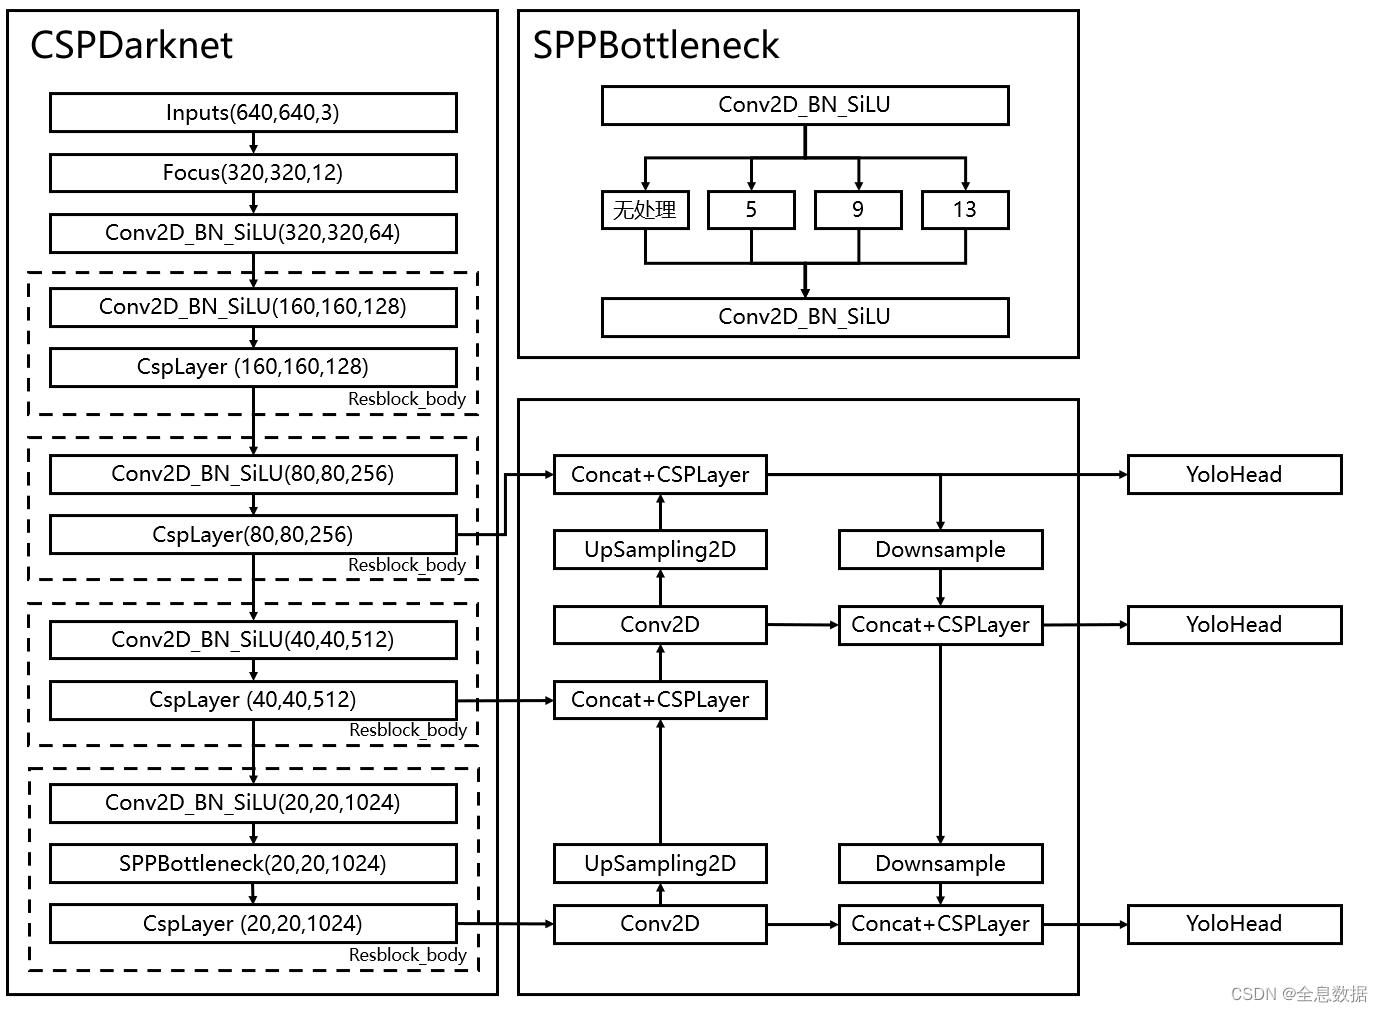
YoloV5的整体网络结构如下:
3.1.1 残差结构BottleNeck
作用:
1、结合不同层次的信息,使网络做的更深;
2、残差网络的特点是容易优化,并且能够通过增加相当的深度来提高准确率;
3、其内部的残差块使用了跳跃连接,缓解了在深度神经网络中增加深度带来的梯度消失问题。
代码:
import torch
import torch.nn as nn


class Bottleneck(nn.Module):
    def __init__(self, c1, c2, e, shortcut=True):
        super(Bottleneck, self).__init__()
        self.c_ = int(c1 * e)  # hidden channels
        self.conv1 = nn.Conv2d(c1, self.c_, 1, 1)
        self.conv2 = nn.Conv2d(self.c_, c2, 3, 1, 1)
        self.add = shortcut and c1 == c2

    def forward(self, x):
        return x + self.conv2(self.conv1(x)) if self.add else self.conv2(self.conv1(x))


if __name__ == '__main__':
    x = torch.randn(2, 3, 3, 3)
    print(x.shape)
    out = Bottleneck(3, 3, 0.5)(x)
    print(out.shape)
# 输出:
#torch.Size([2, 3, 3, 3])
#torch.Size([2, 3, 3, 3])
3.1.2 CSPnet
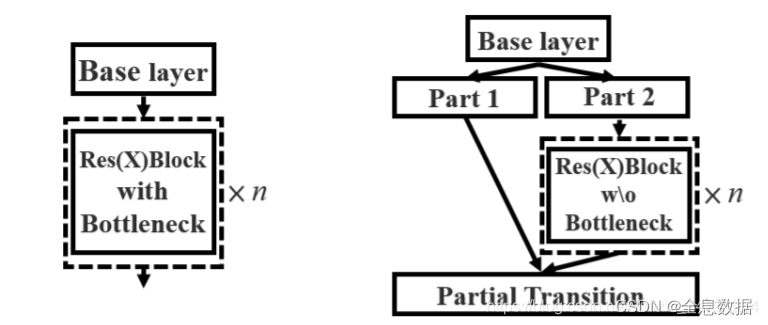
过程如下:
1、输入的feature map先做1×1卷积,然后再进行Bottleneck,得到f1;
2、输入的feature map只做1×1卷积,得到f2;
3、对f1和f2进行堆叠,再进行1×1卷积得到f3;
代码:
class CspNet(nn.Module):
    def __init__(self, c1, c2, e, n=1):
        super(CspNet, self).__init__()
        c_ = int(c1 * e)
        self.conv1 = nn.Conv2d(c1, c_, 1, 1)
        self.conv2 = nn.Conv2d(c1, c_, 1, 1)
        self.conv3 = nn.Conv2d(2 * c_, c2, 1, 1)
        self.m = nn.Sequential(*[Bottleneck(c_, c_, 0.5) for _ in range(n)])

    def forward(self, x):
        return self.conv3(torch.cat((self.m(self.conv1(x)), self.conv2(x)), dim=1))


if __name__ == '__main__':
    x = torch.randn(2, 5, 3, 3)
    print(x.shape)
    out = CspNet(5, 5, 0.5)(x)
    print(out.shape)
# 输出
#torch.Size([2, 5, 3, 3])
#torch.Size([2, 5, 3, 3])
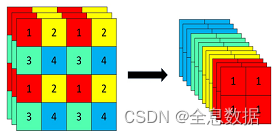
3.1.3 Focus结构
定义:
使用了Focus网络结构,这个网络结构是在YoloV5里面使用到比较有趣的网络结构,具体操作是在一张图片中每隔一个像素拿到一个值,这个时候获得了四个独立的特征层,然后将四个独立的特征层进行堆叠,此时宽高信息就集中到了通道信息,输入通道扩充了四倍。拼接起来的特征层相对于原先的三通道变成了十二个通道,下图很好的展示了Focus结构,一看就能明白。
代码如下:
import torch
import torch.nn as nn


class Focus(nn.Module):
    def __init__(self, c1, c2):
        super(Focus, self).__init__()
        self.conv1 = nn.Conv2d(c1 * 4, c2, 1, 1)

    def forward(self, x):
        return self.conv1(
            torch.cat((x[..., ::2, ::2], x[..., ::2, 1::2], x[..., 1::2, ::2], x[..., 1::2, 1::2]), dim=1))


if __name__ == '__main__':
    x = torch.randn(2, 3, 4, 4)
    print(x.shape)
    out = Focus(3, 3)(x)
    print(out.shape)
# 输出
#torch.Size([2, 3, 4, 4])
#torch.Size([2, 3, 2, 2])
3.1.4 Silu激活函数
silu激活函数结合了relu和sigmoid函数,具备无上界有下界、平滑、非单调的特性。SiLU在深层模型上的效果优于 ReLU。可以看做是平滑的ReLU激活函数。
import matplotlib.pyplot as pl
import torch
import torch.nn as nn
import numpy as np


class SiLU(nn.Module):
    @staticmethod
    def forward(x):
        return x * torch.sigmoid(x)


x = np.linspace(-10, 10, 100)
out = SiLU.forward(torch.from_numpy(x))
print(out.shape)  # torch.Size([100])
fig = pl.figure()
pl.plot(x, out)
pl.show()

3.1.5 spp结构
定义:
使用不同大小的池化核对feature map分别进行池化,然后进行堆叠之后再卷积;
作用:
通过不同大小的池化核进行池化,会提高网络的感受野。在YoloV4中,SPP是用在FPN里面的,在YoloV5中,SPP模块被用在了主干特征提取网络中。
代码:
import torch
import torch.nn as nn


class SPP(nn.Module):
    def __init__(self, c1, c2, k=[5, 7, 13]):
        super(SPP, self).__init__()
        c_ = int(c1 // 2)  # hidden channel
        self.conv1 = nn.Conv2d(c1, c_, 1, 1)
        self.conv2 = nn.Conv2d(c_ * (len(k) + 1), c2, 1, 1)
        self.m = nn.ModuleList([nn.MaxPool2d(kernel_size=_, stride=1, padding=_ // 2) for _ in k])

    def forward(self, x):
        x = self.conv1(x)
        return self.conv2(torch.cat([x] + [m(x) for m in self.m], dim=1))


if __name__ == '__main__':
    x = torch.randn(2, 3, 26, 26)
    out = SPP(3, 3)(x)
    print(out.shape)
# 输出
#torch.Size([2, 3, 26, 26])
3.1.6 整个主干(backbone)实现代码
import torch
import torch.nn as nn


class SiLU(nn.Module):
    @staticmethod
    def forward(x):
        return x * torch.sigmoid(x)


def autopad(k, p=None):
    if p is None:
        p = k // 2 if isinstance(k, int) else [x // 2 for x in k]
    return p


class Focus(nn.Module):
    def __init__(self, c1, c2, k=1, s=1, p=None, g=1, act=True):  # ch_in, ch_out, kernel, stride, padding, groups
        super(Focus, self).__init__()
        self.conv = Conv(c1 * 4, c2, k, s, p, g, act)

    def forward(self, x):
        return self.conv(torch.cat([x[..., ::2, ::2], x[..., 1::2, ::2], x[..., ::2, 1::2], x[..., 1::2, 1::2]], 1))


class Conv(nn.Module):
    def __init__(self, c1, c2, k=1, s=1, p=None, g=1, act=True):
        super(Conv, self).__init__()
        self.conv = nn.Conv2d(c1, c2, k, s, autopad(k, p), groups=g, bias=False)
        self.bn = nn.BatchNorm2d(c2, eps=0.001, momentum=0.03)
        self.act = SiLU() if act is True else (act if isinstance(act, nn.Module) else nn.Identity())

    def forward(self, x):
        return self.act(self.bn(self.conv(x)))

    def fuseforward(self, x):
        return self.act(self.conv(x))


class Bottleneck(nn.Module):
    # Standard bottleneck
    def __init__(self, c1, c2, shortcut=True, g=1, e=0.5):  # ch_in, ch_out, shortcut, groups, expansion
        super(Bottleneck, self).__init__()
        c_ = int(c2 * e)  # hidden channels
        self.cv1 = Conv(c1, c_, 1, 1)
        self.cv2 = Conv(c_, c2, 3, 1, g=g)
        self.add = shortcut and c1 == c2

    def forward(self, x):
        return x + self.cv2(self.cv1(x)) if self.add else self.cv2(self.cv1(x))


class C3(nn.Module):
    # CSP Bottleneck with 3 convolutions
    def __init__(self, c1, c2, n=1, shortcut=True, g=1, e=0.5):  # ch_in, ch_out, number, shortcut, groups, expansion
        super(C3, self).__init__()
        c_ = int(c2 * e)  # hidden channels
        self.cv1 = Conv(c1, c_, 1, 1)
        self.cv2 = Conv(c1, c_, 1, 1)
        self.cv3 = Conv(2 * c_, c2, 1)  # act=FReLU(c2)
        self.m = nn.Sequential(*[Bottleneck(c_, c_, shortcut, g, e=1.0) for _ in range(n)])
        # self.m = nn.Sequential(*[CrossConv(c_, c_, 3, 1, g, 1.0, shortcut) for _ in range(n)])

    def forward(self, x):
        return self.cv3(torch.cat((self.m(self.cv1(x)), self.cv2(x)), dim=1))


class SPP(nn.Module):
    # Spatial pyramid pooling layer used in YOLOv3-SPP
    def __init__(self, c1, c2, k=(5, 9, 13)):
        super(SPP, self).__init__()
        c_ = c1 // 2  # hidden channels
        self.cv1 = Conv(c1, c_, 1, 1)
        self.cv2 = Conv(c_ * (len(k) + 1), c2, 1, 1)
        self.m = nn.ModuleList([nn.MaxPool2d(kernel_size=x, stride=1, padding=x // 2) for x in k])

    def forward(self, x):
        x = self.cv1(x)
        return self.cv2(torch.cat([x] + [m(x) for m in self.m], 1))


class CSPDarknet(nn.Module):
    def __init__(self, base_channels, base_depth):
        super().__init__()
        # -----------------------------------------------#
        #   输入图片是640, 640, 3
        #   初始的基本通道是64
        # -----------------------------------------------#

        # -----------------------------------------------#
        #   利用focus网络结构进行特征提取
        #   640, 640, 3 -> 320, 320, 12 -> 320, 320, 64
        # -----------------------------------------------#
        self.stem = Focus(3, base_channels, k=3)
        # -----------------------------------------------#
        #   完成卷积之后,320, 320, 64 -> 160, 160, 128
        #   完成CSPlayer之后,160, 160, 128 -> 160, 160, 128
        # -----------------------------------------------#
        self.dark2 = nn.Sequential(
            Conv(base_channels, base_channels * 2, 3, 2),
            C3(base_channels * 2, base_channels * 2, base_depth),
        )
        # -----------------------------------------------#
        #   完成卷积之后,160, 160, 128 -> 80, 80, 256
        #   完成CSPlayer之后,80, 80, 256 -> 80, 80, 256
        # -----------------------------------------------#
        self.dark3 = nn.Sequential(
            Conv(base_channels * 2, base_channels * 4, 3, 2),
            C3(base_channels * 4, base_channels * 4, base_depth * 3),
        )

        # -----------------------------------------------#
        #   完成卷积之后,80, 80, 256 -> 40, 40, 512
        #   完成CSPlayer之后,40, 40, 512 -> 40, 40, 512
        # -----------------------------------------------#
        self.dark4 = nn.Sequential(
            Conv(base_channels * 4, base_channels * 8, 3, 2),
            C3(base_channels * 8, base_channels * 8, base_depth * 3),
        )
        # -----------------------------------------------#
        #   完成卷积之后,40, 40, 512 -> 20, 20, 1024
        #   完成SPP之后,20, 20, 1024 -> 20, 20, 1024
        #   完成CSPlayer之后,20, 20, 1024 -> 20, 20, 1024
        # -----------------------------------------------#
        self.dark5 = nn.Sequential(
            Conv(base_channels * 8, base_channels * 16, 3, 2),
            SPP(base_channels * 16, base_channels * 16),
            C3(base_channels * 16, base_channels * 16, base_depth, shortcut=False),
        )

    def forward(self, x):
        x = self.stem(x)
        x = self.dark2(x)
        # -----------------------------------------------#
        #   dark3的输出为80, 80, 256,是一个有效特征层
        # -----------------------------------------------#
        x = self.dark3(x)
        feat1 = x
        # -----------------------------------------------#
        #   dark4的输出为40, 40, 512,是一个有效特征层
        # -----------------------------------------------#
        x = self.dark4(x)
        feat2 = x
        # -----------------------------------------------#
        #   dark5的输出为20, 20, 1024,是一个有效特征层
        # -----------------------------------------------#
        x = self.dark5(x)
        feat3 = x
        return feat1, feat2, feat3


if __name__ == '__main__':
    x = torch.randn(2, 3, 640, 640)
    out = CSPDarknet(64, 3)(x)
    for item in out:
        print(item.shape)

# 输出
#torch.Size([2, 256, 80, 80])
#torch.Size([2, 512, 40, 40])
#torch.Size([2, 1024, 20, 20])
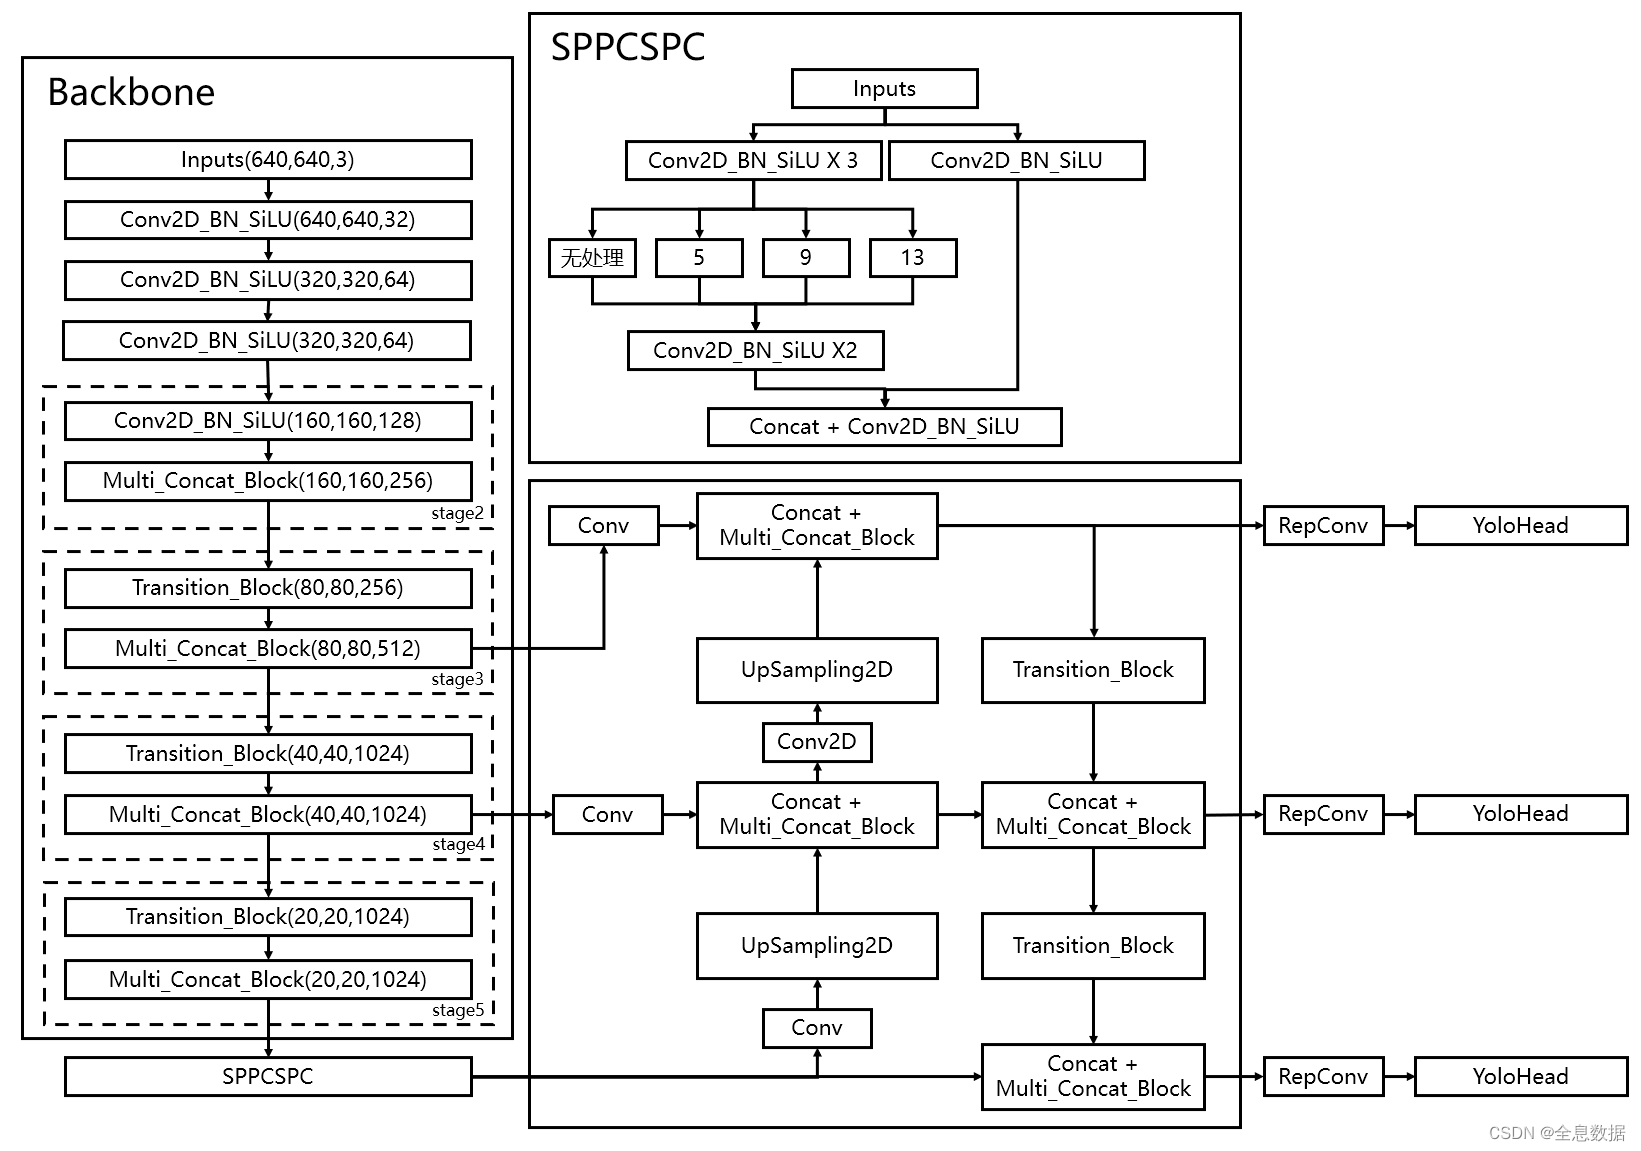
3.3 YoloV7
YoloV7整体网络结构如下:
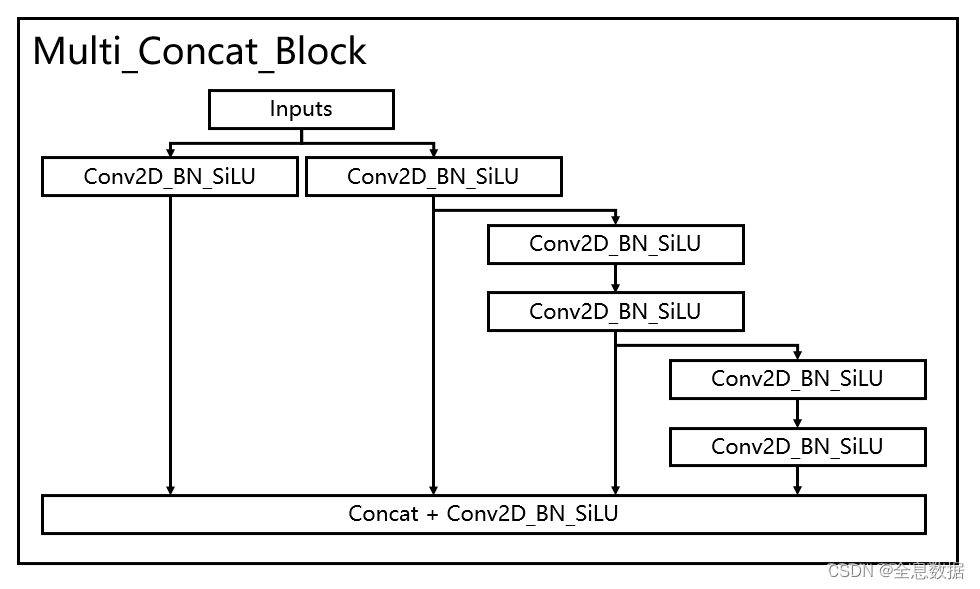
3.3.1 多分支堆叠模块
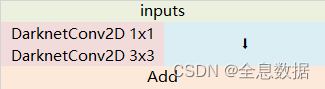
多分支堆叠模块一共有4支卷积标准化激活函数,左一为一个卷积标准化激活函数,左二为一个卷积标准化激活函数,右二为三个卷积标准化激活函数,右一为五个卷积标准化激活函数,如下图所示,
实现代码:
import torch
import torch.nn as nn


def autopad(k, p=None):
    if p is None:
        p = k // 2 if isinstance(k, int) else [x // 2 for x in k]
    return p


class SiLU(nn.Module):
    @staticmethod
    def forward(x):
        return x * torch.sigmoid(x)


class Conv(nn.Module):
    def __init__(self, c1, c2, k=1, s=1, p=None, g=1, act=SiLU()):  # ch_in, ch_out, kernel, stride, padding, groups
        super(Conv, self).__init__()
        self.conv = nn.Conv2d(c1, c2, k, s, autopad(k, p), groups=g, bias=False)
        self.bn = nn.BatchNorm2d(c2, eps=0.001, momentum=0.03)
        # 走SiLU
        self.act = nn.LeakyReLU(0.1, inplace=True) if act is True else (
            act if isinstance(act, nn.Module) else nn.Identity())

    def forward(self, x):
        return self.act(self.bn(self.conv(x)))

    def fuseforward(self, x):
        return self.act(self.conv(x))


class Multi_Concat_Block(nn.Module):
    def __init__(self, c1, c2, c3, n=4, e=1, ids=[0]):
        super(Multi_Concat_Block, self).__init__()
        c_ = int(c2 * e)

        self.ids = ids
        self.cv1 = Conv(c1, c_, 1, 1)
        self.cv2 = Conv(c1, c_, 1, 1)
        self.cv3 = nn.ModuleList(
            [Conv(c_ if i == 0 else c2, c2, 3, 1) for i in range(n)]
        )
        self.cv4 = Conv(c_ * 2 + c2 * (len(ids) - 2), c3, 1, 1)

    def forward(self, x):
        x_1 = self.cv1(x)
        x_2 = self.cv2(x)

        x_all = [x_1, x_2]
        for i in range(len(self.cv3)):
            x_2 = self.cv3[i](x_2)
            x_all.append(x_2)

        out = self.cv4(torch.cat([x_all[id] for id in self.ids], 1))  # 1:在1维拼接, 0:在0维拼接
        return out


if __name__ == '__main__':
    ids = {
        'l': [-1, -3, -5, -6],
        'x': [-1, -3, -5, -7, -8],
    }['l']
    x = torch.randn(2, 3, 5, 5)
    print(x.shape)
    out = Multi_Concat_Block(3, 3, 5, n=4, ids=ids)(x)
    print(out.shape)

# 输出
#torch.Size([2, 3, 5, 5])
#torch.Size([2, 5, 5, 5])
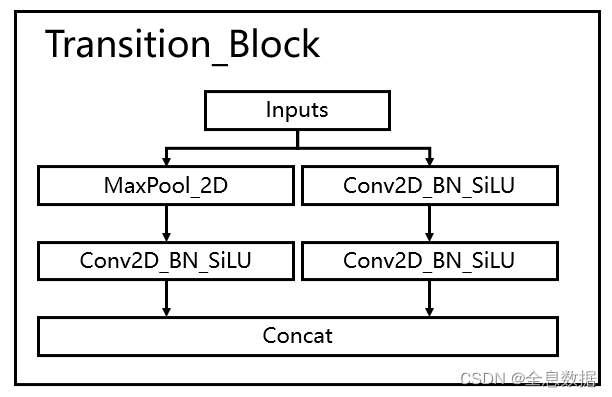
3.3.2 下采样网络结构
使用创新的过渡模块Transition_Block来进行下采样,在卷积神经网络中,常见的用于下采样的过渡模块是一个卷积核大小为3x3、步长为2x2的卷积或者一个步长为2x2的最大池化。在YoloV7中,作者将两种过渡模块进行了集合,一个过渡模块存在两个分支,如图所示。左分支是一个步长为2x2的最大池化+一个1x1卷积,右分支是一个1x1卷积+一个卷积核大小为3x3、步长为2x2的卷积,两个分支的结果在输出时会进行堆叠。
import torch
import torch.nn as nn


def autopad(k, p=None):
    if p is None:
        p = k // 2 if isinstance(k, int) else [x // 2 for x in k]
    return p


class SiLU(nn.Module):
    @staticmethod
    def forward(x):
        return x * torch.sigmoid(x)


class Conv(nn.Module):
    def __init__(self, c1, c2, k=1, s=1, p=None, g=1, act=SiLU()):  # ch_in, ch_out, kernel, stride, padding, groups
        super(Conv, self).__init__()
        self.conv = nn.Conv2d(c1, c2, k, s, autopad(k, p), groups=g, bias=False)
        self.bn = nn.BatchNorm2d(c2, eps=0.001, momentum=0.03)
        # 走SiLU
        self.act = nn.LeakyReLU(0.1, inplace=True) if act is True else (
            act if isinstance(act, nn.Module) else nn.Identity())

    def forward(self, x):
        return self.act(self.bn(self.conv(x)))

    def fuseforward(self, x):
        return self.act(self.conv(x))


class MP(nn.Module):
    def __init__(self, k=3, t=2):
        super(MP, self).__init__()
        self.m = nn.MaxPool2d(kernel_size=k, stride=t, padding=1)

    def forward(self, x):
        return self.m(x)


class Transition_Block(nn.Module):
    def __init__(self, c1, c2):
        super(Transition_Block, self).__init__()
        self.cv1 = Conv(c1, c2, 1, 1)
        self.cv2 = Conv(c1, c2, 1, 1)
        self.cv3 = Conv(c2, c2, 3, 2)

        self.mp = MP()

    def forward(self, x):
        x_1 = self.mp(x)
        x_1 = self.cv1(x_1)

        x_2 = self.cv2(x)
        x_2 = self.cv3(x_2)

        return torch.cat([x_2, x_1], 1)


if __name__ == '__main__':
    x = torch.randn(2, 3, 9, 9)
    print(x.shape)
    out = Transition_Block(3, 5)(x)
    print(out.shape)

# 输出
#torch.Size([2, 3, 9, 9])
#torch.Size([2, 10, 5, 5])
3.3.3 整个主干(backbone)实现代码
整个主干网络实现代码为:
import torch
import torch.nn as nn


def autopad(k, p=None):
    if p is None:
        p = k // 2 if isinstance(k, int) else [x // 2 for x in k]
    return p


class SiLU(nn.Module):
    @staticmethod
    def forward(x):
        return x * torch.sigmoid(x)


class Conv(nn.Module):
    def __init__(self, c1, c2, k=1, s=1, p=None, g=1, act=SiLU()):  # ch_in, ch_out, kernel, stride, padding, groups
        super(Conv, self).__init__()
        self.conv = nn.Conv2d(c1, c2, k, s, autopad(k, p), groups=g, bias=False)
        self.bn = nn.BatchNorm2d(c2, eps=0.001, momentum=0.03)
        # 走SiLU
        self.act = nn.LeakyReLU(0.1, inplace=True) if act is True else (
            act if isinstance(act, nn.Module) else nn.Identity())

    def forward(self, x):
        return self.act(self.bn(self.conv(x)))

    def fuseforward(self, x):
        return self.act(self.conv(x))


class Multi_Concat_Block(nn.Module):
    def __init__(self, c1, c2, c3, n=4, e=1, ids=[0]):
        super(Multi_Concat_Block, self).__init__()
        c_ = int(c2 * e)

        self.ids = ids
        self.cv1 = Conv(c1, c_, 1, 1)
        self.cv2 = Conv(c1, c_, 1, 1)
        self.cv3 = nn.ModuleList(
            [Conv(c_ if i == 0 else c2, c2, 3, 1) for i in range(n)]
        )
        self.cv4 = Conv(c_ * 2 + c2 * (len(ids) - 2), c3, 1, 1)

    def forward(self, x):
        x_1 = self.cv1(x)
        x_2 = self.cv2(x)

        x_all = [x_1, x_2]
        for i in range(len(self.cv3)):
            x_2 = self.cv3[i](x_2)
            x_all.append(x_2)

        out = self.cv4(torch.cat([x_all[id] for id in self.ids], 1))  # 1:在1维拼接, 0:在0维拼接
        return out


class MP(nn.Module):
    def __init__(self, k=2):
        super(MP, self).__init__()
        self.m = nn.MaxPool2d(kernel_size=k, stride=k)

    def forward(self, x):
        return self.m(x)


class Transition_Block(nn.Module):
    def __init__(self, c1, c2):
        super(Transition_Block, self).__init__()
        self.cv1 = Conv(c1, c2, 1, 1)
        self.cv2 = Conv(c1, c2, 1, 1)
        self.cv3 = Conv(c2, c2, 3, 2)

        self.mp = MP()

    def forward(self, x):
        x_1 = self.mp(x)
        x_1 = self.cv1(x_1)

        x_2 = self.cv2(x)
        x_2 = self.cv3(x_2)

        return torch.cat([x_2, x_1], 1)


class Backbone(nn.Module):
    def __init__(self, transition_channels, block_channels, n, phi, pretrained=False):
        super().__init__()
        # -----------------------------------------------#
        #   输入图片是640, 640, 3
        # -----------------------------------------------#
        ids = {
            'l': [-1, -3, -5, -6],
            'x': [-1, -3, -5, -7, -8],
        }[phi]
        self.stem = nn.Sequential(
            Conv(3, transition_channels, 3, 1),
            Conv(transition_channels, transition_channels * 2, 3, 2),
            Conv(transition_channels * 2, transition_channels * 2, 3, 1),
        )
        self.dark2 = nn.Sequential(
            Conv(transition_channels * 2, transition_channels * 4, 3, 2),
            Multi_Concat_Block(transition_channels * 4, block_channels * 2, transition_channels * 8, n=n, ids=ids),
        )
        self.dark3 = nn.Sequential(
            Transition_Block(transition_channels * 8, transition_channels * 4),
            Multi_Concat_Block(transition_channels * 8, block_channels * 4, transition_channels * 16, n=n, ids=ids),
        )
        self.dark4 = nn.Sequential(
            Transition_Block(transition_channels * 16, transition_channels * 8),
            Multi_Concat_Block(transition_channels * 16, block_channels * 8, transition_channels * 32, n=n, ids=ids),
        )
        self.dark5 = nn.Sequential(
            Transition_Block(transition_channels * 32, transition_channels * 16),
            Multi_Concat_Block(transition_channels * 32, block_channels * 8, transition_channels * 32, n=n, ids=ids),
        )

    def forward(self, x):
        x = self.stem(x)
        x = self.dark2(x)
        # -----------------------------------------------#
        #   dark3的输出为80, 80, 512,是一个有效特征层
        # -----------------------------------------------#
        x = self.dark3(x)
        feat1 = x
        # -----------------------------------------------#
        #   dark4的输出为40, 40, 1024,是一个有效特征层
        # -----------------------------------------------#
        x = self.dark4(x)
        feat2 = x
        # -----------------------------------------------#
        #   dark5的输出为20, 20, 1024,是一个有效特征层
        # -----------------------------------------------#
        x = self.dark5(x)
        feat3 = x
        return feat1, feat2, feat3


if __name__ == '__main__':
    x = torch.randn(16, 3, 640, 640)
    print("x.shape:", x.shape)
    out1, out2, out3 = Backbone(3, 5, n=4, phi='l')(x)
    print("out1.shape:", out1.shape, '\n', "out2.shape:", out2.shape, '\n', "out3.shape:", out3.shape)

# 输出
#x.shape: torch.Size([16, 3, 640, 640])
#out1.shape: torch.Size([16, 48, 80, 80])
#out2.shape: torch.Size([16, 96, 40, 40])
#out3.shape: torch.Size([16, 96, 20, 20])
四、detection head
4.1 YoloV5
YoloV5对于物体的坐标与类别检测是放在一起的,输入feature size为640*640,经过backbone与FPN之后,会获得3个不同大小的shape:(20,20,1024)、(40,40,512)、(80,80,256),然后我们利用这3个shape的特征层传入Yolo Head获得预测结果。
对于每一个特征层,我们可以获得利用一个卷积调整通道数,最终的通道数和需要区分的种类个数相关,在YoloV5里,每一个特征层上每一个特征点存在3个先验框。
如果使用的是voc训练集,类别则为20种,最后的维度应该为75 = 3*(20+5),三个特征层的shape为(20,20,75),(40,40,75),(80,80,75)。
最后的75可以拆分成3个25,对应3个先验框的25个参数,25可以拆分成4+1+20。
前4个参数用于判断每一个特征点的回归参数,回归参数调整后可以获得预测框;
第5个参数用于判断每一个特征点是否包含物体;
最后20个参数用于判断每一个特征点所包含的物体种类。
如果是猫狗检测,类别为2种,最后的维度应该为6 = 3*(2+5),三个特征层的shape为(20,20,21),(40,40,21),(80,80,21)。
最后的21可以拆分成3个7,对应3个先验框的7个参数,25可以拆分成4+1+2。
前4个参数用于判断每一个特征点的回归参数,回归参数调整后可以获得预测框;
第5个参数用于判断每一个特征点是否包含物体;
最后2个参数用于判断每一个特征点所包含的物体种类。
实现代码如下:
import torch
import torch.nn as nn

from nets.CSPdarknet import CSPDarknet, C3, Conv

#---------------------------------------------------#
#   yolo_body
#---------------------------------------------------#
class YoloBody(nn.Module):
    def __init__(self, anchors_mask, num_classes, phi):
        super(YoloBody, self).__init__()
        depth_dict          = {'s' : 0.33, 'm' : 0.67, 'l' : 1.00, 'x' : 1.33,}
        width_dict          = {'s' : 0.50, 'm' : 0.75, 'l' : 1.00, 'x' : 1.25,}
        dep_mul, wid_mul    = depth_dict[phi], width_dict[phi]

        base_channels       = int(wid_mul * 64)  # 64
        base_depth          = max(round(dep_mul * 3), 1)  # 3
        #-----------------------------------------------#
        #   输入图片是640, 640, 3
        #   初始的基本通道是64
        #-----------------------------------------------#

        #---------------------------------------------------#
        #   生成CSPdarknet53的主干模型
        #   获得三个有效特征层,他们的shape分别是:
        #   80,80,256
        #   40,40,512
        #   20,20,1024
        #---------------------------------------------------#
        self.backbone   = CSPDarknet(base_channels, base_depth)

        self.upsample   = nn.Upsample(scale_factor=2, mode="nearest")

        self.conv_for_feat3         = Conv(base_channels * 16, base_channels * 8, 1, 1)
        self.conv3_for_upsample1    = C3(base_channels * 16, base_channels * 8, base_depth, shortcut=False)

        self.conv_for_feat2         = Conv(base_channels * 8, base_channels * 4, 1, 1)
        self.conv3_for_upsample2    = C3(base_channels * 8, base_channels * 4, base_depth, shortcut=False)

        self.down_sample1           = Conv(base_channels * 4, base_channels * 4, 3, 2)
        self.conv3_for_downsample1  = C3(base_channels * 8, base_channels * 8, base_depth, shortcut=False)

        self.down_sample2           = Conv(base_channels * 8, base_channels * 8, 3, 2)
        self.conv3_for_downsample2  = C3(base_channels * 16, base_channels * 16, base_depth, shortcut=False)

        self.yolo_head_P3 = nn.Conv2d(base_channels * 4, len(anchors_mask[2]) * (5 + num_classes), 1)
        self.yolo_head_P4 = nn.Conv2d(base_channels * 8, len(anchors_mask[1]) * (5 + num_classes), 1)
        self.yolo_head_P5 = nn.Conv2d(base_channels * 16, len(anchors_mask[0]) * (5 + num_classes), 1)

    def forward(self, x):
        #  backbone
        feat1, feat2, feat3 = self.backbone(x)

        P5          = self.conv_for_feat3(feat3)
        P5_upsample = self.upsample(P5)
        P4          = torch.cat([P5_upsample, feat2], 1)
        P4          = self.conv3_for_upsample1(P4)

        P4          = self.conv_for_feat2(P4)
        P4_upsample = self.upsample(P4)
        P3          = torch.cat([P4_upsample, feat1], 1)
        P3          = self.conv3_for_upsample2(P3)

        P3_downsample = self.down_sample1(P3)
        P4 = torch.cat([P3_downsample, P4], 1)
        P4 = self.conv3_for_downsample1(P4)

        P4_downsample = self.down_sample2(P4)
        P5 = torch.cat([P4_downsample, P5], 1)
        P5 = self.conv3_for_downsample2(P5)

        #---------------------------------------------------#
        #   第三个特征层
        #   y3=(batch_size,75,80,80)
        #---------------------------------------------------#
        out2 = self.yolo_head_P3(P3)
        #---------------------------------------------------#
        #   第二个特征层
        #   y2=(batch_size,75,40,40)
        #---------------------------------------------------#
        out1 = self.yolo_head_P4(P4)
        #---------------------------------------------------#
        #   第一个特征层
        #   y1=(batch_size,75,20,20)
        #---------------------------------------------------#
        out0 = self.yolo_head_P5(P5)
        return out0, out1, out2
4.3 YoloV7
YoloV7的detection head 与YoloV5类似。
五、loss
5.1 YoloV5
YoloV5的损失由三个部分组成:
1、Reg部分,每个真实框对应的先验框,获取到每个框对应的先验框后,取出该先验框对应的预测框,利用真实框和预测框计算GIOU损失,作为Reg部分的Loss组成。
2、Obj部分,每个真实框对应的先验框,所有真实框对应的先验框都是正样本,剩余的先验框均为负样本,根据正负样本和特征点的是否包含物体的预测结果计算交叉熵损失,作为Obj部分的Loss组成。
3、Cls部分,每个真实框对应的先验框,获取到每个框对应的先验框后,取出该先验框的种类预测结果,根据真实框的种类和先验框的种类预测结果计算交叉熵损失,作为Cls部分的Loss组成。
5.3 YoloV7
YoloV7的损失由三个部分组成:
1、Reg部分,每个真实框对应的先验框,获取到每个框对应的先验框后,取出该先验框对应的预测框,利用真实框和预测框计算GIOU损失,作为Reg部分的Loss组成。
2、Obj部分,每个真实框对应的先验框,所有真实框对应的先验框都是正样本,剩余的先验框均为负样本,根据正负样本和特征点的是否包含物体的预测结果计算交叉熵损失,作为Obj部分的Loss组成。
3、Cls部分,每个真实框对应的先验框,获取到每个框对应的先验框后,取出该先验框的种类预测结果,根据真实框的种类和先验框的种类预测结果计算交叉熵损失,作为Cls部分的Loss组成
六、postprocessing step
6.1 YoloV5
代码如下:
def decode_box(self, inputs):
    outputs = []
    for i, input in enumerate(inputs):
        # -----------------------------------------------#
        #   输入的input一共有三个,他们的shape分别是
        #   batch_size, 255, 20, 20
        #   batch_size, 255, 40, 40
        #   batch_size, 255, 80, 80
        # -----------------------------------------------#
        batch_size = input.size(0)
        input_height = input.size(2)
        input_width = input.size(3)

        # -----------------------------------------------#
        #   输入为416x416时
        #   stride_h = stride_w = 32、16、8
        # -----------------------------------------------#
        stride_h = self.input_shape[0] / input_height
        stride_w = self.input_shape[1] / input_width
        # -------------------------------------------------#
        #   此时获得的scaled_anchors大小是相对于特征层的
        # -------------------------------------------------#
        scaled_anchors = [(anchor_width / stride_w, anchor_height / stride_h) for anchor_width, anchor_height in
                          self.anchors[self.anchors_mask[i]]]

        # -----------------------------------------------#
        #   输入的input一共有三个,他们的shape分别是
        #   batch_size, 3, 20, 20, 85
        #   batch_size, 3, 40, 40, 85
        #   batch_size, 3, 80, 80, 85
        # -----------------------------------------------#
        prediction = input.view(batch_size, len(self.anchors_mask[i]),
                                self.bbox_attrs, input_height, input_width).permute(0, 1, 3, 4, 2).contiguous()

        # -----------------------------------------------#
        #   先验框的中心位置的调整参数
        # -----------------------------------------------#
        x = torch.sigmoid(prediction[..., 0])
        y = torch.sigmoid(prediction[..., 1])
        # -----------------------------------------------#
        #   先验框的宽高调整参数
        # -----------------------------------------------#
        w = torch.sigmoid(prediction[..., 2])
        h = torch.sigmoid(prediction[..., 3])
        # -----------------------------------------------#
        #   获得置信度,是否有物体
        # -----------------------------------------------#
        conf = torch.sigmoid(prediction[..., 4])
        # -----------------------------------------------#
        #   种类置信度
        # -----------------------------------------------#
        pred_cls = torch.sigmoid(prediction[..., 5:])

        FloatTensor = torch.cuda.FloatTensor if x.is_cuda else torch.FloatTensor
        LongTensor = torch.cuda.LongTensor if x.is_cuda else torch.LongTensor

        # ----------------------------------------------------------#
        #   生成网格,先验框中心,网格左上角
        #   batch_size,3,20,20
        # ----------------------------------------------------------#
        grid_x = torch.linspace(0, input_width - 1, input_width).repeat(input_height, 1).repeat(
            batch_size * len(self.anchors_mask[i]), 1, 1).view(x.shape).type(FloatTensor)
        grid_y = torch.linspace(0, input_height - 1, input_height).repeat(input_width, 1).t().repeat(
            batch_size * len(self.anchors_mask[i]), 1, 1).view(y.shape).type(FloatTensor)

        # ----------------------------------------------------------#
        #   按照网格格式生成先验框的宽高
        #   batch_size,3,20,20
        # ----------------------------------------------------------#
        anchor_w = FloatTensor(scaled_anchors).index_select(1, LongTensor([0]))
        anchor_h = FloatTensor(scaled_anchors).index_select(1, LongTensor([1]))
        anchor_w = anchor_w.repeat(batch_size, 1).repeat(1, 1, input_height * input_width).view(w.shape)
        anchor_h = anchor_h.repeat(batch_size, 1).repeat(1, 1, input_height * input_width).view(h.shape)

        # ----------------------------------------------------------#
        #   利用预测结果对先验框进行调整
        #   首先调整先验框的中心,从先验框中心向右下角偏移
        #   再调整先验框的宽高。
        # ----------------------------------------------------------#
        pred_boxes = FloatTensor(prediction[..., :4].shape)
        pred_boxes[..., 0] = x.data * 2. - 0.5 + grid_x
        pred_boxes[..., 1] = y.data * 2. - 0.5 + grid_y
        pred_boxes[..., 2] = (w.data * 2) ** 2 * anchor_w
        pred_boxes[..., 3] = (h.data * 2) ** 2 * anchor_h

        # ----------------------------------------------------------#
        #   将输出结果归一化成小数的形式
        # ----------------------------------------------------------#
        _scale = torch.Tensor([input_width, input_height, input_width, input_height]).type(FloatTensor)
        output = torch.cat((pred_boxes.view(batch_size, -1, 4) / _scale,
                            conf.view(batch_size, -1, 1), pred_cls.view(batch_size, -1, self.num_classes)), -1)
        outputs.append(output.data)
    return outputs


 2156
2156

 被折叠的 条评论
为什么被折叠?
被折叠的 条评论
为什么被折叠?
 到【灌水乐园】发言


