


MLM之InternVL:InternVL(GPT-4V的开创性开源替代品/通过开源套件缩小与商业多模态模型的差距)的简介、安装和使用方法、案例应用之详细攻略
目录
Vision-Language Foundation Model
使用InternVL-C(对比)和InternVL-G(生成)(点击展开)
InternVL的简介
InternVL将ViT扩展到6B参数,并将其与LLM对齐。InternVL是一个开源的多模态视觉语言模型系列,它可以解决视觉与语言交叉领域的各种任务。InternVL的主要特点和贡献包括:
>> 规模化:InternVL-Chat-V1。5模型参数达到34B,超过过去开源模型。核心视觉模型InternViT的参数6B,较ViT-22B明显扩大。
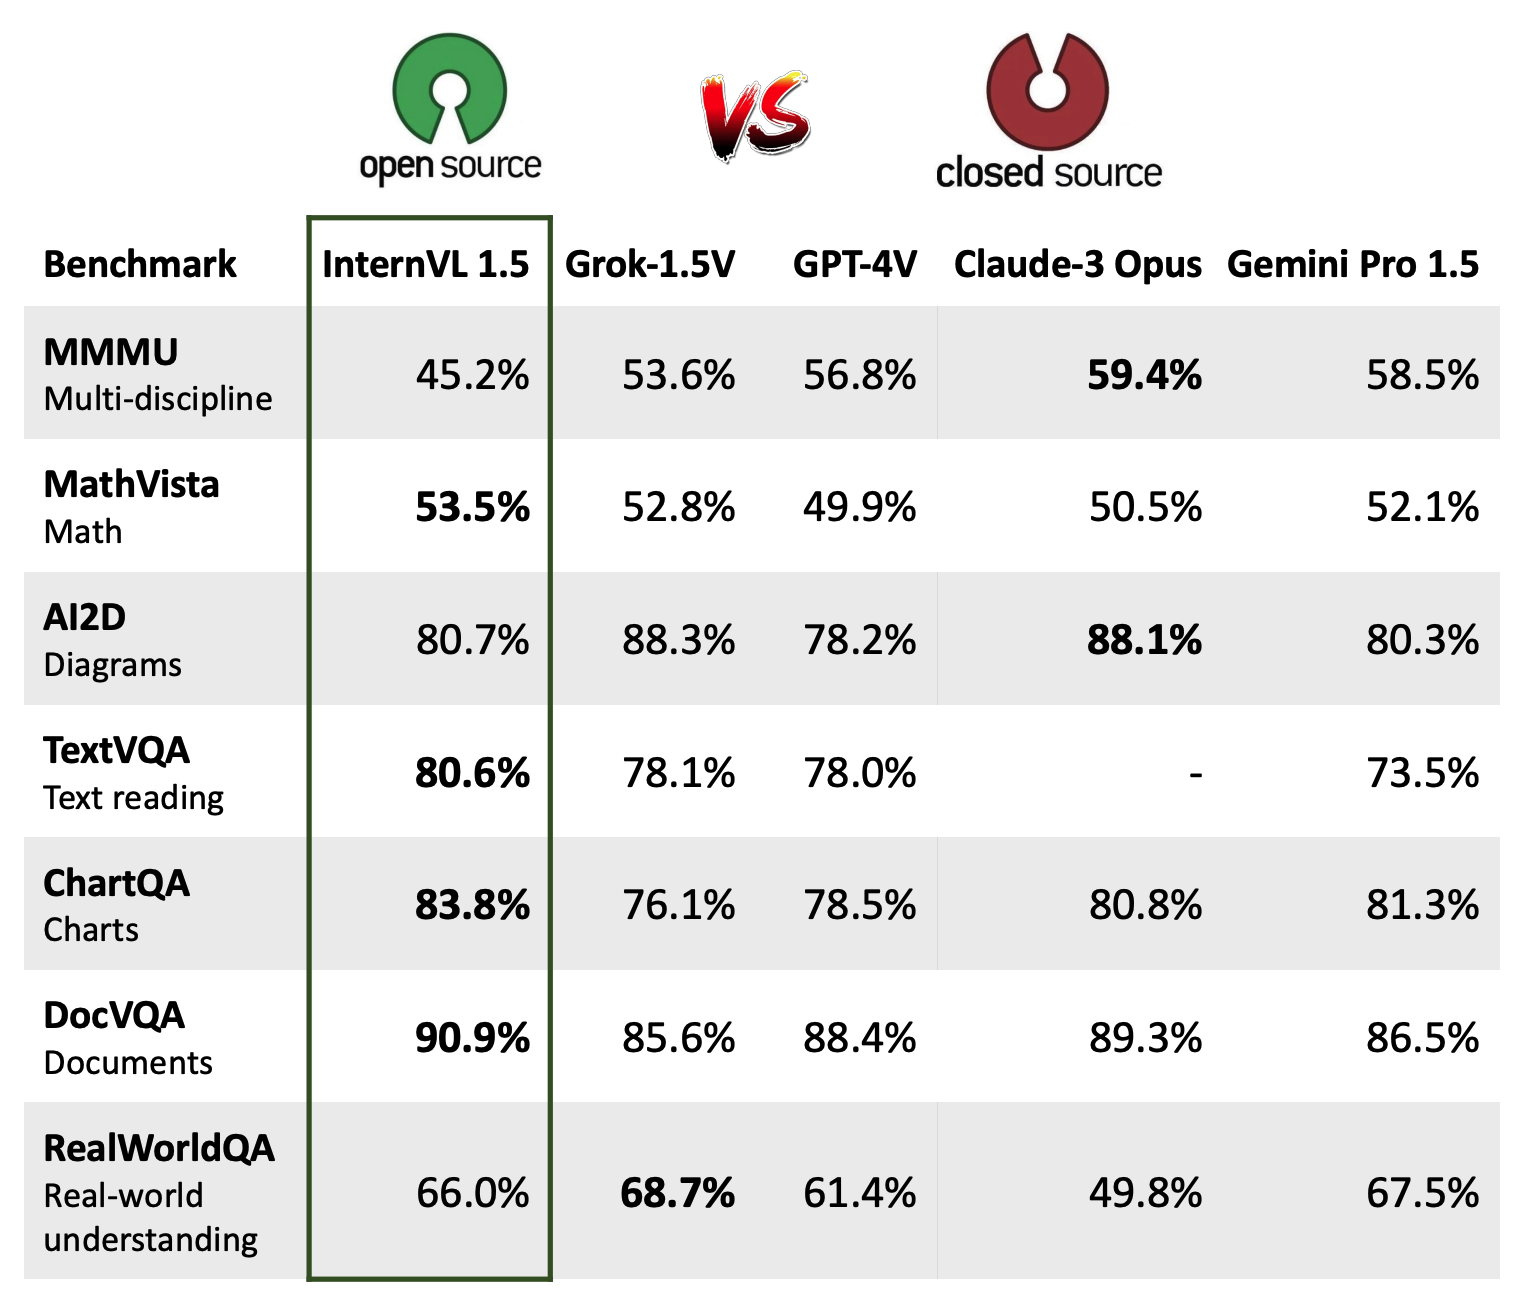
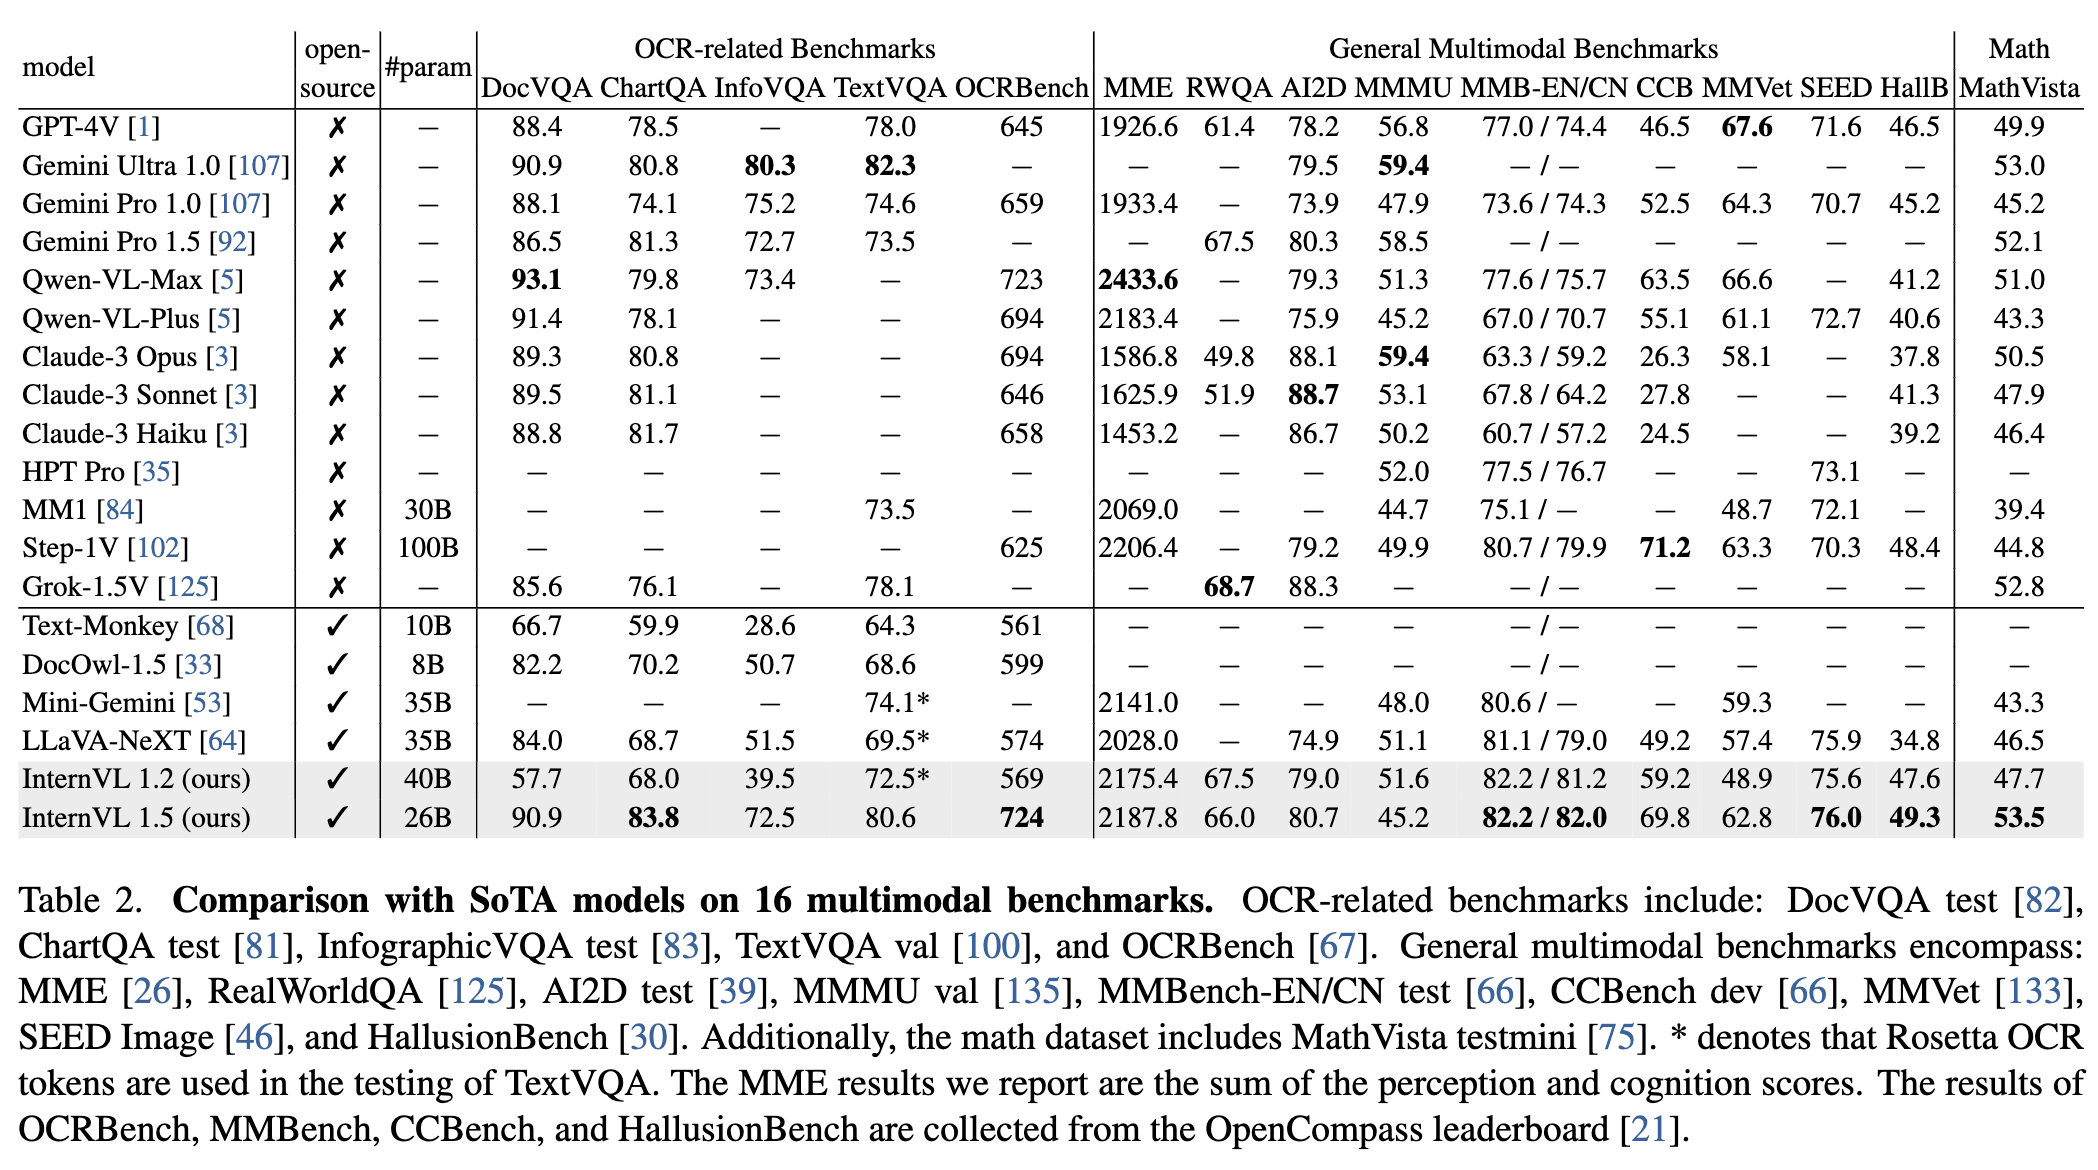
>> 性能强劲:InternVL在很多视觉语言评估任务上超过SOTA,如MMMU、DocVQA等成绩接近商业模型GPT-4V。语义分割mIoU也高GPT-4V几个点。
>> 多语言支持:InternVL不仅支持英语,还支持中文等其他语言,在多语言零画识别、翻译等任务上表现出色。
>> 可拓展性强:InternVL提供分级模型,2B参数mini版本的InternVL-Chat也具备很强功能。还提供8位整型版本进行高效推理。
>> 开放性:InternVL采用MIT许可,所有模型、代码和数据都开源在GitHub上,方便开发者参考和应用。
>> 全面性:InternVL不仅支援图像与文本对话任务,还可以解决图像分类、语义分割、视频分类、图像与文本匹配等任务。目标检测和实例分割也在持续研发中。
总之,InternVL是迄今最强大、全面和开放的视觉语言模型系列之一。它在规模、性能和可拓展性等方面超越以往开源工作,近似商业水平,为视觉语言领域的研究和应用奠定坚实基础。
1、更新日志
2024/05/13:�� InternVL现在可以作为扩散模型的文本编码器,原生支持全球110多种语言的多语言生成。详见MuLan。
2024/04/28:我们发布了InternVL-Chat-V1-5的INT8版本,请见HF链接。
2024/04/28:我们在信息图表VQA基准测试上达到了SOTA性能(75.74),请见此处。
2024/04/18:InternVL-Chat-V1.5已在HF链接上发布,接近于在各种基准测试如MMMU、DocVQA、ChartQA、MathVista等上的GPT-4V和Gemini Pro的性能。
2024/02/27:InternVL被CVPR 2024接受!��
2024/02/24:InternVL-Chat模型已包含在VLMEvalKit中。
2024/02/21:InternVL-Chat-V1.2-Plus在MathVista(59.9)、MMBench(83.8)和MMVP(58.7)上取得了SOTA性能。详情请见我们的博客。
2024/02/12:InternVL-Chat-V1.2已发布。在MMMU val上达到51.6,在MMBench测试上达到82.3。更多详情,请参阅我们的博客、SFT数据或尝试我们的演示。该模型现已在HuggingFace上提供,并且训练/评估数据和脚本均为开源。
2024/02/04:InternVL-Chat-V1.1在MMVP上达到了44.67%,高于GPT-4V!
2024/01/27:我们发布了448分辨率模型,在MMBench dev上达到了76.6,请见此处。
2024/01/24:InternVL-Chat-V1.1发布,支持中文并具有更强大的OCR功能,请见此处或尝试我们的演示。
2024/01/16:我们发布了定制的mmcv/mmsegmentation/mmdetection代码,集成了DeepSpeed,可用于训练大规模目标检测和语义分割模型。
2、文档
| 如何安装环境? [链接] 如何复现InternVL-Chat-V1.2的SFT阶段? [链接] 如何在自定义数据集上微调InternVL-Chat-V1.2? [链接] 如何评估InternVL-Chat-V1-5? [链接] 如何使用VLMEvalKit评估InternVL-Chat-V1-5?(推荐)[链接] 如何部署本地演示? [链接] 如何在Nvidia V100 GPU上运行InternVL 1.5-8位? [链接] [中文教程] 如何执行批量推断? [链接] LMDeploy进行推断加速 [链接] [中文教程] |
|
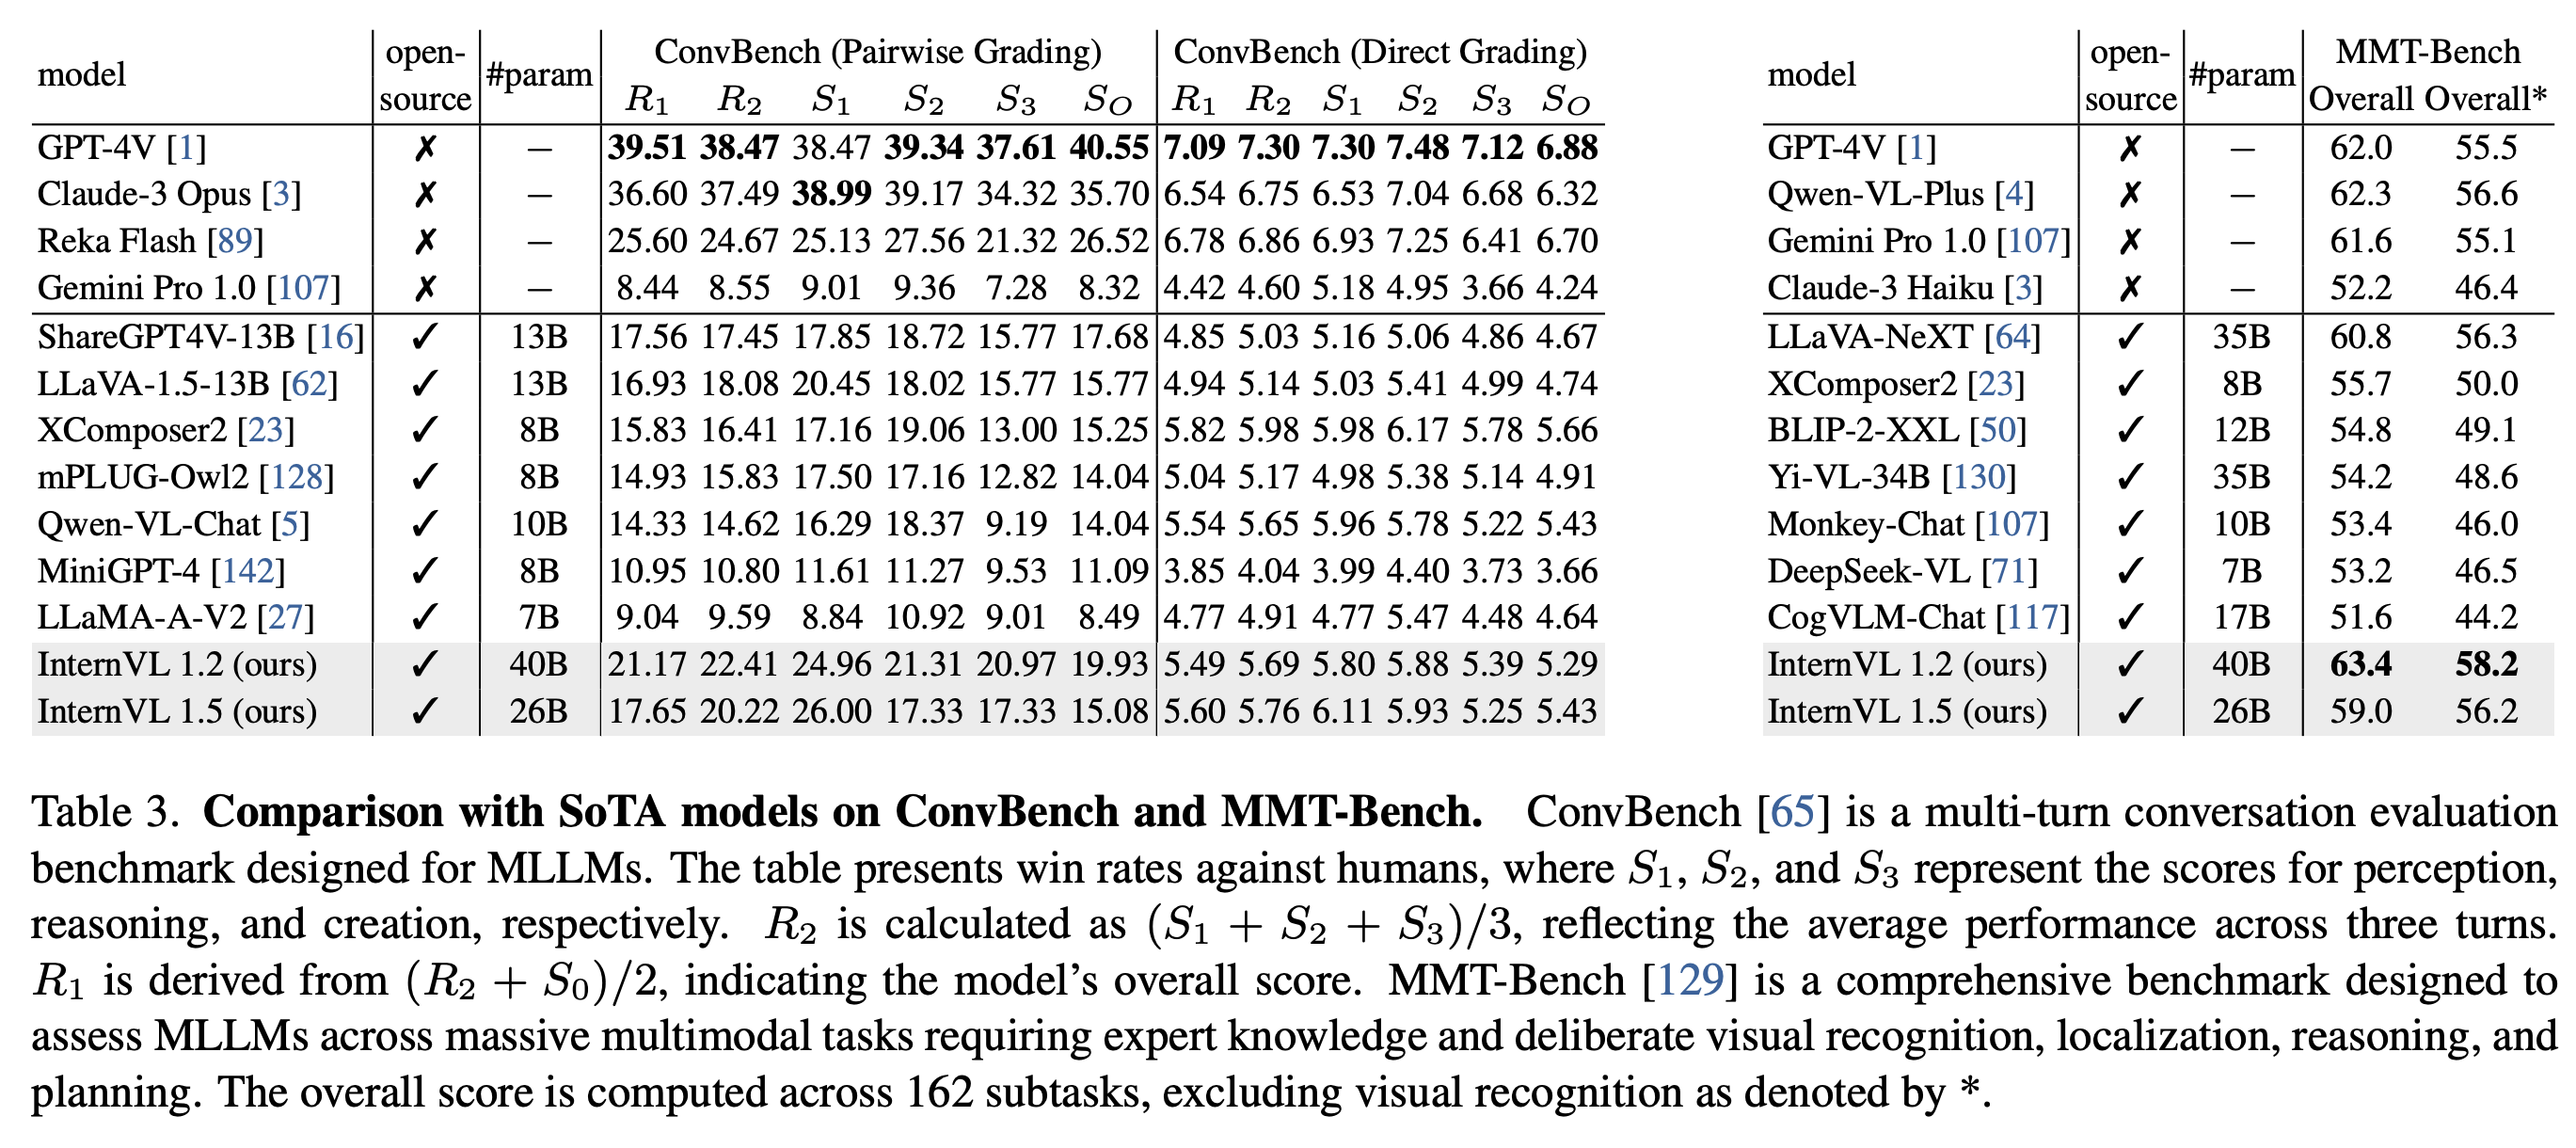
3、与SOTA VLLMs比较
4、InternVL能做什么?
视觉感知(点击展开)
-
Linear-Probe Image Classification [see details]
ViT-22B uses the private JFT-3B dataset.
method #param IN-1K IN-ReaL IN-V2 IN-A IN-R IN-Sketch OpenCLIP-G 1.8B 86.2 89.4 77.2 63.8 87.8 66.4 DINOv2-g 1.1B 86.5 89.6 78.4 75.9 78.8 62.5 EVA-01-CLIP-g 1.1B 86.5 89.3 77.4 70.5 87.7 63.1 MAWS-ViT-6.5B 6.5B 87.8 - - - - - ViT-22B* 21.7B 89.5 90.9 83.2 83.8 87.4 − InternViT-6B (ours) 5.9B 88.2 90.4 79.9 77.5 89.8 69.1 -
Semantic Segmentation [see details]
method decoder #param (train/total) crop size mIoU OpenCLIP-G (frozen) Linear 0.3M / 1.8B 512 39.3 ViT-22B (frozen) Linear 0.9M / 21.7B 504 34.6 InternViT-6B (frozen) Linear 0.5M / 5.9B 504 47.2 (+12.6) ViT-22B (frozen) UperNet 0.8B / 22.5B 504 52.7 InternViT-6B (frozen) UperNet 0.4B / 6.3B 504 54.9 (+2.2) ViT-22B UperNet 22.5B / 22.5B 504 55.3 InternViT-6B UperNet 6.3B / 6.3B 504 58.9 (+3.6) -
Zero-Shot Image Classification [see details]
method IN-1K IN-A IN-R IN-V2 IN-Sketch ObjectNet OpenCLIP-G 80.1 69.3 92.1 73.6 68.9 73.0 EVA-02-CLIP-E+ 82.0 82.1 94.5 75.7 71.6 79.6 ViT-22B* 85.9 90.1 96.0 80.9 − 87.6 InternVL-C (ours) 83.2 83.8 95.5 77.3 73.9 80.6 -
Multilingual Zero-Shot Image Classification [see details]
EN: English, ZH: Chinese, JP: Japanese, Ar: Arabic, IT: Italian
method IN-1K (EN) IN-1K (ZH) IN-1K (JP) IN-1K (AR) IN-1K (IT) Taiyi-CLIP-ViT-H - 54.4 - - - WuKong-ViT-L-G - 57.5 - - - CN-CLIP-ViT-H - 59.6 - - - AltCLIP-ViT-L 74.5 59.6 - - - EVA-02-CLIP-E+ 82.0 - - - 41.2 OpenCLIP-XLM-R-H 77.0 55.7 53.1 37.0 56.8 InternVL-C (ours) 83.2 64.5 61.5 44.9 65.7 -
Zero-Shot Video Classification [see details]
method #frame K400 K600 K700 OpenCLIP-G 1 65.9 66.1 59.2 EVA-02-CLIP-E+ 1 69.8 69.3 63.4 InternVL-C (ours) 1 71.0 71.3 65.7 ViCLIP 8 75.7 73.5 66.4 InternVL-C (ours) 8 79.4 78.8 71.5
跨模态检索(点击展开)
-
English Zero-Shot Image-Text Retrieval [see details]
model Flickr30K COCO avg image-to-text text-to-image image-to-text text-to-image R@1 R@5 R@10 R@1 R@5 R@10 R@1 R@5 R@10 R@1 R@5 R@10 OpenCLIP-G 92.9 99.3 99.8 79.5 95.0 97.1 67.3 86.9 92.6 51.4 74.9 83.0 85.0 EVA-02-CLIP-E+ 93.9 99.4 99.8 78.8 94.2 96.8 68.8 87.8 92.8 51.1 75.0 82.7 85.1 EVA-CLIP-8B 95.6 99.6 99.9 80.8 95.5 97.6 70.3 89.3 93.9 53.0 76.0 83.4 86.2 InternVL-C (ours) 94.7 99.6 99.9 81.7 96.0 98.2 70.6 89.0 93.5 54.1 77.3 84.6 86.6 InternVL-G (ours) 95.7 99.7 99.9 85.0 97.0 98.6 74.9 91.3 95.2 58.6 81.3 88.0 88.8 -
Chinese Zero-Shot Image-Text Retrieval [see details]
model Flickr30K-CN COCO-CN avg image-to-text text-to-image image-to-text text-to-image R@1 R@5 R@10 R@1 R@5 R@10 R@1 R@5 R@10 R@1 R@5 R@10 CN-CLIP-ViT-H 81.6 97.5 98.8 71.2 91.4 95.5 63.0 86.6 92.9 69.2 89.9 96.1 86.1 OpenCLIP-XLM-R-H 86.1 97.5 99.2 71.0 90.5 94.9 70.0 91.5 97.0 66.1 90.8 96.0 87.6 InternVL-C (ours) 90.3 98.8 99.7 75.1 92.9 96.4 68.8 92.0 96.7 68.9 91.9 96.5 89.0 InternVL-G (ours) 92.9 99.4 99.8 77.7 94.8 97.3 71.4 93.9 97.7 73.8 94.4 98.1 90.9 -
Multilingual Zero-Shot Image-Text Retrieval on XTD [see details]
method EN ES FR ZH IT KO RU JP average AltCLIP 95.4 94.1 92.9 95.1 94.2 94.4 91.8 91.7 93.7 OpenCLIP-XLM-R-H 97.3 96.1 94.5 94.7 96.0 90.2 93.9 94.0 94.6 InternVL-C (ours) 97.3 95.7 95.1 95.6 96.0 92.2 93.3 95.5 95.1 InternVL-G (ours) 98.6 97.7 96.5 96.7 96.9 95.1 94.8 96.1 96.6
多模态对话(参见“与SOTA VLLMs比较”)
5、Model Zoo
Vision Large Language Model
| Model | Date | Download | Note |
|---|---|---|---|
| Mini-InternVL−Chat−2B-V1.5 (Preview version) | 2024.05.19 | 🤗 HF link | 🚀🚀 Only 2B parameters, anyone can deploy it locally. |
| InternVL−Chat−V1.5-Int8 | 2024.04.28 | 🤗 HF link | The INT8 version of InternVL-Chat-V1-5 |
| InternVL−Chat−V1.5 | 2024.04.18 | 🤗 HF link | support 4K image; super strong OCR; Approaching the performance of GPT-4V and Gemini Pro on various benchmarks like MMMU, DocVQA, ChartQA, MathVista, etc. (🔥new) |
| InternVL−Chat−V1.2−Plus | 2024.02.21 | 🤗 HF link | more SFT data and stronger |
| InternVL−Chat−V1.2 | 2024.02.11 | 🤗 HF link | scaling up LLM to 34B |
| InternVL−Chat−V1.1 | 2024.01.24 | 🤗 HF link | support Chinese and stronger OCR |
| InternVL−Chat−19B−448px | 2024.02.03 | 🤗 HF link | 448 resolution |
| InternVL−Chat−19B | 2023.12.25 | 🤗 HF link | English multimodal dialogue |
| InternVL−Chat−13B | 2023.12.25 | 🤗 HF link | English multimodal dialogue |
Vision-Language Foundation Model
| Model | Date | Download | Note |
|---|---|---|---|
| InternViT−6B−448px−V1.5 | 2024.04.20 | 🤗 HF link | support dynamic resolution, super strong OCR (🔥new) |
| InternViT−6B−448px−V1.2 | 2024.02.11 | 🤗 HF link | 448 resolution |
| InternViT−6B−448px−V1.0 | 2024.01.30 | 🤗 HF link | 448 resolution |
| InternViT−6B−224px | 2023.12.22 | 🤗 HF link | vision foundation model |
| InternVL−14B−224px | 2023.12.22 | 🤗 HF link | vision-language foundation model, InternViT-6B + QLLaMA, can be used for image-text retrival like CLIP |
InternVL的安装和使用方法
1、安装
T1、CLI使用
使用Huggingface的快速入门
使用InternViT-6B(点击展开)
import torch
from PIL import Image
from transformers import AutoModel, CLIPImageProcessor

model = AutoModel.from_pretrained(
    'OpenGVLab/InternViT-6B-224px',
    torch_dtype=torch.bfloat16,
    low_cpu_mem_usage=True,
    trust_remote_code=True).cuda().eval()

image = Image.open('./examples/image1.jpg').convert('RGB')

image_processor = CLIPImageProcessor.from_pretrained('OpenGVLab/InternViT-6B-224px')

pixel_values = image_processor(images=image, return_tensors='pt').pixel_values
pixel_values = pixel_values.to(torch.bfloat16).cuda()

outputs = model(pixel_values)
使用InternVL-C(对比)和InternVL-G(生成)(点击展开)
import torch
from PIL import Image
from transformers import AutoModel, CLIPImageProcessor
from transformers import AutoTokenizer


model = AutoModel.from_pretrained(
    'OpenGVLab/InternVL-14B-224px',
    torch_dtype=torch.bfloat16,
    low_cpu_mem_usage=True,
    trust_remote_code=True).cuda().eval()

image_processor = CLIPImageProcessor.from_pretrained('OpenGVLab/InternVL-14B-224px')

tokenizer = AutoTokenizer.from_pretrained(
    'OpenGVLab/InternVL-14B-224px', use_fast=False, add_eos_token=True)
tokenizer.pad_token_id = 0  # set pad_token_id to 0

images = [
    Image.open('./examples/image1.jpg').convert('RGB'),
    Image.open('./examples/image2.jpg').convert('RGB'),
    Image.open('./examples/image3.jpg').convert('RGB')
]
prefix = 'summarize:'
texts = [
    prefix + 'a photo of a red panda',  # English
    prefix + '一张熊猫的照片',  # Chinese
    prefix + '二匹の猫の写真'  # Japanese
]

pixel_values = image_processor(images=images, return_tensors='pt').pixel_values
pixel_values = pixel_values.to(torch.bfloat16).cuda()
input_ids = tokenizer(texts, return_tensors='pt', max_length=80,
                      truncation=True, padding='max_length').input_ids.cuda()

# InternVL-C
logits_per_image, logits_per_text = model(
    image=pixel_values, text=input_ids, mode='InternVL-C')
probs = logits_per_image.softmax(dim=-1)
# tensor([[9.9609e-01, 5.2185e-03, 6.0070e-08],
#         [2.2949e-02, 9.7656e-01, 5.9903e-06],
#         [3.2932e-06, 7.4863e-05, 1.0000e+00]], device='cuda:0',
#        dtype=torch.bfloat16, grad_fn=<SoftmaxBackward0>)

# InternVL-G
logits_per_image, logits_per_text = model(
    image=pixel_values, text=input_ids, mode='InternVL-G')
probs = logits_per_image.softmax(dim=-1)
# tensor([[9.9609e-01, 3.1738e-03, 3.6322e-08],
#         [8.6060e-03, 9.9219e-01, 2.8759e-06],
#         [1.7583e-06, 3.1233e-05, 1.0000e+00]], device='cuda:0',
#        dtype=torch.bfloat16, grad_fn=<SoftmaxBackward0>)

# please set add_eos_token to False for generation
tokenizer.add_eos_token = False
image = Image.open('./examples/image1.jpg').convert('RGB')
pixel_values = image_processor(images=image, return_tensors='pt').pixel_values
pixel_values = pixel_values.to(torch.bfloat16).cuda()

tokenized = tokenizer("English caption:", return_tensors='pt')
pred = model.generate(
    pixel_values=pixel_values,
    input_ids=tokenized.input_ids.cuda(),
    attention_mask=tokenized.attention_mask.cuda(),
    num_beams=5,
    min_new_tokens=8,
)
caption = tokenizer.decode(pred[0].cpu(), skip_special_tokens=True).strip()
# English caption: a red panda sitting on top of a wooden platform
使用InternVL-Chat(点击展开)
from transformers import AutoTokenizer, AutoModel
import torch
import torchvision.transforms as T
from PIL import Image

from torchvision.transforms.functional import InterpolationMode


IMAGENET_MEAN = (0.485, 0.456, 0.406)
IMAGENET_STD = (0.229, 0.224, 0.225)


def build_transform(input_size):
    MEAN, STD = IMAGENET_MEAN, IMAGENET_STD
    transform = T.Compose([
        T.Lambda(lambda img: img.convert('RGB') if img.mode != 'RGB' else img),
        T.Resize((input_size, input_size), interpolation=InterpolationMode.BICUBIC),
        T.ToTensor(),
        T.Normalize(mean=MEAN, std=STD)
    ])
    return transform


def find_closest_aspect_ratio(aspect_ratio, target_ratios, width, height, image_size):
    best_ratio_diff = float('inf')
    best_ratio = (1, 1)
    area = width * height
    for ratio in target_ratios:
        target_aspect_ratio = ratio[0] / ratio[1]
        ratio_diff = abs(aspect_ratio - target_aspect_ratio)
        if ratio_diff < best_ratio_diff:
            best_ratio_diff = ratio_diff
            best_ratio = ratio
        elif ratio_diff == best_ratio_diff:
            if area > 0.5 * image_size * image_size * ratio[0] * ratio[1]:
                best_ratio = ratio
    return best_ratio


def dynamic_preprocess(image, min_num=1, max_num=6, image_size=448, use_thumbnail=False):
    orig_width, orig_height = image.size
    aspect_ratio = orig_width / orig_height

    # calculate the existing image aspect ratio
    target_ratios = set(
        (i, j) for n in range(min_num, max_num + 1) for i in range(1, n + 1) for j in range(1, n + 1) if
        i * j <= max_num and i * j >= min_num)
    target_ratios = sorted(target_ratios, key=lambda x: x[0] * x[1])

    # find the closest aspect ratio to the target
    target_aspect_ratio = find_closest_aspect_ratio(
        aspect_ratio, target_ratios, orig_width, orig_height, image_size)

    # calculate the target width and height
    target_width = image_size * target_aspect_ratio[0]
    target_height = image_size * target_aspect_ratio[1]
    blocks = target_aspect_ratio[0] * target_aspect_ratio[1]

    # resize the image
    resized_img = image.resize((target_width, target_height))
    processed_images = []
    for i in range(blocks):
        box = (
            (i % (target_width // image_size)) * image_size,
            (i // (target_width // image_size)) * image_size,
            ((i % (target_width // image_size)) + 1) * image_size,
            ((i // (target_width // image_size)) + 1) * image_size
        )
        # split the image
        split_img = resized_img.crop(box)
        processed_images.append(split_img)
    assert len(processed_images) == blocks
    if use_thumbnail and len(processed_images) != 1:
        thumbnail_img = image.resize((image_size, image_size))
        processed_images.append(thumbnail_img)
    return processed_images


def load_image(image_file, input_size=448, max_num=6):
    image = Image.open(image_file).convert('RGB')
    transform = build_transform(input_size=input_size)
    images = dynamic_preprocess(image, image_size=input_size, use_thumbnail=True, max_num=max_num)
    pixel_values = [transform(image) for image in images]
    pixel_values = torch.stack(pixel_values)
    return pixel_values


path = "OpenGVLab/InternVL-Chat-V1-5"
# If you have an 80G A100 GPU, you can put the entire model on a single GPU.
model = AutoModel.from_pretrained(
    path,
    torch_dtype=torch.bfloat16,
    low_cpu_mem_usage=True,
    trust_remote_code=True).eval().cuda()
# Otherwise, you need to set device_map='auto' to use multiple GPUs for inference.
# model = AutoModel.from_pretrained(
#     path,
#     torch_dtype=torch.bfloat16,
#     low_cpu_mem_usage=True,
#     trust_remote_code=True,
#     device_map='auto').eval()

tokenizer = AutoTokenizer.from_pretrained(path, trust_remote_code=True)
# set the max number of tiles in `max_num`
pixel_values = load_image('./examples/image1.jpg', max_num=6).to(torch.bfloat16).cuda()

generation_config = dict(
    num_beams=1,
    max_new_tokens=512,
    do_sample=False,
)

# single-round single-image conversation
question = "请详细描述图片" # Please describe the picture in detail
response = model.chat(tokenizer, pixel_values, question, generation_config)
print(question, response)

# multi-round single-image conversation
question = "请详细描述图片" # Please describe the picture in detail
response, history = model.chat(tokenizer, pixel_values, question, generation_config, history=None, return_history=True)
print(question, response)

question = "请根据图片写一首诗" # Please write a poem according to the picture
response, history = model.chat(tokenizer, pixel_values, question, generation_config, history=history, return_history=True)
print(question, response)

# multi-round multi-image conversation
pixel_values1 = load_image('./examples/image1.jpg', max_num=6).to(torch.bfloat16).cuda()
pixel_values2 = load_image('./examples/image2.jpg', max_num=6).to(torch.bfloat16).cuda()
pixel_values = torch.cat((pixel_values1, pixel_values2), dim=0)

question = "详细描述这两张图片" # Describe the two pictures in detail
response, history = model.chat(tokenizer, pixel_values, question, generation_config, history=None, return_history=True)
print(question, response)

question = "这两张图片的相同点和区别分别是什么" # What are the similarities and differences between these two pictures
response, history = model.chat(tokenizer, pixel_values, question, generation_config, history=history, return_history=True)
print(question, response)

# batch inference (single image per sample)
pixel_values1 = load_image('./examples/image1.jpg', max_num=6).to(torch.bfloat16).cuda()
pixel_values2 = load_image('./examples/image2.jpg', max_num=6).to(torch.bfloat16).cuda()
image_counts = [pixel_values1.size(0), pixel_values2.size(0)]
pixel_values = torch.cat((pixel_values1, pixel_values2), dim=0)

questions = ["Describe the image in detail."] * len(image_counts)
responses = model.batch_chat(tokenizer, pixel_values,
                             image_counts=image_counts,
                             questions=questions,
                             generation_config=generation_config)
for question, response in zip(questions, responses):
    print(question)
    print(response)
通过LMDeploy进行推断加速
如果需要优化InternVL-Chat模型推断,我们建议使用LMDeploy。
在以下子章节中,我们将以InternVL-Chat-V1-5模型为例介绍LMDeploy的使用。
设置推断环境
首先,请按照以下步骤设置推断环境:
LMDeploy pypi包默认依赖CUDA 12.x。对于CUDA 11.x环境,请参阅安装指南。
conda create -n internvl python=3.10 -y
conda activate internvl

pip install timm torchvision==0.17.2
pip install lmdeploy
离线推断管道
from lmdeploy import pipeline
from lmdeploy.vl import load_image

pipe = pipeline('OpenGVLab/InternVL-Chat-V1-5')
image = load_image('examples/image2.jpg')
response = pipe(('描述这张图片', image))
print(response)
有关使用VLM管道的更多信息,包括多图像推断或多轮对话,请查阅此指南。
在线推断服务
LMDeploy支持一键将VLM模型打包成OpenAI服务,与OpenAI API实现无缝集成。
服务可以通过以下命令一键启动:
lmdeploy serve api_server OpenGVLab/InternVL-Chat-V1-5可以通过命令lmdeploy serve api_server -h查看api_server的参数,例如,--tp用于设置张量并行度,--session-len用于指定上下文窗口的最大长度,--cache-max-entry-count用于调整GPU内存比例以供k/v缓存等。
有关更多详情,包括使用docker启动服务、RESTful API信息和OpenAI集成方法,请参阅此指南。
2、使用方法
(1)、在线使用
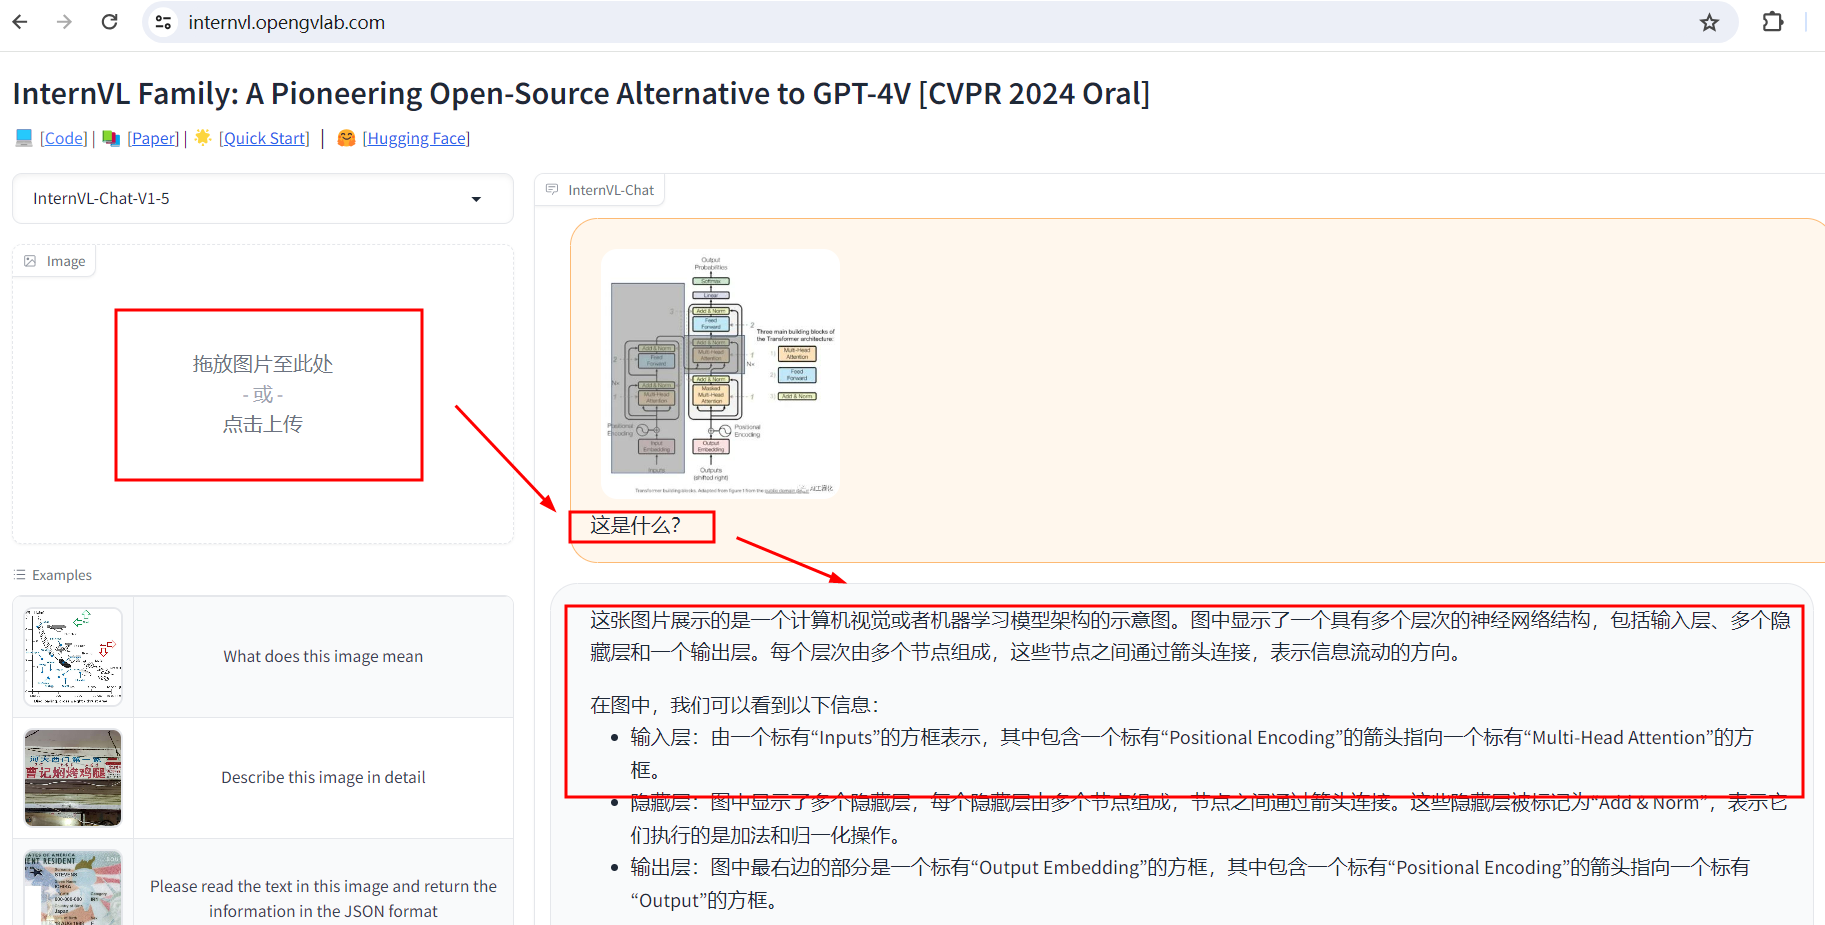
InternVL的案例应用
持续更新中……


 被折叠的 条评论
为什么被折叠?
被折叠的 条评论
为什么被折叠?
 到【灌水乐园】发言


