


CV之FR:基于Keras框架利用训练好的hdf5模型直接进行人脸识别推理(cv2自带两步检测法)实现对《跑男第六季第五期》之如花视频片段(或调用摄像头)进行实时性别、脸部表情识别
目录
基于Keras框架利用训练好的hdf5模型直接进行人脸识别推理(cv2自带两步检测法)实现对《跑男第六季第五期》之如花视频片段(或调用摄像头)进行实时性别、脸部表情识别
基于Keras框架利用训练好的hdf5模型直接进行人脸识别推理(cv2自带两步检测法)实现对《跑男第六季第五期》之如花视频片段(或调用摄像头)进行实时性别、脸部表情识别
输出结果
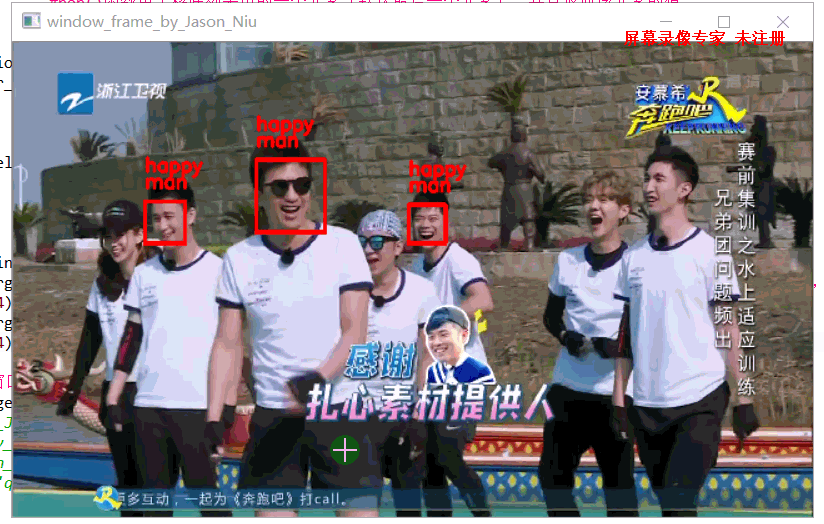
设计思路

核心代码
from statistics import mode

import cv2
from keras.models import load_model
import numpy as np


detection_model_path = '../trained_models/detection_models/haarcascade_frontalface_default.xml'

emotion_model_path = '../trained_models/emotion_models/fer2013_mini_XCEPTION.102-0.66.hdf5'
gender_model_path = '../trained_models/gender_models/simple_CNN.81-0.96.hdf5'
emotion_labels = get_labels('fer2013')
gender_labels = get_labels('imdb')
font = cv2.FONT_HERSHEY_SIMPLEX

frame_window = 10
gender_offsets = (30, 60)
emotion_offsets = (20, 40)

face_detection = load_detection_model(detection_model_path)
emotion_classifier = load_model(emotion_model_path, compile=False)
gender_classifier = load_model(gender_model_path, compile=False)

emotion_target_size = emotion_classifier.input_shape[1:3]
gender_target_size = gender_classifier.input_shape[1:3]

gender_window = []
emotion_window = []

cv2.namedWindow('window_frame_by_Jason_Niu')
# video_capture = cv2.VideoCapture(0)
video_capture = cv2.VideoCapture("F:\File_Python\Python_example\YOLOv3_use_TF\RunMan5.mp4")
while True:

    bgr_image = video_capture.read()[1]
    gray_image = cv2.cvtColor(bgr_image, cv2.COLOR_BGR2GRAY) #分别将读取的图像进行灰化、RGB化处理
    rgb_image = cv2.cvtColor(bgr_image, cv2.COLOR_BGR2RGB)
    faces = detect_faces(face_detection, gray_image)
    for face_coordinates in faces:

        x1, x2, y1, y2 = apply_offsets(face_coordinates, gender_offsets)
        rgb_face = rgb_image[y1:y2, x1:x2]

        x1, x2, y1, y2 = apply_offsets(face_coordinates, emotion_offsets)
        gray_face = gray_image[y1:y2, x1:x2]
        try:
            rgb_face = cv2.resize(rgb_face, (gender_target_size))
            gray_face = cv2.resize(gray_face, (emotion_target_size))
        except:
            continue
        gray_face = preprocess_input(gray_face, False)
        gray_face = np.expand_dims(gray_face, 0)
        gray_face = np.expand_dims(gray_face, -1)

        emotion_label_arg = np.argmax(emotion_classifier.predict(gray_face))
        emotion_text = emotion_labels[emotion_label_arg]
        emotion_window.append(emotion_text)

        rgb_face = np.expand_dims(rgb_face, 0)
        rgb_face = preprocess_input(rgb_face, False)
        gender_prediction = gender_classifier.predict(rgb_face)
        gender_label_arg = np.argmax(gender_prediction)
        gender_text = gender_labels[gender_label_arg]
        gender_window.append(gender_text)

        if len(gender_window) > frame_window:
            emotion_window.pop(0)
            gender_window.pop(0)
        try:
            emotion_mode = mode(emotion_window)
            gender_mode = mode(gender_window)
        except:
            continue

        if gender_text == gender_labels[0]:
            color = (0, 0, 255)
        else:
            color = (255, 0, 0)

        draw_bounding_box(face_coordinates, rgb_image, color)
        draw_text(face_coordinates, rgb_image, gender_mode,
                  color, 0, -20, 1, 4)
        draw_text(face_coordinates, rgb_image, emotion_mode,
                  color, 0, -45, 1, 4)


    bgr_image = cv2.cvtColor(rgb_image, cv2.COLOR_RGB2BGR)
    cv2.namedWindow("window_frame_by_Jason_Niu",0);
    cv2.resizeWindow("window_frame_by_Jason_Niu", 640, 380);
    cv2.imshow('window_frame_by_Jason_Niu', bgr_image)
    if cv2.waitKey(1) & 0xFF == ord('q'):
        break


 1万+
1万+


 被折叠的 条评论
为什么被折叠?
被折叠的 条评论
为什么被折叠?
 到【灌水乐园】发言


