


《------往期经典推荐------》
二、机器学习实战专栏【链接】,已更新31期,欢迎关注,持续更新中~~
三、深度学习【Pytorch】专栏【链接】
四、【Stable Diffusion绘画系列】专栏【链接】
五、YOLOv8改进专栏【链接】,持续更新中~~
六、YOLO性能对比专栏【链接】,持续更新中~
《------正文------》
目录
引言
物体检测是计算机视觉的核心任务,为从自动驾驶汽车到实时视频监控的技术提供动力。它涉及检测和定位图像中的对象,深度学习的最新进展使这项任务更加准确和高效。驱动物体检测的最新创新之一是Vision Transformer(ViT),该模型凭借其比传统方法更好地捕获全局上下文的能力,改变了图像处理的格局。
在这篇博客中,我们将详细探讨对象检测,介绍Vision Transformers的强大功能,然后通过一个动手项目,我们将使用ViTs进行对象检测。为了使其更具吸引力,我们将创建一个交互式界面,允许用户上传图像并查看实时对象检测结果。
学习内容
- 什么是目标检测以及为什么它很重要。
- **Vision Transformers(ViTs)**与传统神经网络的区别
- 使用PyTorch的ViT逐步实现对象检测。
- 使用
ipyWidgets构建一个用于对象检测的交互式工具。

目标检测简介
目标检测是一种计算机视觉技术,用于识别和定位图像或视频中的目标。你可以把它想象成教一台计算机看到和识别像猫、汽车甚至人这样的东西。通过在这些对象周围画框,我们可以知道每个对象在图像中的位置。
为什么物体检测很重要
- 自动驾驶汽车:实时识别行人、交通信号灯和其他车辆。
- 监控:检测和跟踪视频流中的可疑活动。
- 医疗保健:在医学扫描中识别肿瘤和异常。
什么是Vision Transformers?
ViTs最初是由Google的研究人员引入的。Vision Transformers(ViT)是一项尖端技术,它使用最初为自然语言处理而设计的Transformer架构来理解和处理图像。想象一下,将一张图像分解成小块(就像拼图一样),然后使用智能算法来弄清楚这些小块代表什么以及它们如何组合在一起。
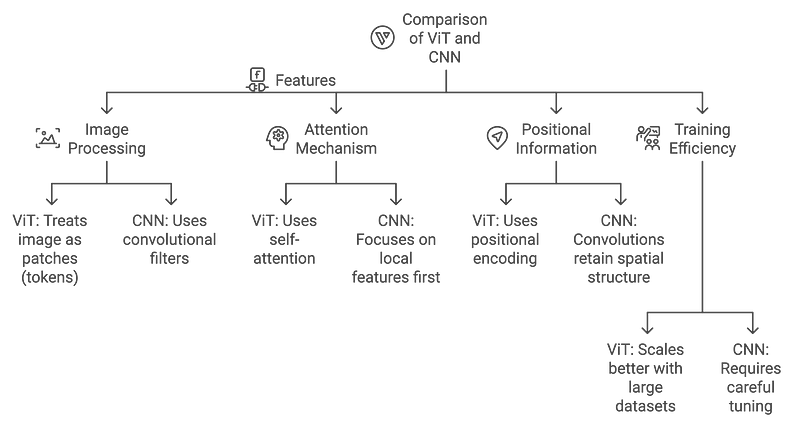
ViTs与CNN的区别
- CNN:通过卷积层有效识别局部模式(边缘,纹理)。
- ViTs:从一开始就捕获全局模式,使其更适合需要理解整个图像上下文的任务。
Transformer体系结构说明
Transformer架构最初是为机器翻译等基于序列的NLP任务设计的,现已适用于ViTs中的视觉数据。以下是它的工作原理:
Transformer架构的关键组件
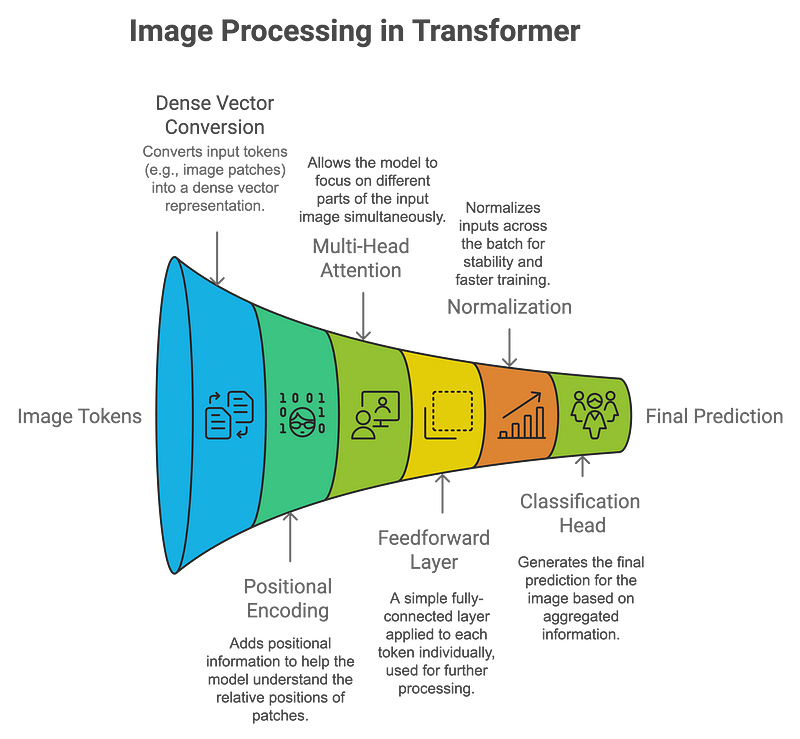
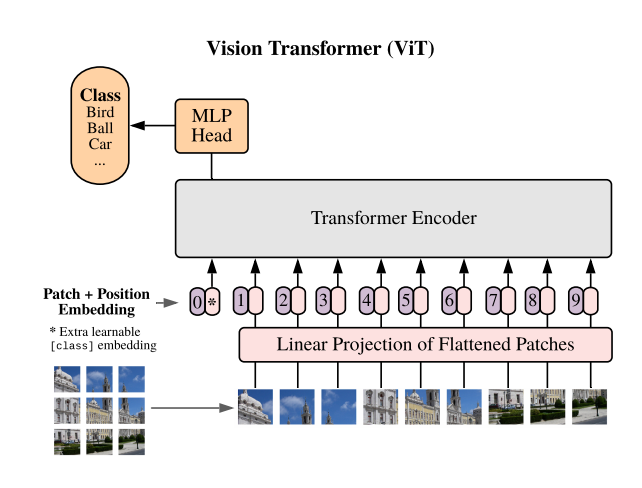
Vision Transformers如何处理图像:
- 补丁嵌入:图像被划分为小补丁(例如16x16像素),每个补丁被线性嵌入到矢量中。这些补丁的处理类似于NLP任务中的单词。
- 位置编码:由于transformers本身并不理解空间信息,因此添加了位置编码以保留每个补丁的相对位置。
- 自我注意力:这种机制允许模型同时关注图像(或补丁)的不同部分。每个补丁都学会权衡它与其他补丁的关系,从而对图像进行全局理解。
- 分类:聚合输出通过分类头,模型预测图像中存在哪些对象。
ViTs相对于CNN的优势:
- 更好地捕捉全局背景:ViT可以对长期依赖关系进行建模,使其更好地理解复杂场景。
- 灵活适应不同的输入大小:与需要固定大小输入的CNN不同,ViT可以适应不同的图像大小。
下面的图表比较了ViTs和CNN中的Transformer架构:
项目实战
我们将使用PyTorch和预训练的Vision Transformer建立一个简单的对象检测项目。确保您安装了必要的库:
pip install torch torchvision matplotlib pillow ipywidgets
这些库的作用:
- PyTorch:加载预训练模型并与之交互。
- torchvision:预处理图像并应用转换。
- matplotlib:可视化图像和结果。
- pillow:图像处理。
- ipywidgets:创建一个交互式UI来上传和处理图像。
使用ViT的逐步目标检测
步骤1:加载并显示图像
我们将从网络加载一个图像并使用matplotlib显示它。
import torch
from torchvision import transforms
from PIL import Image
import matplotlib.pyplot as plt

# 读取图片
img = plt.imread('path_to_your_image.jpg')

# 显示图片
plt.imshow(img)
plt.axis('off')  # 隐藏坐标轴
plt.show()
步骤2:预处理图像
ViT期望图像在被输入模型之前被归一化。
from torchvision import transforms

preprocess = transforms.Compose([
    transforms.Resize((224, 224)),
    transforms.ToTensor(),
    transforms.Normalize(mean=[0.485, 0.456, 0.406], std=[0.229, 0.224, 0.225]),
])

input_tensor = preprocess(image)
input_batch = input_tensor.unsqueeze(0)
步骤3:加载预训练的Vision Transformer模型
现在,我们将从PyTorch的torchvision加载一个预先训练好的Vision Transformer模型。
from torchvision.models import vit_b_16

# Step 3: Load a pre-trained Vision Transformer model
model = vit_b_16(pretrained=True)
model.eval()  # Set the model to evaluation mode (no training happening here)

# Forward pass through the model
with torch.no_grad():  # No gradients are needed, as we are only doing inference
    output = model(input_batch)

# Output: This will be a classification result (e.g., ImageNet classes)
步骤4:预测结果
让我们从ImageNet数据集中获取预测的标签。
# Step 4: Interpret the output
from torchvision import models
# Load ImageNet labels for interpretation
imagenet_labels = requests.get("https://raw.githubusercontent.com/anishathalye/imagenet-simple-labels/master/imagenet-simple-labels.json").json()
# Get the index of the highest score
_, predicted_class = torch.max(output, 1)
# Display the predicted class
predicted_label = imagenet_labels[predicted_class.item()]
print(f"Predicted Label: {predicted_label}")
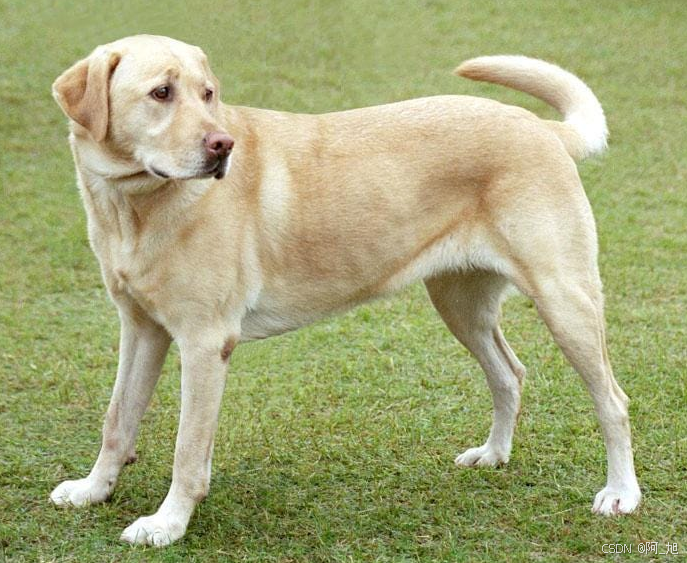
# Visualize the result
plt.imshow(image)
plt.axis('off')
plt.title(f"Predicted: {predicted_label}")
plt.show()
Predicted Label: Labrador Retriever
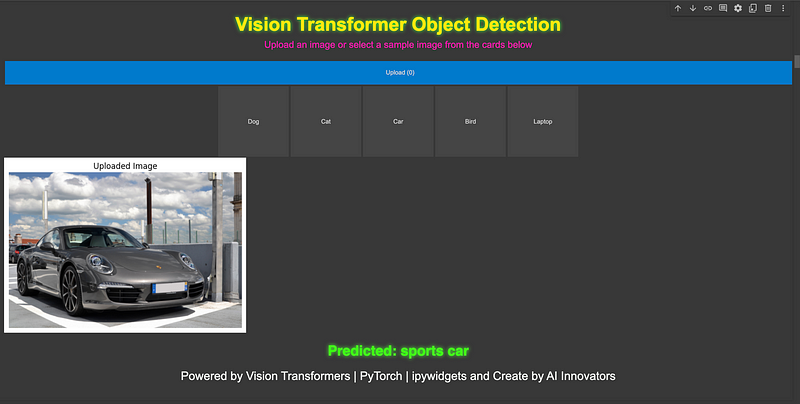
构建交互式界面
我们可以通过创建一个交互式工具,使该项目更加用户友好,用户可以上传图像或选择样本图像进行分类。为了使项目更具交互性,我们将使用ipyWidgets创建一个用户界面,用户可以在其中上传自己的图像或选择样本图像进行对象检测。
import ipywidgets as widgets
from IPython.display import display, HTML, clear_output
from PIL import Image
import torch
import matplotlib.pyplot as plt
from io import BytesIO
import requests
from torchvision import transforms


# Preprocessing for the image
preprocess = transforms.Compose([
    transforms.Resize(256),
    transforms.CenterCrop(224),
    transforms.ToTensor(),
    transforms.Normalize(mean=[0.485, 0.456, 0.406], std=[0.229, 0.224, 0.225]),
])

# Create header with glowing title
header = HTML("""
    <div style='text-align:center; margin-bottom:20px;'>
        <h1 style='font-family: Arial, sans-serif; color: #ffe814; font-size: 40px; text-shadow: 0 0 8px #39FF14;'>
            Vision Transformer Object Detection
        </h1>
        <p style='font-family: Arial, sans-serif; color: #ff14b5; font-size:20px'>Upload an image or select a sample image from the cards below</p>
    </div>
""")

# Footer with signature
footer = HTML("""
    <div style='text-align:center; margin-top:20px;'>
        <p style='font-family: Arial, sans-serif; color: #f3f5f2; font-size:25px'>Powered by Vision Transformers | PyTorch | ipywidgets and Create by AI Innovators</p>
    </div>
""")

# Make upload button bigger and centered
upload_widget = widgets.FileUpload(accept='image/*', multiple=False)
upload_widget.layout = widgets.Layout(width='100%', height='50px')
upload_widget.style.button_color = '#007ACC'
upload_widget.style.button_style = 'success'

# Sample images (as cards)
sample_images = [
    ("Dog", "https://upload.wikimedia.org/wikipedia/commons/2/26/YellowLabradorLooking_new.jpg"),
    ("Cat", "https://upload.wikimedia.org/wikipedia/commons/b/b6/Felis_catus-cat_on_snow.jpg"),
    ("Car", "https://upload.wikimedia.org/wikipedia/commons/f/fc/Porsche_911_Carrera_S_%287522427256%29.jpg"),
    ("Bird", "https://upload.wikimedia.org/wikipedia/commons/3/32/House_sparrow04.jpg"),
    ("Laptop", "https://upload.wikimedia.org/wikipedia/commons/c/c9/MSI_Gaming_Laptop_on_wood_floor.jpg")
]

# Function to display and process image
def process_image(image):
    # Clear any previous outputs and predictions
    clear_output(wait=True)

    # Re-display header, upload button, and sample images after clearing
    display(header)
    display(upload_widget)
    display(sample_buttons_box)

    if image.mode == 'RGBA':
        image = image.convert('RGB')

    # Center and display the uploaded image
    plt.imshow(image)
    plt.axis('off')
    plt.title('Uploaded Image')
    plt.show()

    # Preprocess and make prediction
    input_tensor = preprocess(image)
    input_batch = input_tensor.unsqueeze(0)

    with torch.no_grad():
        output = model(input_batch)

    _, predicted_class = torch.max(output, 1)
    predicted_label = imagenet_labels[predicted_class.item()]

    # Display the prediction with space and style
    display(HTML(f"""
        <div style='text-align:center; margin-top:20px; font-size:30px; font-weight:bold; color:#39FF14; text-shadow: 0 0 8px #39FF14;'>
            Predicted: {predicted_label}
        </div>
    """))

    # Display footer after prediction
    display(footer)

# Function triggered by file upload
def on_image_upload(change):
    uploaded_image = Image.open(BytesIO(upload_widget.value[list(upload_widget.value.keys())[0]]['content']))
    process_image(uploaded_image)

# Function to handle sample image selection
def on_sample_image_select(image_url):
    # Define custom headers with a compliant User-Agent
    headers = {
        'User-Agent': 'MyBot/1.0 (your-email@example.com)'  # Replace with your bot's name and contact email
    }

    response = requests.get(image_url, stream=True, headers=headers)  # Added headers
    response.raise_for_status()
    img = Image.open(response.raw)
    process_image(img)

# Add a button for each sample image to the UI (as cards)
sample_image_buttons = [widgets.Button(description=label, layout=widgets.Layout(width='150px', height='150px')) for label, _ in sample_images]

# Link each button to its corresponding image
for button, (_, url) in zip(sample_image_buttons, sample_images):
    button.on_click(lambda b, url=url: on_sample_image_select(url))

# Display buttons horizontally
sample_buttons_box = widgets.HBox(sample_image_buttons, layout=widgets.Layout(justify_content='center'))

# Link the upload widget to the function
upload_widget.observe(on_image_upload, names='value')

# Display the complete UI
display(header)
display(upload_widget)  # Show file upload widget
display(sample_buttons_box)  # Display sample image cards
结论
Vision Transformers(ViTs)代表了计算机视觉领域的一次重大飞跃,为传统的基于CNN的方法提供了一种新的替代方案。通过利用Transformer架构从一开始就捕获全局上下文的能力,ViT已经展示了令人印象深刻的性能,特别是在大型数据集上。
在这篇博客中,我们探讨了物体检测的基础知识,Vision Transformers的工作原理,并实现了一个逐步的物体检测项目。随着计算机视觉世界的不断发展,探索变形金刚及其变体(如DETR) 将开辟更先进的可能性。
好了,这篇文章就介绍到这里,喜欢的小伙伴感谢给点个赞和关注,更多精彩内容持续更新~~
关于本篇文章大家有任何建议或意见,欢迎在评论区留言交流!


 2万+
2万+

 被折叠的 条评论
为什么被折叠?
被折叠的 条评论
为什么被折叠?
 到【灌水乐园】发言


