


本系列文章主要介绍全覆盖路径规划开源项目Clean-robot-turtlebot3的相关内容,包含如下四篇文章,分别介绍了开源项目Clean-robot-turtlebot3流程的概括总结、ROS坐标系常用坐标及其变换、Clean-robot-turtlebot3关键函数解析等内容。
1、全覆盖路径规划开源项目Clean-robot-turtlebot3原理及流程概括总结
https://blog.csdn.net/qq_44339029/article/details/136880603
2、ROS坐标系常用坐标及其变换详细梳理
https://blog.csdn.net/qq_44339029/article/details/136671867
3、全覆盖路径规划开源项目Clean-robot-turtlebot3关键函数解析(上)
https://blog.csdn.net/qq_44339029/article/details/136879605
4、全覆盖路径规划开源项目Clean-robot-turtlebot3关键函数解析(下)
https://blog.csdn.net/qq_44339029/article/details/136660766

函数目录上篇:
一、CleaningPathPlanning()
二、initializeMats()
三、getCellMatAndFreeSpace()
四、initializeNeuralMat()
五、initializeCoveredGrid()
函数目录下篇:
六、GetPathInROS()
七、GetPathInCV()
八、mainPlanningLoop()
九、Boundingjudge()
十、next_goal.cpp中的主函数
六、GetPathInROS()
∗ ∗ ∗ ∗ ∗ ∗ ∗ ∗ ∗ ∗ ∗ ∗ ∗ ∗ ∗ ∗ ∗ ∗ ∗ ∗ ∗ ∗ ∗ ∗ ∗ ∗ ∗ ∗ ∗ ∗ ∗ ∗ ∗ ∗ ∗ ∗ ∗ ∗ ∗ ∗ ∗ ∗ ∗ ∗ ∗ ∗ ∗ ∗ ************************************************ ∗∗∗∗∗∗∗∗∗∗∗∗∗∗∗∗∗∗∗∗∗∗∗∗∗∗∗∗∗∗∗∗∗∗∗∗∗∗∗∗∗∗∗∗∗∗∗∗
写在前面: 可以简单的认为该函数是算法的主函数,该函数通过调用GetPathInCV()函数获取路径的离散表示,存储在cellvec中。对cellvec中的每个元素进行遍历,将其转换为ROS中的geometry_msgs::PoseStamped类型,并将其添加到pathVecInROS_向量中。 最后,将规划好的路径发布出去,并输出路径的大小。
∗ ∗ ∗ ∗ ∗ ∗ ∗ ∗ ∗ ∗ ∗ ∗ ∗ ∗ ∗ ∗ ∗ ∗ ∗ ∗ ∗ ∗ ∗ ∗ ∗ ∗ ∗ ∗ ∗ ∗ ∗ ∗ ∗ ∗ ∗ ∗ ∗ ∗ ∗ ∗ ∗ ∗ ∗ ∗ ∗ ∗ ∗ ∗ ************************************************ ∗∗∗∗∗∗∗∗∗∗∗∗∗∗∗∗∗∗∗∗∗∗∗∗∗∗∗∗∗∗∗∗∗∗∗∗∗∗∗∗∗∗∗∗∗∗∗∗
1. 函数源码:
该函数返回一个geometry_msgs::PoseStamped类型的向量,表示规划好的路径。
//规划路径
vector<geometry_msgs::PoseStamped> CleaningPathPlanning::GetPathInROS()
{
    //    vector<geometry_msgs::PoseStamped> resultVec;
    if (!pathVecInROS_.empty())
        pathVecInROS_.clear(); //清空操作
    geometry_msgs::PoseStamped posestamped;
    geometry_msgs::Pose pose;
    vector<cellIndex> cellvec;
    cellvec = GetPathInCV();
    /*trasnsform*/
    vector<cellIndex>::iterator iter; //cellIndex里面存放的是行,列以及角度信息。
    int sizey = cellMat_.rows;

    for (iter = cellvec.begin(); iter != cellvec.end(); iter++)
    {
        costmap2d_->mapToWorld((*iter).col * SIZE_OF_CELL + SIZE_OF_CELL / 2, (sizey - (*iter).row - 1) * SIZE_OF_CELL + SIZE_OF_CELL / 2, pose.position.x, pose.position.y);
        pose.orientation.w = cos((*iter).theta * PI / 180 / 2); //(sizey-(*iter).row-1)
        pose.orientation.x = 0;
        pose.orientation.y = 0;
        pose.orientation.z = sin((*iter).theta * PI / 180 / 2);
        posestamped.header.stamp = ros::Time::now();
        posestamped.header.frame_id = "map";
        posestamped.pose = pose;

        pathVecInROS_.push_back(posestamped);
    }
    publishPlan(pathVecInROS_);
    cout << "The path size is " << pathVecInROS_.size() << endl;
    return pathVecInROS_;
}
–
2. 功能概述:
该函数通过调用GetPathInCV()函数获取路径的离散表示,存储在cellvec中。对cellvec中的每个元素进行遍历,将其转换为ROS中的geometry_msgs::PoseStamped类型,并将其添加到pathVecInROS_向量中。 最后,将规划好的路径发布出去,并输出路径的大小。
–
3. 详细解释:
-
清空操作:
if (!pathVecInROS_.empty())
    pathVecInROS_.clear(); //清空操作
在进入路径规划之前,首先检查
pathVecInROS_是否为空,如果不为空,则清空该向量,以确保不会在新路径规划时叠加旧的路径。 -
获取路径离散表示:
vector<cellIndex> cellvec;
cellvec = GetPathInCV();
调用
GetPathInCV()函数,获取路径的离散表示并存储在cellvec中。cellIndex是一个自定义的结构体,其中存放了行、列以及角度信息。 -
路径坐标转换:
for (iter = cellvec.begin(); iter != cellvec.end(); iter++)
{
    // ...
    // 坐标转换逻辑
    // ...
}
遍历
cellvec中的每个元素,将其从离散表示转换为ROS中的geometry_msgs::PoseStamped类型。这涉及到将地图中的栅格坐标映射到实际世界中的坐标,并进行角度信息的处理。其中pose.orientation.w = cos((*iter).theta * PI / 180 / 2);和pose.orientation.z = sin((*iter).theta * PI / 180 / 2);是二维平面中姿态角转四元数的公式。 -
路径发布和输出:
publishPlan(pathVecInROS_); cout << "The path size is " << pathVecInROS_.size() << endl;publishPlan(pathVecInROS_)用于发布规划好的路径,具体实现是通过ROS的消息发布机制。- 输出规划好的路径的大小到控制台。
4. 返回值:
return pathVecInROS_;
返回包含规划好的路径信息的pathVecInROS_向量。
七、GetPathInCV()
∗ ∗ ∗ ∗ ∗ ∗ ∗ ∗ ∗ ∗ ∗ ∗ ∗ ∗ ∗ ∗ ∗ ∗ ∗ ∗ ∗ ∗ ∗ ∗ ∗ ∗ ∗ ∗ ∗ ∗ ∗ ∗ ∗ ∗ ∗ ∗ ∗ ∗ ∗ ∗ ∗ ∗ ∗ ∗ ∗ ∗ ∗ ∗ ************************************************ ∗∗∗∗∗∗∗∗∗∗∗∗∗∗∗∗∗∗∗∗∗∗∗∗∗∗∗∗∗∗∗∗∗∗∗∗∗∗∗∗∗∗∗∗∗∗∗∗
写在前面: 一个嵌套函数,核心在其调用的mainPlanningLoop();函数中
∗ ∗ ∗ ∗ ∗ ∗ ∗ ∗ ∗ ∗ ∗ ∗ ∗ ∗ ∗ ∗ ∗ ∗ ∗ ∗ ∗ ∗ ∗ ∗ ∗ ∗ ∗ ∗ ∗ ∗ ∗ ∗ ∗ ∗ ∗ ∗ ∗ ∗ ∗ ∗ ∗ ∗ ∗ ∗ ∗ ∗ ∗ ∗ ************************************************ ∗∗∗∗∗∗∗∗∗∗∗∗∗∗∗∗∗∗∗∗∗∗∗∗∗∗∗∗∗∗∗∗∗∗∗∗∗∗∗∗∗∗∗∗∗∗∗∗
–
GetPathInCV()函数实际上调用了mainPlanningLoop();函数,所以我们直接看mainPlanningLoop();函数
vector<cellIndex> CleaningPathPlanning::GetPathInCV()
{
    mainPlanningLoop();
    return this->pathVec_;
}
八、mainPlanningLoop()
∗ ∗ ∗ ∗ ∗ ∗ ∗ ∗ ∗ ∗ ∗ ∗ ∗ ∗ ∗ ∗ ∗ ∗ ∗ ∗ ∗ ∗ ∗ ∗ ∗ ∗ ∗ ∗ ∗ ∗ ∗ ∗ ∗ ∗ ∗ ∗ ∗ ∗ ∗ ∗ ∗ ∗ ∗ ∗ ∗ ∗ ∗ ∗ ************************************************ ∗∗∗∗∗∗∗∗∗∗∗∗∗∗∗∗∗∗∗∗∗∗∗∗∗∗∗∗∗∗∗∗∗∗∗∗∗∗∗∗∗∗∗∗∗∗∗∗
写在前面: 该函数是规划阶段的核心函数,在该函数中循环迭代,完成对覆盖路径的规划,其核心流程是计算机器人在八个方向上的活动值,然后选择活动值最大的方向作为下一步的移动方向。然后根据选择的方向计算下一个点的位置,并更新当前点和路径信息。在特定条件下,处理距离关系,防止自锁现象。循环执行以上步骤,直到达到规划循环的最大次数或出现自锁现象。
mainPlanningLoop()函数结束后,就得到了规划的全覆盖路径点存放在pathVec_中,然后赋值给GetPathInROS()中的变量cellvec
∗ ∗ ∗ ∗ ∗ ∗ ∗ ∗ ∗ ∗ ∗ ∗ ∗ ∗ ∗ ∗ ∗ ∗ ∗ ∗ ∗ ∗ ∗ ∗ ∗ ∗ ∗ ∗ ∗ ∗ ∗ ∗ ∗ ∗ ∗ ∗ ∗ ∗ ∗ ∗ ∗ ∗ ∗ ∗ ∗ ∗ ∗ ∗ ************************************************ ∗∗∗∗∗∗∗∗∗∗∗∗∗∗∗∗∗∗∗∗∗∗∗∗∗∗∗∗∗∗∗∗∗∗∗∗∗∗∗∗∗∗∗∗∗∗∗∗
–
1. 函数源码:
该函数没有返回值,主要用于执行全覆盖路径规划的主循环。
void CleaningPathPlanning::mainPlanningLoop()
{
    cellIndex initPoint, nextPoint, currentPoint;
    //    initPoint.row = cellMat_.rows/2; //initPoint to be made interface.
    //    initPoint.col = cellMat_.cols/2;

    initPoint.theta = 90;
    bool isok = costmap2d_ros_->getRobotPose(initPose_);
    if (!isok)
    {
        ROS_INFO("Failed to get robot location! Please check where goes wrong!");
        return;
    }
    //initPoint.row = initPose_.getOrigin().y()
    unsigned int mx, my;
    double wx = initPose_.pose.position.x; //获取原点的x坐标
    double wy = initPose_.pose.position.y;
    //geometry_msgs::PoseStamped current_position;
    //tf::poseStampedTFToMsg(global_pose, current_position);

    bool getmapcoor = costmap2d_->worldToMap(wx, wy, mx, my);
    if (!getmapcoor)
    {
        ROS_INFO("Failed to get robot location in map! Please check where goes wrong!");
        return;
    }
    initPoint.row = cellMat_.rows - my / SIZE_OF_CELL - 1; //再研究一下这个行列之间的转换问题。
    initPoint.col = mx / SIZE_OF_CELL;                     //这里貌似不光有行列转换

    currentPoint = initPoint; //将初始化的点赋予给当前点。
    pathVec_.clear();
    pathVec_.push_back(initPoint);

    float initTheta = initPoint.theta; //initial orientation
    const float c_0 = 50;              //这貌似是后面算法中要用到的参数。0.001
    float e = 0.0, v = 0.0, v_1 = 0.0, deltaTheta = 0.0, lasttheta = initTheta, PI = 3.14159;
    int fx;
    vector<float> thetaVec = {0, 45, 90, 135, 180, 225, 270, 315};
    //vector<float> thetaVec = {0,315,270,225,180,135,90,45};
    //the main planning loop
    //while(freeSpaceVec_.size()>0)

    for (int loop = 0; loop < 9000; loop++)
    {
        //erase current point from free space first.
        vector<cellIndex>::iterator it;

        /*
	for(it=freeSpaceVec_.begin();it!=freeSpaceVec_.end();)
        {
            if((*it).row==nextPoint.row && (*it).col==nextPoint.col)
            {it = freeSpaceVec_.erase(it);continue;}
            it++;
        }

        */

        //compute neiborhood's activities
        //hjr注:目前我认为这里进行的是有关方向上的抉择。
        int maxIndex = 0; //目前尚不清楚这两个参数最后是干啥的。
        float max_v = -300;
        neuralizedMat_.at<float>(currentPoint.row, currentPoint.col) = -250.0;
        lasttheta = currentPoint.theta;
        for (int id = 0; id < 8; id++)
        {
            deltaTheta = max(thetaVec[id], lasttheta) - min(thetaVec[id], lasttheta);
            if (deltaTheta > 180)
                deltaTheta = 360 - deltaTheta;
            e = 1 - abs(deltaTheta) / 180; //角度参数?
            switch (id)
            {
            case 0:
                if (currentPoint.col == neuralizedMat_.cols - 1)
                {
                    v = -100000;
                    break;
                } //处于边界?
                v = neuralizedMat_.at<float>(currentPoint.row, currentPoint.col + 1) + c_0 * e;

                break;
            case 1:
                if (currentPoint.col == neuralizedMat_.cols - 1 || currentPoint.row == 0)
                {
                    v = -100000;
                    break;
                }
                v = neuralizedMat_.at<float>(currentPoint.row - 1, currentPoint.col + 1) + c_0 * e - 200;

                break;
            case 2:
                if (currentPoint.row == 0)
                {
                    v = -100000;
                    break;
                }
                v = neuralizedMat_.at<float>(currentPoint.row - 1, currentPoint.col) + c_0 * e;

                break;
            case 3:
                if (currentPoint.col == 0 || currentPoint.row == 0)
                {
                    v = -100000;
                    break;
                }
                v = neuralizedMat_.at<float>(currentPoint.row - 1, currentPoint.col - 1) + c_0 * e - 200;

                break;
            case 4:
                if (currentPoint.col == 0)
                {
                    v = -100000;
                    break;
                }
                v = neuralizedMat_.at<float>(currentPoint.row, currentPoint.col - 1) + c_0 * e;

                break;
            case 5:
                if (currentPoint.col == 0 || currentPoint.row == neuralizedMat_.rows - 1)
                {
                    v = -100000;
                    break;
                }
                v = neuralizedMat_.at<float>(currentPoint.row + 1, currentPoint.col - 1) + c_0 * e - 200;

                break;
            case 6:
                if (currentPoint.row == neuralizedMat_.rows - 1)
                {
                    v = -100000;
                    break;
                }
                v = neuralizedMat_.at<float>(currentPoint.row + 1, currentPoint.col) + c_0 * e;

                break;
            case 7:
                if (currentPoint.col == neuralizedMat_.cols - 1 || currentPoint.row == neuralizedMat_.rows - 1)
                {
                    v = -100000;
                    break;
                }
                v = neuralizedMat_.at<float>(currentPoint.row + 1, currentPoint.col + 1) + c_0 * e - 200;

                break;
            default:
                break;
            }
            if (v > max_v)
            {
                max_v = v;
                maxIndex = id;
            }

            if (v == max_v && id > maxIndex)
            {
                max_v = v;
                maxIndex = id;
            }
        }

        if (max_v <= 0) //接下来应该是在处理距离上的关系。
        {
            float dist = 0.0, min_dist = 100000000;
            //vector<cellIndex>::iterator min_iter;
            int ii = 0, min_index = -1;
            for (it = freeSpaceVec_.begin(); it != freeSpaceVec_.end(); it++)
            {
                if (neuralizedMat_.at<float>((*it).row, (*it).col) > 0)
                {
                    if (Boundingjudge((*it).row, (*it).col)) //周围是否存在-250的点
                    {
                        dist = sqrt((currentPoint.row - (*it).row) * (currentPoint.row - (*it).row) + (currentPoint.col - (*it).col) * (currentPoint.col - (*it).col));
                        if (dist < min_dist)
                        {
                            min_dist = dist;
                            min_index = ii;
                        }
                    }
                }
                ii++;
            }
            //if(min_dist==0 || min_index == -1)
            //{break;}
            //else
            if (min_index != -1 && min_dist != 100000000)
            {
                cout << "next point index: " << min_index << endl;
                cout << "distance: " << min_dist << endl;
                nextPoint = freeSpaceVec_[min_index];
                currentPoint = nextPoint;
                pathVec_.push_back(nextPoint);

                continue;
            }
            else //产生了自锁现象
            {
                ROS_INFO("The program has been dead because of the self-locking");
                ROS_INFO("The program has gone through %ld steps", pathVec_.size());
                break;
            }
        }

        //hjr自己编写部分------------------------------------------------------------------------------

        //next point.
        switch (maxIndex)
        {
        case 0:
            nextPoint.row = currentPoint.row;
            nextPoint.col = currentPoint.col + 1;
            break;
        case 1:
            nextPoint.row = currentPoint.row - 1;
            nextPoint.col = currentPoint.col + 1;
            break;
        case 2:
            nextPoint.row = currentPoint.row - 1;
            nextPoint.col = currentPoint.col;
            break;
        case 3:
            nextPoint.row = currentPoint.row - 1;
            nextPoint.col = currentPoint.col - 1;
            break;
        case 4:
            nextPoint.row = currentPoint.row;
            nextPoint.col = currentPoint.col - 1;
            break;
        case 5:
            nextPoint.row = currentPoint.row + 1;
            nextPoint.col = currentPoint.col - 1;
            break;
        case 6:
            nextPoint.row = currentPoint.row + 1;
            nextPoint.col = currentPoint.col;
            break;
        case 7:
            nextPoint.row = currentPoint.row + 1;
            nextPoint.col = currentPoint.col + 1;
            break;
        default:
            break;
        }
        nextPoint.theta = thetaVec[maxIndex];
        currentPoint = nextPoint;
        pathVec_.push_back(nextPoint);

        //for(it=freeSpaceVec_.begin();it!=freeSpaceVec_.end();)
        // {
        //     if((*it).row==nextPoint.row && (*it).col==nextPoint.col)
        //     {it = freeSpaceVec_.erase(it);continue;}
        //      it++;
        //  }
    }

    // Mat resultMat = Mat(srcMap_.rows, srcMap_.cols, CV_8UC3);
    // writeResult(resultMat, pathVec_);
}
–
2. 功能概述:
–
先获取机器人初始位置,并将其转换为地图上的坐标。然后初始化路径相关参数,包括起始点、角度、距离权重等。
在主规划循环中,计算机器人在八个方向上的活动值,选择活动值最大的方向作为下一步的移动方向。然后根据选择的方向计算下一个点的位置,并更新当前点和路径信息。在特定条件下,处理距离关系,防止自锁现象。循环执行以上步骤,直到达到规划循环的最大次数或出现自锁现象。
–
3. 详细解释:
–
-
初始位置获取:
cellIndex initPoint, nextPoint, currentPoint;
initPoint.theta = 90;
bool isok = costmap2d_ros_->getRobotPose(initPose_);
获取机器人的初始位置,并将其转换为地图上的坐标。如果获取失败,输出错误信息并返回。
-
初始点的行列转换:
unsigned int mx, my;
double wx = initPose_.pose.position.x;
double wy = initPose_.pose.position.y;
bool getmapcoor = costmap2d_->worldToMap(wx, wy, mx, my);
initPoint.row = cellMat_.rows - my / SIZE_OF_CELL - 1;
initPoint.col = mx / SIZE_OF_CELL;
将机器人的初始位置从世界坐标转换为地图坐标,并根据新地图的分辨率进行转换。
其中,initPoint.row = cellMat_.rows - my / SIZE_OF_CELL - 1;这行语句计算机器人所在位置的行索引。假设 my 是机器人在垂直方向(y轴)上的栅格坐标,cellMat_.rows 是用于全覆盖规划的地图的行数。此语句的计算过程如下:my / SIZE_OF_CELL:将垂直坐标 my 转换为新地图的栅格单位。cellMat_.rows - my / SIZE_OF_CELL - 1:用新地图栅格的总行数减去机器人垂直栅格位置再减1,这是因为数组索引通常从0开始。这样计算得到的值将被赋给 initPoint.row。
initPoint.col = mx / SIZE_OF_CELL; 这行语句计算机器人所在位置的列索引。假设 mx 是机器人在水平方向(x轴)上的坐标。此语句的计算过程如下:mx / SIZE_OF_CELL:将水平坐标 mx 转换为新地图的栅格单位,即得到机器人所在新地图的水平栅格位置。这个值将被赋给 initPoint.col。
综合起来,这两行语句的功能是将机器人原来在ROS的costmap_2d栅格地图中的坐标转换为全覆盖路径规划所使用的地图中相应的行列索引,并将结果保存在 initPoint.row 和 initPoint.col 中。这个转换可能是将原来比较密集的栅格地图,按照SIZE_OF_CELL (默认值为3)转换为比较稀疏的新地图,这里可能是认为机器人每走过原来栅格地图中的一个栅格,就可以完成对其周围SIZE_OF_CELL 个栅格的覆盖。
注:cellMat_的数据类型为cv::Mat。 cv::Mat 是OpenCV(Open Source Computer Vision Library)中用于表示图像和矩阵的主要数据结构。它是一个多维数组,可以用于存储图像、矩阵和其他类型的数据。在C++中,cv::Mat 类提供了许多方法和操作符,使得对图像和矩阵的处理变得更加方便。这包括了访问和修改像素值、图像变换、矩阵运算等功能。
-
主规划循环:
for (int loop = 0; loop < 9000; loop++)
{
    // ...
    // 主规划循环中的核心逻辑
    // ...
}
在一个循环中执行路径规划的核心逻辑。最大循环次数为9000次,可以根据实际情况进行调整。
其中,语句neuralizedMat_.at(currentPoint.row, currentPoint.col) = -250.0;:这行代码将 neuralizedMat_ 中指定位置(起点处)的值设置为 -250.0。通过 at(row, col),可以访问矩阵中特定位置的元素。 -
在主循环中,①先计算邻域的活动值:
for (int id = 0; id < 8; id++)
{
    // ...
    // 计算八个方向上的活动值
    // ...
}
计算机器人在姿态角分别为0, 45, 90, 135, 180, 225, 270, 315这八个方向上的活动值,选择活动值最大的方向作为下一步的移动方向。
具体而言,计算每个方向上活动值时,先计算当前方向角度与上一步的角度lasttheta之间的角度差deltaTheta,对于第一个方向lasttheta被初始化为90,如果差值超过180度,进行调整,确保差值在0到180度之间。e是一个与角度差有关的参数,表示当前方向的角度与上一步的角度的偏离程度。在0到1之间,极端的0表示方向相同,1表示方向相反。
然后在switch语句中进行了方向判断和活动值计算,根据当前方向的不同情况,计算相应的活动值v。活动值的计算涉及到当前点在地图中的位置,以及周围的情况。如果机器人处于地图边界或者某些条件不满足,将活动值设置为一个极大的负数(-100000)以排除该方向。在每个方向计算完活动值后,比较当前方向的活动值v与记录的最大活动值max_v。如果当前方向的活动值更大,更新最大活动值和对应的方向索引maxIndex。
插入部分,活力值(活动值)的具体计算规则如下:
详情请见如下博客:https://blog.csdn.net/qq_44339029/article/details/136671867
如果你对这部分涉及到的各种坐标变换,以及活力值计算的详细推算,不太清楚,强烈建议看一下上面这篇博客 ↑ ↑ ↑ ↑ ↑ ↑ ↑ ↑ ↑ ↑ ↑
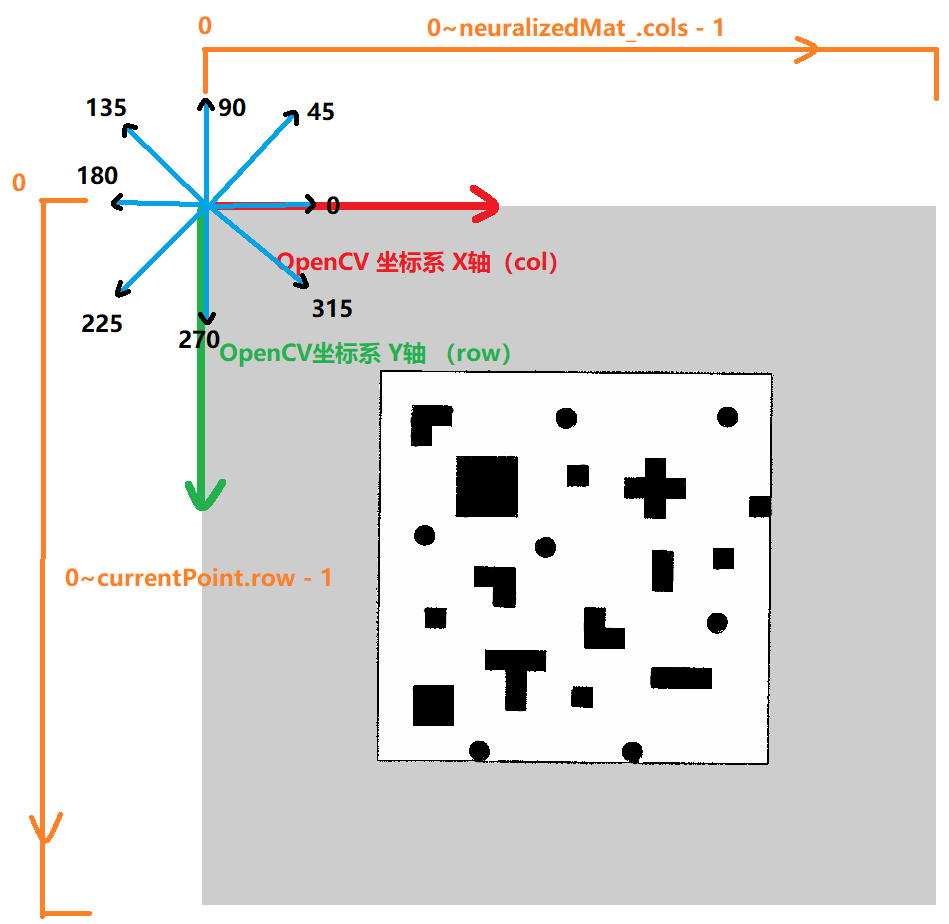
根据程序推断,上述0, 45, 90, 135, 180, 225, 270, 315这八个角度对应的八个方向的0度是水平向右的,即OpenCV坐标系的X轴方向,且按照逆时针方向角度增加的原则,如下图所示
–
现在再来看上面程序中活力值v的计算方法,就容易的多了,如case 0 时,沿角度为0的移动方向时,如果当前机器人位于地图的右边界时,即currentPoint .col == neuralizedMat_ .cols - 1,继续沿着图中角度为0的方向移动,必然会超出地图边界,从而此时当前方向需要给一个很小的活力值,如程序中的v = -100000,来使机器人不要向该方向移动。
再比如case 1 时,沿角度为45的移动方向时,如果当前机器人位于地图的上边界或者右边界时,继续沿着图中角度为45的方向移动,必然会超出地图边界,从而此时当前方向需要给一个很小的活力值,如程序中的v = -100000,来使机器人不要向该方向移动。
以此类推,我们同样理解其他6个方向基于极小的活力值的程序,接下来我们来看不在边界的情况,例如case 0时,如下所示,其中(currentPoint.row, currentPoint.col + 1)即为机器人从当前位置沿着case0 对应的角度为0方向走一步后OpenCV坐标系坐标,c0为系数,程序设定值为50,e是当前方向与上一次移动方向的相关系数,取值范围为0~1,两个端点,为0则当前移动方向与上一次移动方向相反,为1当前移动方向与上一次移动方向相同,所以附加项 c_0 * e的作用是更倾向于选取与上一次移动方向相同或者相近的方向
v = neuralizedMat_.at<float>(currentPoint.row, currentPoint.col + 1) + c_0 * e;
此外,所有对角方向,即45, 135, 225, 315这四个方向计算活力值时,后面还有一个附加项-200,如case1对应的45度方向的表达式如下,这个-200的附加项的作用可能是尽量选取上下左右这四个方向,所以对对角的四个方向施加了额外的代价
v = neuralizedMat_.at<float>(currentPoint.row - 1, currentPoint.col + 1) + c_0 * e - 200;
上述neuralizedMat_是活力值地图,是使用稀疏后的新地图cellMat_来初始化的,初始化规则如下:如果新地图中某个栅格处有障碍物,则其对应的活力值地图中存储一个较大的负数-100000,如果没有障碍物,则活力值地图中对应的位置存储的活力值为50/j,其中j是其所在的列数,这种活力值设置模式使得同一列无障碍物点的初始活力值相同,而随着所在列编号的增加,活力值依次降低,在后续的步骤中,机器人会倾向于向活力值高的区域移动,这样初始化活力值,将引导机器人按列形成从弓字型的覆盖路径,且避开障碍物。
- 在主循环中,②然后处理距离关系:
在活动值小于等于0的情况下,处理距离关系,避免自锁现象。该程序段主要用于处理当最大活力值(max_v)小于或等于0时的情况。在路径规划中,如果最大活跃值小于等于0,则说明当前方向上没有活跃的路径可供选择。因此,程序段尝试在周围空闲区域中找到最近的点,以便路径规划可以继续进行。if (max_v <= 0) { // ... // 处理距离关系,防止自锁现象 // ... }
具体而言,当上一步计算出的最大活力值小于等于0的数时,则说明当前位置的相邻位置上没有活跃的栅格可供选择,则依次遍历存储新地图无障碍点坐标的变量freeSpaceVec_中的点,查询该点的活力值,若活力值大于0,则找到了一个活跃的点,则进一步判断该点周围相邻的位置是否存在活力值为-250的点,若存在,则计算当前点与找到的这个活跃点之间的距离,如果这个距离小于当前的最小距离(初始化为一个较大值100000000),则更新最小距离及其索引,也就是在freeSpaceVec_中的位置,遍历完freeSpaceVec_中的点后,判断最小距离是否为初始化的100000000,若不是,则找到了距离当前点最近的活跃点,更新当前点为该活跃点,并将其添加到路径点队列pathVec_中。若没有找到,则说明产生了自锁现象,退出循环,结束规划。
注意:通过这里更新的当前点,在下一轮循环的开始处将活力值赋值为-250
-
在主循环中,③确定下一个点的位置:
switch (maxIndex)
{
    // ...
    // 根据选择的方向确定下一个点的位置
    // ...
}
根据计算得到的最大活动值方向,从当前点沿着该方向走一步,得到并确定下一个点的位置
-
在主循环中,④最后更新当前点和路径信息:
currentPoint = nextPoint;
pathVec_.push_back(nextPoint);
更新当前点和路径信息,将下一个点加入路径向量中。即将当前点更新为上一步移动后的点,并将该点加入到路径点队列pathVec_
注意:通过这里更新的当前点,在一次循环的开始处,该当前点处的活力值被赋值为-250
4. 总体流程:
- 获取初始位置并进行坐标转换。
- 在主规划循环中,计算活动值,选择方向,处理距离关系,更新当前点和路径信息。
- 持续循环直到达到规划循环的最大次数或出现自锁现象。
该函数实现了全覆盖路径规划算法的主要逻辑,包括根据活动值选择方向、处理距离关系、更新路径信息等步骤。
九、Boundingjudge()
∗ ∗ ∗ ∗ ∗ ∗ ∗ ∗ ∗ ∗ ∗ ∗ ∗ ∗ ∗ ∗ ∗ ∗ ∗ ∗ ∗ ∗ ∗ ∗ ∗ ∗ ∗ ∗ ∗ ∗ ∗ ∗ ∗ ∗ ∗ ∗ ∗ ∗ ∗ ∗ ∗ ∗ ∗ ∗ ∗ ∗ ∗ ∗ ************************************************ ∗∗∗∗∗∗∗∗∗∗∗∗∗∗∗∗∗∗∗∗∗∗∗∗∗∗∗∗∗∗∗∗∗∗∗∗∗∗∗∗∗∗∗∗∗∗∗∗
写在前面: 该函数用于查找输入的点周围相邻的点中是否有活力值为-250的点,若有返回true,否则返回flase
∗ ∗ ∗ ∗ ∗ ∗ ∗ ∗ ∗ ∗ ∗ ∗ ∗ ∗ ∗ ∗ ∗ ∗ ∗ ∗ ∗ ∗ ∗ ∗ ∗ ∗ ∗ ∗ ∗ ∗ ∗ ∗ ∗ ∗ ∗ ∗ ∗ ∗ ∗ ∗ ∗ ∗ ∗ ∗ ∗ ∗ ∗ ∗ ************************************************ ∗∗∗∗∗∗∗∗∗∗∗∗∗∗∗∗∗∗∗∗∗∗∗∗∗∗∗∗∗∗∗∗∗∗∗∗∗∗∗∗∗∗∗∗∗∗∗∗
bool CleaningPathPlanning::Boundingjudge(int a, int b)
{
    int num = 0;
    for (int i = -1; i <= 1; i++)
    {
        for (int m = -1; m <= 1; m++)
        {
            if (i == 0 && m == 0)
            {
                continue;
            }
            if (neuralizedMat_.at<float>((a + i), (b + m)) == -250.0)
                num++;
        }
    }
    if (num != 0)
        return true;
    else
        return false;
}
十、next_goal.cpp中的主函数main
∗ ∗ ∗ ∗ ∗ ∗ ∗ ∗ ∗ ∗ ∗ ∗ ∗ ∗ ∗ ∗ ∗ ∗ ∗ ∗ ∗ ∗ ∗ ∗ ∗ ∗ ∗ ∗ ∗ ∗ ∗ ∗ ∗ ∗ ∗ ∗ ∗ ∗ ∗ ∗ ∗ ∗ ∗ ∗ ∗ ∗ ∗ ∗ ************************************************ ∗∗∗∗∗∗∗∗∗∗∗∗∗∗∗∗∗∗∗∗∗∗∗∗∗∗∗∗∗∗∗∗∗∗∗∗∗∗∗∗∗∗∗∗∗∗∗∗
写在前面: 该函数主要用于依次发布全覆盖路径规划算法中规划的全覆盖路径中的点,将全覆盖路径中的点依次作为目标点发送出去,当位置与当前目标点位置小于阈值时,发送下一个。发送出去的目标点通过点对点的全局和局部规划算法进行跟踪。
∗
∗
∗
∗
∗
∗
∗
∗
∗
∗
∗
∗
∗
∗
∗
∗
∗
∗
∗
∗
∗
∗
∗
∗
∗
∗
∗
∗
∗
∗
∗
∗
∗
∗
∗
∗
∗
∗
∗
∗
∗
∗
∗
∗
∗
∗
∗
∗
************************************************
∗∗∗∗∗∗∗∗∗∗∗∗∗∗∗∗∗∗∗∗∗∗∗∗∗∗∗∗∗∗∗∗∗∗∗∗∗∗∗∗∗∗∗∗∗∗∗∗
1. 函数源码:
int main(int argc, char *argv[])
{
  srand(time(0));
  ros::init(argc, argv, "next_goal");
  ros::NodeHandle next_goal;
  ros::Subscriber sub1 = next_goal.subscribe("/odom", 1000, pose_callback);
  ros::Subscriber sub2 = next_goal.subscribe("/path_planning_node/cleaning_plan_nodehandle/cleaning_path", 1000, path_callback);

  ros::Publisher pub1 = next_goal.advertise<geometry_msgs::PoseStamped>("/move_base_simple/goal", 1000);
  pub_passed_path = next_goal.advertise<nav_msgs::Path>("/clean_robot/passed_path", 1000);

  ros::Rate loop_rate(10);

  geometry_msgs::PoseStamped goal_msgs;
  int count = 0;
  double angle;
  bool goal_reached = false;
  //获取发送下一个点的阈值
  if (!next_goal.getParam("/NextGoal/tolerance_goal", normeNextGoal))
  {
    ROS_ERROR("Please set your tolerance_goal");
    return 0;
  }
  ROS_INFO("tolerance_goal=%f", normeNextGoal);

  while (ros::ok())
  {
    ros::spinOnce();
    if (new_path)
    {
      count = 0;
      new_path = false;
    }
    //当前处理的点
    cout << " count : " << count << endl;
    if (!planned_path.Path.empty())
    {
      //当前距离达到了
      if (sqrt(pow(x_current - planned_path.Path[count].x, 2) + pow(y_current - planned_path.Path[count].y, 2)) <= normeNextGoal)
      {
        count++;
        goal_reached = false;
      }
      if (goal_reached == false)
      {
        goal_msgs.header.frame_id = "odom";
        goal_msgs.header.stamp = ros::Time::now();
        goal_msgs.pose.position.x = planned_path.Path[count].x;
        goal_msgs.pose.position.y = planned_path.Path[count].y;
        goal_msgs.pose.position.z = 0;
        if (count < planned_path.Path.size())
        {//计算发布的yaw,不过还有bug 但是不影响使用,yaw不会产生太大影响
          angle = atan2(planned_path.Path[count + 1].y - planned_path.Path[count].y, planned_path.Path[count + 1].x - planned_path.Path[count].x);
        }
        else
        {
          angle = atan2(planned_path.Path[0].y - planned_path.Path[count].y, planned_path.Path[0].x - planned_path.Path[count].x);
        }
        cout << angle << endl;
        quaternion_ros q;
        q.toQuaternion(0, 0, float(angle));
        goal_msgs.pose.orientation.w = q.w;
        goal_msgs.pose.orientation.x = q.x;
        goal_msgs.pose.orientation.y = q.y;
        if (planned_path.Path[count].x < planned_path.Path[count + 1].x)
        {
          goal_msgs.pose.orientation.z = 0;
        }
        if (planned_path.Path[count].x > planned_path.Path[count + 1].x)
        {
          goal_msgs.pose.orientation.z = 2;
        }

        cout << " NEW GOAL " << endl;
        cout << " x = " << planned_path.Path[count].x << " y = " << planned_path.Path[count].y << endl;

        goal_reached = true;
        pub1.publish(goal_msgs);
      }
      cout << x_current << " " << y_current << endl;
      //当前
      cout << planned_path.Path[count].x << " " << planned_path.Path[count].y << endl;
      //目标
      cout << " DISTANCE : " << sqrt((x_current - planned_path.Path[count].x) * (x_current - planned_path.Path[count].x) + (y_current - planned_path.Path[count].y) * (y_current - planned_path.Path[count].y)) << endl;
      // 距离公式
    }

    loop_rate.sleep();
  }

  return 0;
}
2. 详情介绍:
这段代码是一个ROS节点,用于路径规划中发送目标点的功能。让我们逐步分析其主要部分:
①. ROS节点初始化:
ros::init(argc, argv, "next_goal");
ros::NodeHandle next_goal;
这两行代码初始化了ROS节点,并创建了一个节点句柄 next_goal 用于与ROS系统通信。
②. 订阅器和发布器:
ros::Subscriber sub1 = next_goal.subscribe("/odom", 1000, pose_callback);
ros::Subscriber sub2 = next_goal.subscribe("/path_planning_node/cleaning_plan_nodehandle/cleaning_path", 1000, path_callback);
ros::Publisher pub1 = next_goal.advertise<geometry_msgs::PoseStamped>("/move_base_simple/goal", 1000);
pub_passed_path = next_goal.advertise<nav_msgs::Path>("/clean_robot/passed_path", 1000);
这些代码行分别创建了两个订阅器,分别订阅 /odom 和 /path_planning_node/cleaning_plan_nodehandle/cleaning_path 话题,还创建了两个发布器,分别发布 /move_base_simple/goal 和 /clean_robot/passed_path 话题。这些话题用于接收机器人当前位置和规划好的路径,以及发布机器人的目标点和已通过的路径。
③. 主循环:
while (ros::ok())
{
  ros::spinOnce();
  // 代码逻辑...
  loop_rate.sleep();
}
主循环使ROS节点保持运行状态,其中 ros::spinOnce() 用于处理ROS消息队列中的所有未处理消息,loop_rate.sleep() 控制主循环的频率。
④. 目标点发布逻辑:
if (!planned_path.Path.empty())
{
  // 代码逻辑...
}
这部分代码是关键的目标点发布逻辑。如果已经有了规划路径,那么就会执行目标点的发布操作。在循环中,会检查当前位置与规划路径上下一个点的距离,当机器人接近某个点时,会发布下一个目标点。
⑤. 参数获取:
if (!next_goal.getParam("/NextGoal/tolerance_goal", normeNextGoal))
{
  ROS_ERROR("Please set your tolerance_goal");
  return 0;
}
这部分代码用于从ROS参数服务器中获取参数 /NextGoal/tolerance_goal,这个参数表示到达目标点的容忍范围。如果未能获取到这个参数,会打印错误消息并退出节点。
⑥. 计算目标点的姿态:
angle = atan2(planned_path.Path[count + 1].y - planned_path.Path[count].y, planned_path.Path[count + 1].x - planned_path.Path[count].x);
// 其他代码逻辑...
这部分代码计算目标点的姿态,即机器人朝向的角度,以确保机器人朝向正确。在这里,使用 atan2 函数计算目标点相对于当前点的角度。
⑦. 发布目标点:
pub1.publish(goal_msgs);
最后,将计算出的目标点发布到 /move_base_simple/goal 话题上,以便导航系统获取并处理。
总的来说,这段代码实现了一个ROS节点,用于接收路径规划信息并发布机器人的目标点,以便机器人能够按照规划好的路径进行移动。


 2559
2559

 被折叠的 条评论
为什么被折叠?
被折叠的 条评论
为什么被折叠?
 到【灌水乐园】发言


