


 本文介绍了如何在TensorRT8版本中进行模型量化,包括模型量化的重要性、TensorRT提供的IInt8Calibrator类型,以及使用EntropyCalibrator2进行校准的详细步骤。通过示例展示了模型从FP32到INT8的转换和性能提升。
原作者github:https://github.com/xuanandsix/Tensorrt-int8-quantization-pipline/tree/main
改进:
源代码支持的TensorRT版本为7.许多属性已经弃用;
在原有的代码上将支持的TensorRT版本从7改到8.!!不知道如何安装TensorRT?请参考:【通俗易懂】Windows系统安装TensorRT。
!!项目排坑请参考:【Debug】TensorRT报错汇总 欢迎大家补充。
!!c++部署TensorRT实测效果移步:yolov8 TensorRT加速
一、简介
模型量化是深度学习领域中一种重要的模型优化技术,它主要涉及将模型中的浮点数(如FP32)转换为低比特的格式(如INT8)。这样做的目的是为了减少模型的存储大小和内存占用,同时加快模型的推理速度,尤其在硬件资源受限的设备上效果显著。
模型量化的方法:
1. 训练时量化也叫量化感知训练(Quantization-Aware-Training,QAT),在训练过程中模拟量化操作,使模型适应量化,减少量化误差。
2. 训练后量化(Post-Training Quantization,PTQ),PTQ不需要再训练,因此是一种轻量级的量化方法。在模型训练好后,再通过一个校准(Calibration)流程去计算比例因子,从而实现量化过程。
这里使用第二种方法简单且高效。
二、量化流程
2.1 TensorRT提供了四种IInt8Calibrator:
- Int8EntropyCalibrator2:当前推荐的熵校准器,默认情况下校准发生在层融合之前,推荐用于CNN模型中。
- IInt8MinMaxCalibrator:该校准器使用激活分布的整个范围来确定比例因子,默认情况下校准发生在层融合之前,推荐用于NLP任务的模型中。
- IInt8EntropyCalibrator: 该校准器是TensorRT最原始的熵校准器,默认情况下校准发生在层融合之后,目前已不推荐使用。
- IInt8LegacyCalibrator: 该校准器需要用户进行参数化,默认情况下校准发生在层融合之后,不推荐使用。
2.2 IInt8Calibrator需要实现的功能
- getBatchSize:获取校准过程中的batchSize;
- getBatch:获取校准过程中的输入;
- writeCalibrationCache:由于校准花费的时间比较长,调用该函数将校准参数结果写入本地文件,方便下次直接读取。
- readCalibrationCache:读取保存在本地的校准参数文件,在生成引擎过程中会自动调用。.
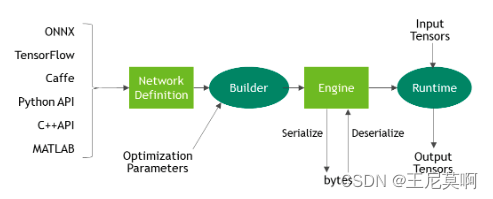
2.3 TensorRT构建INT8模型引擎时,会执行下面的步骤:
构建一个32位的模型引擎,然后在校准数据集上运行这个引擎,然后为每个张量激活值的分布记录一个直方图;
从直方图构建一个校准表,为每个张量计算出一个比例因子;
根据校准表和模型的定义构建一个INT8的引擎。
校准的过程可能会比较慢,不过第二步生成的校准表可以输出到文件并可以被重用,如果校准表文件已存在,那么校准器就直接从该文件中读取校准表而无需执行前面两步。另外,与引擎文件不同的是,校准表是可以跨平台使用的。因此,我们在实际部署模型过程中可以先在带通用GPU的计算机上生成校准表,然后在Jetson Nano等嵌入式平台上去使用。为了编码方便,我们可以用Python编程来实现INT8量化过程来生成校准表。
三、关键代码:
加载校准文件:quantization.py:
import numpy as np
import util_trt
import glob,os,cv2

BATCH_SIZE = 4  # 批处理大小
BATCH = 100     # 校准批次
height = 640    # 输入高度
width = 640     # 输入宽度
CALIB_IMG_DIR = './calibration/'    # 校准图片路径
onnx_model_path = './weights/yolov8s.onnx'  # 待校准onnx模型路径

def preprocess(img):
    img = cv2.resize(img, (height, width))
    img = cv2.cvtColor(img, cv2.COLOR_BGR2RGB)
    img = img.transpose((2, 0, 1)).astype(np.float32)
    img /= 255.0
    return img

class DataLoader:
    def __init__(self):
        self.index = 0
        self.length = BATCH
        self.batch_size = BATCH_SIZE
        # self.img_list = [i.strip() for i in open('calib.txt').readlines()]
        self.img_list = glob.glob(os.path.join(CALIB_IMG_DIR, "*.jpg"))
        assert len(self.img_list) > self.batch_size * self.length, '{} must contains more than '.format(CALIB_IMG_DIR) + str(self.batch_size * self.length) + ' images to calib'
        print('found all {} images to calib.'.format(len(self.img_list)))
        self.calibration_data = np.zeros((self.batch_size,3,height,width), dtype=np.float32)

    def reset(self):
        self.index = 0

    def next_batch(self):
        if self.index < self.length:
            for i in range(self.batch_size):
                assert os.path.exists(self.img_list[i + self.index * self.batch_size]), 'not found!!'
                img = cv2.imread(self.img_list[i + self.index * self.batch_size])
                img = preprocess(img)
                self.calibration_data[i] = img

            self.index += 1

            # example only
            return np.ascontiguousarray(self.calibration_data, dtype=np.float32)
        else:
            return np.array([])

    def __len__(self):
        return self.length

def main():
    # onnx2trt
    fp16_mode = False
    int8_mode = True
    print('*** onnx to tensorrt begin ***')
    # calibration
    calibration_stream = DataLoader()
    engine_model_path = "./weights/yolov8s_Int8.trt"
    calibration_table = 'best_calibration.cache'
    # fixed_engine,校准产生校准表
    engine_fixed = util_trt.get_engine(BATCH_SIZE, onnx_model_path, engine_model_path, fp16_mode=fp16_mode,
        int8_mode=int8_mode, calibration_stream=calibration_stream, calibration_table_path=calibration_table, save_engine=True)
    print(engine_fixed)
    assert engine_fixed, 'Brokenls engine_fixed'
    print('*** onnx to tensorrt completed ***\n')

if __name__ == '__main__':
    main()
四、测试结果
| model(640*640) | infer_time(ms)/frame | size |
|---|---|---|
| float32(trt) | 8. | 51.6M |
| int8(trt) | 2. | 14.3M |
yolov8s模型FP32和INT8精度的目标检测结果分别如下面两张图片所示:
| float32 tensorrt | int8 tensorrt |
|---|---|
 | 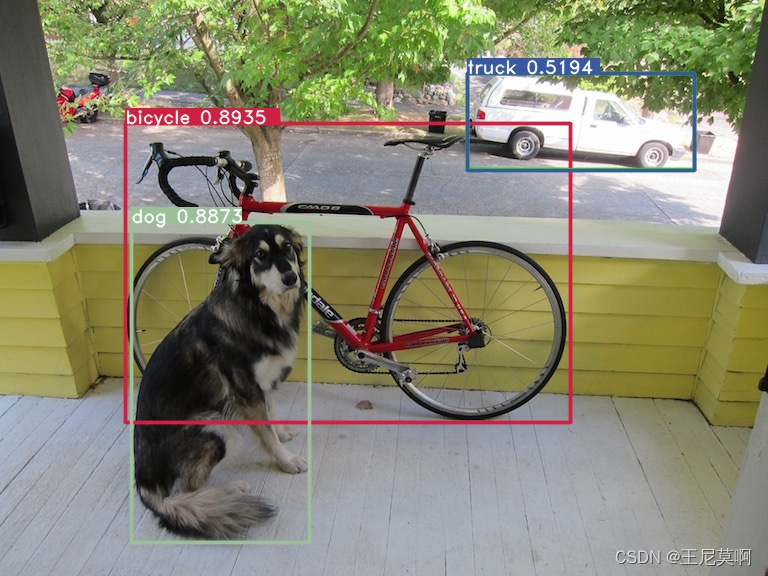 |
五、参考:
- https://zhuanlan.zhihu.com/p/645010134
- https://github.com/xuanandsix/Tensorrt-int8-quantization-pipline


 2097
2097

 被折叠的 条评论
为什么被折叠?
被折叠的 条评论
为什么被折叠?
 到【灌水乐园】发言


